本页内容
安装 AP45 接入点
本主题提供 AP45 的各种安装选项。您可以将接入点安装在墙壁、天花板或接线盒上。接入点随附一个通用安装支架,可用于所有安装选项。要将接入点安装在天花板上,您需要根据天花板类型订购额外的适配器。
我们建议您在安装接入点之前声明它。声明代码位于接入点的背面,安装接入点后可能难以访问接入点。有关声明接入点的信息,请参阅 声明瞻博网络接入点。
支持用于 AP45 的安装支架
表 1 列出了可用于 AP45 的支架。
| 部件号 | 说明 |
|---|---|
| APBR-U | 用于 T 型杆和石膏板安装的通用支架 |
| APBR-T58 | 用于将接入点安装在 5/8 英寸上的支架。螺纹杆 |
| APBR-M16 | 用于将接入点安装到 16 毫米螺纹杆上的支架 |
| APBR-ADP-CR9 | 托架适配器,用于将接入点安装在凹陷的 9/16 英寸上。T 型杆或通道轨道 |
| APBR-ADP-RT15 | 托架适配器,用于将接入点安装在嵌入式 15/16 英寸上。T 型杆 |
| APBR-ADP-WS15 | 托架适配器,用于将接入点安装在凹陷的 1.5 英寸上。T 型杆 |
瞻博网络接入点随附通用支架 APBR-U。如果您需要其他支架,则必须单独订购。
用于瞻博网络接入点的通用安装支架 (APBR-U)
您可以将通用安装支架 APBR-U 用于所有类型的安装选项,例如,在墙上、天花板上或接线盒上。 图 1 显示了 APBR-U。将接入点安装到接线盒上时,您需要使用编号的孔来插入接入点。您使用的编号孔因接线盒的类型而异。
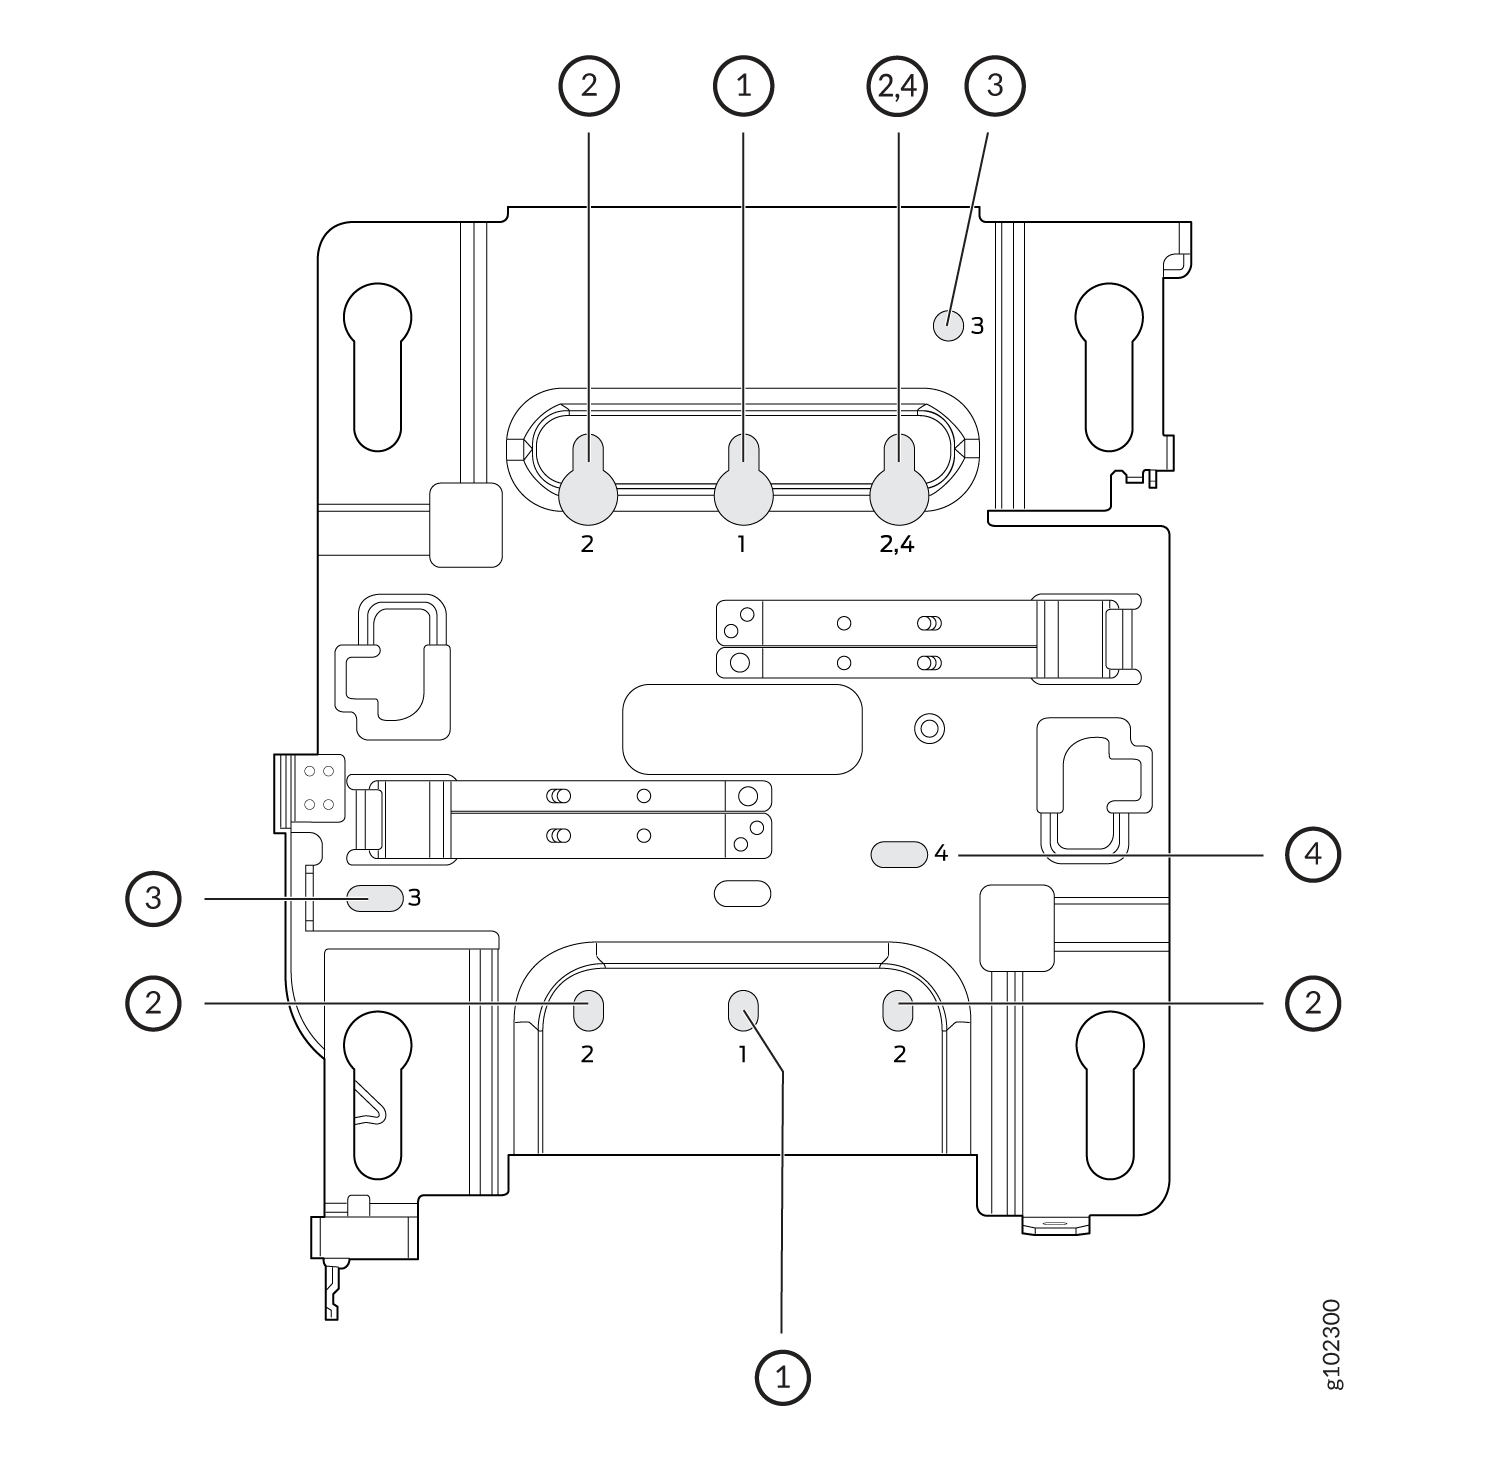
如果要将接入点安装在墙上,请使用符合以下规格的螺钉:
-
螺钉头直径:1/4 英寸。(6.3 毫米)
-
长度:至少 2 英寸。(50.8 毫米)
下表列出了用于特定安装选项所需的托架孔。
| 孔号 | 安装选件 |
|---|---|
| 1 |
|
| 2 |
|
| 3 |
|
| 4 |
|
This is the new Mist BR-U bracket that works for all our indoor APs. We'll ship with the shoulder screws already installed, so attached to the BR-U bracket as follows. You will note a strong click when the locking lever engages. To remove, you need to gently push the lever out of the way and slide the AP back out.
将接入点安装在单帮或 3.5 英寸或 4 英寸圆形接线盒上
- 使用两个螺钉将安装支架连接到单组接线盒。确保将螺钉插入标记为 1 的孔中,如图 2 所示。
图 2:将 APBR-U 安装支架连接到单帮接线盒
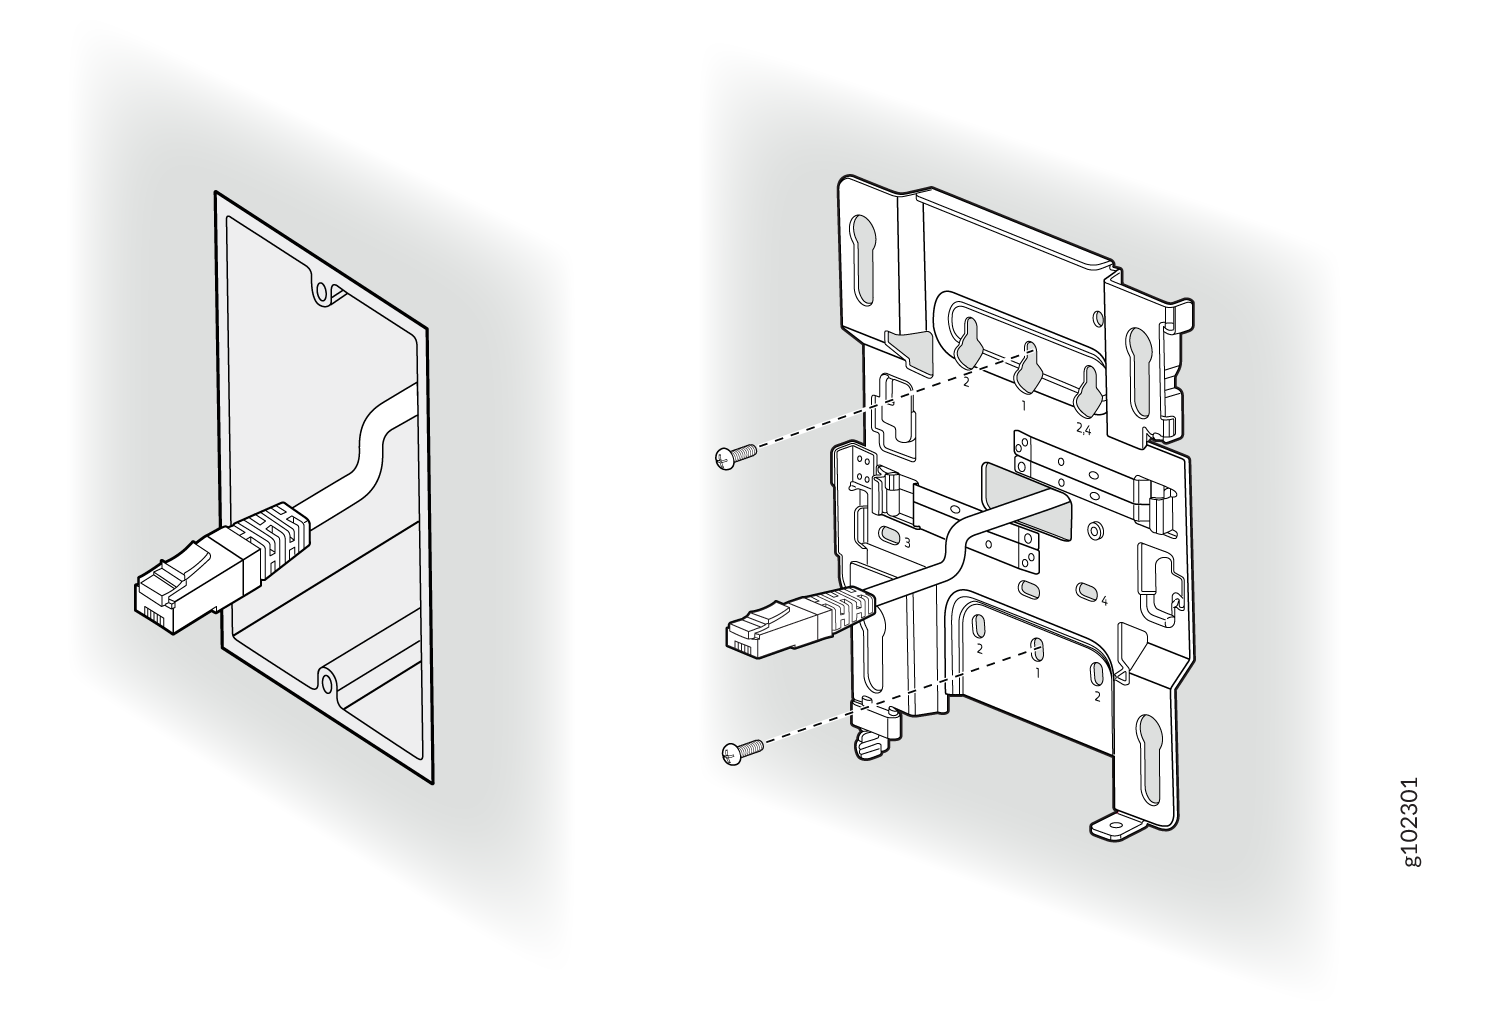
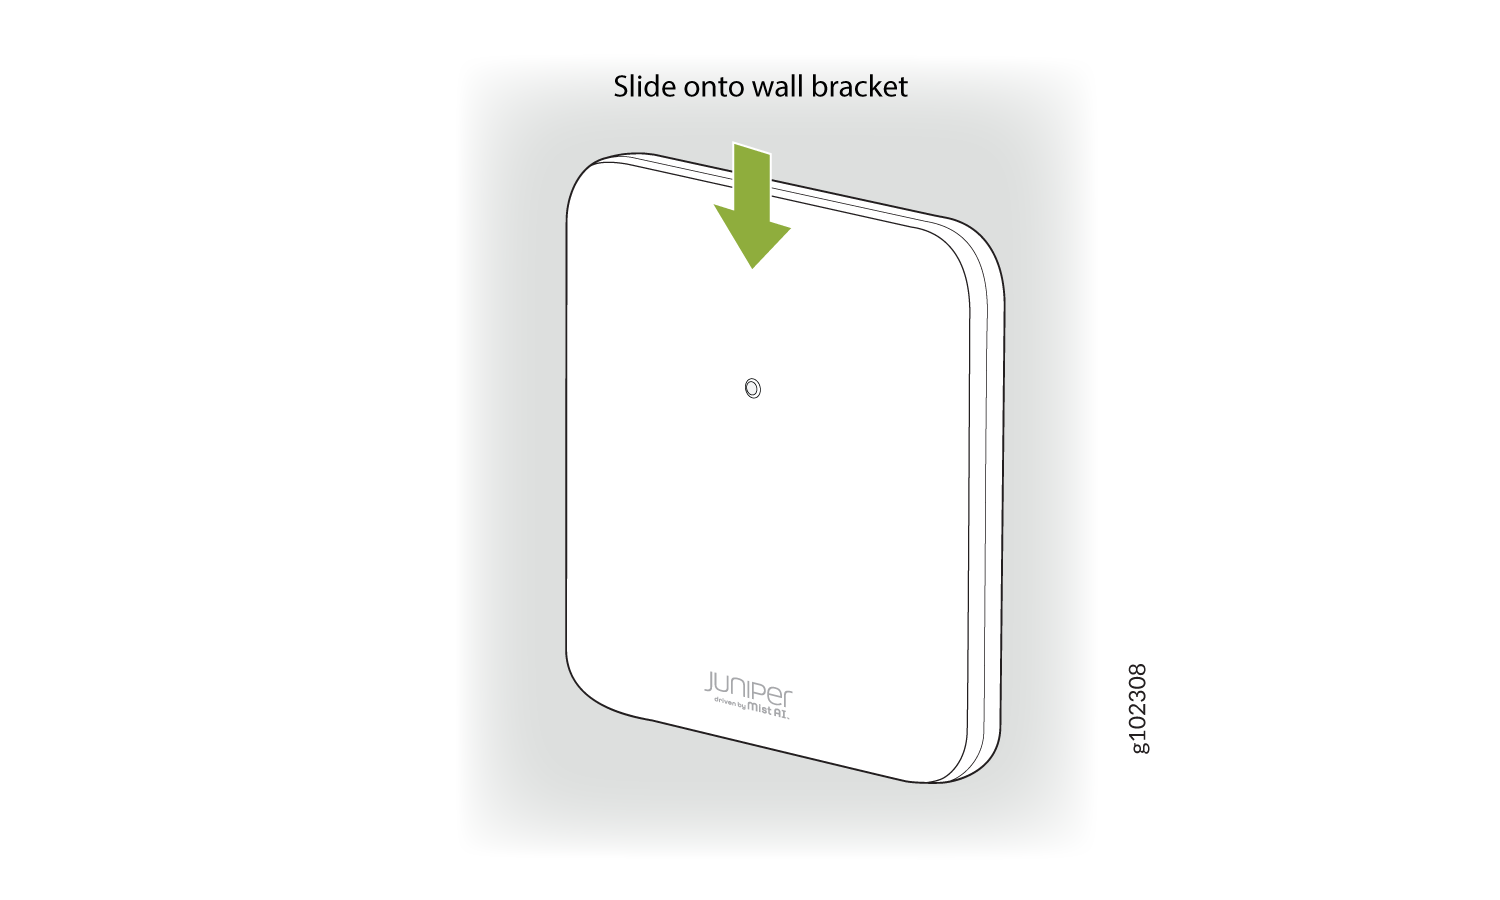
- 放置 接入点,使 AP 上的肩接入点与安装托架的锁孔啮合。滑动并将接入点锁定到位。
图 3:将接入点安装在单帮接线盒
 上
上
This is a US single gang box and it attaches as shown here. And the AP would be installed normally.
This is a US 3 and 1/2 inch round and the BR-U attaches as shown here. And the AP would be installed normally. This is a US 4-inch round and the BR-U attaches as shown here. And the AP would be installed normally.
在双帮接线盒上安装接入点
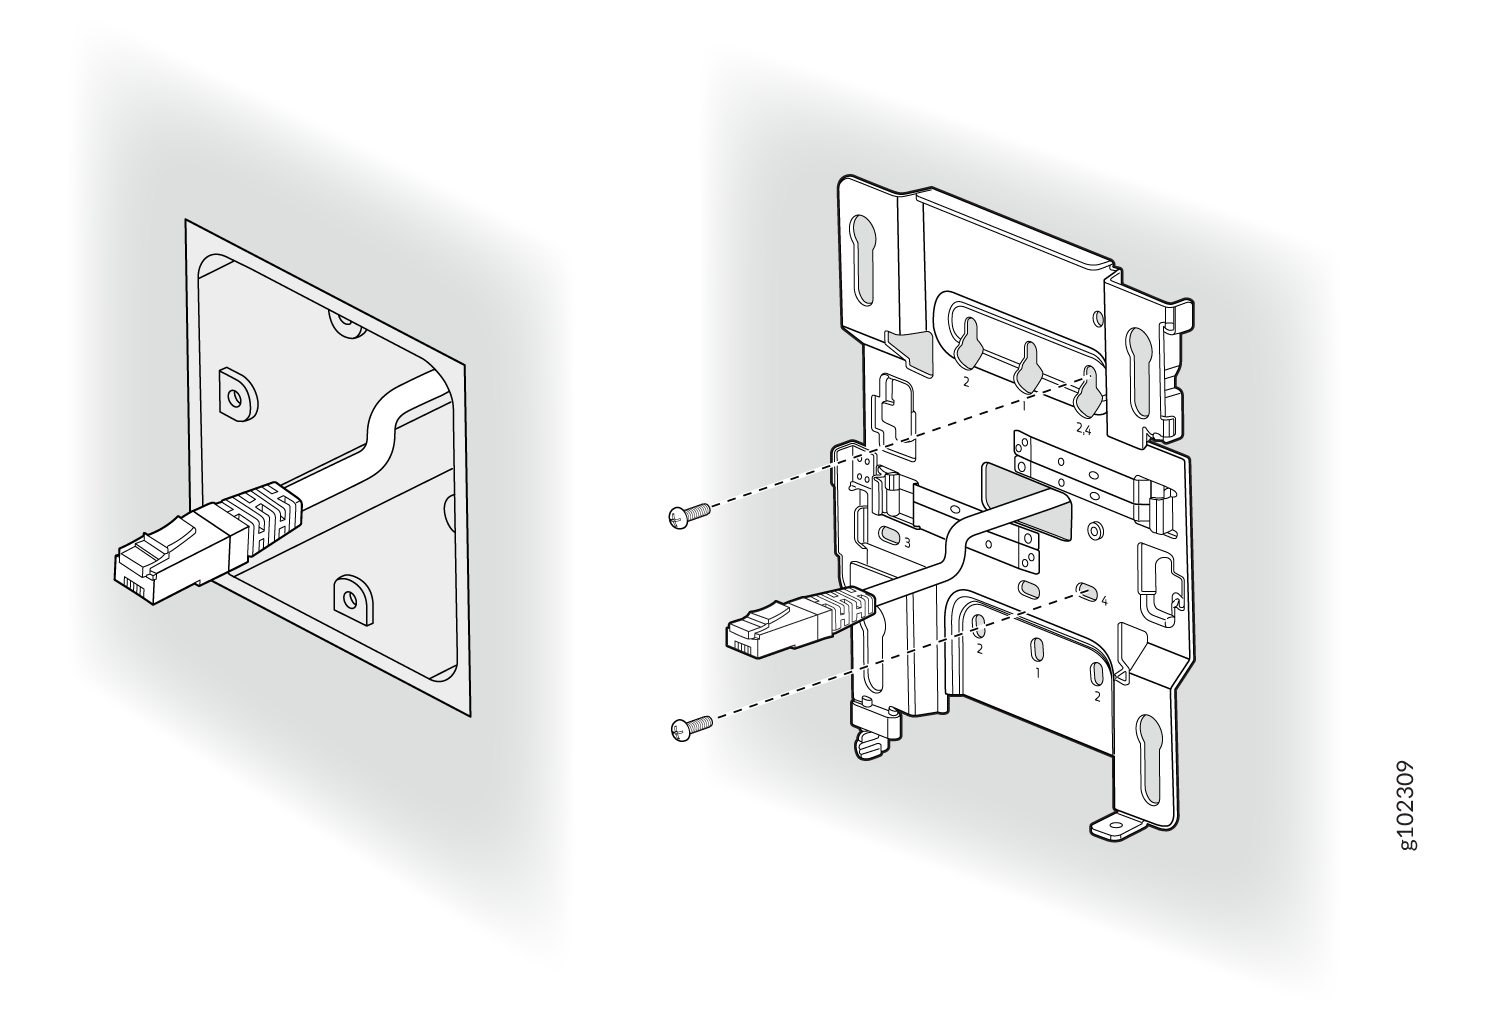
- 使用四颗螺钉将安装支架连接到双组接线盒。确保将螺钉插入标记为 2 的孔中,如图 4 所示。
图 4:将 APBR-U 安装支架连接到双帮接线盒
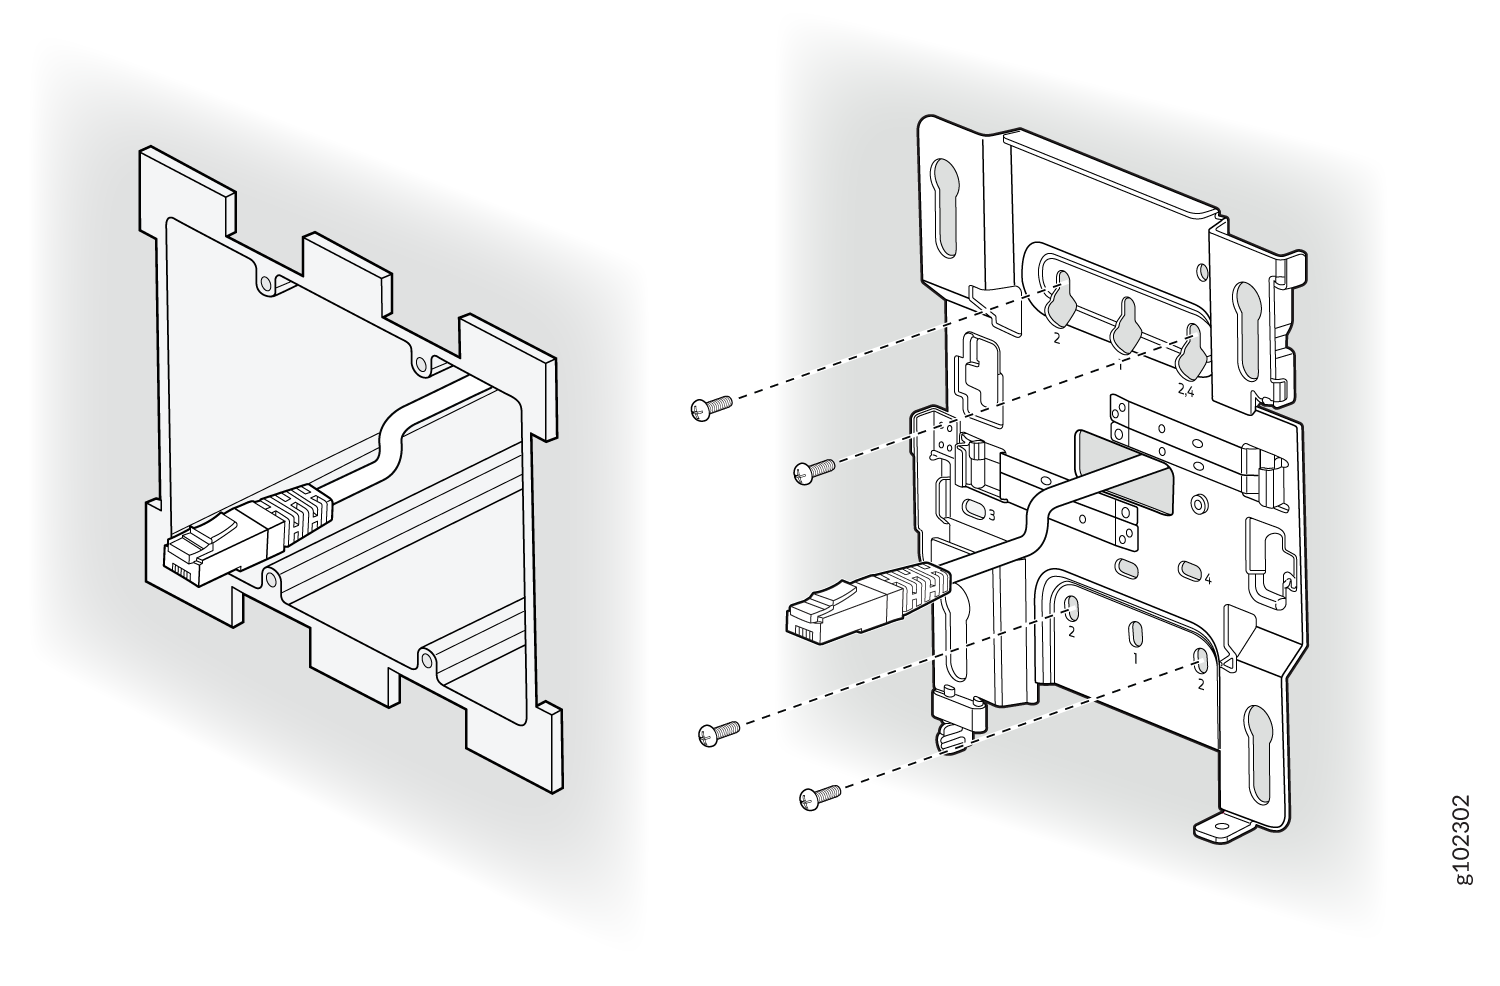
- 放置 接入点,使 AP 上的肩接入点与安装托架的锁孔啮合。滑动并将接入点锁定到位。
图 5:将接入点安装在双帮接线盒上
This is a US double gang box, and it attaches as shown here. And the AP would be installed normally
在欧盟接线盒上安装接入点
- 使用两颗螺钉将安装支架连接到欧盟接线盒。确保将螺钉插入标记为 4 的孔中,如图 6 所示。
图 6:将 APBR-U 安装支架连接到欧盟接线盒
- 放置 接入点,使 AP 上的肩接入点与安装托架的锁孔啮合。滑动并将接入点锁定到位。
图 7:在欧盟接线盒上安装接入点
将接入点安装在美国 4 英寸方形接线盒上
- 使用两颗螺钉将安装支架连接到 4 英寸方形接线盒。确保将螺钉插入标记为 3 的孔中,如图 8 所示。
图 8:将安装支架 (APBR-U) 连接到美国 4 英寸方形接线盒
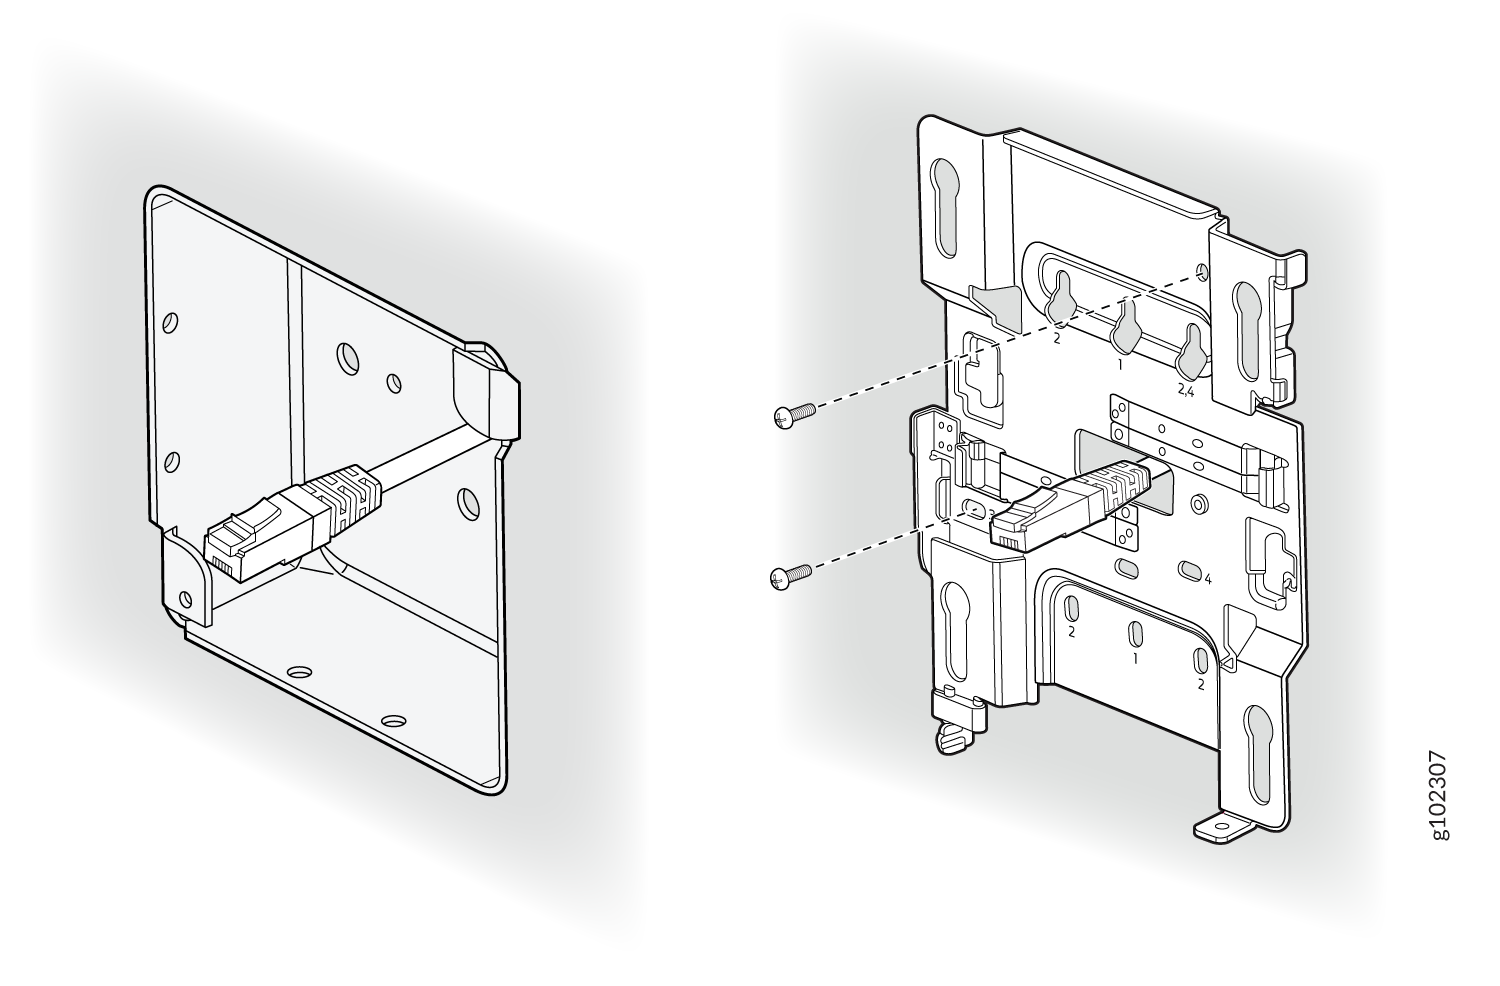
- 放置 接入点,使 AP 上的肩接入点与安装托架的锁孔啮合。滑动并将接入点锁定到位。
图 9:将接入点安装在美国 4 英寸方形接线盒上
This is a US 4 inch square mount and attaches as shown here. And the AP would be installed normally.
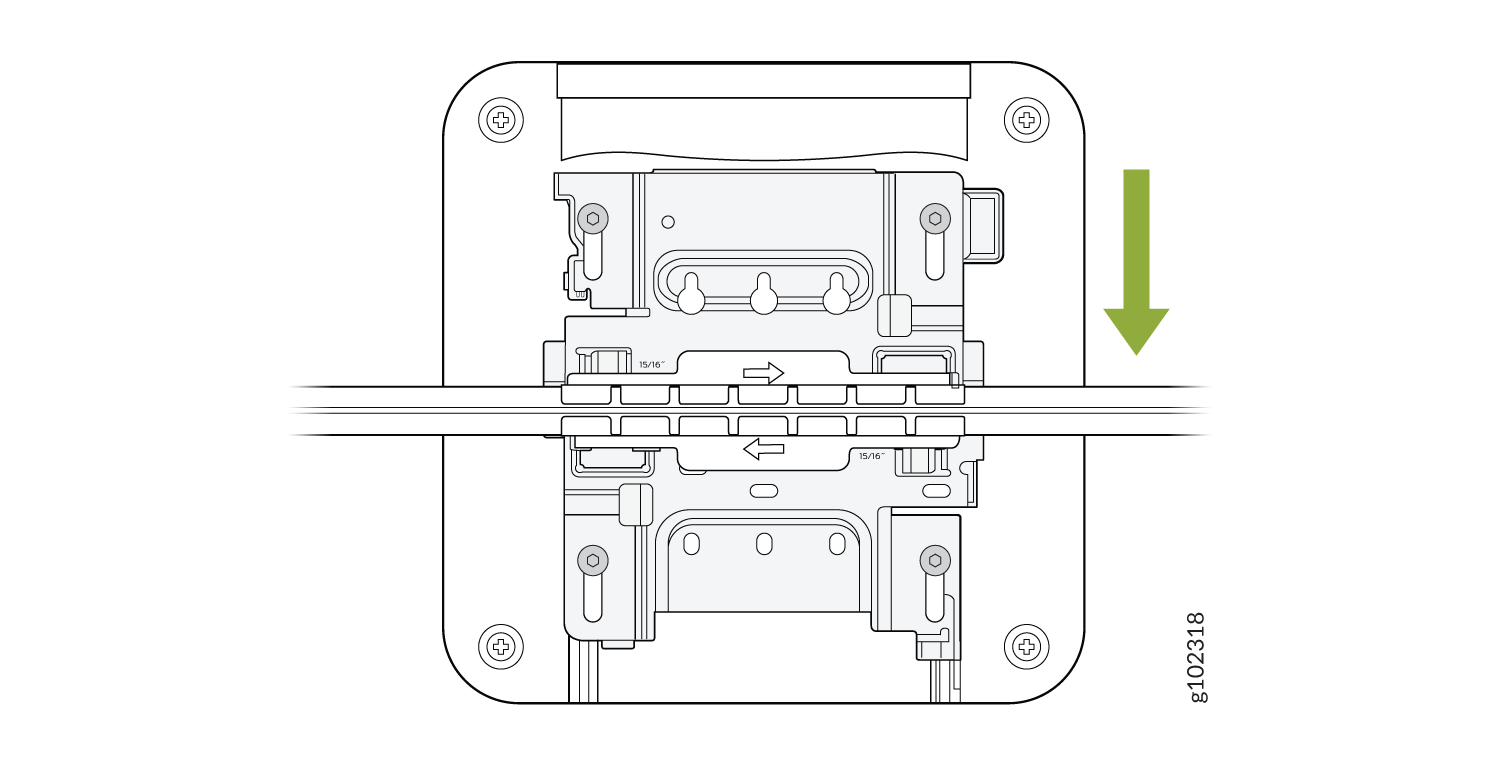
将接入点安装在 9/16 英寸或 15/16 英寸 T 形杆上
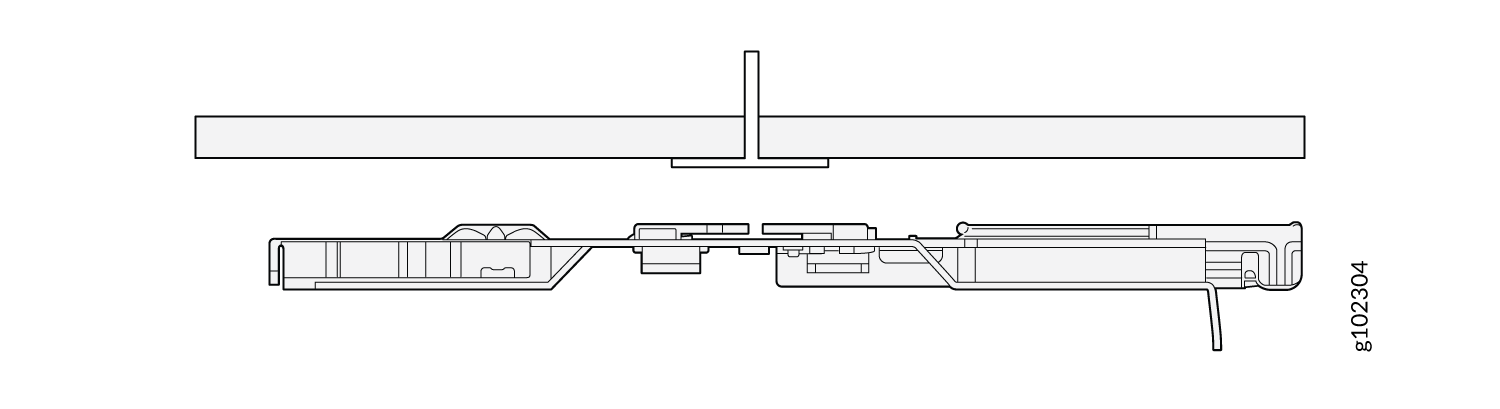
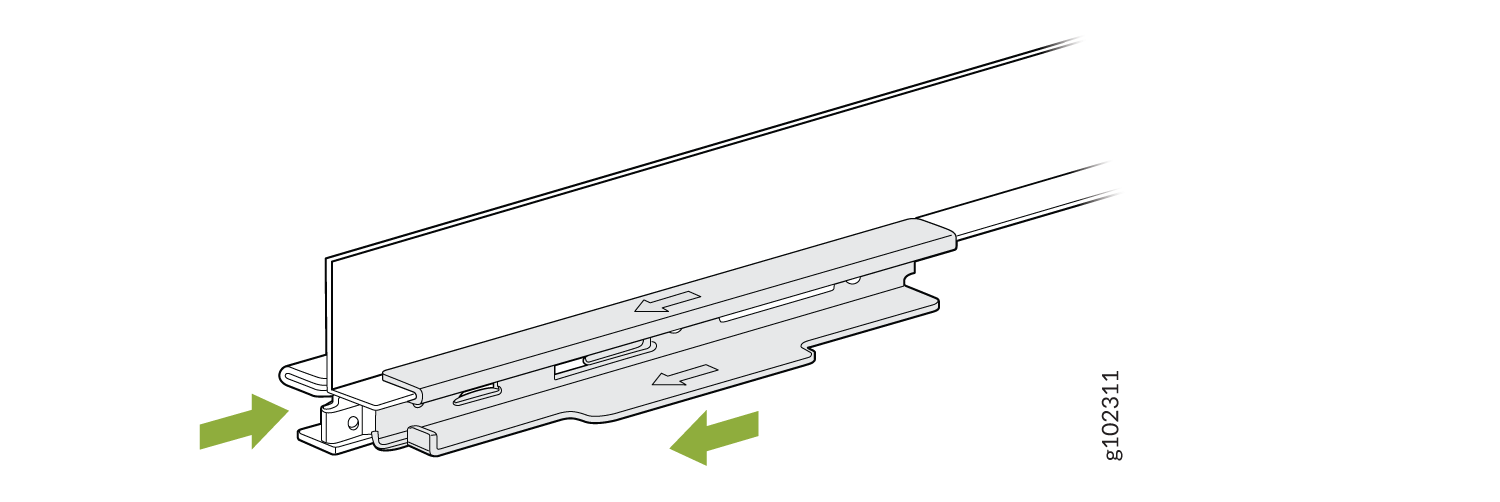
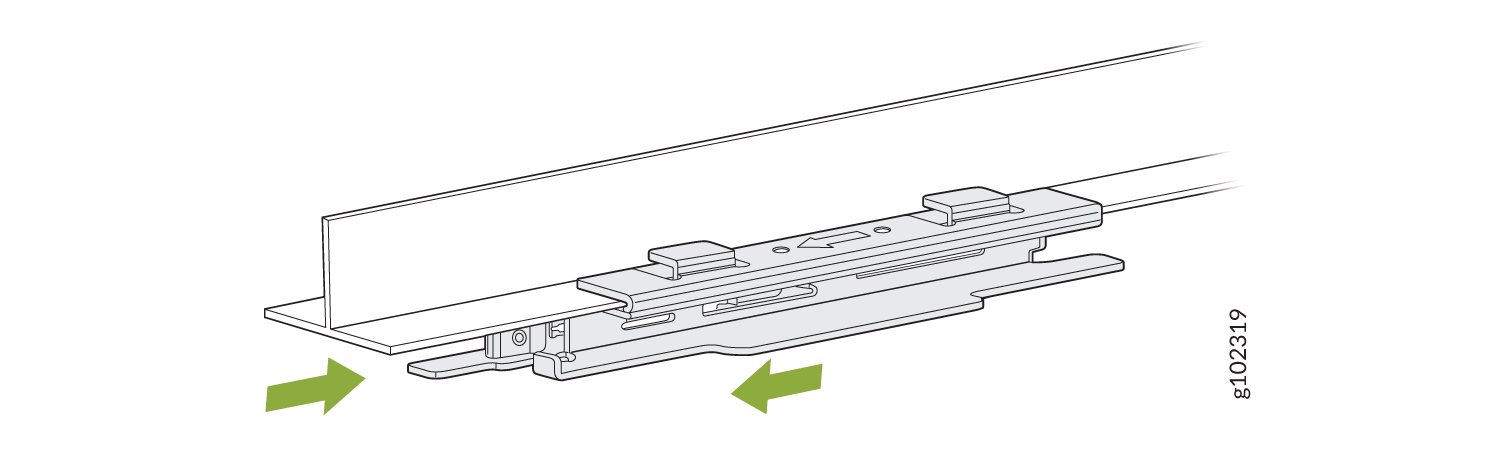
- 将 通用安装支架 (APBR-U) 连接到 T 形杆上。
图 10:将安装支架 (APBR-U) 连接到 9/16 英寸或 15/16 英寸。T 型杆
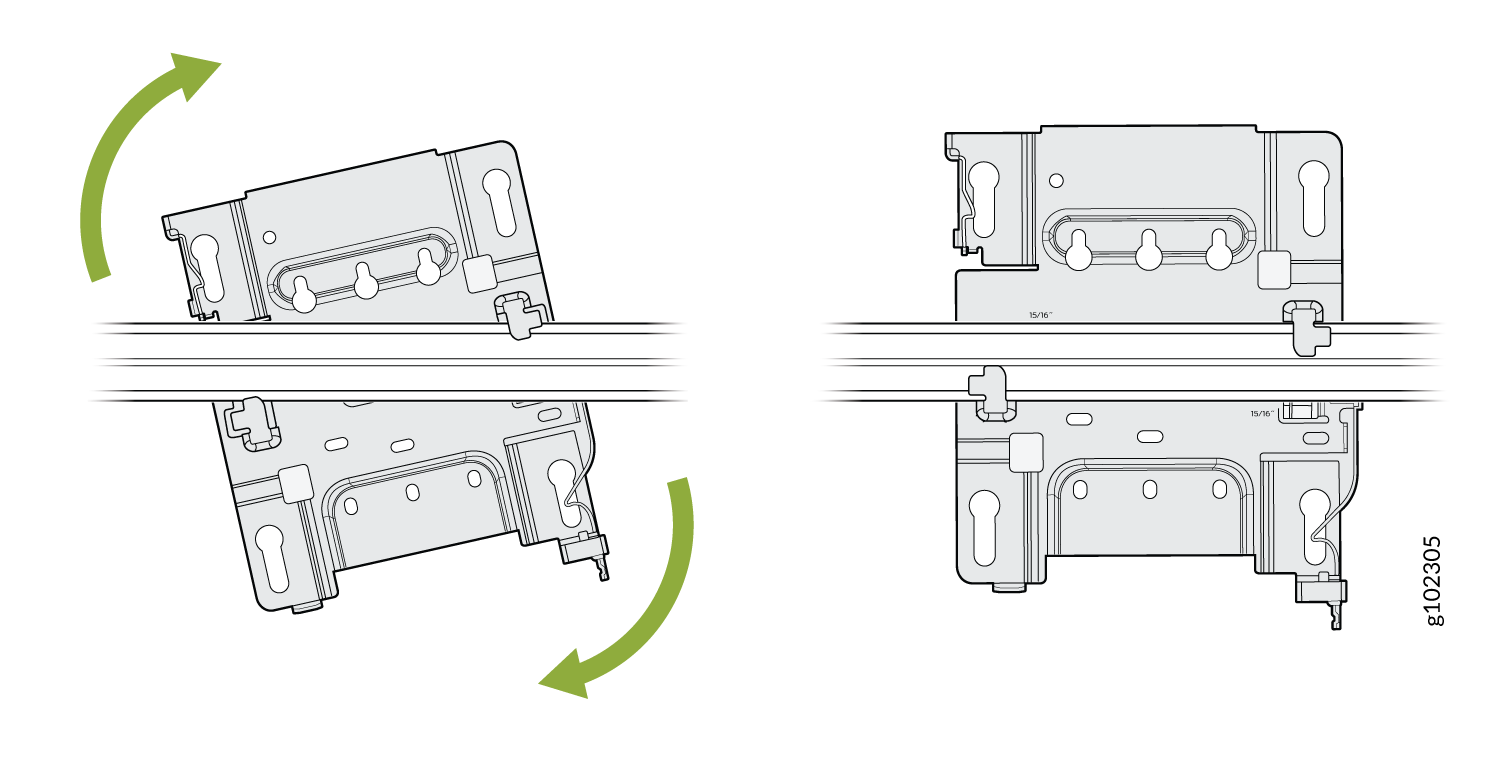
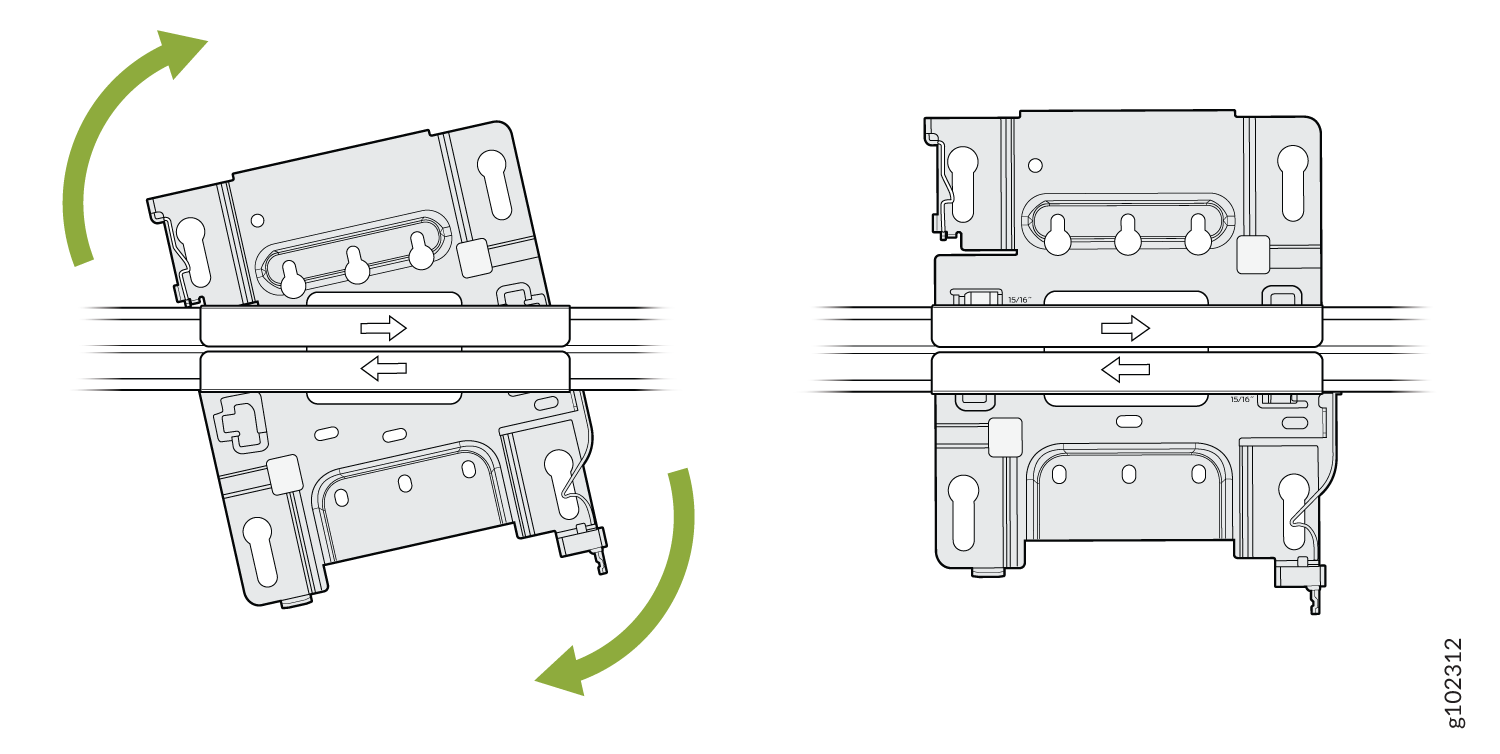
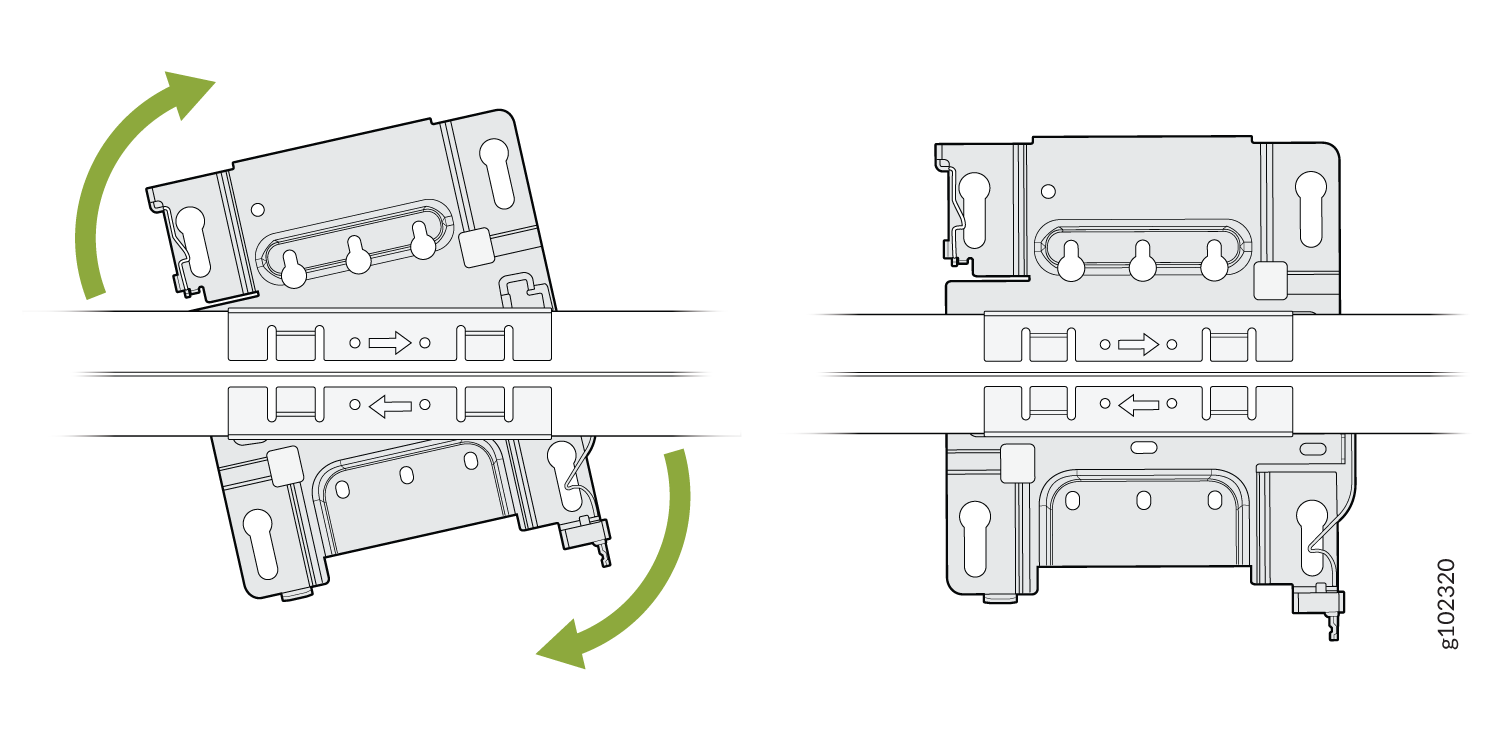
- 旋转支架,直到听到明显的咔嗒声,这表示支架已锁定到位。
图 11:将安装支架 (APBR-U) 锁定到 9/16 英寸或 15/16 英寸。T 型杆
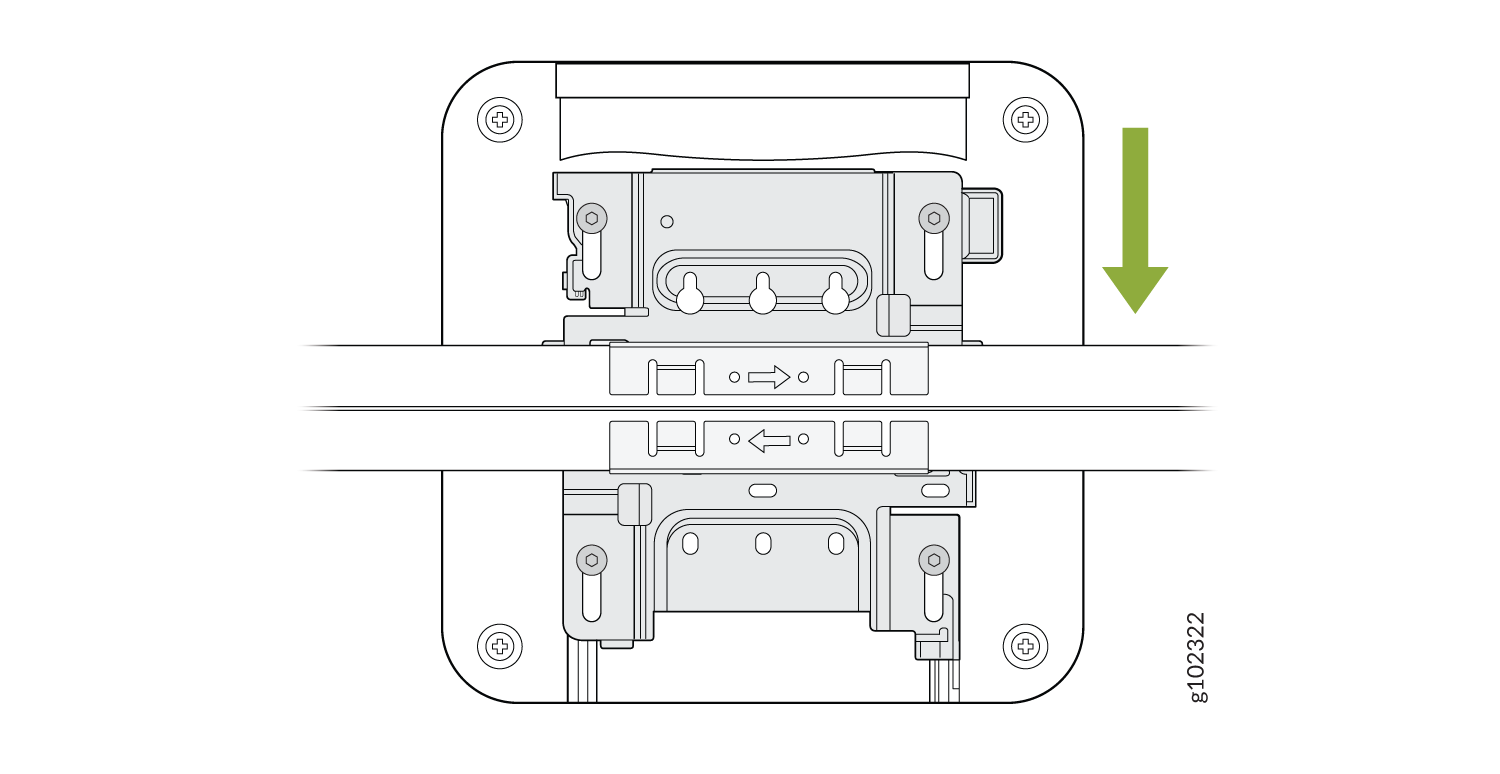
- 放置接入点,使安装支架的锁孔与 AP 上的肩部螺钉接入点啮合。将接入点滑动并锁定到位。
图 12:将接入点连接到 9/16 英寸或 15/16 英寸。T 型杆
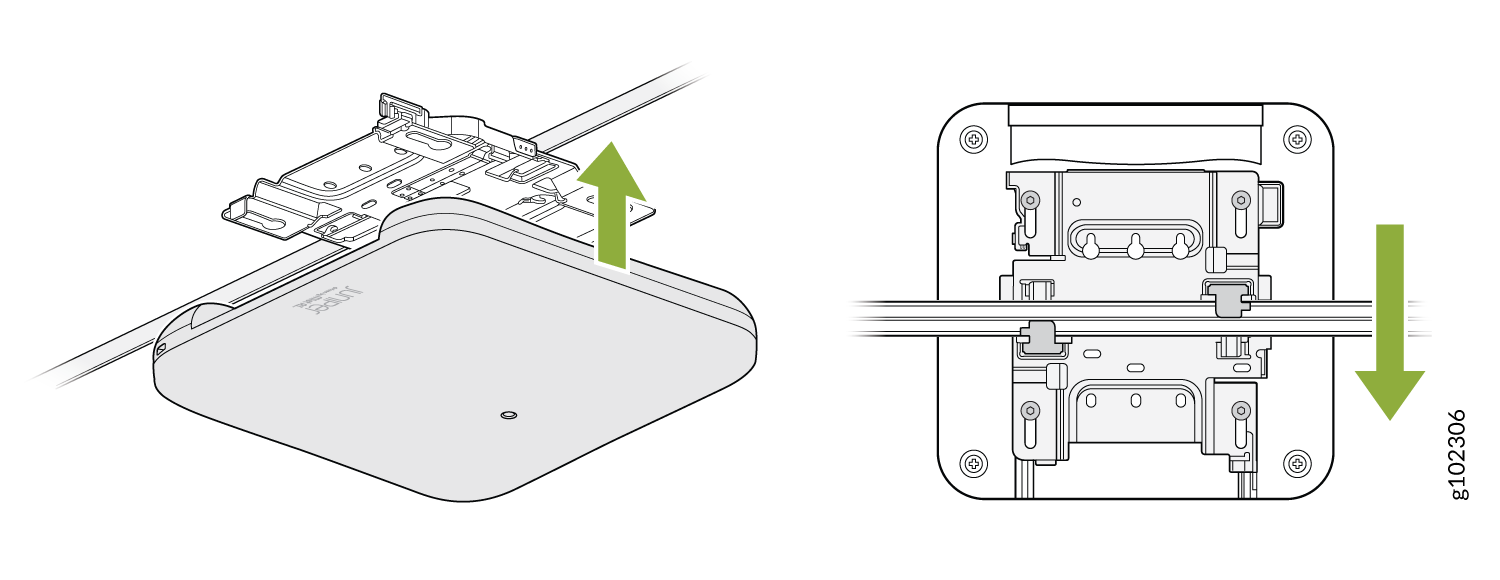
You can directly connect to 9/16ths or 15/16ths T-bar by using these flanges and inserting the bracket as shown. You will hear a click when properly installed. To disconnect, please press the clips as shown and remove the AP. The AP would then be hung as shown. Again, to remove the AP, you must gently press the security lever while you slide it out.
将接入点安装在凹进的 15/16 英寸 T 型杆上
- 将 ADPR-ADP-RT15 适配器连接到 T 形杆。
图 13:将 ADPR-ADP-RT15 适配器连接到 T 形杆
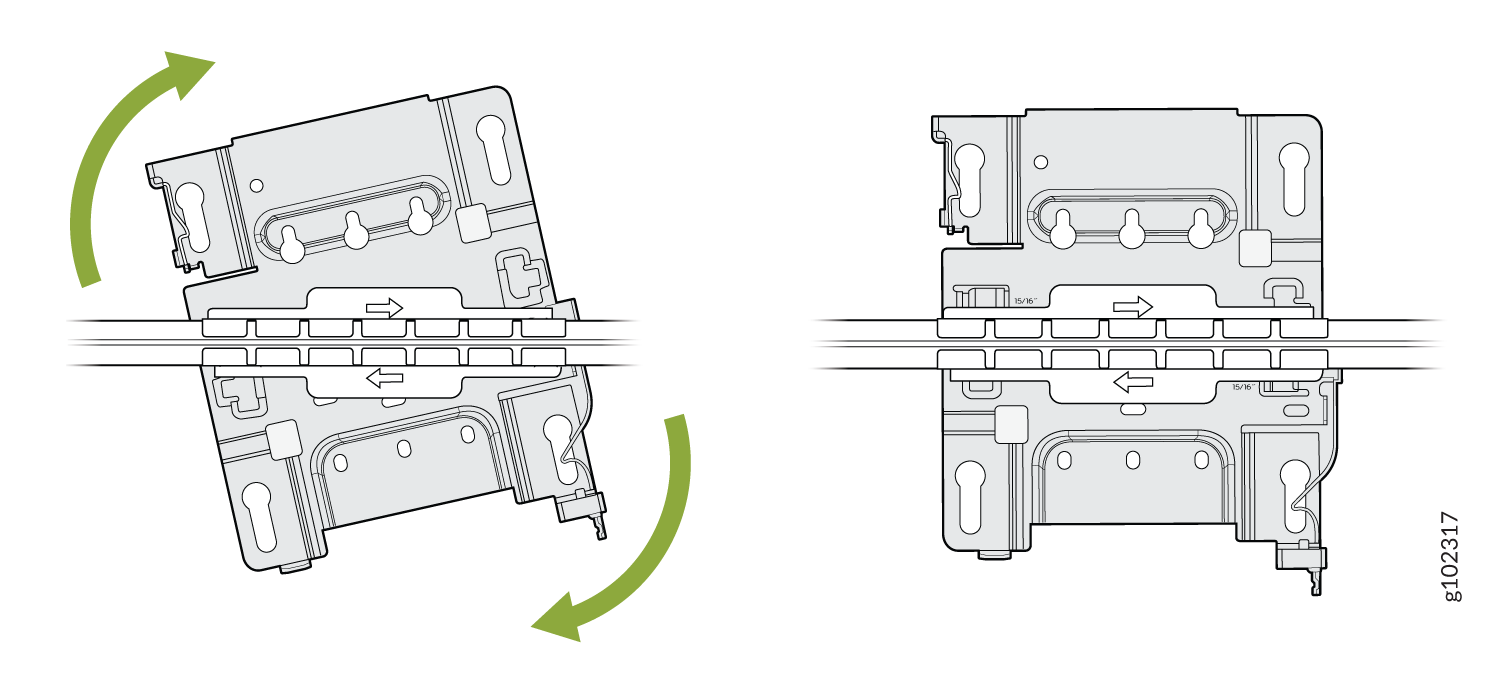
- 将 通用安装支架 (APBR-U) 连接到适配器。旋转支架,直到听到明显的咔嗒声,这表示支架已锁定到位。
图 14:将安装支架 (APBR-U) 连接到 ADPR-ADP-RT15 适配器
- 放置接入点,使安装支架的锁孔与 AP 上的肩部螺钉接入点啮合。将接入点滑动并锁定到位。
图 15:将接入点连接到凹进的 15/16 英寸 T 型杆
 上
上
将接入点安装在凹进的 9/16 英寸 T 形杆或通道轨道上
- 将 ADPR-ADP-CR9 适配器连接到 T 形杆或通道导轨。
图 16:将 ADPR-ADP-CR9 适配器连接到嵌入式 9/16 英寸 T 型杆
 图 17:将 ADPR-ADP-CR9 适配器连接到嵌入式 9/16 英寸通道导轨
- 将 通用安装支架 (APBR-U) 连接到适配器。旋转支架,直到听到明显的咔嗒声,这表示支架已锁定到位。
图 18:将 APBR-U 安装支架连接到 ADPR-ADP-CR9 适配器
- 放置接入点,使安装支架的锁孔与 AP 上的肩部螺钉接入点啮合。将接入点滑动并锁定到位。
图 19:将接入点连接到嵌入式 9/16 英寸。T 形杆或通道轨道
For recessed channel ceilings, we use this mount as shown to clip onto the channel. You could then attach the BRU just like you did with the T-bar install shown earlier. To remove it, it's the same process. Sometimes you need to mount to a recessed T-bar and this is the adapter for that, the same theory as the channel adapter.
在 1.5 英寸 T 型杆上安装接入点
- 将 ADPR-ADP-WS15 适配器连接到 T 形杆。
图 20:将 ADPR-ADP-WS15 适配器连接到 1.5 英寸 T 形杆
- 将 通用安装支架 (APBR-U) 连接到适配器。旋转支架,直到听到明显的咔嗒声,这表示支架已锁定到位。
图 21:将 APBR-U 安装支架连接到 ADPR-ADP-WS15 适配器
- 放置接入点,使安装支架的锁孔与 AP 上的肩部螺钉接入点啮合。将接入点滑动并锁定到位。
图 22:将接入点连接到 1.5 英寸 T 形杆
将 AP21、AP45 或 BT11 安装在 5/8 英寸螺纹杆上
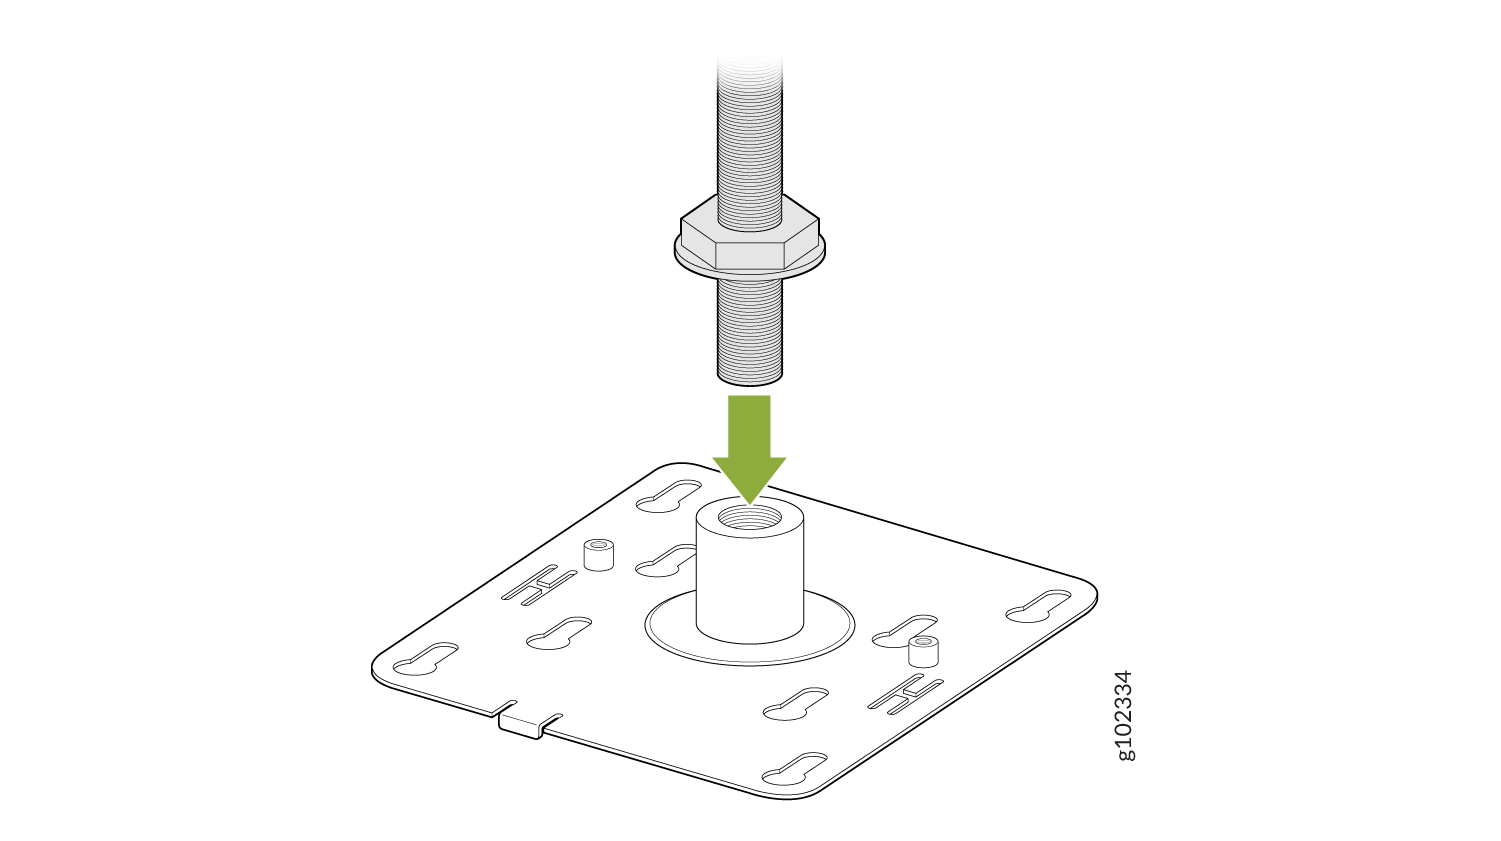
- 使用提供的锁紧垫圈和螺母将 APBR-T58 支架连接到螺纹杆上。
图 23:将 APBR-T58 支架连接到 5/8 英寸。螺纹杆

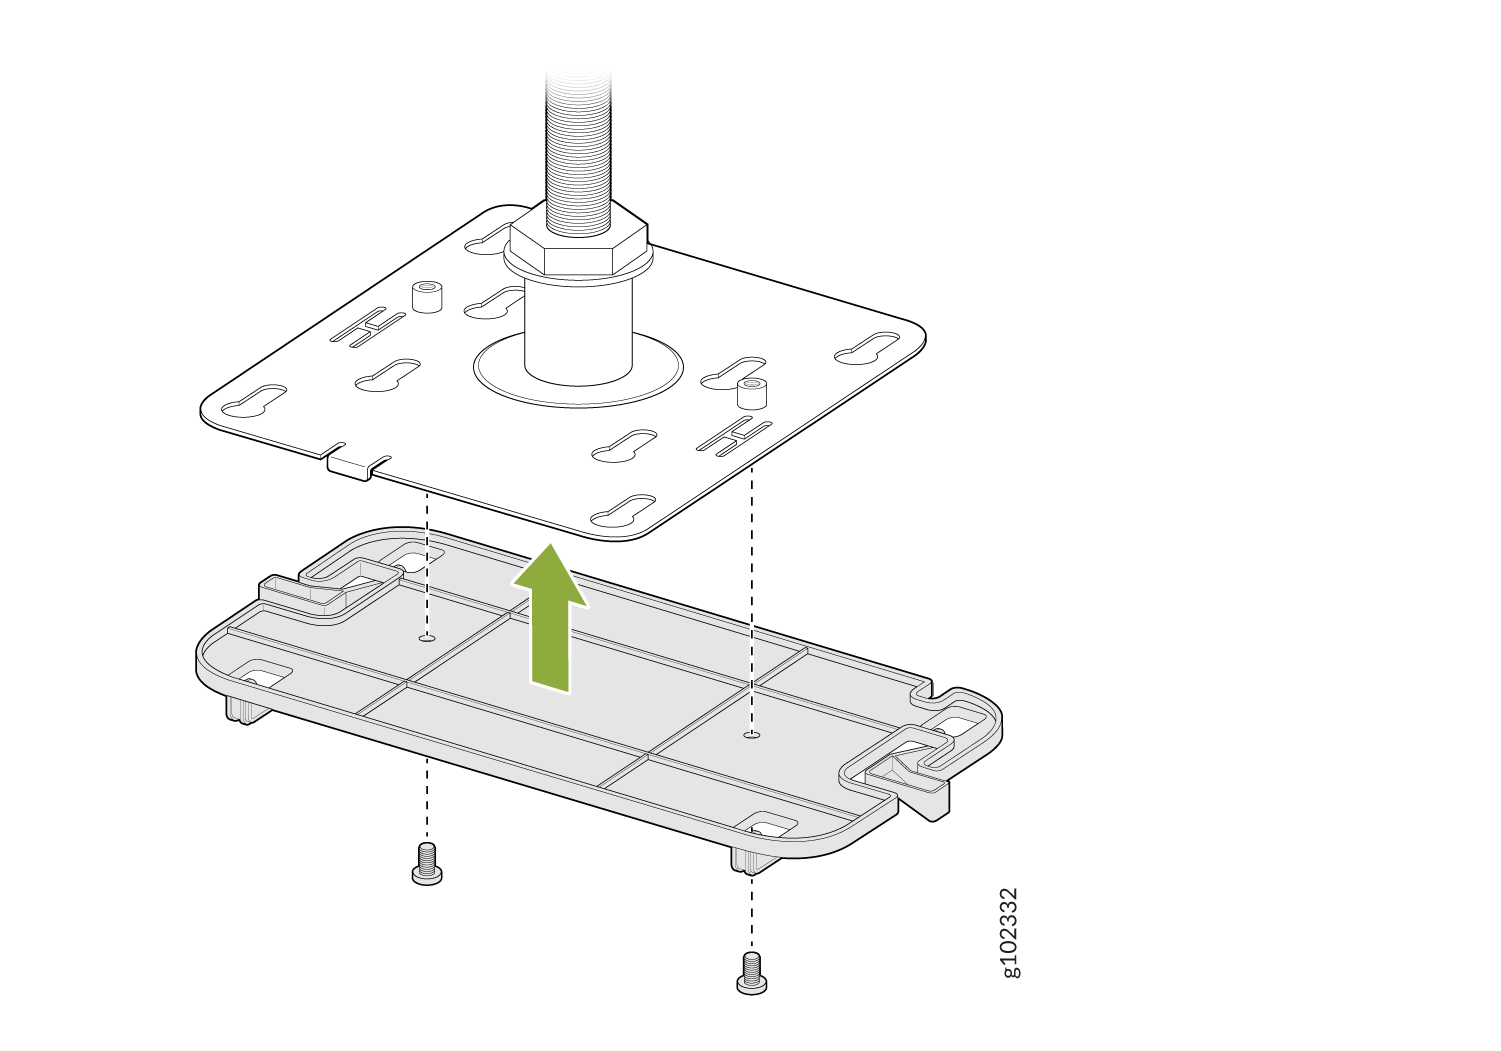
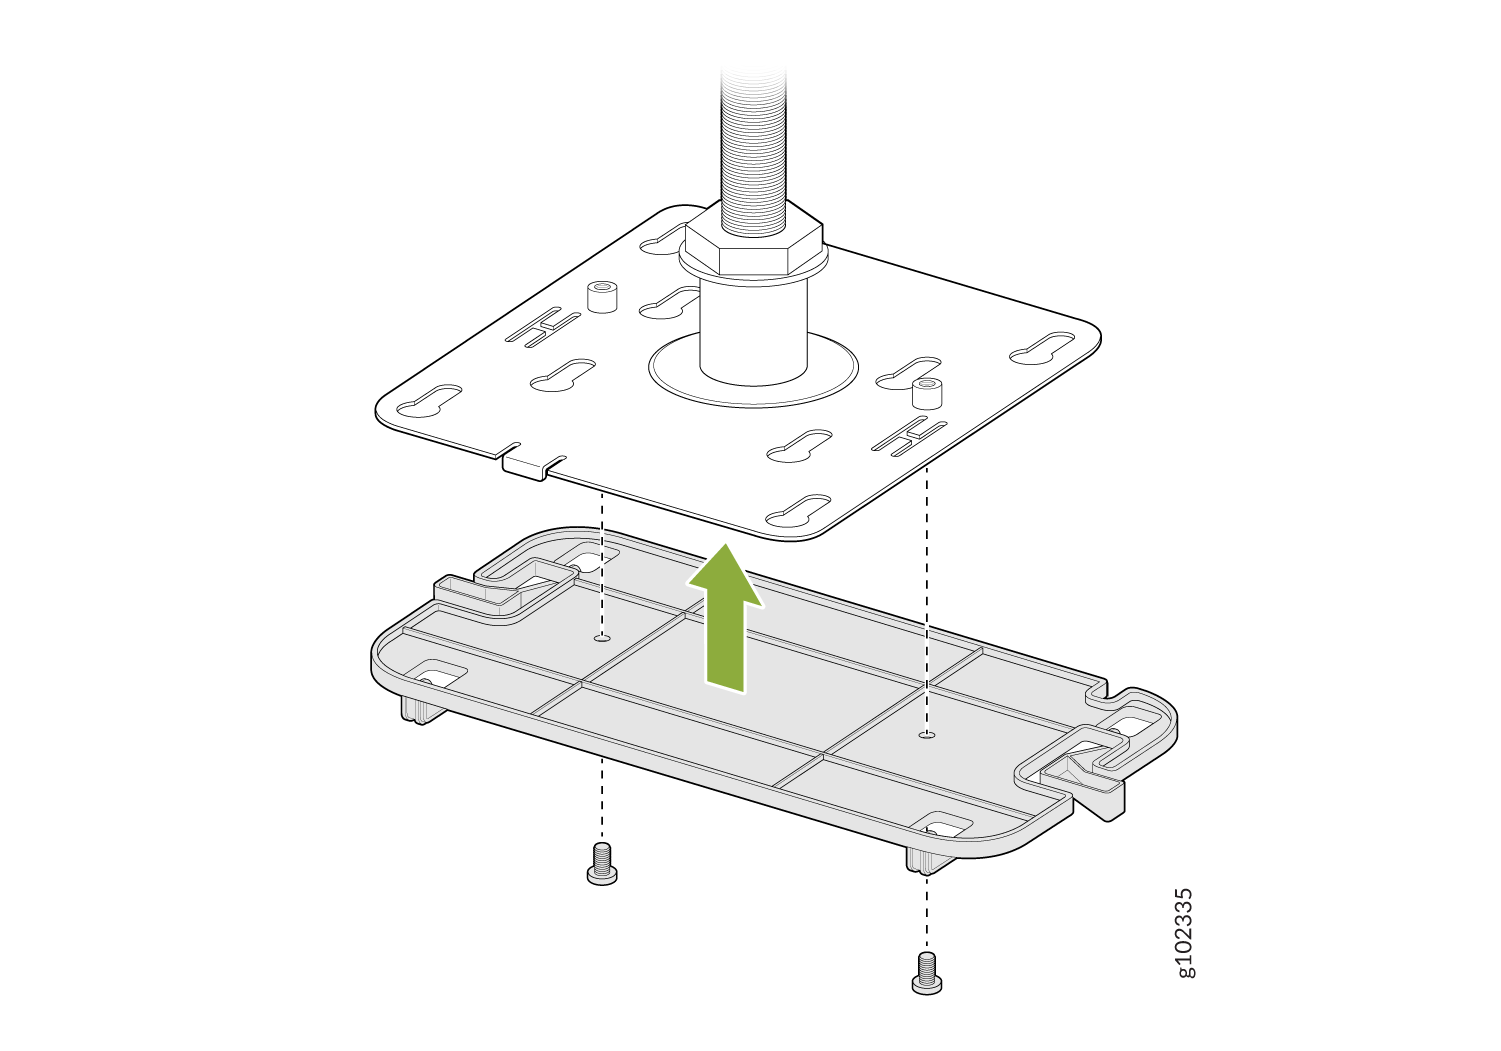
- 使用两颗螺钉(随 AP 提供)将 APBR-SW1 托架适配器连接到 APBR-T58 安装接入点。
图 24:将 APBR-SW1 托架适配器连接到 APBR-T58 安装托架
- 放置 接入点,使 AP 上的肩接入点与安装托架的锁孔啮合。滑动并将接入点锁定到位。
图 25:将接入点安装在 5/8 英寸上。螺纹杆
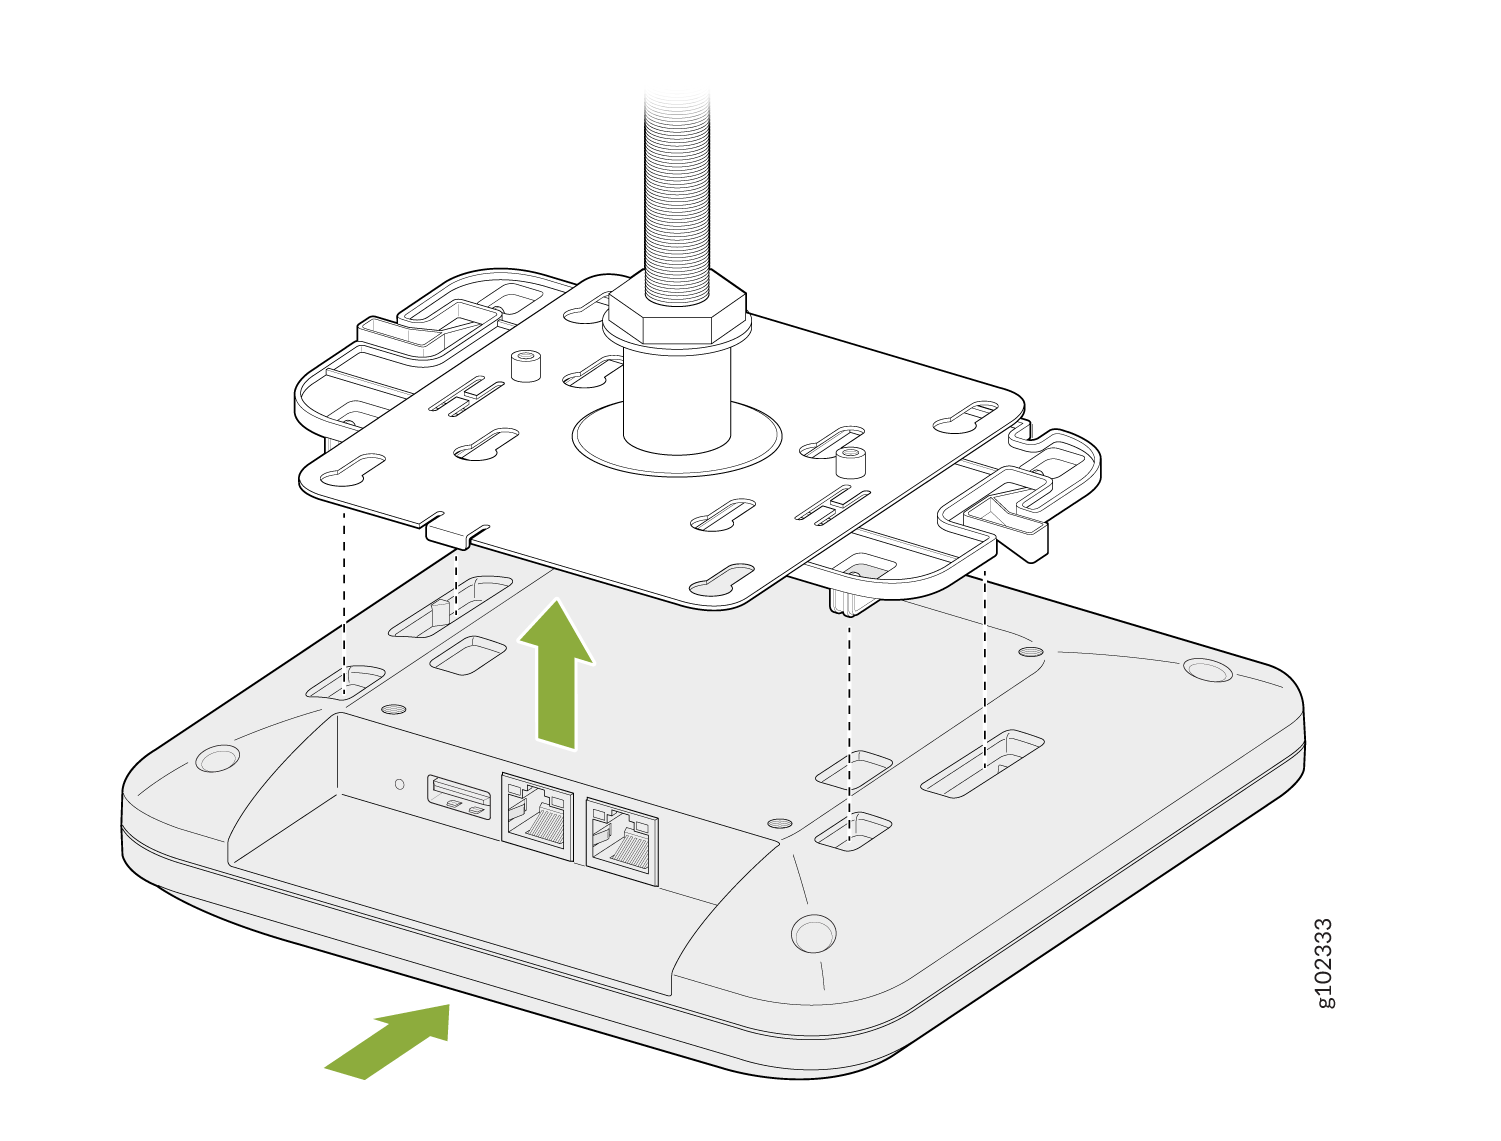
Now if you need to mount a BT11 which is our Bluetooth-only unit to this threaded rod mount, there's a special adapter provided as shown. There are two special screw holes provided and those screws are shipped with the bracket. The bracket to a BT11 there are four indentations as shown which the bracket will clip into. To remove, depress the latches as shown and it will slide back out. Now you use the 2 screws to connect both brackets and attach the BT11.
将 AP21、AP45 或 BT11 安装在 16 毫米螺纹杆上
- 使用提供的锁紧垫圈和螺母将 APBR-M16 支架连接到螺纹杆上。
图 26:将 APBR-T58 支架连接到 16 毫米螺纹杆
 上
上
- 使用两颗螺钉(随 AP 提供)将 APBR-SW1 托架适配器连接到 APBR-M16 安装接入点。
图 27:将 APBR-SW1 托架适配器连接到 APBR-M16 安装托架
- 放置 接入点,使 AP 上的肩接入点与安装托架的锁孔啮合。滑动并将接入点锁定到位。
图 28:将 AP21 或 BT11 安装在 16 毫米螺纹杆
 上
上
将接入点安装在 1/2 英寸螺纹杆上
- 将 APBR-ADP-T12 托架适配器连接到 APBR-U 安装托架。旋转支架,直到听到明显的咔嗒声,这表示支架已锁定到位。
图 29:将 APBR-ADP-T12 托架适配器连接到 APBR-U 安装托架

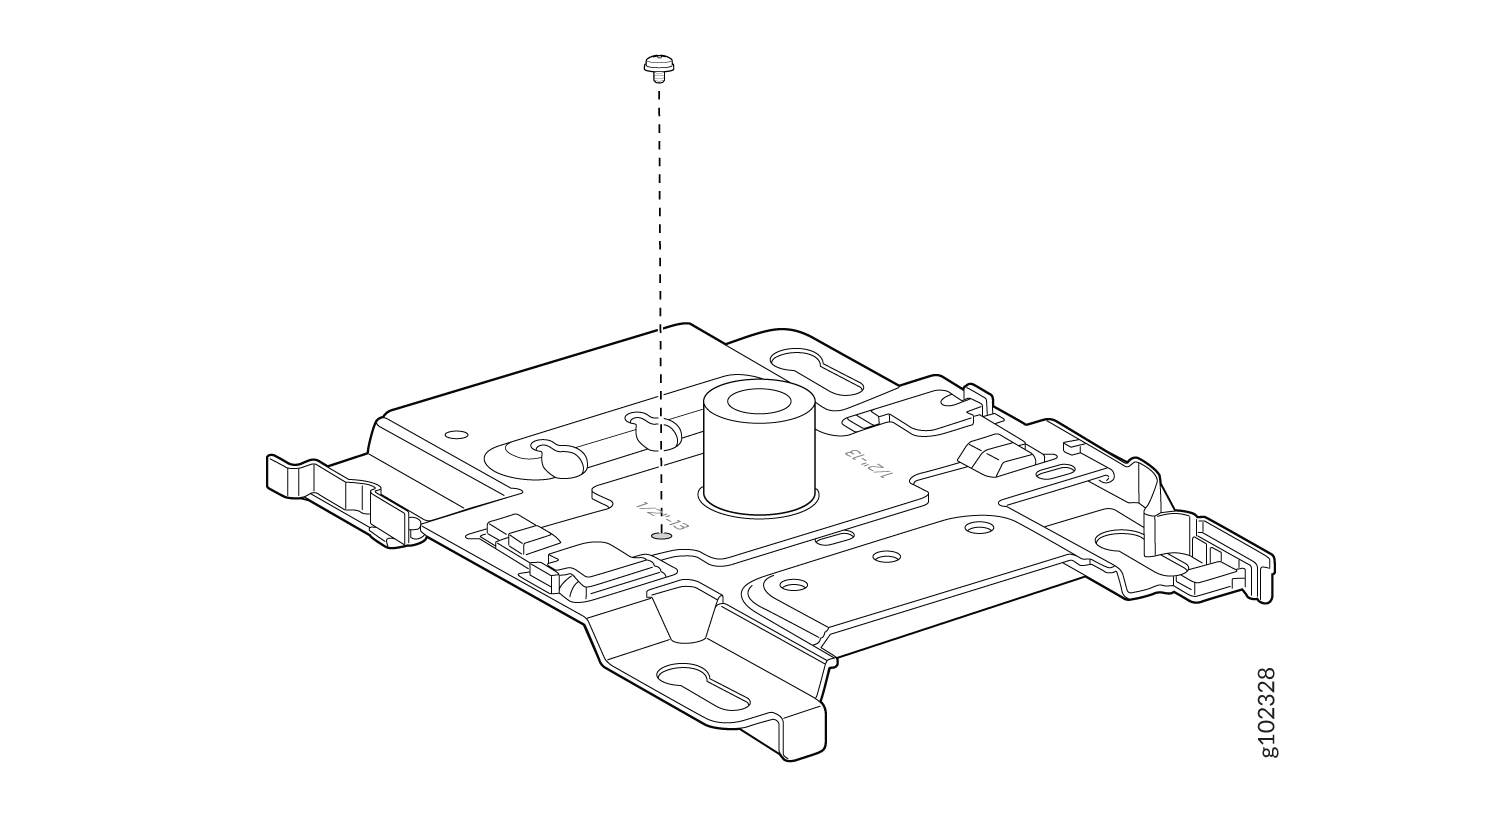
- 使用螺钉将适配器固定到支架上。
图 30:将 APBR-ADP-T12 托架适配器固定到 APBR-U 安装托架
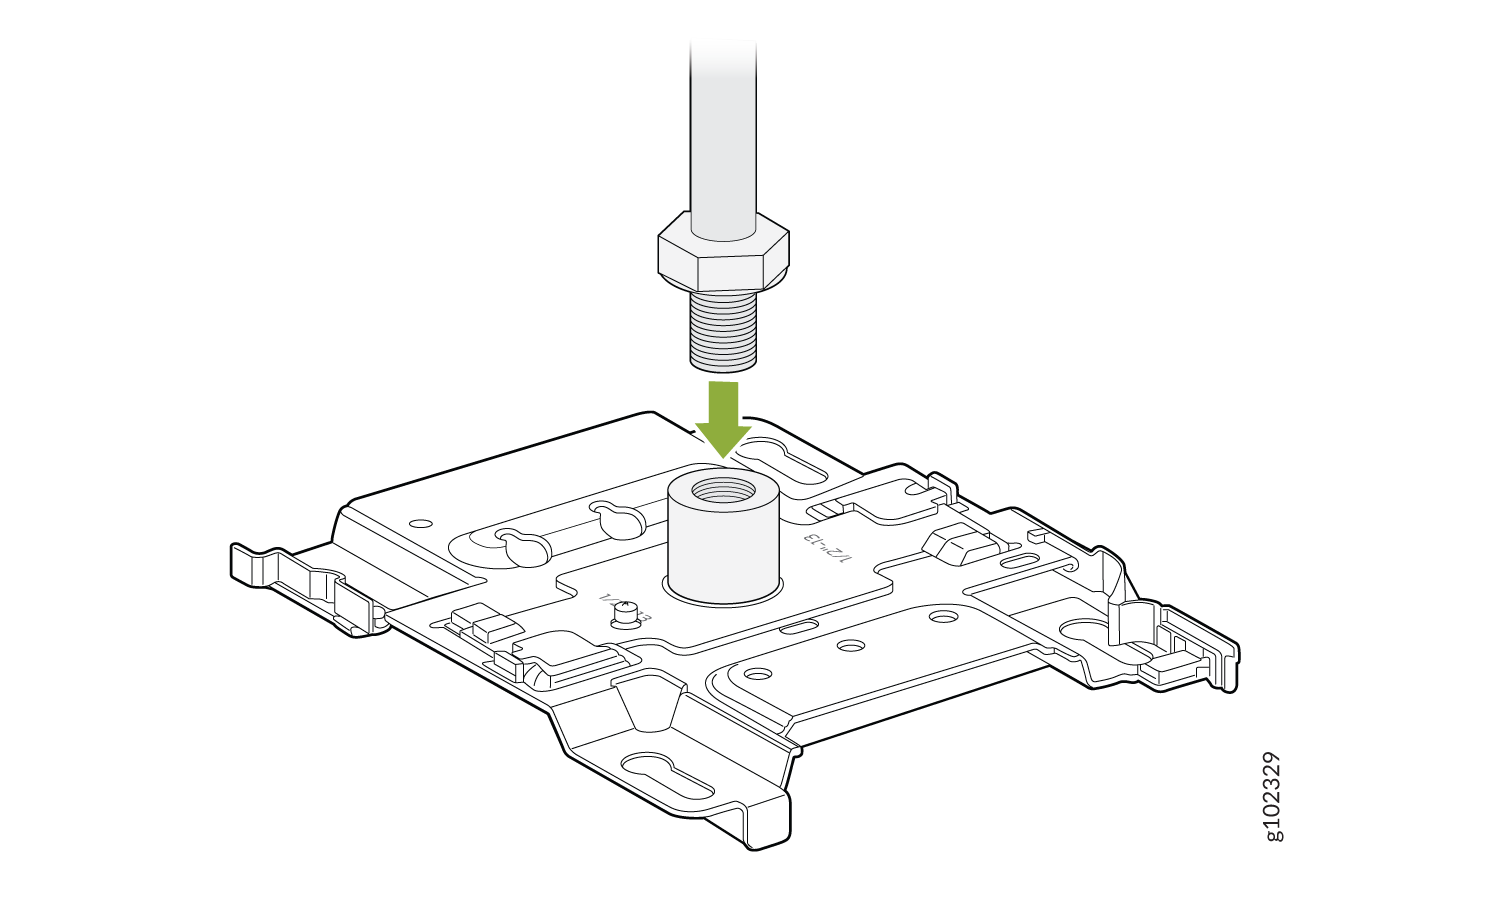
- 使用提供的锁紧垫圈和螺母将托架组件(托架和适配器)连接到 1/2 英寸螺纹杆
图 31:将 APBR-ADP-T12 和 APBR-U 托架组件连接到 1/2 英寸螺纹杆
- 放置 接入点,使 AP 上的肩接入点与安装托架的锁孔啮合。滑动并将接入点锁定到位。
图 32:将接入点安装在 1/2 英寸上。螺纹杆
