静态路由优先级和合格下一跳
了解静态路由优先级和合格下一跳
静态路由目标地址可以有多个与之关联的下一跃点。在这种情况下,路由表中会插入多个路由,并且必须进行路由选择。由于路由选择的主要标准是 路由优先级,因此可以通过设置与特定下一跃点关联的路由优先级来控制用作特定目标的主要路由。始终使用路由优先级较低的路由来路由流量。如果未设置首选路由,Junos OS 将随机选择下一个跃点地址之一转发表入转发表。
通常,分配给静态路由的默认属性适用于为静态路由配置的所有下一跃点地址。但是,如果您希望为特定路由配置两个可能的下一跃点地址并区别对待它们,则可以将其中一个定义为合格下一跃点。
合格下一跃点允许您将一个或多个属性与特定的下一跃点地址相关联。您可以为特定静态路由设置总体优先级,然后为合格的下一跃点指定不同的优先级。例如,假设两个下一跃点地址(10.10.10.10 和 10.10.10.7)与静态路由 192.168.47.5/32 相关联。常规优先级分配给整个静态路由,然后仅将不同的优先级分配给合格的下一跃点地址 10.10.10.7。例如:
route 192.168.47.5/32 {
    next-hop 10.10.10.10;
    qualified-next-hop 10.10.10.7 {
        preference 6;
    }
    preference 5;
}
在此示例中,为合格的下一跃点 10.10.10.7 分配了优先级 6,为下一跃点 10.10.10 分配了优先级 5。
preference] 层次结构中的和 metric 选项[edit route route qualified-next-hop仅适用于合格的下一跃点。限定下一跃点优先级和指标仅覆盖该特定限定下一跃点的路由优先级和指标,类似于路由优先级覆盖默认优先级和指标(针对该特定路由)的方式。
从 Junos OS 15.1R4 版开始,路由器不再支持静态路由指向与订阅者绑定的下一跃点的配置。通常,当 RADIUS 使用 Framed-IP 地址属性分配下一跃点时,可能会发生这种情况。此错误配置的替代方法是让 RADIUS 服务器提供与静态路由匹配的 Framed-Route 属性。
示例:配置静态路由首选项和限定下一跳以控制静态路由选择
此示例说明如何控制静态路由选择。
要求
在此示例中,除了设备初始化之外,不需要任何特殊配置。
概述
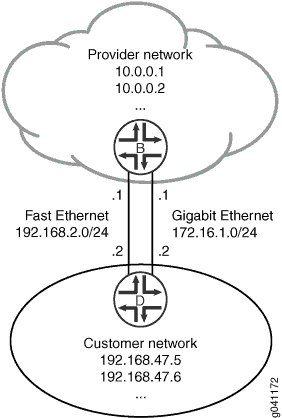
在此示例中,静态路由 192.168.47.0/24 有两个可能的下一跃点。由于一个链路具有较高的带宽,因此此链路是首选路径。要强制执行此首选项, qualified-next-hop 语句将包含在两台设备上的配置中。请参阅 图 1。

拓扑学
配置
程序
CLI 快速配置
要快速配置此示例,请复制以下命令,将其粘贴到文本文件中,删除所有换行符,更改详细信息,以便与网络配置匹配,然后将命令复制并粘贴到层 [edit] 级的 CLI 中。
提供商网络中的设备 B
set interfaces ge-1/2/0 unit 0 description B->D
set interfaces ge-1/2/0 unit 0 family inet address 172.16.1.1/24
set interfaces fe-1/2/1 unit 2 description secondary-B->D
set interfaces fe-1/2/1 unit 2 family inet address 192.168.2.1/24
set interfaces lo0 unit 57 family inet address 10.0.0.1/32
set interfaces lo0 unit 57 family inet address 10.0.0.2/32
set routing-options static route 192.168.47.0/24 next-hop 172.16.1.2
set routing-options static route 192.168.47.0/24 qualified-next-hop 192.168.2.2 preference 25
客户网络中的设备 D
set interfaces ge-1/2/0 unit 1 description D->B
set interfaces ge-1/2/0 unit 1 family inet address 172.16.1.2/24
set interfaces fe-1/2/1 unit 3 description secondary-D->B
set interfaces fe-1/2/1 unit 3 family inet address 192.168.2.2/24
set interfaces lo0 unit 2 family inet address 192.168.47.5/32
set interfaces lo0 unit 2 family inet address 192.168.47.6/32
set routing-options static route 0.0.0.0/0 next-hop 172.16.1.1
set routing-options static route 0.0.0.0/0 qualified-next-hop 192.168.2.1 preference 25
分步过程
下面的示例要求您在各个配置层级中进行导航。有关操作说明,请参阅《Junos OS CLI 用户指南》中的在配置模式下使用 CLI 编辑器。
要控制静态路由选择:
在设备 B 上,配置接口。
[edit interfaces]
user@B# set ge-1/2/0 unit 0 description B->D
user@B# set ge-1/2/0 unit 0 family inet address 172.16.1.1/24
user@B# set fe-1/2/1 unit 2 description secondary-B->D
user@B# set fe-1/2/1 unit 2 family inet address 192.168.2.1/24
user@B# set lo0 unit 57 family inet address 10.0.0.1/32
user@B# set lo0 unit 57 family inet address 10.0.0.2/32
在设备 B 上,配置到客户网络的静态路由。
[edit routing-options static route 192.168.47.0/24]
user@B# set next-hop 172.16.1.2
在设备 B 上,配置到客户网络的备份路由。
[edit routing options static route 192.168.47.0/24]
user@B# set qualified-next-hop 192.168.2.2 preference 25
在设备 D 上,配置接口。
[edit interfaces]
user@D# set ge-1/2/0 unit 1 description D->B
user@D# set ge-1/2/0 unit 1 family inet address 172.16.1.2/24
user@D# set fe-1/2/1 unit 3 description secondary-D->B
user@D# set fe-1/2/1 unit 3 family inet address 192.168.2.2/24
user@D# set lo0 unit 2 family inet address 192.168.47.5/32
user@D# set lo0 unit 2 family inet address 192.168.47.6/32
在设备 D 上,配置到外部网络的静态默认路由。
[edit routing options static route 0.0.0.0/0]
user@D# set next-hop 172.16.1.1
在设备 D 上,配置到外部网络的备份静态默认路由。
[edit routing options static route 0.0.0.0/0]
user@D# set qualified-next-hop 192.168.2.1 preference 25
结果
发出 show interfaces 和 show routing-options 命令,以确认您的配置。如果输出未显示预期的配置,请重复此示例中的说明以更正配置。
user@B# show interfaces
ge-1/2/0 {
    unit 0 {
        description B->D;
        family inet {
            address 172.16.1.1/24;
        }
    }
}
fe-1/2/1 {
    unit 2 {
        description secondary-B->D;
        family inet {
            address 192.168.2.1/24;
        }
    }
}
lo0 {
    unit 57 {
        family inet {
            address 10.0.0.1/32;
            address 10.0.0.2/32;
        }
    }
}
user@B# show routing-options
static {
    route 192.168.47.0/24 {
        next-hop 172.16.1.2;
        qualified-next-hop 192.168.2.2 {
            preference 25;
        }
    }
}
user@D# show interfaces
ge-1/2/0 {
    unit 1 {
        description D->B;
        family inet {
            address 172.16.1.2/24;
        }
    }
}
fe-1/2/1 {
    unit 3 {
        description secondary-D->B;
        family inet {
            address 192.168.2.2/24;
        }
    }
}
lo0 {
    unit 2 {
        family inet {
            address 192.168.47.5/32;
            address 192.168.47.6/32;
        }
    }
}
user@D# show routing-options
static {
    route 0.0.0.0/0 {
        next-hop 172.16.1.1;
        qualified-next-hop 192.168.2.1 {
            preference 25;
        }
    }
}
如果完成设备配置,请在两台设备上从配置模式进入 提交 。
验证
确认配置工作正常。
检查路由表
目的
确保静态路由显示在设备 B 和设备 D 的路由表中。
行动
user@B> show route protocol static
inet.0: 7 destinations, 8 routes (7 active, 0 holddown, 0 hidden)
+ = Active Route, - = Last Active, * = Both

192.168.47.0/24    *[Static/5] 02:02:03
                    > to 172.16.1.2 via ge-1/2/0.0
                    [Static/25] 01:58:21
                    > to 192.168.2.2 via fe-1/2/1.2
user@D> show route protocol static
inet.0: 7 destinations, 8 routes (7 active, 0 holddown, 0 hidden)
+ = Active Route, - = Last Active, * = Both

0.0.0.0/0          *[Static/5] 02:02:12
                    > to 172.16.1.1 via ge-1/2/0.1
                    [Static/25] 01:58:31
                    > to 192.168.2.1 via fe-1/2/1.3
意义
路由表中的星号 (*) 表示活动路由。下面列出了备份路由。
对远程地址执行 Ping 命令
目的
验证静态路由是否正常工作。
从设备 B 对设备 D 上的一个环路接口地址执行 ping 命令。
从设备 D,对设备 B 上的某个环路接口地址执行 ping 命令。
行动
user@B> ping 192.168.47.5
PING 192.168.47.5 (192.168.47.5): 56 data bytes
64 bytes from 192.168.47.5: icmp_seq=0 ttl=64 time=156.126 ms
64 bytes from 192.168.47.5: icmp_seq=1 ttl=64 time=120.393 ms
64 bytes from 192.168.47.5: icmp_seq=2 ttl=64 time=175.361 ms
user@D> ping 10.0.0.1
PING 10.0.0.1 (10.0.0.1): 56 data bytes
64 bytes from 10.0.0.1: icmp_seq=0 ttl=64 time=1.315 ms
64 bytes from 10.0.0.1: icmp_seq=1 ttl=64 time=31.819 ms
64 bytes from 10.0.0.1: icmp_seq=2 ttl=64 time=1.268 ms
确保备份路由成为活动路由
目的
如果主路由变得不可用,请确保备用辅助路由变为活动状态。
行动
通过停用设备 B 上的 ge-1/2/0.0 接口来禁用活动路由。
user@B# deactivate interfaces ge-1/2/0 unit 0 family inet address 172.16.1.1/24
user@B# commit
检查设备 B 的路由表。
user@B> show route protocol static
inet.0: 5 destinations, 5 routes (5 active, 0 holddown, 0 hidden)
+ = Active Route, - = Last Active, * = Both

192.168.47.0/24    *[Static/25] 02:06:24
                    > to 192.168.2.2 via fe-1/2/1.2
意义
备用路由已成为活动路由。
使用静态路由保护 IP 地址
托管提供商为多个客户托管多个服务器,并希望节省其 IP 地址空间的使用。传统上,当托管提供商客户端添加新服务器时,会为服务器分配一小块 IP 地址,例如 /29 块,并且客户端的服务器都位于该 IP 地址块中。
问题,图解
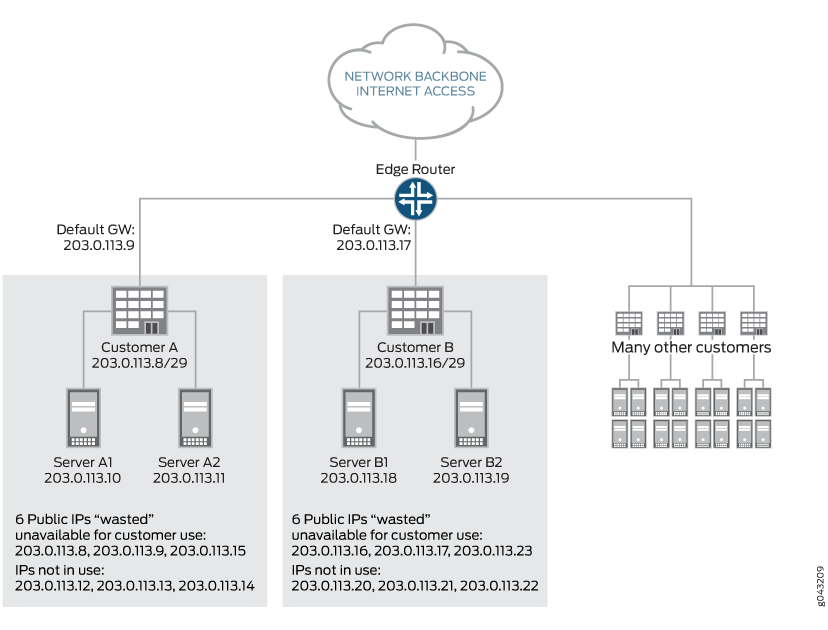
例如,客户 A 可能需要三台服务器,并被分配了块 10.3.3.0/29(10.3.3.0 到 10.3.3.7)。在此方案中,将使用多个 IP 地址。这些地址包括网络和广播 IP 地址(10.3.3.0 和 10.3.3.7)、服务器连接到的路由器网关地址以及各个服务器的地址。要分配三个服务器,必须分配八个 IP 地址。将单个 /24 网络分解为 32 /29 个网络将导致 256 个 IP 地址中有 96 个,其中 /24 被网络、广播和网关地址占用。当这种影响在成千上万的托管服务提供商中成倍增加时,IP 地址空间远未得到有效利用。 图 2 说明了这个问题。
 使用效率低下
在此配置中,为每个客户分配一个 /29 地址空间块。对于每个块,网络、广播和网关地址不可用于服务器 IP 寻址,这导致三个 IP 地址的使用效率低下。此外,这些区块会消耗未使用的 IP 地址以用于未来的扩展。
溶液
可以通过将路由器上的接口配置为共享地址空间保留 IPv4 前缀 (RFC 6598) 中的地址并使用指向接口的静态路由来解决此问题。IANA 记录了 IPv4 /10 的分配,用作共享地址空间。共享地址空间地址范围为 100.64.0.0/10。
路由器中的接口从 RFC 6598 空间分配 IP 地址,因此不会占用公共可路由地址空间,并且通过接口上的静态路由处理连接。服务器中的接口配置了可公开路由的地址,但路由器接口没有。网络和广播地址将从 RFC 6598 空间(而不是公共可路由地址空间)中消耗。
从 Junos OS 17.1R1 开始,QFX10000交换机支持此功能。
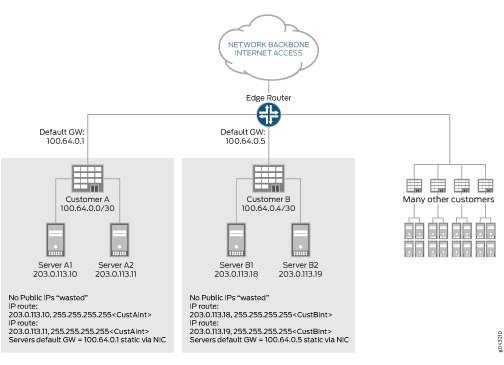
图 3 显示了 IP 地址空间的有效利用。
 的配置
的配置
在此配置中,每个客户都会为每个服务器分配单独的 IP 地址。有一个静态路由可以配置为主机路由。路由器中的接口从 RFC 6598 空间分配一个 IP 地址,因此不会占用可公开路由的地址空间,并且通过输出到接口的静态路由来处理连接。
配置
对于网关路由器上的客户 A,配置如下所示:
    interfaces {
        ge-1/0/1 {
            unit 0 {
                family inet {
                    address 100.64.0.1/30;
                }
            }
        }
    }
    routing-options {
        static {
            route 203.0.113.10/32 {
                qualified-next-hop ge-1/0/1.0;
            }
            route 203.0.113.11 {
                qualified-next-hop ge-1/0/1.0;
            }
        }
    }
使用此配置,不会浪费任何可公开路由 IP 地址。值得注意的是,当在此配置中将数据包从路由器转发到客户 A 的服务器 203.0.113.10 的服务器时,路由将被转发到接口 ge-1/0/1.0,其 IP 地址为 100.64.0.1。
客户 A 的服务器将按如下方式配置:
ifconfig eth0 203.0.113.10 netmask 255.255.255.255route add -host 100.64.0.1/32 dev eth0 route add default gw 100.64.0.1
ifconfig eth0 203.0.113.11 netmask 255.255.255.255route add -host 100.64.0.1/32 dev eth0 route add default gw 100.64.0.1
此示例显示每个服务器的单个主机路由,即 1:1 映射。如果维护这些情况,这可能相当于大量静态主机路由。出于扩展目的,我们需要在此环境中支持非主机路由。例如,如果此配置中的客户 C 有八台服务器,那么在路由器上分配一条 /29 路由来指明八台服务器所连接的接口会更有效。如果为客户 C 分配了从 203.0.114.8 到 203.0.114.15 的服务器 IP,并且这些 IP 通过接口 ge-1/0/2.0 进行连接,则如下所示:
user@host# set routing-options static route 203.0.114.8/29 qualified-next-hop ge-1/0/2.0
了解路由和转发表中的静态路由控制
您可以通过多种方式控制将静态路由导入到路由表和转发表。主要方法包括为路由分配以下一个或多个属性:
retain — 在路由进程关闭或设备重新启动后,将路由保留在转转发表中。
no-readvertise — 防止路由重新播发至其他路由协议。
passive — 拒绝发往路由的流量。
本主题包含以下部分:
路由保留
默认情况下,当路由进程关闭时,静态路由不会保留在转转发表中。当路由进程再次启动时,任何配置为静态路由的路由都必须再次转发表。为避免这种延迟,可以将路由标记为 保留,这样即使在路由进程关闭后,路由也会保留在转转发表中。保留可确保路由始终在转转发表中,即使在系统重新启动后也是如此。
防止重新播发
默认情况下,静态路由可由其他路由协议重新播发。在任何情况下,在存根区域中,您可能都不希望重新播发这些静态路由,您可以将静态路由标记为 不重新播发。
强制拒绝被动路由流量
通常,路由和转发表中仅包含活动路由。如果静态路由的下一跃点地址无法访问,则路由将被标记为 被动,并且它不包含在路由或转发表中。若要强制将路由包含在路由表中,不考虑下一跃点的可访问性,可以将路由标记为 被动路由。如果路由被标记为 被动 ,且其下一跃点地址无法访问,则该路由将包含在路由表中,并且发往该路由的所有流量都将被拒绝。
示例:防止重新播发静态路由
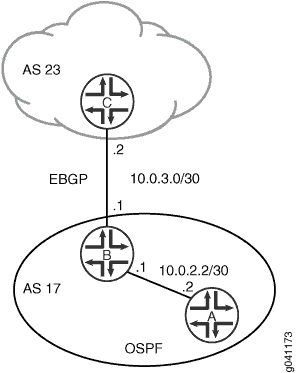
此示例说明如何防止将静态路由重新播发到 OSPF 中,从而防止路由出现在路由和转发表中。
要求
在此示例中,除了设备初始化之外,不需要任何特殊配置。
概述
此示例说明如何配置将静态路由重新播发到 OSPF 的路由策略,但因使用语句标记 no-readvertise 而未重新播发的静态路由除外。
配置
程序
CLI 快速配置
要快速配置此示例,请复制以下命令,将其粘贴到文本文件中,删除所有换行符,更改详细信息,以便与网络配置匹配,然后将命令复制并粘贴到层 [edit] 级的 CLI 中。
设备 A
set interfaces fe-1/2/0 unit 4 description A->B
set interfaces fe-1/2/0 unit 4 family inet address 10.0.2.2/30
set protocols ospf area 0.0.0.0 interface fe-1/2/0.4
设备 B
set interfaces fe-1/2/0 unit 3 description B->A
set interfaces fe-1/2/0 unit 3 family inet address 10.0.2.1/30
set interfaces fe-1/2/1 unit 6 description B->C
set interfaces fe-1/2/1 unit 6 family inet address 10.0.3.1/30
set protocols bgp group ext type external
set protocols bgp group ext peer-as 23
set protocols bgp group ext neighbor 10.0.3.2
set protocols ospf export send-static
set protocols ospf area 0.0.0.0 interface fe-1/2/0.3
set policy-options policy-statement send-static from protocol static
set policy-options policy-statement send-static then accept
set routing-options static route 0.0.0.0/0 next-hop 10.0.3.2
set routing-options static route 192.168.0.0/24 next-hop 10.0.3.2
set routing-options static route 192.168.0.0/24 no-readvertise
set routing-options autonomous-system 17
设备 C
set interfaces fe-1/2/0 unit 7 description B->C
set interfaces fe-1/2/0 unit 7 family inet address 10.0.3.2/30
set interfaces lo0 unit 5 family inet address 192.168.0.1/32
set protocols bgp group ext type external
set protocols bgp group ext peer-as 17
set protocols bgp group ext neighbor 10.0.3.1
set routing-options autonomous-system 23
分步过程
下面的示例要求您在各个配置层级中进行导航。有关操作说明,请参阅《Junos OS CLI 用户指南》中的在配置模式下使用 CLI 编辑器。
要配置设备 A,请执行以下操作:
配置设备 B 的接口。
[edit interfaces fe-1/2/0 unit 4]
user@A# set description A->B
user@A# set family inet address 10.0.2.2/30
配置 OSPF 以与设备 B 形成 OSPF 对等关系。
[edit protocols ospf area 0.0.0.0]
user@A# set interface fe-1/2/0.4
分步过程
要配置设备 B,请执行以下操作:
配置设备 A 和设备 C 的接口。
[edit interfaces]
user@B# set fe-1/2/0 unit 3 description B->A
user@B# set fe-1/2/0 unit 3 family inet address 10.0.2.1/30
user@B# set fe-1/2/1 unit 6 description B->C
user@B# set fe-1/2/1 unit 6 family inet address 10.0.3.1/30
配置一个或多个静态路由和自治系统 (AS) 编号。
[edit routing-options]
user@B# set static route 0.0.0.0/0 next-hop 10.0.3.2
user@B# set static route 192.168.0.0/24 next-hop 10.0.3.2
user@B# set autonomous-system 17
配置路由策略。
此策略将静态路由从路由表导出到 OSPF 中。
[edit policy-options policy-statement send-static]
user@B# set from protocol static
user@B# set then accept
包括
no-readvertise语句以防止将 192.168.0.0/24 路由导出到 OSPF。[edit routing-options] user@B# set static route 192.168.0.0/24 no-readvertise
配置路由协议。
BGP 配置与设备 C 形成外部 BGP (EBGP) 对等关系。
OSPF 配置与设备 A 形成 OSPF 对等关系并应用 发送静态 路由策略。
[edit protocols]
user@B# set bgp group ext type external
user@B# set bgp group ext peer-as 23
user@B# set bgp group ext neighbor 10.0.3.2
user@B# set ospf export send-static
user@B# set ospf area 0.0.0.0 interface fe-1/2/0.3
分步过程
要配置设备 C,请执行以下操作:
创建设备 B 的接口,并配置环路接口。
[edit interfaces ]
user@C# set fe-1/2/0 unit 7 description B->C
user@C# set fe-1/2/0 unit 7 family inet address 10.0.3.2/30
user@C# set lo0 unit 5 family inet address 192.168.0.1/32
配置与设备 B 的 EBGP 对等会话。
[edit protocols bgp group ext]
user@C# set type external
user@C# set peer-as 17
user@C# set neighbor 10.0.3.1
配置 AS 编号。
[edit routing-options]
user@C# set autonomous-system 23
结果
通过发出 show interfaces、 show policy-options、 show protocols和 show routing-options 命令来确认您的配置。如果输出未显示预期的配置,请重复此示例中的说明以更正配置。
设备 A
user@A# show interfaces
fe-1/2/0 {
    unit 4 {
        description A->B;
        family inet {
            address 10.0.2.2/30;
        }
    }
}
user@A# show protocols
ospf {
    area 0.0.0.0 {
        interface fe-1/2/0.4;
    }
}
设备 B
user@B# show interfaces
interfaces {
    fe-1/2/0 {
        unit 3 {
            description B->A;
            family inet {
                address 10.0.2.1/30;
            }
        }
    }
    fe-1/2/1 {
        unit 6 {
            description B->C;
            family inet {
                address 10.0.3.1/30;
            }
        }
    }
}
user@B# show policy-options
policy-statement send-static {
    from protocol static;
    then accept;
}
user@B# show protocols
bgp {
    group ext {
        type external;
        peer-as 23;
        neighbor 10.0.3.2;
    }
}
ospf {
    export send-static;
    area 0.0.0.0 {
        interface fe-1/2/0.3;
    }
}
user@B# show routing-options
static {
    route 0.0.0.0/0 next-hop 10.0.3.2;
    route 192.168.0.0/24 {
        next-hop 10.0.3.2;
        no-readvertise;
    }
}
autonomous-system 17;
设备 C
user@C# show interfaces
fe-1/2/0 {
    unit 7 {
        description B->C;
        family inet {
            address 10.0.3.2/30;
        }
    }
}
lo0 {
    unit 5 {
        family inet {
            address 192.168.0.1/32;
        }
    }
}
user@C# show protocols
bgp {
    group ext {
        type external;
        peer-as 17;
        neighbor 10.0.3.1;
    }
}
user@C# show routing-options
autonomous-system 23;
如果完成设备配置,请从配置模式进入 提交 。
验证
确认配置工作正常。
检查路由表
目的
确保语 no-readvertise 句有效。
行动
在设备 A 上,运行
show route protocol ospf命令以确保 192.168.0.0/24 路由不会出现在设备 A 的路由表中。user@A> show route protocols ospf inet.0: 4 destinations, 4 routes (4 active, 0 holddown, 0 hidden) + = Active Route, - = Last Active, * = Both 0.0.0.0/0 *[OSPF/150] 00:03:15, metric 0, tag 0 > to 10.0.2.1 via fe-1/2/0.4 224.0.0.5/32 *[OSPF/10] 00:04:07, metric 1 MultiRecv在设备 B 上,停用语
no-readvertise句。user@B# deactivate routing-options static route 192.168.0.0/24 no-readvertise
在设备 A 上,重新运行
show route protocol ospf命令以确保 192.168.0.0/24 路由显示在设备 A 的路由表中。user@A> show route protocols ospf inet.0: 5 destinations, 5 routes (5 active, 0 holddown, 0 hidden) + = Active Route, - = Last Active, * = Both 0.0.0.0/0 *[OSPF/150] 00:04:24, metric 0, tag 0 > to 10.0.2.1 via fe-1/2/0.4 192.168.0.0/24 *[OSPF/150] 00:00:15, metric 0, tag 0 > to 10.0.2.1 via fe-1/2/0.4 224.0.0.5/32 *[OSPF/10] 00:05:16, metric 1 MultiRecv
意义
语 no-readvertise 句按预期工作。
验证静态路由配置
目的
验证静态路由是否在路由表中,以及这些路由是否处于活动状态。
行动
从 CLI 中输入 show route terse 命令。
示例输出
命令-名称
user@host> show route terse
inet.0: 20 destinations, 20 routes (20 active, 0 holddown, 0 hidden)
+ = Active Route, - = Last Active, * = Both
A Destination        P Prf   Metric 1   Metric 2  Next hop        AS path
* 192.168.47.5/32        S   5                        Reject
* 172.16.0.0/12      S   5                       >192.168.71.254
* 192.168.0.0/18     S   5                       >192.168.71.254
* 192.168.40.0/22    S   5                       >192.168.71.254
* 192.168.64.0/18    S   5                       >192.168.71.254
* 192.168.64.0/21    D   0                       >fxp0.0
* 192.168.71.246/32  L   0                        Local
* 192.168.220.4/30   D   0                       >ge-0/0/1.0
* 192.168.220.5/32   L   0                        Local
* 192.168.220.8/30   D   0                       >ge-0/0/2.0
* 192.168.220.9/32   L   0                        Local
* 192.168.220.12/30  D   0                       >ge-0/0/3.0
* 192.168.220.13/32  L   0                        Local
* 192.168.220.17/32  L   0                        Reject
* 192.168.220.21/32  L   0                        Reject
* 192.168.220.24/30  D   0                       >at-1/0/0.0
* 192.168.220.25/32  L   0                        Local
* 192.168.220.28/30  D   0                       >at-1/0/1.0
* 192.168.220.29/32  L   0                        Local
* 224.0.0.9/32       R 100          1             MultiRecv
意义
输出显示当前在 inet.0 路由表中的路由列表。验证以下信息:
每个配置的静态路由都存在。路由按 IP 地址升序排列。静态路由在输出的协议 (P) 列中用 S 标识。
每个静态路由都处于活动状态。处于活动状态的路由会在“ 下一跃点 ”列中显示下一跃点 IP 地址。如果路由的下一跃点地址无法访问,则下一跃点地址将被标识为 拒绝。这些路由不是活动路由,但由于设置了 被动 属性,因此会显示在路由表中。
每个静态路由的优先级都是正确的。对特定路由的优先级列在输出的 Prf 列中。
另见
变更历史表
是否支持某项功能取决于您使用的平台和版本。使用 功能浏览器 查看您使用的平台是否支持某项功能。

