- play_arrow Site Planning and Specifications
- play_arrow Site Preparation
- play_arrow Rack Requirements
- play_arrow Power Requirements
- play_arrow Compliance
-
- play_arrow Safety and Regulatory Compliance Information
- play_arrow General Safety Information
- play_arrow Radiation and Laser Warnings
- play_arrow Installation and Maintenance Safety Information
- play_arrow Power and Electrical Safety Information
- General Electrical Safety Guidelines and Warnings
- Preventing Electrostatic Discharge Damage
- AC Power Electrical Safety Guidelines
- AC Power Disconnection Warning
- DC Power Electrical Safety Guidelines
- DC Power Disconnection Warning
- DC Power Grounding Requirements and Warning
- DC Power Wiring Sequence Warning
- DC Power Wiring Terminations Warning
- Multiple Power Supplies Disconnection Warning
- TN Power Warning
- Action to Take After an Electrical Accident
-
- play_arrow Installation and Configuration
- play_arrow Installing the Appliance
- Tools and Parts Required to Install the Junos Space Appliance
- Unpacking the JA2500 Junos Space Appliance
- Mounting the JA2500 Junos Space Appliance
- Front-and-Rear Mounting the JA2500 Junos Space Appliance Flush to a Rack
- Front-and-Rear Mounting the JA2500 Junos Space Appliance Recessed in a Rack
- Midmounting the Junos Space Appliance in a Two-Post Rack
- play_arrow Connecting the Appliance
- play_arrow Performing Initial Configuration
- Booting the Junos Space Appliance
- Configuring a Junos Space Appliance as a Junos Space Node
- Configuring a Junos Space Appliance as a Standalone or Primary FMPM Node
- Configuring a Junos Space Appliance as a Backup or Secondary FMPM Node for High Availability
- Installing a Junos Space Image on a Junos Space Appliance by Using a USB Drive
- Powering Off the Junos Space Appliance
- play_arrow Changing Network and System Settings
-
- play_arrow Maintenance and Replacing Components
- play_arrow Replacing Components
- Installing and Removing JA2500 Junos Space Appliance Hardware Components
- Replacing the AC Power Supply Cord on a Junos Space Appliance
- Replacing the AC Power Supply Module on a Junos Space Appliance
- Replacing the DC Power Supply Cable on a Junos Space Appliance
- Replacing the DC Power Supply Module on a Junos Space Appliance
- Replacing the Fan on a Junos Space Appliance
- Replacing the Hard Disk on a JA2500 Junos Space Appliance
- play_arrow Maintenance
-
- play_arrow Troubleshooting
- play_arrow Troubleshooting Procedures
- play_arrow Monitoring the Appliance
- play_arrow Returning Hardware
- Returning a JA2500 Junos Space Appliance or Component for Repair or Replacement
- Locating the Serial Number on a JA2500 Junos Space Appliance or Component
- Contacting Customer Support to Obtain Return Materials Authorization for Junos Space Appliances
- Packing a JA2500 Junos Space Appliance or Component for Shipping
-
Front Panel of a JA2500 Appliance
The front panel of the JA2500 Junos Space Appliance, shown in Figure 1, consists of the components listed in Table 1.

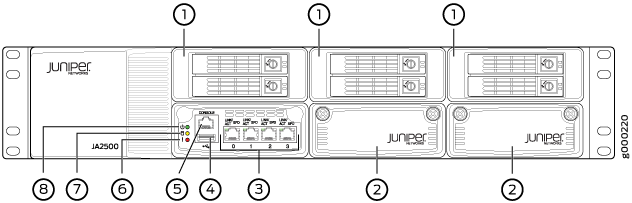
1 — Hard drive | 5 — Console port |
2 — IOC expansion slot | 6 — Hardware Fault LED |
3 — Network (Ethernet) ports | 7 — Hard Disk Activity LED |
4 — USB port | 8 — Power LED |
Component | Description |
---|---|
Hard drives | The JA2500 appliance has six hot-swappable 1-TB hard disk drives in a RAID 10 configuration. The hard drives are numbered (0 through 5) as follows:
|
I/O card (IOC) expansion slots | IOC expansion is currently not supported. |
Network ports | Four RJ-45 Ethernet 10/100/1000 ports, labeled 0 through 3 from left to right |
USB port | One USB port |
Console port | One RJ-45 console port |
Chassis LEDs | The following chassis LEDs, located next to the console port, are present on the appliance:
|
Ethernet (LAN) port LEDs | The following LEDs are present above each Ethernet port:
|
Hard drive LEDs | In addition to the LEDs on the appliance chassis, there are two LEDs on each hard disk:
|