ON THIS PAGE
Replacing the Hard Disk on a JA2500 Junos Space Appliance
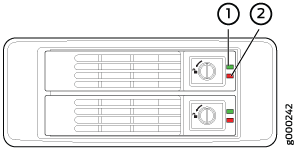
The Junos Space JA2500 appliance ships with six hard disk drives in RAID 10 array configuration. The hot-swappable drives are externally accessible in field-replaceable trays. You can remove and replace a hard disk without powering off the appliance or disrupting any functions performed by the appliance. If a hard drive fails, the Hard Disk Fault LED on the hard disk turns on and an alarm sounds.

1 — Hard Disk Activity LED | 2 — Hard Disk Fault LED |
Ensure that you have the following parts and tools available to remove the hard disk from the appliance chassis:
(Optional) Electrostatic discharge (ESD) grounding strap
Flat screwdriver
An antistatic bag or an antistatic mat
Removing the Hard Disk
To remove a hard disk from the JA2500 appliance, do the following:
- Place the antistatic bag or antistatic mat on a flat, stable surface.
- (Optional) Attach an ESD grounding strap to your bare wrist, and connect the strap to an external ESD point.
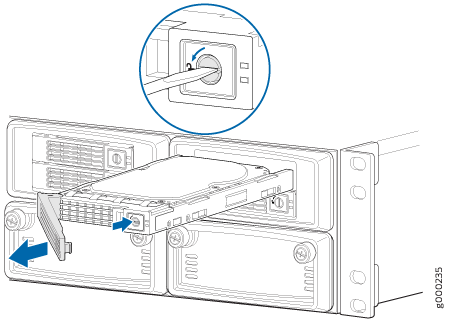
- Turn the hard disk locking screw counterclockwise to the unlock position, as shown in Figure 2, to unlock the hard disk lever.
- Push the screw knob (button) in so that the hard disk lever is released.
- Gently pull the hard disk lever outwards, and slide the hard disk out of the slot. Keep one hand underneath the hard disk to support it while removing it from the chassis.
- Place the hard drive in the antistatic bag or on the antistatic mat placed on a flat, stable surface.

Installing the Hard Disk
To install a hard disk in the JA2500 appliance, do the following:
- (Optional) Attach an ESD grounding strap to your bare wrist, and connect the strap to an external ESD point.
- Remove the replacement hard disk from its antistatic bag.
- Slide the hard disk into the hard disk slot.
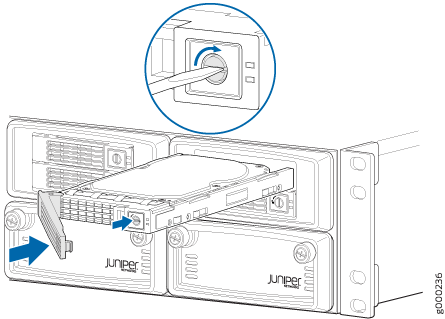
- Push the hard disk lever, as shown in Figure 3, until it closes with a click to ensure that the hard disk is secured firmly in the slot.
- Using a flat screwdriver, turn the screw clockwise to the locked position so that the notch in the screw is oriented vertically.

When you install a replacement hard disk, the alarm shuts off when the new drive is sensed and the red Hard Disk Fault LED on the new hard drive starts blinking, which indicates that the drive is being rebuilt. When the drive is rebuilt, the red LED goes out.
