Step 5: Connect Power to the ACX Series Router
Depending on your configuration, your router uses either AC or DC power supplies. Perform the appropriate procedures for each power supply in your router.
You must ground the router before connecting the power cables.
Connect AC Power to an AC-Powered ACX2100 Series Router
To connect power to the AC-powered router, you need the following tools:
AC power cords
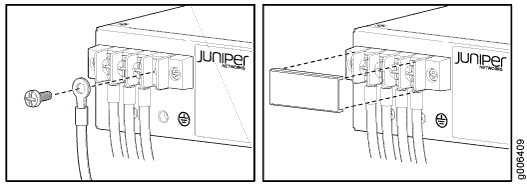
Connect DC Power to a DC-Powered ACX2000 or ACX2100 Router
To connect power to the DC-powered router, you need the following tools:
Phillips (+) screwdriver, number 2
ESD grounding wrist strap
M3 screws and flat washers
DC power source cables, minimum 14 AWG or as required by local code (not provided)
Ring lugs, Molex 190700067 or equivalent (not provided)
The DC power supply has four terminals on the front panel, covered by a clear plastic cover.
Nominal Voltage |
Specification |
|---|---|
+24 |
Operating range: +18 to +30 VDC |
–48 |
Operating range: –39 to –56 VDC |
–60 |
Operating range: –39 to –72 VDC |

