Help us improve your experience.

Let us know what you think.

Do you have time for a two-minute survey?


Connecting the SRX5800 to External Devices

Tools and Parts Required for SRX5800 Firewall Connections

To connect the device to management devices and IOCs, you need the following tools and parts:

  • Phillips (+) screwdrivers, numbers 1 and 2

  • 2.5-mm flat-blade (-) screwdriver

  • 2.5 mm Phillips (+) screwdriver

  • Electrostatic discharge (ESD) grounding wrist strap

Connecting the SRX5800 Firewall to a Management Console or an Auxiliary Device

To use a system console to configure and manage the Routing Engine, connect it to the appropriate CONSOLE port on the Routing Engine. To use a laptop, modem, or other auxiliary device, connect it to the AUX port on the Routing Engine. Both ports accept a cable with an RJ-45 connector. To connect a device to the CONSOLE port and another device to the AUX port, you must supply two separate cables.

Note:

We no longer include the console cable as part of the device package. If the console cable and adapter are not included in your device package, or if you need a different type of adapter, you can order the following separately:

  • RJ-45 to DB-9 adapter (JNP-CBL-RJ45-DB9)

  • RJ-45 to USB-A adapter (JNP-CBL-RJ45-USBA)

  • RJ-45 to USB-C adapter (JNP-CBL-RJ45-USBC)

If you want to use RJ-45 to USB-A or RJ-45 to USB-C adapter you must have X64 (64-Bit) Virtual COM port (VCP) driver installed on your PC. See https://ftdichip.com/drivers/vcp-drivers/ to download the driver.

To connect a management console or auxiliary device:

  1. Plug the RJ-45 end of the serial cable (Figure 1 shows the connector) into the AUX port or CONSOLE port on the Routing Engine. Figure 2 shows the ports.
    Figure 1: Routing Engine Console and Auxiliary Cable ConnectorRouting Engine Console and Auxiliary Cable Connector
    Figure 2: Auxiliary and Console PortsAuxiliary and Console Ports
  2. Plug the socket DB-9 end into the device's serial port.
    Note:

    For console devices, configure the serial port to the following values:

    • Baud rate—9600

    • Parity—N

    • Data bits—8

    • Stop bits—1

    • Flow control—none

Connecting the SRX5800 Firewall to a Network for Out-of-Band Management

To connect the Firewall Routing Engine to a network for out-of-band management, connect an Ethernet cable with RJ-45 connectors to the ETHERNET port on the Routing Engine. To connect to the ETHERNET port on the Routing Engine:

  1. Plug one end of the Ethernet cable (Figure 3 shows the connector) into the ETHERNET port on the Routing Engine. Figure 4 shows the port.
  2. Plug the other end of the cable into the network device.
Figure 3: Routing Engine Ethernet Cable ConnectorRouting Engine Ethernet Cable Connector
Figure 4: Ethernet PortEthernet Port

Connecting an SRX5800 Firewall to an External Alarm-Reporting Device

To connect the firewall to external alarm-reporting devices, attach wires to the RED and YELLOW relay contacts on the craft interface. (See Figure 5.) A system condition that triggers the red or yellow alarm LED on the craft interface also activates the corresponding alarm relay contact.

Figure 5: Alarm Relay ContactsAlarm Relay Contacts

The terminal blocks that plug into the alarm relay contacts are supplied with the firewall. They accept wire of any gauge between 28-AWG and 14-AWG (0.08 and 2.08 mm2), which is not provided. Use the gauge of wire appropriate for the external device you are connecting.

To connect an external device to an alarm relay contact (see Figure 5):

  1. Prepare the required length of wire with gauge between 28-AWG and 14-AWG (0.08 and 2.08 mm2).
  2. While the terminal block is not plugged into the relay contact, use a 2.5-mm flat-blade screwdriver to loosen the small screws on its top. With the small screws on its top facing upward, insert wires into the slots in the front of the block based on the wiring for the external device. Tighten each screw to secure the corresponding wire.
  3. Plug the terminal block into the relay contact, and use a 2.5-mm flat-blade screwdriver to tighten the screws on the face of the block. See Figure 6.
    Figure 6: Connecting an External Alarm-Reporting DeviceConnecting an External Alarm-Reporting Device
  4. Attach the other end of the wires to the external device.

To attach a reporting device for the other kind of alarm, repeat the procedure.

Connecting Network Cables to SRX5800 Firewall IOCs and Port Modules

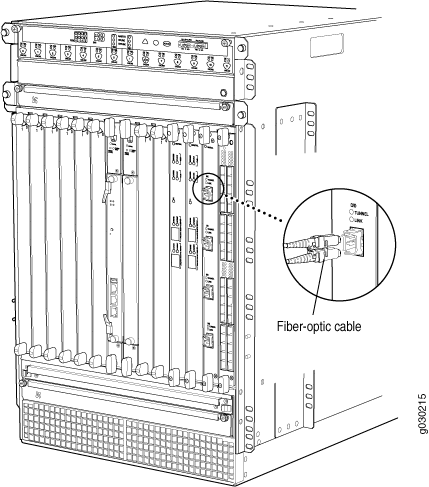
To connect the IOCs, MPCs, and port modules to the network (see Figure 7):
  1. Have ready a length of the type of cable used by the component.
  2. Remove the rubber safety plug from the cable connector port.
    Laser Warning:

    Do not look directly into a fiber-optic transceiver or into the ends of fiber-optic cables. Fiber-optic transceivers and fiber-optic cables connected to a transceiver emit laser light that can damage your eyes.

    CAUTION:

    Do not leave a fiber-optic transceiver uncovered, except when inserting or removing a cable. The safety cap keeps the port clean and protects your eyes from accidental exposure to laser light.

  3. Insert the cable connector into the cable connector port on the faceplate.
    Note:

    The XFP cages and optics on the components are industry standard parts that have limited tactile feedback for insertion of optics and fiber. You need to insert the optics and fiber firmly until the latch is securely in place.

  4. Arrange the cable in the standard or extended cable manager to prevent it from dislodging or developing stress points. Secure the cable so that it is not supporting its own weight as it hangs to the floor. Place excess cable out of the way in a neatly coiled loop. Placing fasteners on the loop helps to maintain its shape.
    CAUTION:

    Do not bend a fiber-optic cable beyond its minimum bend radius. An arc smaller than a few inches in diameter can damage the cable and cause problems that are difficult to diagnose.

    CAUTION:

    Do not let fiber-optic cables hang free from the connector. Do not allow the fastened loops of a cable to dangle, which stresses the cable at the fastening point.

Figure 7: Attaching a Cable to an IOCAttaching a Cable to an IOC