Help us improve your experience.

Let us know what you think.

Do you have time for a two-minute survey?


SSR1300 Power Supply Maintenance

SUMMARY Maintaining an SSR1300 appliance includes replacing power supplies. Replacing includes removing a failed power supply and installing a functional power supply.

Replacing an AC Power Supply on the SSR1300

The two AC power supplies (part number: JNP-650W-AC-SSRHE) are hot-removable and hot-insertable field-replaceable units (FRUs) installed in the rear panel of the SSR1300 appliance. You can remove and replace them without powering off the SSR1300 or disrupting the SSR1300 functions.

Ensure that you have the following parts and tools available:

  • ESD grounding strap

  • Antistatic bag or an antistatic mat

  • Replacement AC power supply

Removing the AC Power Supply from an SSR1300

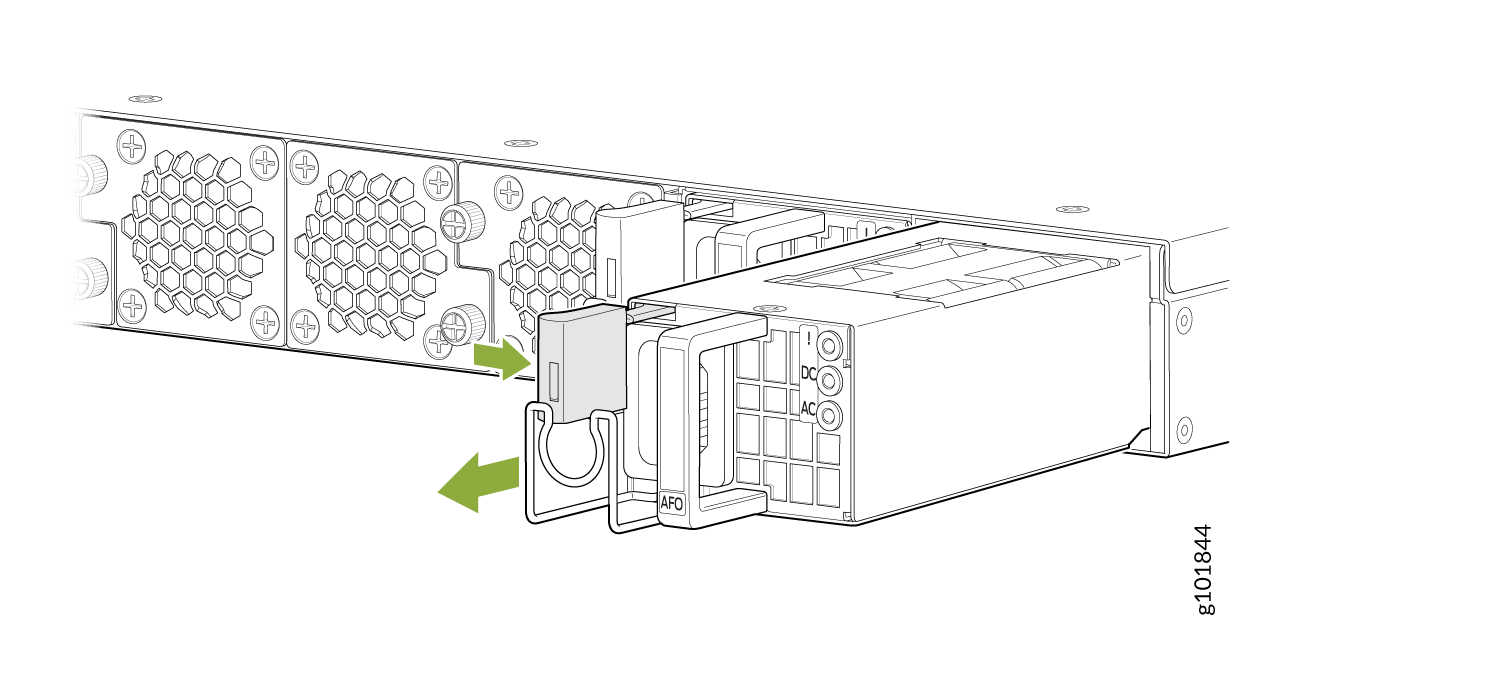
To remove a power supply from the appliance (see Figure 1):

  1. If the AC power source outlet has a power switch, set it to the off (0) position and pull out the power cord connected to the power source outlet.
  2. Place the antistatic bag or the antistatic mat on a flat, stable surface.
  3. Attach an electrostatic discharge (ESD) grounding strap to your bare wrist and connect the strap to the ESD point on the chassis.
  4. Pull the power cord retainer down and remove the power cord from the power supply faceplate.
  5. Slide the ejector lever towards the right (see Figure 1) until the power supply is unseated.
  6. Grasp the power supply handle and pull firmly to slide the power supply halfway out of the chassis.
  7. Place one hand under the power supply to support it and slide it completely out of the chassis. Take care not to touch power supply components, pins, leads, or solder connections.
    Figure 1: Remove an SSR1300 AC Power Supply Remove an SSR1300 AC Power Supply
  8. Place the power supply in the antistatic bag or on the antistatic mat placed on a flat, stable surface.

Installing the AC Power Supply in an SSR1300

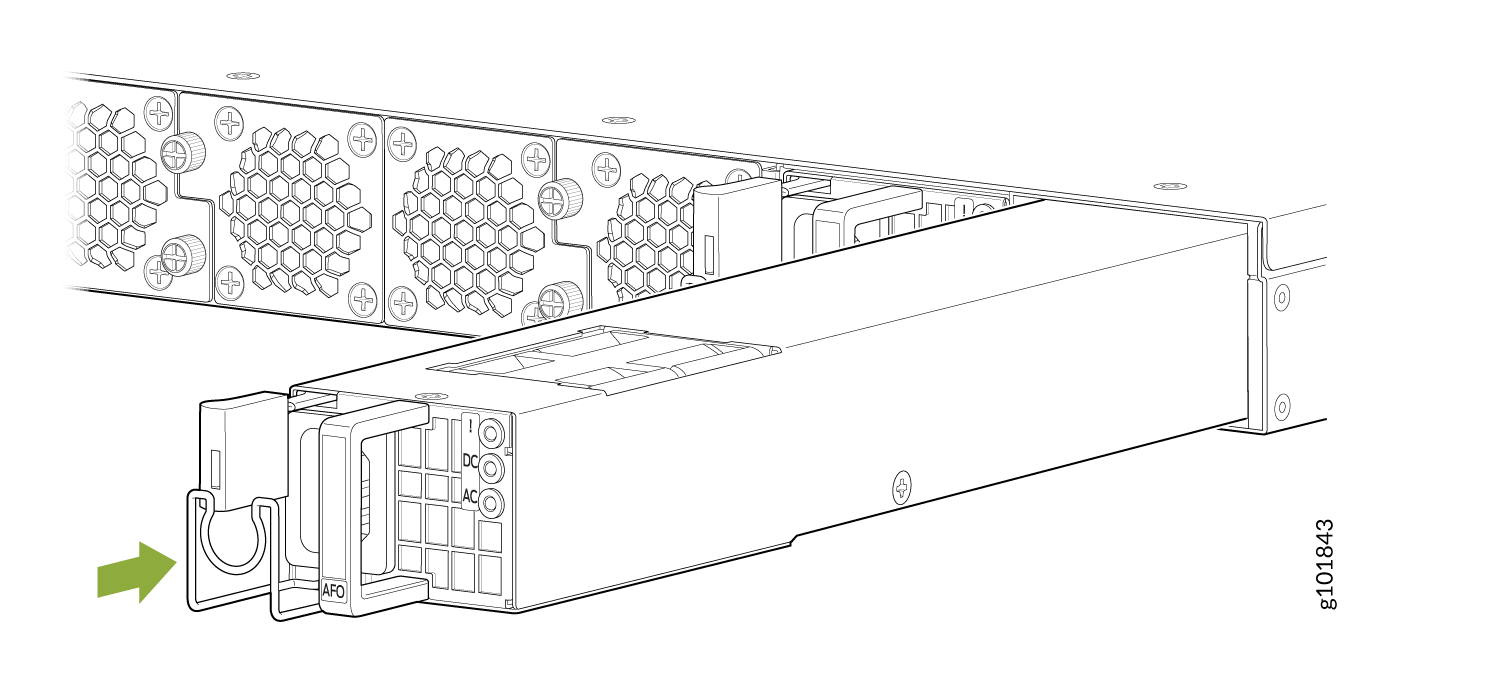
To install an AC power supply (see Figure 2):

  1. Attach the ESD grounding strap to your bare wrist, and connect the strap to the ESD point on the chassis.
  2. If the power supply slot has a cover panel on it, remove the cover panel. Save the cover panel for later use.
  3. Taking care not to touch power supply pins, leads, or solder connections, remove the power supply from the bag.
  4. Using both hands, place the power supply in the power supply slot on the rear panel of SSR1300 and slide it in until it is fully seated and the ejector lever fits into place. You will hear a distinct click when the power supply is fully seated in the chassis.
    Figure 2: Install an SSR1300 AC Power Supply Install an SSR1300 AC Power Supply
  5. Connect the power cord (see Connect the SSR1300 to Power).

Replacing a DC Power Supply on the SSR1300-DC

The two DC power supplies (part number: JPSU-650W-DC-F-AFO) are field-replaceable units (FRUs) installed in the rear panel of the SSR1300-DC appliance. However, due to the DC power requirements the entire unit must be taken off line and powered down.

CAUTION:

Do not attempt to install a DC power supply into an SSR1300 that originally contained an AC power supply. This may result in damage to the SSR1300, and the appliance may not function.

Note:

In most cases, electrical code requires that DC connection be performed by a licensed professional. Please consult your local electrical codes before replacing a DC power supply.

Ensure that you have the following parts and tools available:

  • ESD grounding strap

  • Antistatic bag or an antistatic mat

  • Replacement DC power supply

  • #2 Phillips Screwdriver

There are three tasks to replace the DC power supply:

  • Disconnect Power

  • Remove the existing DC power supply

  • Install the new DC power supply

Removing a DC Power Supply from the SSR1300-DC

Up to two power supplies can be located at the rear of the chassis on the right side. Each DC power supply weighs approximately 2.20 lbs (1 kg).

CAUTION:

Do not leave a power supply slot empty for more than 30 minutes while the SSR is operational. For proper airflow, the power supply must remain in the chassis, or a blank panel must be used in the empty slot.

Note:

After powering off a power supply, wait at least 60 seconds before turning it back on.

Wire the DC power supply using the appropriate lugs. When disconnecting power, the proper wiring sequence is:

  1. Negative (–) DC source power cable lug to a -48V (input) terminal

  2. Positive (+) DC source power cable lug to a (+) RTN (return) terminal.

  3. Ground to Ground

Note that the ground wire should always be connected first and disconnected last.

To remove a DC power supply:
  1. Locate the circuit breaker on the electrical panel that services the DC circuit and switch the circuit breaker to the OFF position (O).
  2. Tape the switch handle of the circuit breaker in the OFF position.
  3. Ensure that the voltage across the DC power source cable leads is 0 V and that there is no chance that the cable leads might become active during removal.
  4. Attach an ESD grounding strap to your bare wrist and connect the strap to one of the ESD points on the chassis.
  5. Remove the clear plastic cover protecting the terminal studs on the faceplate.
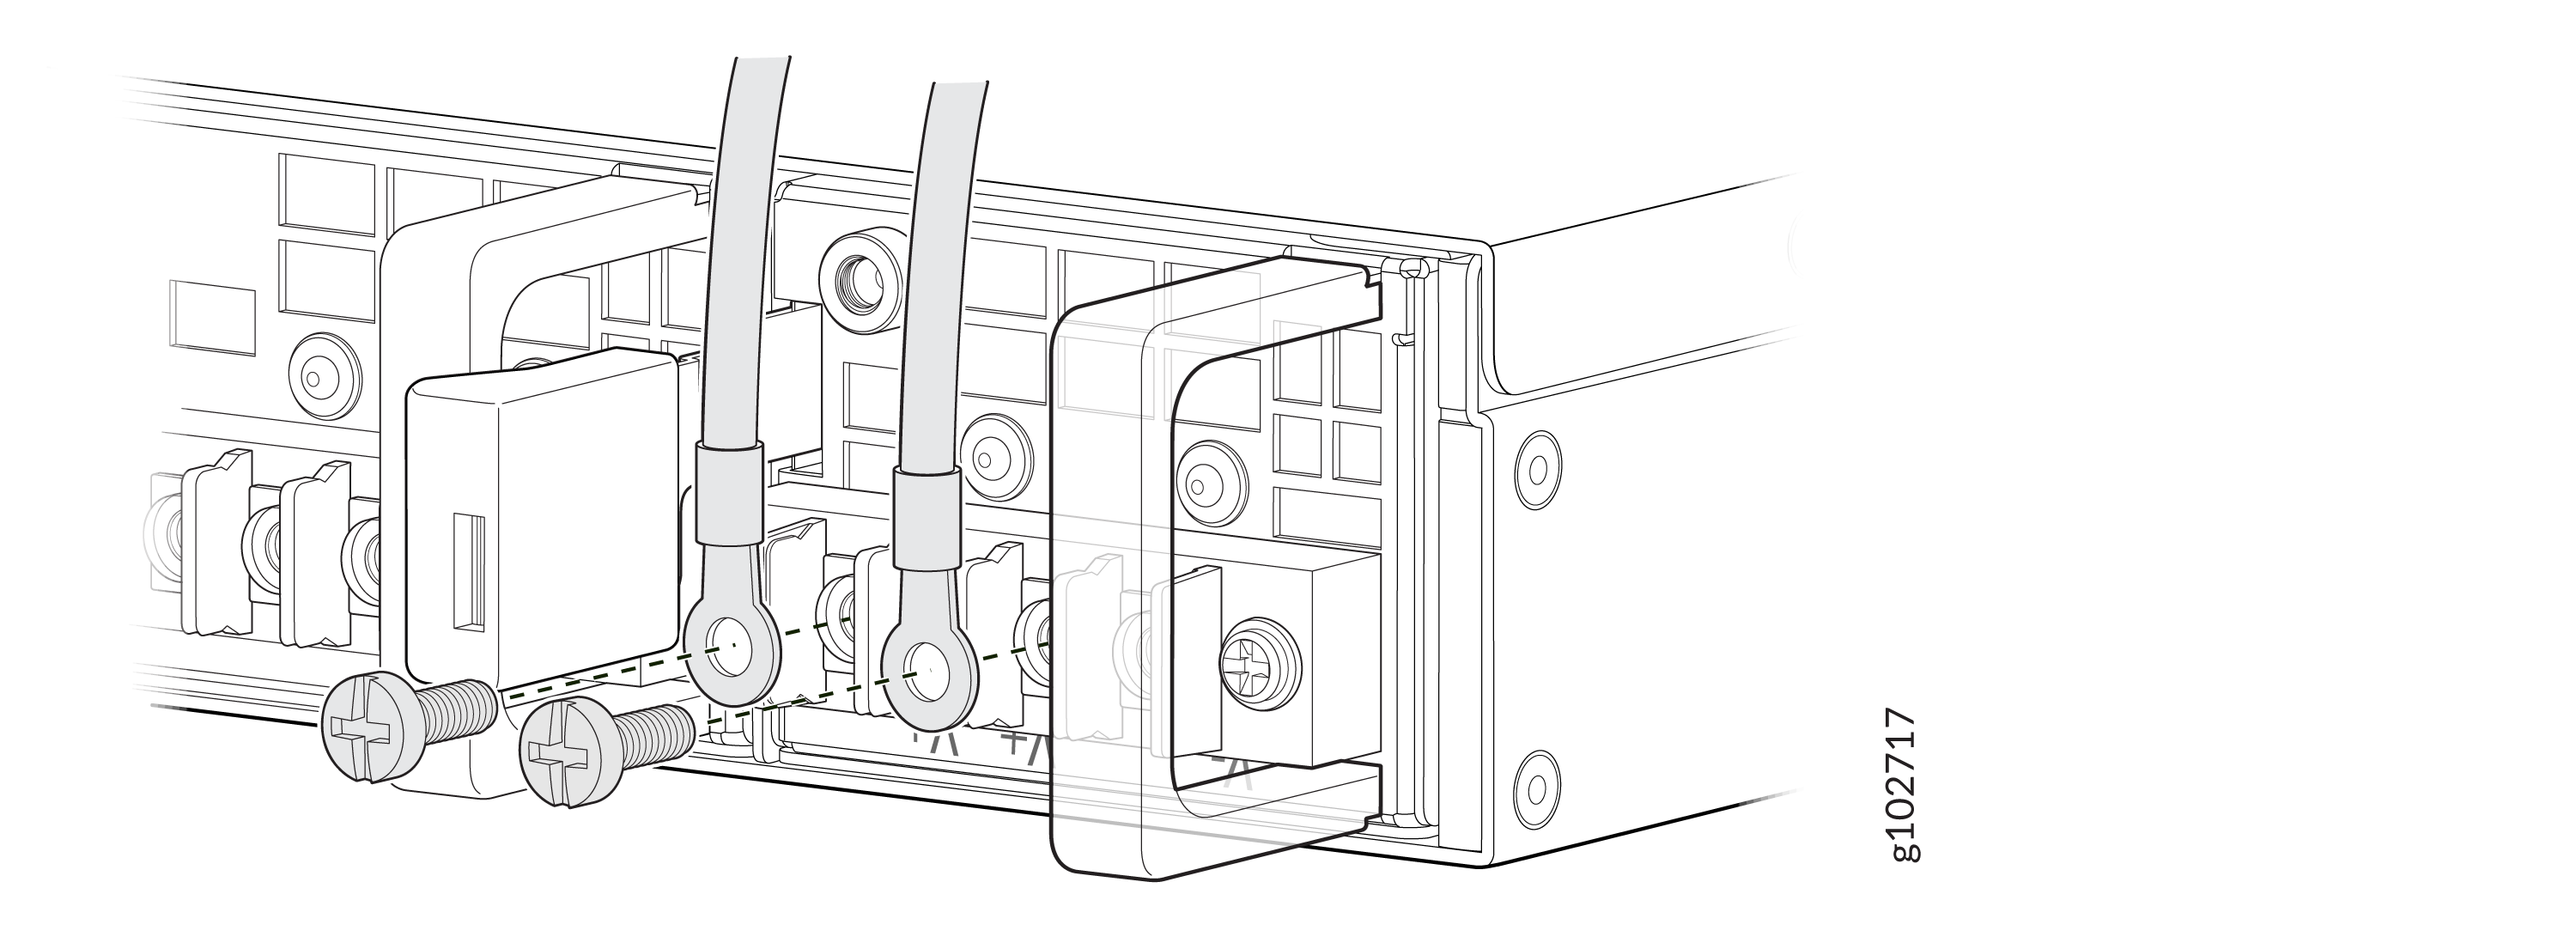
  6. Remove the screws and washers from the terminals using a number 2 Phillips screwdriver.
    Figure 3: Remove Terminal Screws
  7. Remove the cable lugs from the terminal studs.
  8. Carefully move the power cables out of the way.
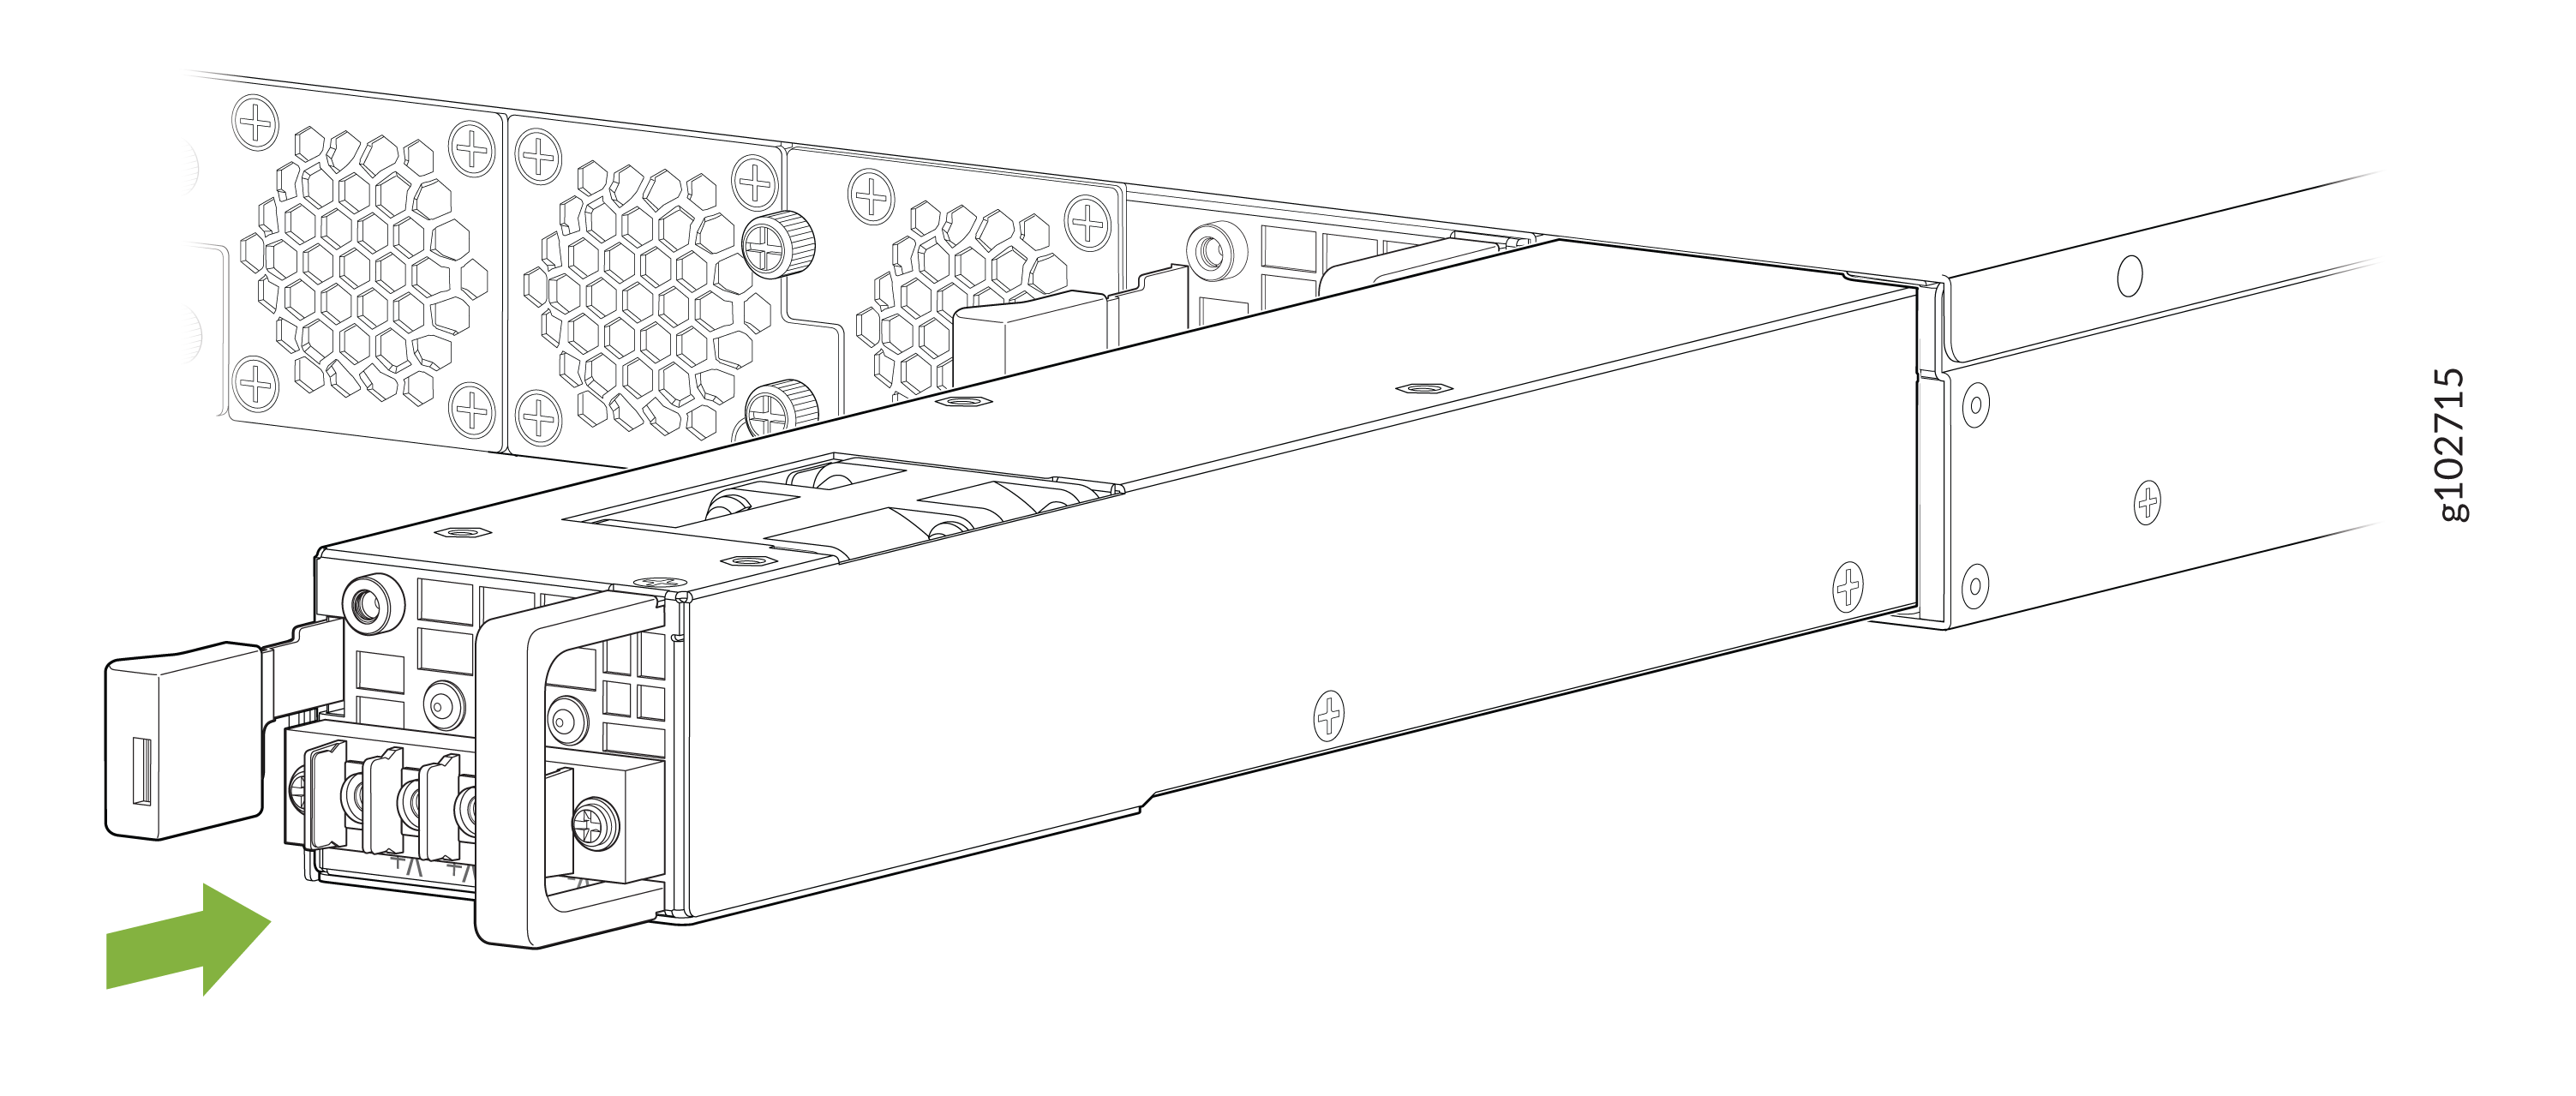
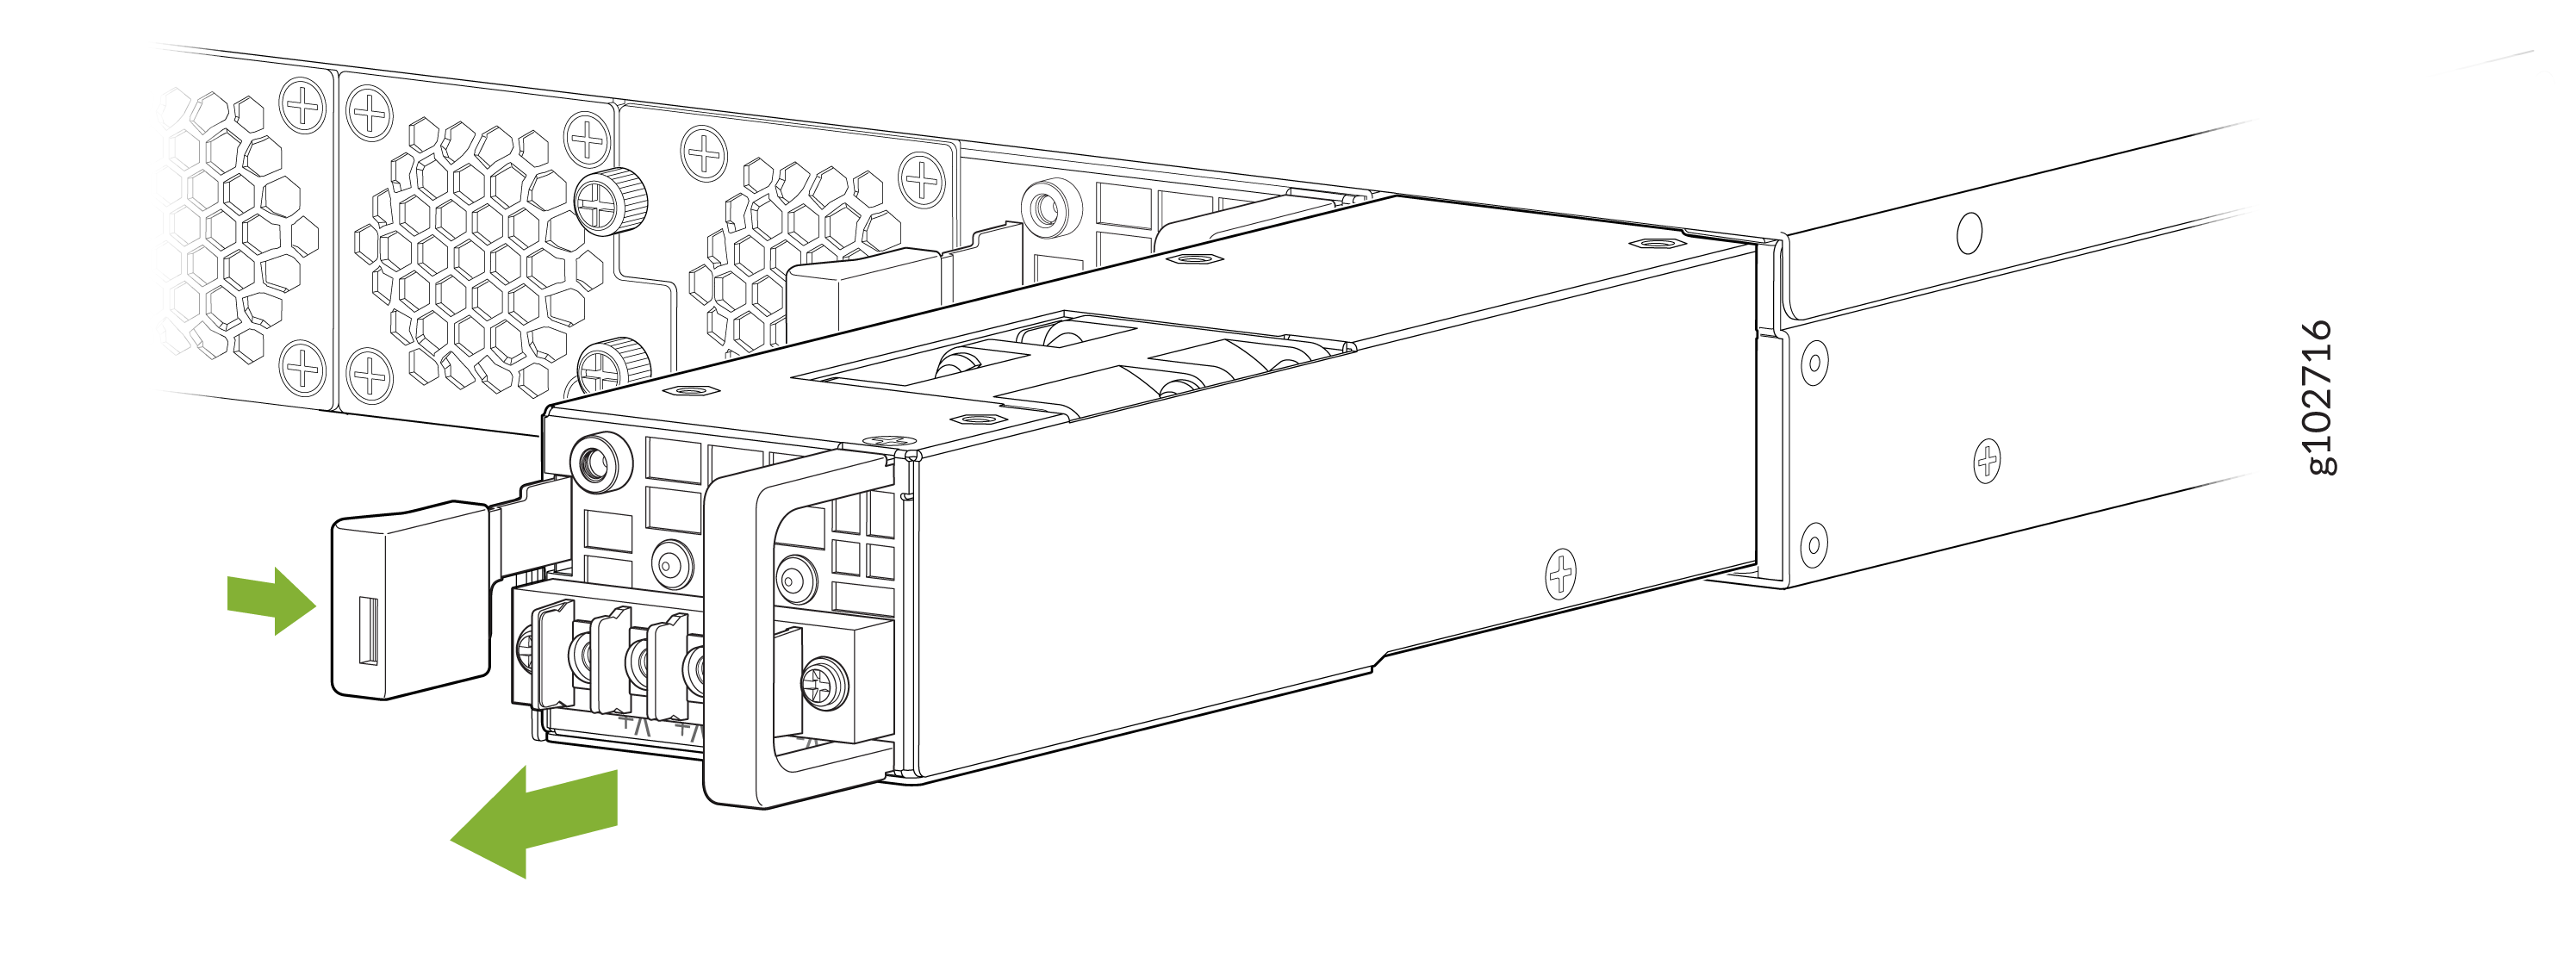
  9. Push the Tab latch on the left edge of the power supply to the right.
  10. Pull the power supply straight out of the chassis.
Figure 4: Removing a DC Power Supply Removing a DC Power Supply

Installing a DC Power Supply in the SSR1300-DC

Wire the DC power supply using the appropriate lugs. When connecting power, the proper wiring sequence is:

  1. Ground to Ground

  2. Positive (+) DC source power cable lug to a (+) RTN (return) terminal.

  3. Negative (–) DC source power cable lug to a -48V (input) terminal

Note that the ground wire should always be connected first and disconnected last.

Use the following steps to install a DC power supply:

CAUTION:

When installing a DC power supply in either an SSR1300-DC or an SSR1400-DC, the label indicating proper install orientation MUST be facing up, the orange handle must be on the RIGHT, and the locking lever must be on the LEFT as shown in the diagram below. If it is not installed in this orientation, it will not make proper electrical connection and could electrify the chassis.
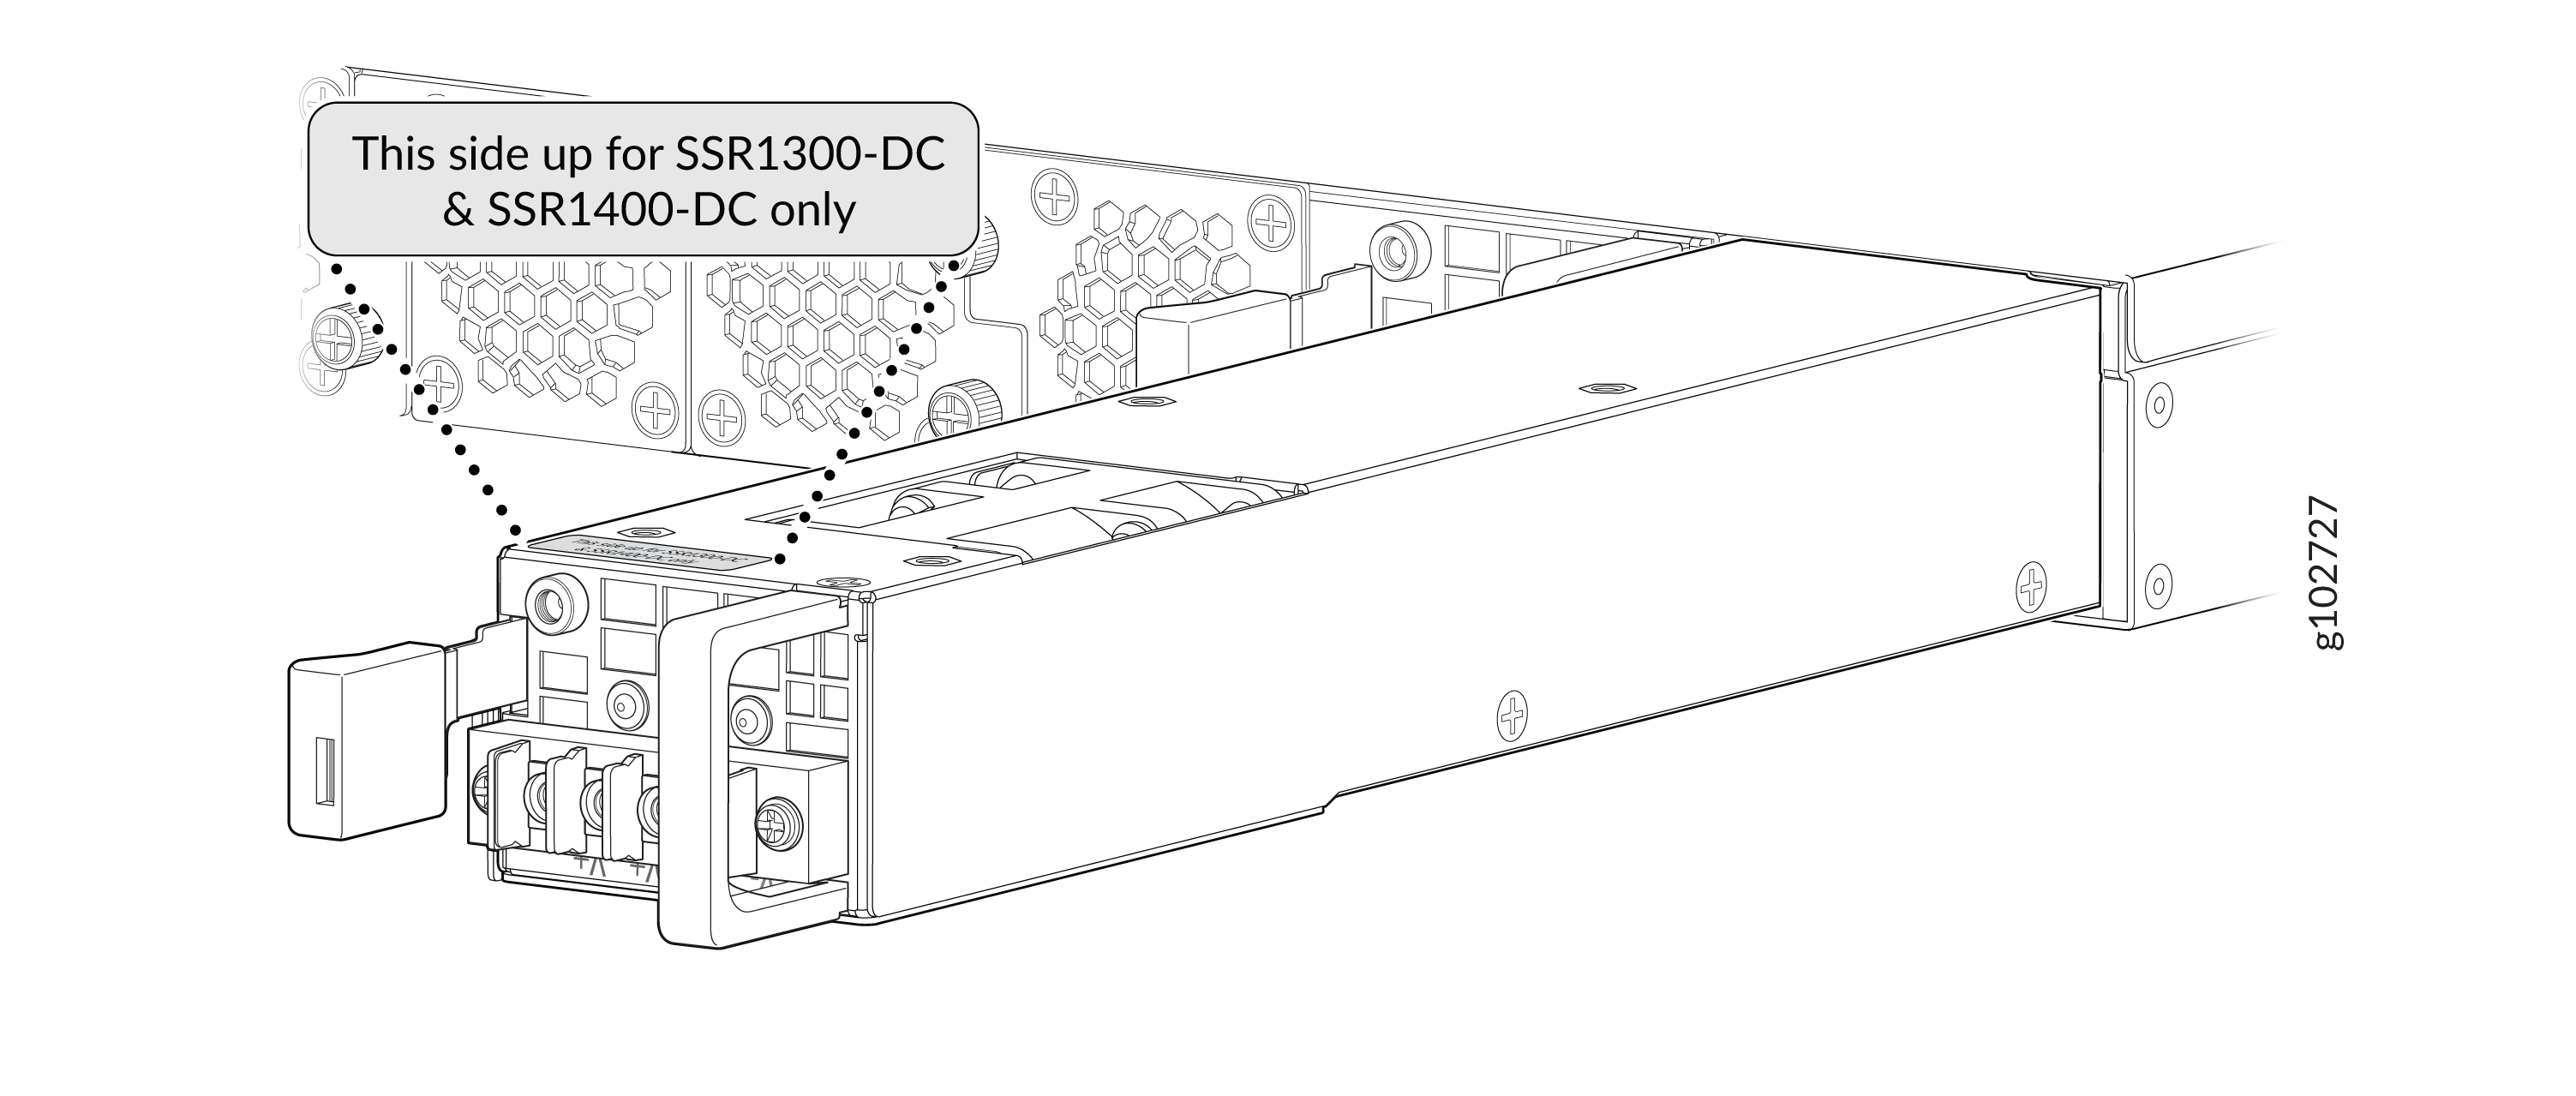
Figure 5: DC Power Supply Orientation
  1. Locate the circuit breaker on the electrical panel that services the DC circuit and switch the circuit breaker to the OFF position (O).
  2. Tape the switch handle of the circuit breaker in the OFF position.
  3. Ensure that the voltage across the DC power source cable leads is 0 V and that there is no chance that the cable leads might become active during installation.
  4. Attach an electrostatic discharge (ESD) grounding strap to your bare wrist and connect the strap to one of the ESD points on the chassis.
  5. Orient the power supply so that the orange handle is on the RIGHT, and the locking lever is on the LEFT as shown in the diagram below. If the power supply is installed incorrectly, it will not make proper electrical connection and and could electrify the chassis.
    Figure 6: Insert the DC Power Supply
  6. Using both hands, slide the power supply straight into the chassis until the power supply is fully seated in the chassis slot. The power supply faceplate should be flush with any adjacent power supply faceplate.
  7. Tighten the captive screws on the lower edge of the power supply faceplate.
  8. Remove the clear plastic cover protecting the terminal studs on the faceplate.
  9. Verify that the DC power cables are correctly labeled before making connections to the power supply. In a typical power distribution scheme where the return is connected to chassis ground at the battery plant, you can use a multimeter to verify the ohm output of the –48V and RTN DC cables to chassis ground. The cable with very high resistance (indicating an open circuit) to chassis ground will be –48V and the cable with very low resistance (indicating a closed circuit) to chassis ground will be RTN.
    CAUTION:

    You must ensure that power connections maintain the proper polarity. The power source cables might be labeled (+) and (–) to indicate their polarity. There is no standard color coding for DC power cables. The color coding used by the external DC power source at your site determines the color coding for the leads on the power cables that attach to the terminal studs on each power supply.

  10. Using a number 2 Phillips screwdriver, remove the screws and square washers from the terminal studs.
  11. Secure each power cable lug to the terminal studs, first with the square washer, then with the screw. Apply between 23 lb-in. (2.6 Nm) and 25 lb-in. (2.8 Nm) of torque to each screw.
    1. Attach the positive (+) DC source power cable lug to the RTN (return) terminal.
    2. Attach the negative (–) DC source power cable lug to the –48V (input) terminal.
    Note:

    The text on the power supply describing each terminal is upside down. This is correct for the orientation of the power supply.

    Figure 7: Securing the Power Cables Securing the Power Cables
  12. Replace the clear plastic cover over the terminal studs on the faceplate.
  13. Verify that the power cables are connected correctly, that they are not touching or blocking access to device components, and that they do not hang where people could trip on them.
  14. Remove the tape from the switch handle of the circuit breaker on the elecrical panel that services the DC circuit and switch the circuit breaker to the ON position (|). Observe the status LEDs on the power supply faceplate. If the power supply is correctly installed and functioning normally, the POWER LED glows solid green on the services gateway front panel.
Note:

If more than one power supply is being installed, turn on both power supplies at the same time.

If both power supplies are plugged in and receiving power, the RPS LED glows solid green.