Step 2: Up and Running
After you claim the device you need to:
Mount the Mist Edge device.
Configure the Tunnel Services between the Access Point (AP) and the Mist Edge device.
Configure the Out-of-Band Management Interface for the Mist Edge device.
The steps are explained in detail in the following sections.
Mount the Mist Edge
You can mount the Mist Edge on a server rack. For instructions specific to your Mist Edge model, see the applicable hardware guide on the Juniper Mist Supported Hardware page.
Connect to the Network and Power On the Mist Edge
Before connecting the Mist Edge device to the network, ensure that you complete all necessary configurations on switch ports for Out-Of-Band-Management (OOBM) and tunnel configuration.
Some tasks in the following procedure require you to configure or connect to services like DHCP and DNS in your local network. We do not provide instructions for configuring or locating these services.
Connect the Mist Edge device to a network with Internet access. To ensure that your device has access to the Juniper Mist cloud, confirm that the required ports on your Internet firewall are open. See Firewall Configuration.
To connect a Mist Edge device to the network:
- Connect an Ethernet port from a switch to the OOBM interface of the Mist Edge device port (labeled as MIST). This interface allows the Mist Edge device to connect to Internet and to Juniper Mist cloud for configuration, telemetry, and life cycle management.
Connect an Ethernet port from a switch to the ge0 (downstream port of Mist Edge) and ge1 (Upstream port of Mist Edge). These interfaces are for Tunnel services, where an AP forms a tunnel with Mist Edge.
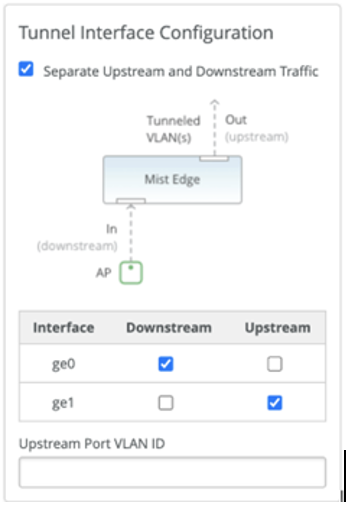 Note:
Note:Port and tunnel interface configuration are different for each Mist Edge model. The ports mentioned here are for ME-X1 device.
(Optional) Connect an Ethernet port from a switch to the Integrated Dell Remote Access Controller (iDRAC) port of the Mist Edge device.
If your network is DHCP enabled, you can then use the Juniper Mist portal to configure the static IP address. Here's an example to configure static IP address:

In rare cases, where DHCP is not available, only then configure static IP from CLI. Ensure to replicate it on the Mist portal. You can choose any of the following methods to access the console:
Log in to Mist Edge CLI using the keyboard, monitor, and mouse and access the console.
Configure Integrated Dell Remote Access Controller (iDRAC) port on the Mist Edge device.
Connect iDRAC port to the network.
Get the IP address from the front panel on the device through View > IPv4 > IDRAC IP.
Open browser on a PC connected to the same network as iDRAC IP. You can access the iDRAC user interface by using the URL https://<iDRAC IP address>. The default IDRAC user is
rootand the password isavailable on the Mist Edge appliance pull-out tag, on reverse sides of the tag.From the iDRAC dashboard, launch the virtual console. See iDRAC Virtual Console.
Enter the user credentials in the console.
mist—The default usernameClaim-code—The default password and the password for the root (su -) user
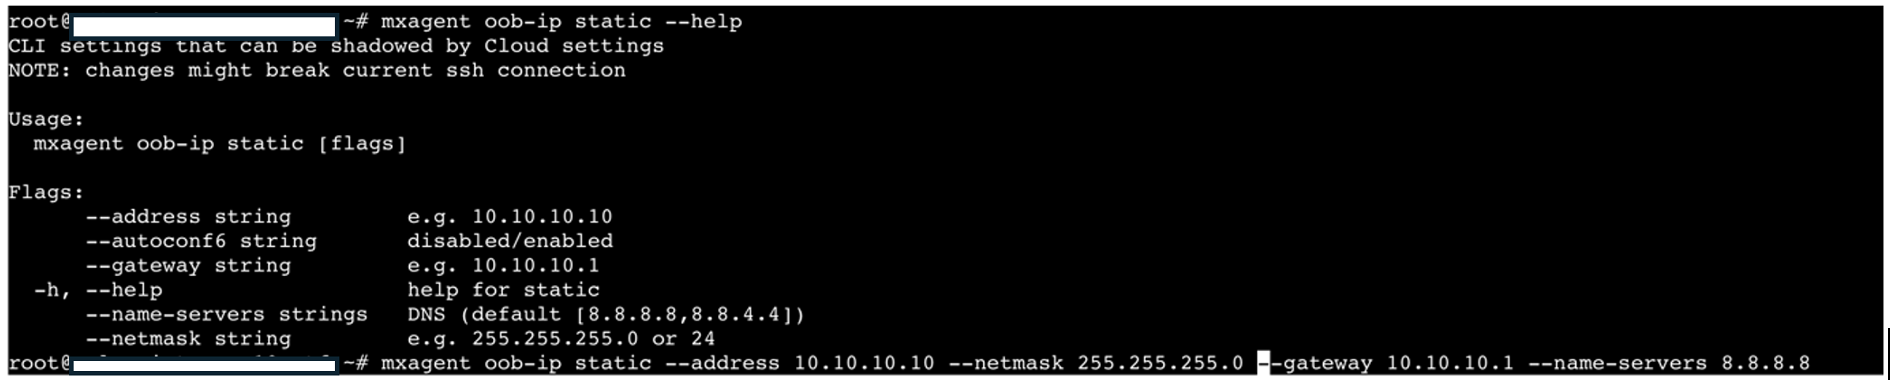
Enter the following command to specify the OOBM parameters:
mxagent oob-ip configure -–address ip-address -–gateway gateway-ip-address –-netmask netmask -–name-servers name-servers
Once OOBM interface has the IP address, the Mist Edge establishes connectivity to the Mist cloud. and the Mist cloud pushes the configuration onto the Mist Edge along with the services updates.
Once the OOBM is configured and the firewall rules are set, the Mist Edge appears as Connected with an amber dot and Registered in the Mist Edge inventory.
Congratulations! You've successfully onboarded your Mist Edge.
If you do not see the Mist Edge device online, see Troubleshooting Juniper Mist Edge.