Step 1: Begin
In this guide, we provide a simple, three-step path, to quickly get you up and running with the Juniper Networks® QFX10016 switch. You'll learn how to install, power on, and configure basic settings for both AC-powered and DC-powered QFX10016 switches.
Meet the QFX10016
The QFX10016 is a rigid sheet-metal switch-chassis that houses field -replaceable units (FRUs) such as control boards, Switch Interface Boards (SIBs), power supplies, fan trays, and line cards. The switch chassis ships in a cardboard box that has a two-layer wooden pallet base. The switch chassis is bolted to the pallet base. You can install a QFX10016 switch in a standard 19 in. (48.26 cm) equipment rack by using the supplied rack-mounting kit and the front-mounting bracket that is attached to the chassis.
Before you install the QFX10016, make sure the site meets all the power, cooling, and clearance requirements. See the site preparation guidelines and power requirements in the QFX10016 Switch Hardware Guide.
Prepare the Site for the QFX10016
Rack-Mounting Requirements
The QFX10016 switch chassis is designed to be installed in standard 19-in. wide four-post racks that are spaced at 1 U (1.75 in. or 4.45 cm) increments.
You can stack two QFX10016 chassis in a four-post rack if:
-
The rack is 42 U or greater.
-
The rack meets the strength requirements to support the weight.
-
The facility can provide adequate power and cooling.
Before installing the chassis, ensure that:
-
The rack rails are spaced widely enough to accommodate the switch chassis’ external dimensions. The outer edges of the front-mounting brackets extend the chassis width to 19 in. (48.26 cm).
-
The rack is strong enough to support the weight of the switch and cabling.
-
The spacing of rails and adjacent racks allows for proper clearance around the switch and rack.
Clearance Requirements
For the cooling system to function properly, the airflow around the chassis must be unrestricted. You must allow sufficient clearance around the installed chassis for cooling and maintenance.
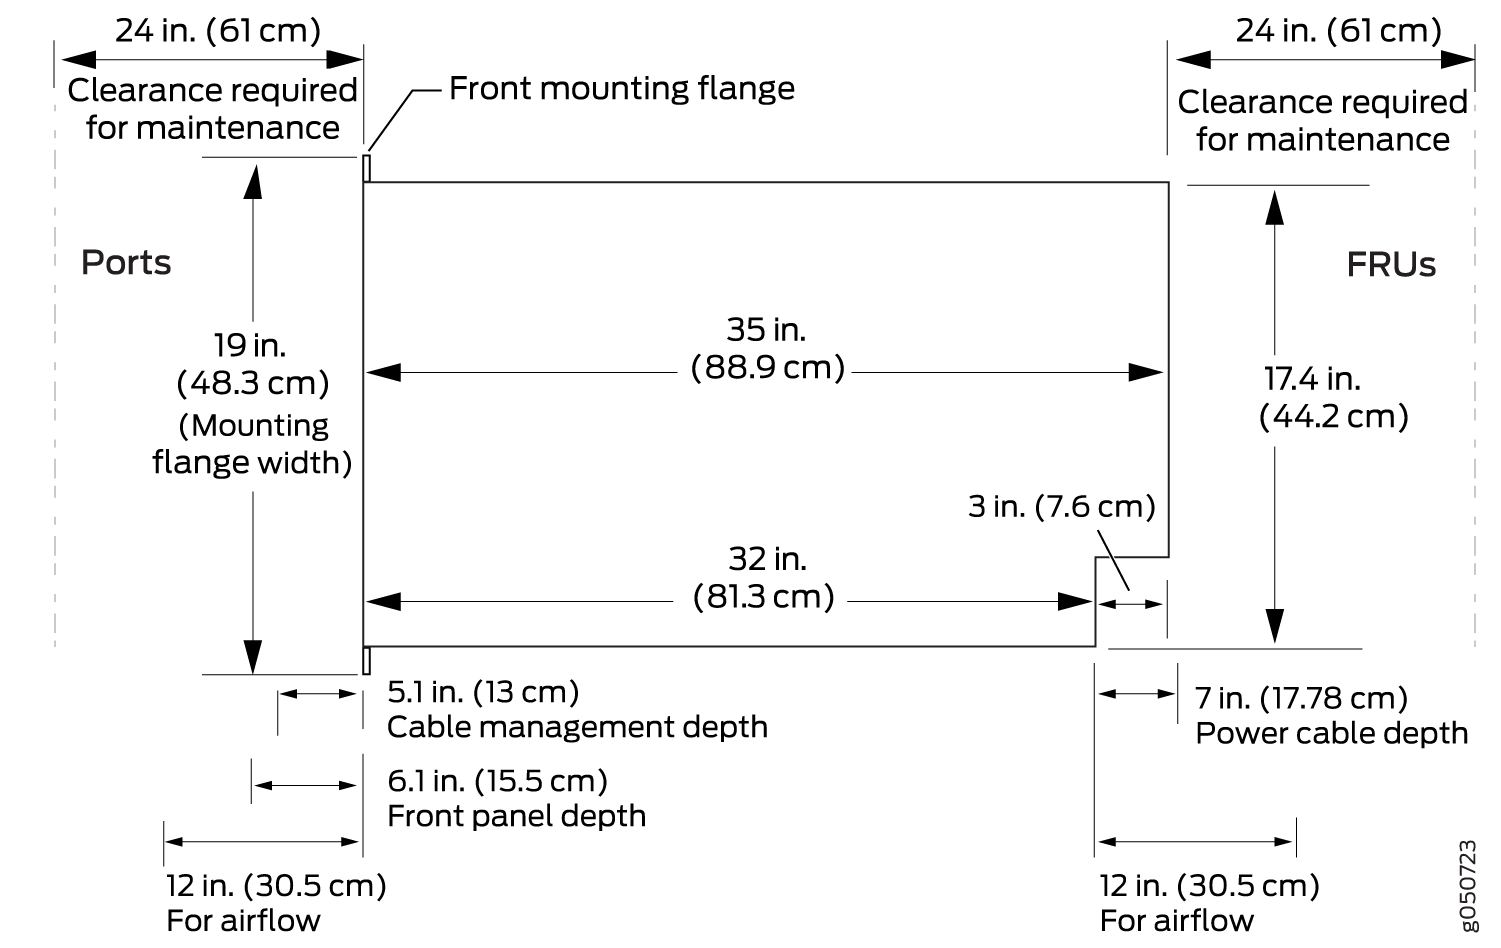
If you are mounting a QFX10016 in a rack with other equipment, ensure that the exhaust from other equipment does not blow into the intake vents of the chassis.
Cooling and Airflow Requirements
The cooling system in a QFX10016 chassis consists of dual fan trays and dual fan tray controllers. There is no air filter in a QFX10016.
The air intake to cool the chassis is located on the port (line card) side of the chassis. Air flows into the chassis from the ports in the control boards and line cards, through the Switch Interface Boards (SIBs), and exits from the fan trays and the power supplies. This airflow is called port-to-FRU cooling or airflow out (AFO).
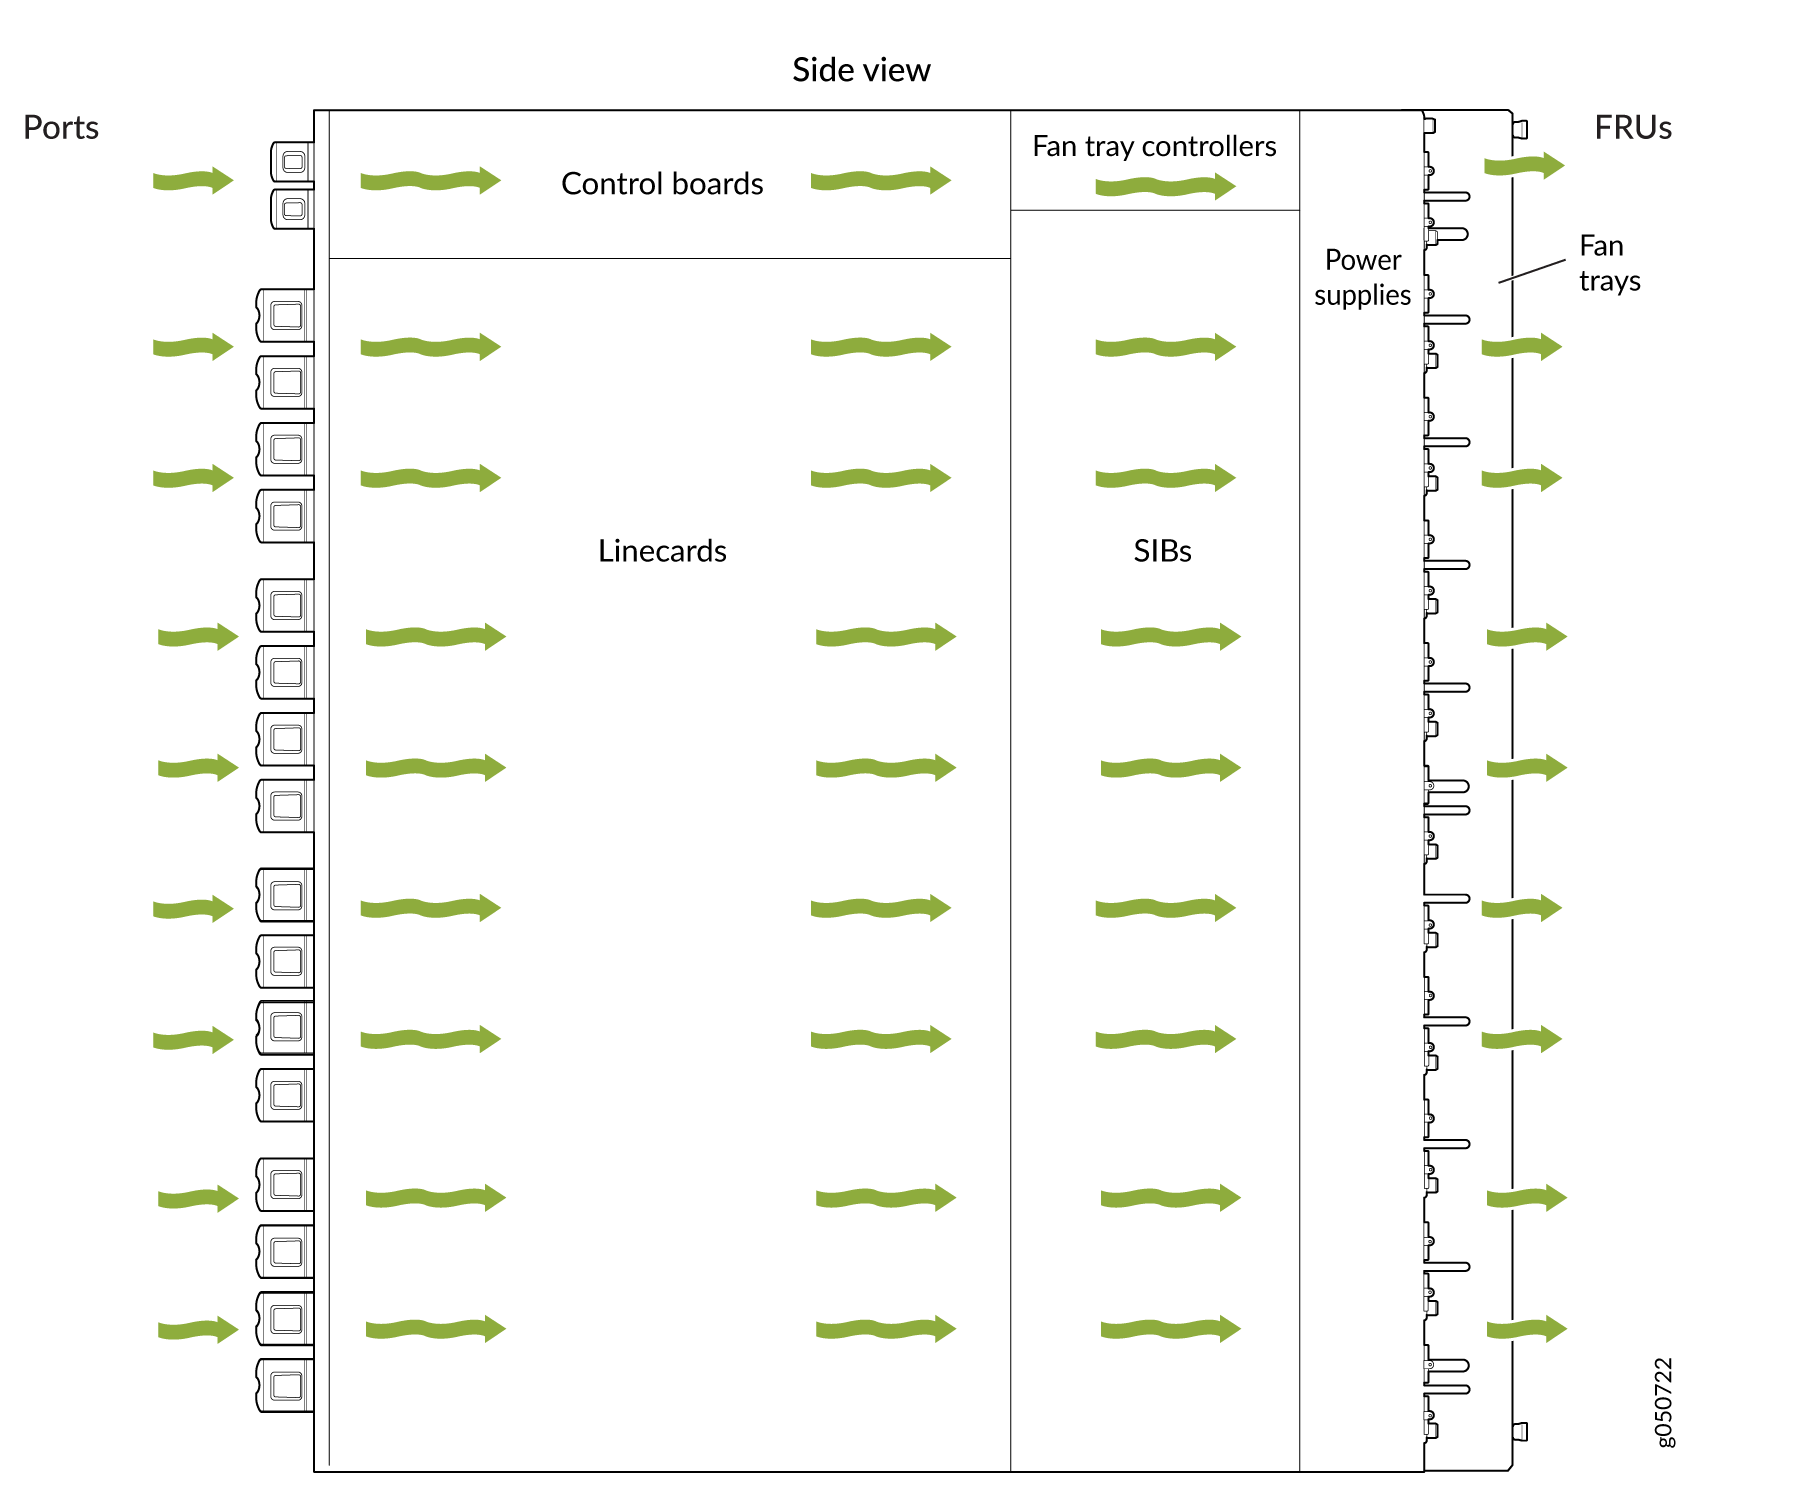
Follow these guidelines:
-
For the cooling system to function properly, the airflow around the chassis must be unrestricted.
-
If you are mounting a QFX10016 in a rack with other equipment, ensure that the exhaust from other equipment does not blow into the intake vents of the chassis.
-
Leave at least 24 in. (61 cm) both in front of and behind the QFX10016 for service personnel to remove and install hardware components. To be NEBS GR-63 compliant, allow at least 30 in. (76.2 cm) in front of the rack and 24 in. (61 cm) behind the rack.
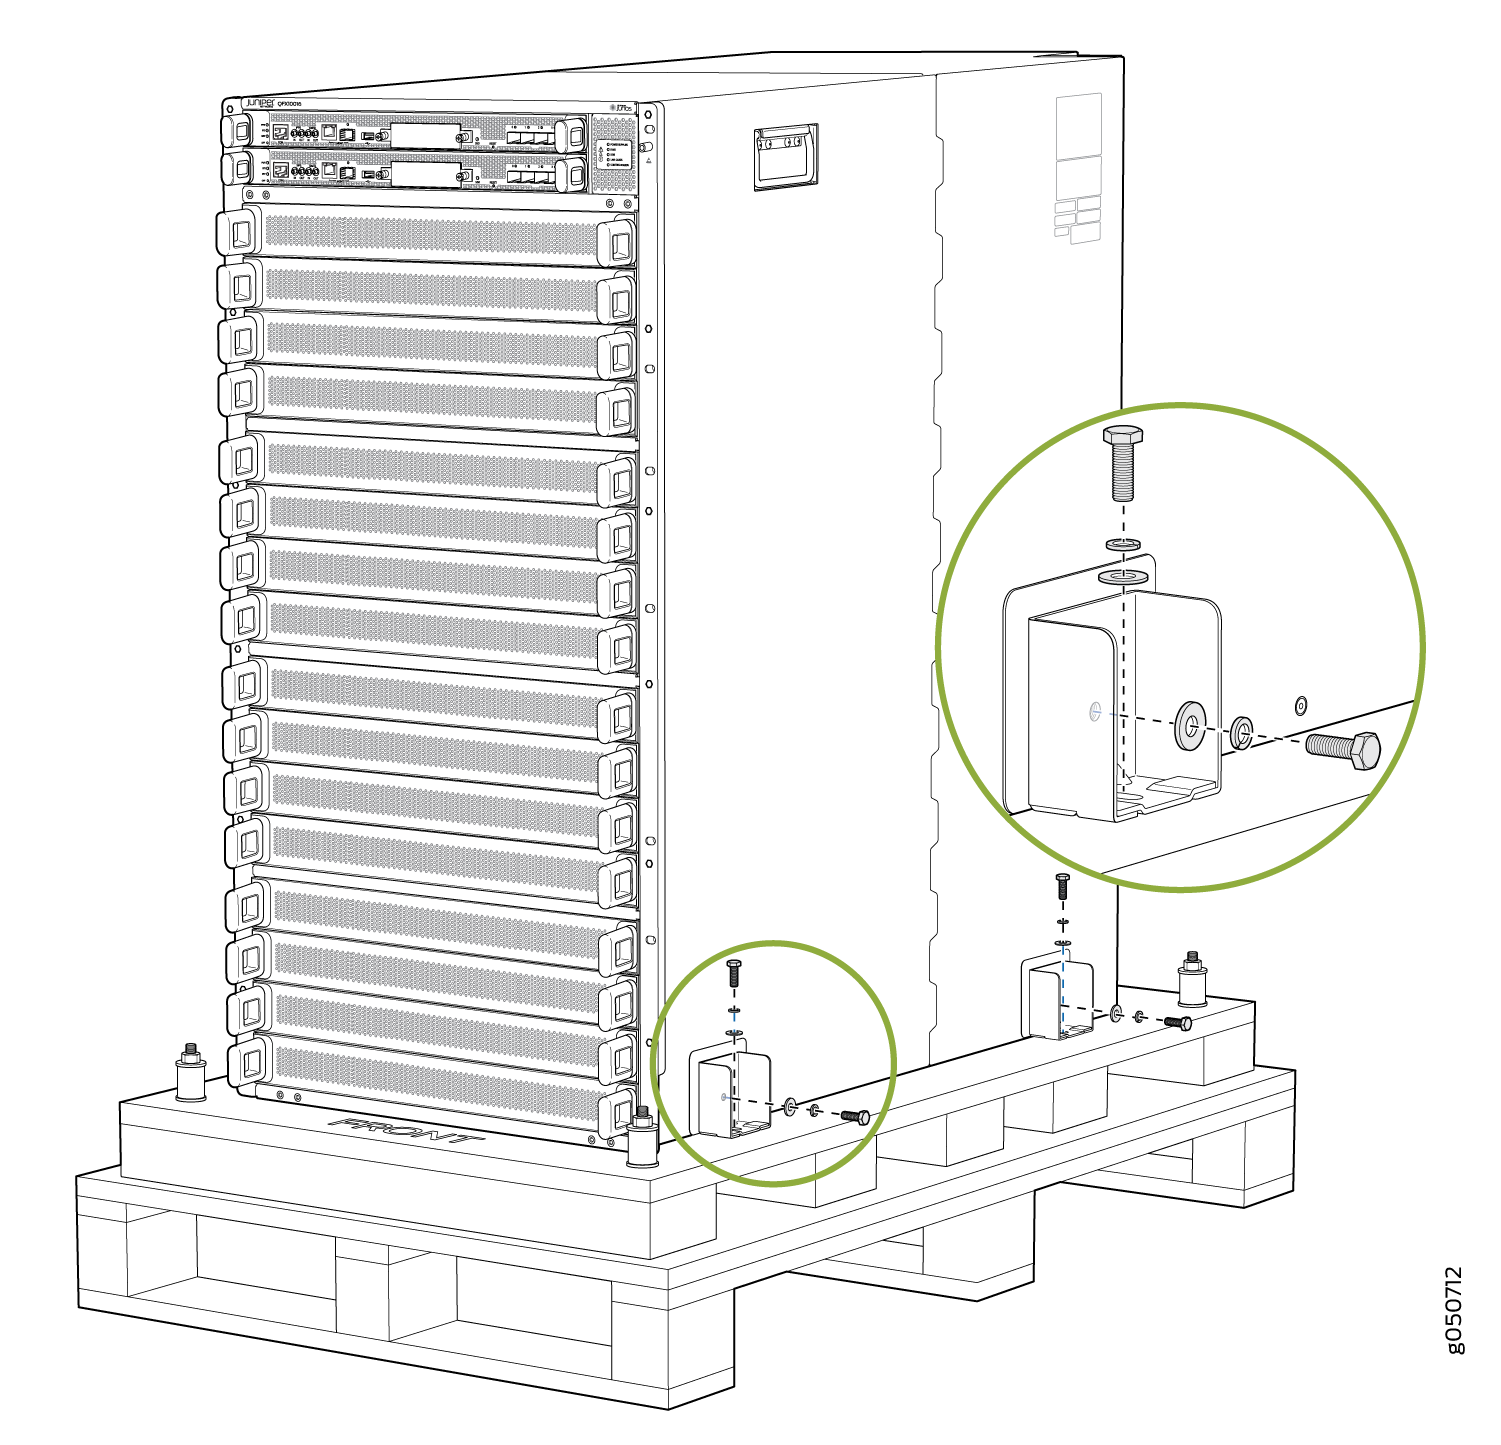
Unpack the QFX10016
Here’s how to unpack the chassis for QFX10016:
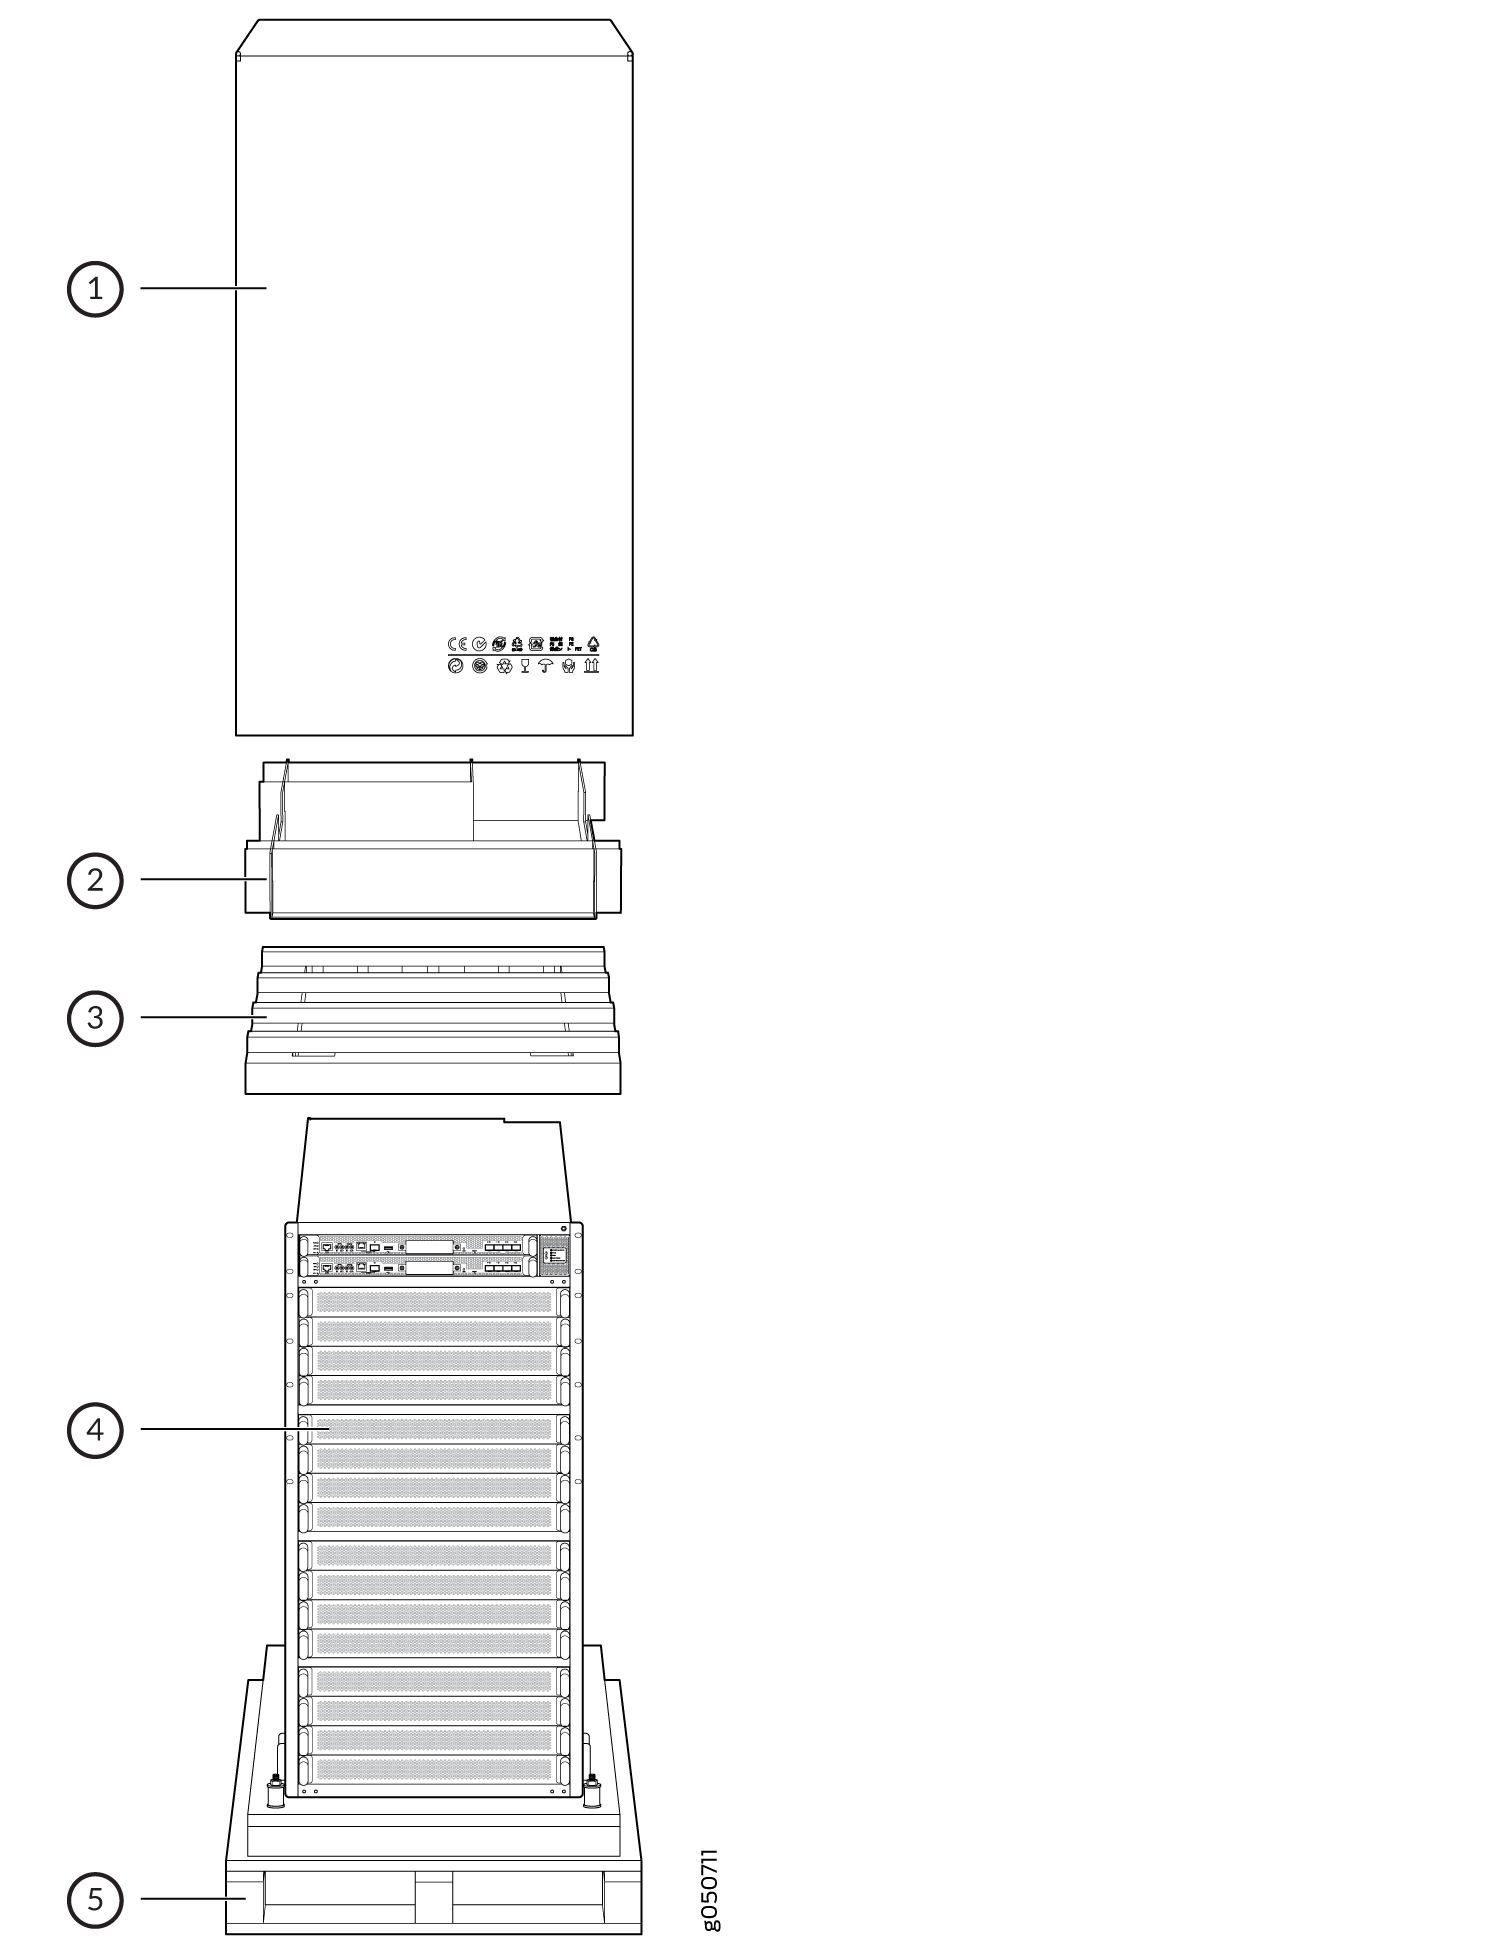
Mount the Switch Chassis
To install the QFX10016, first install the mounting hardware and then use a mechanical lift to load the chassis into the rack.
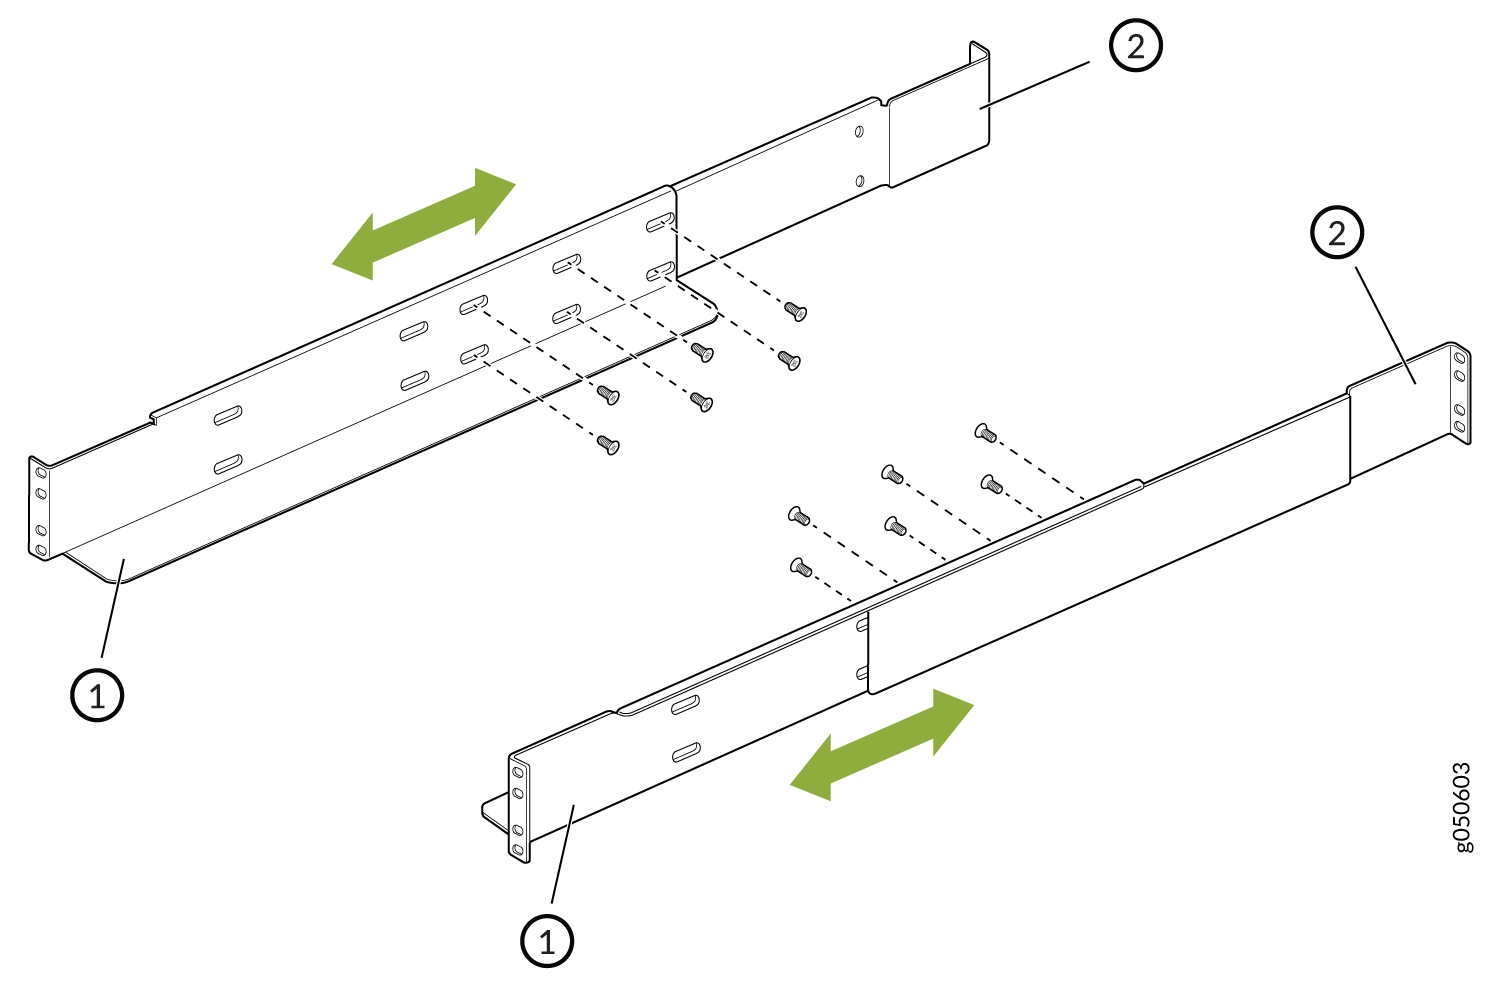
Install the Mounting Hardware
Two-post installation racks are not supported.
When you install the mounting brackets, the adjustable portion of the brackets overlap. Use the overlap area to adjust the total bracket length to fit any of the four standard rack sizes: 19 in. (483 mm), 23.62 in. (600 mm), 30 in. (762 mm), or 31.5 in. (800 mm).
To install the mounting brackets in a four-post rack:
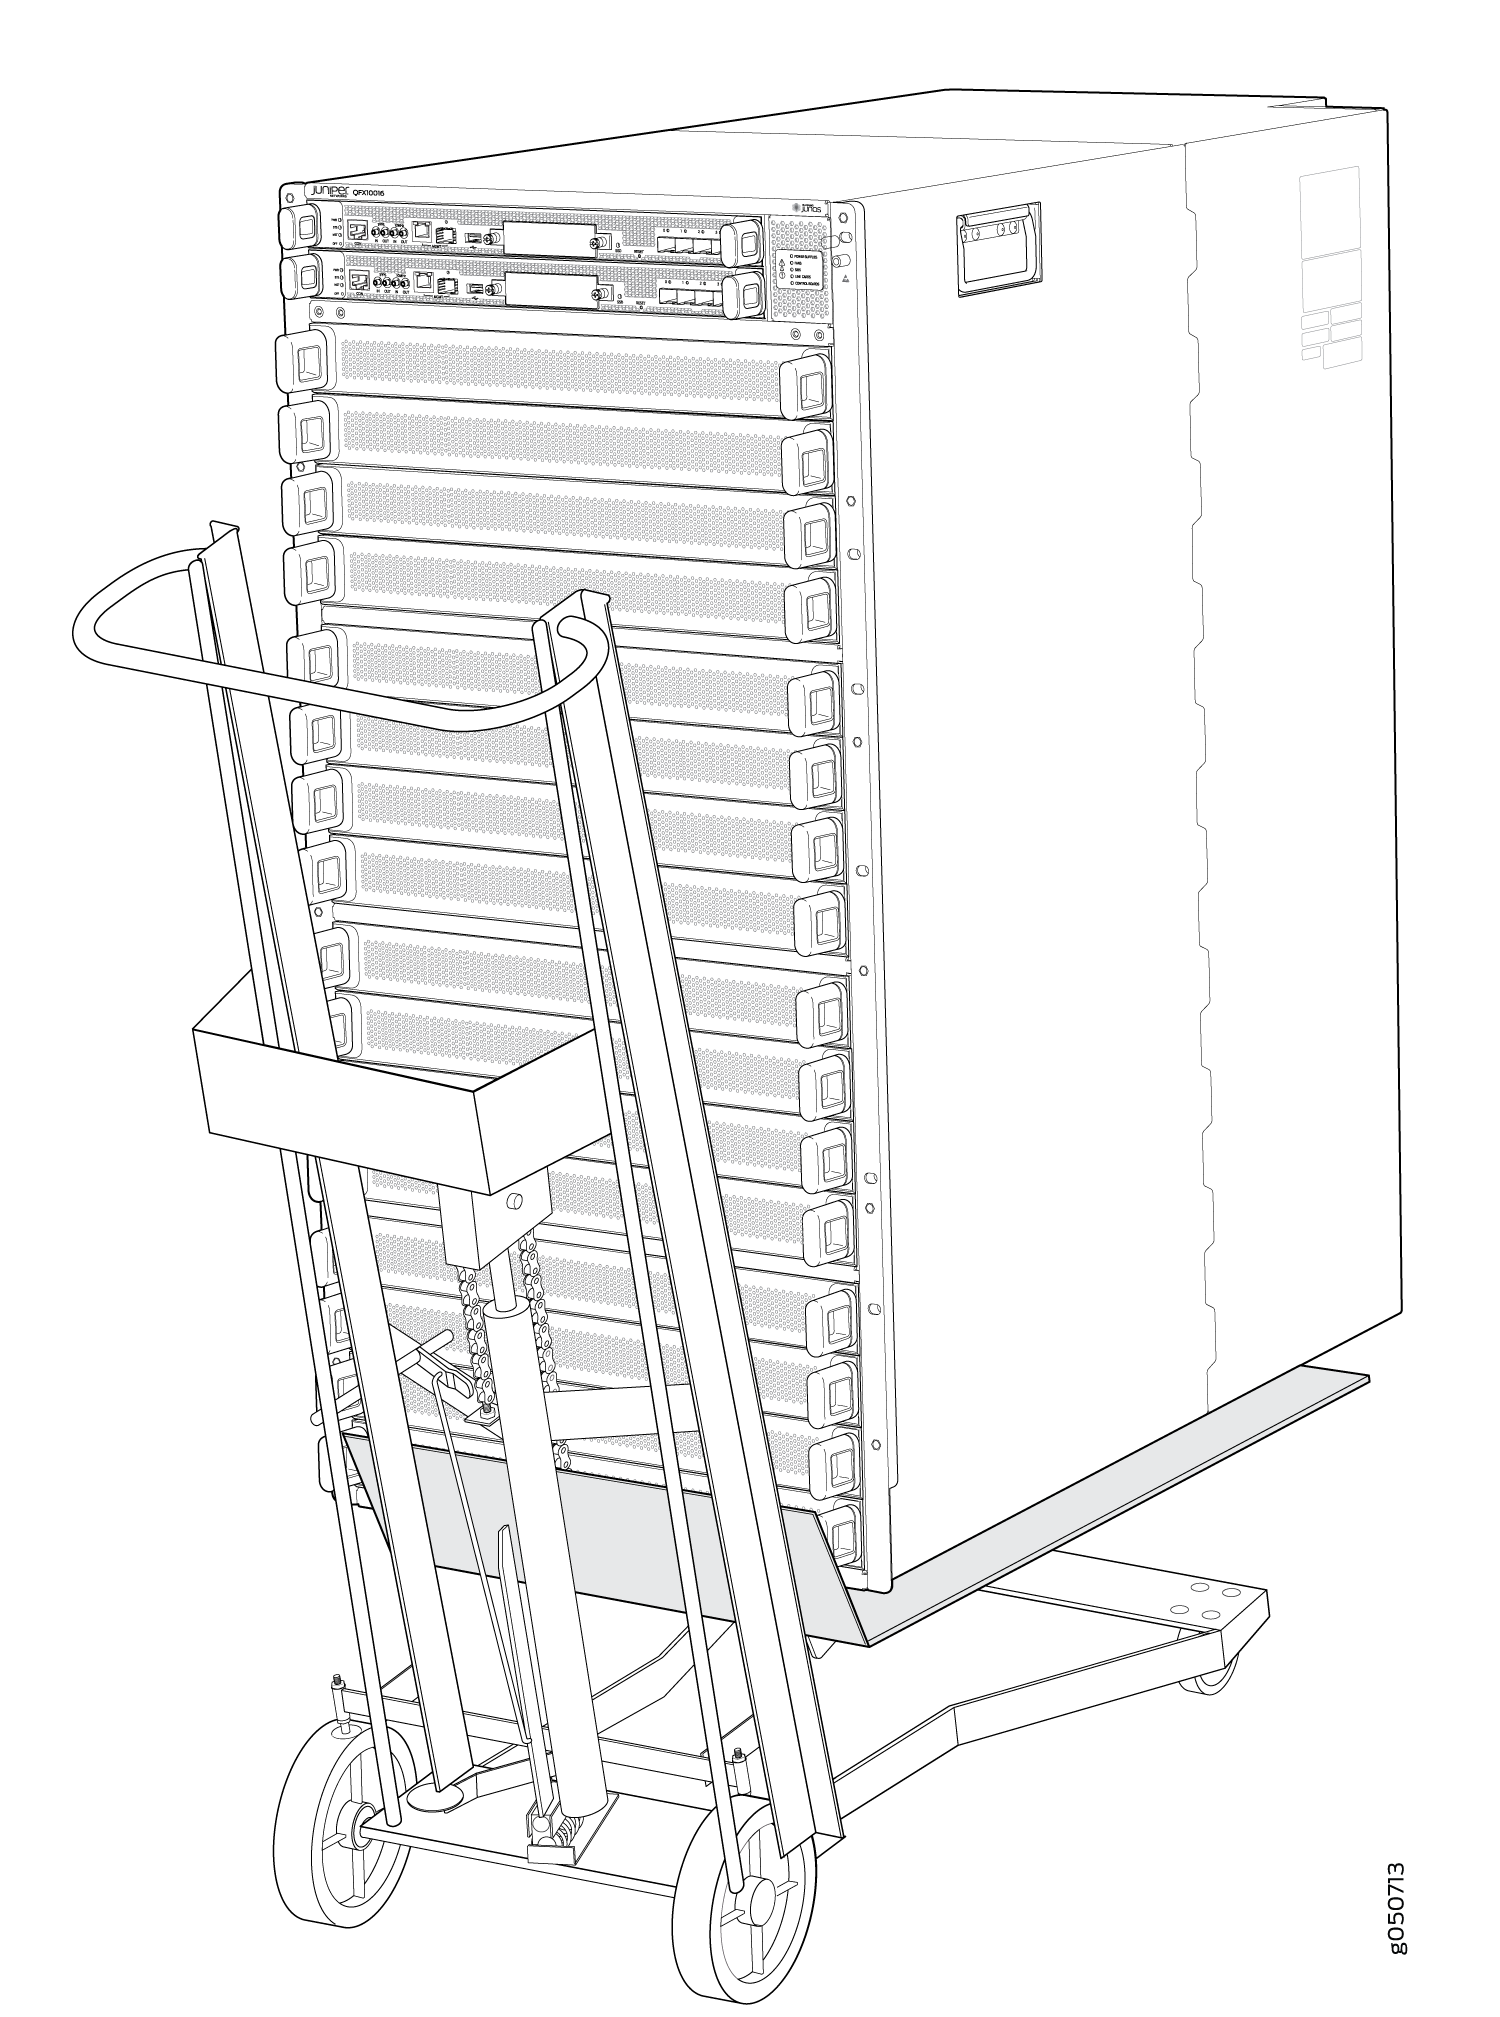
Mount the QFX10016 using a Mechanical Lift
Do not install line cards in the chassis until after you mount the chassis securely on a rack or cabinet.
Before front-mounting the switch on a rack or cabinet, have a qualified technician verify that the rack or cabinet is strong enough to support the switch's weight and is adequately supported at the installation site.
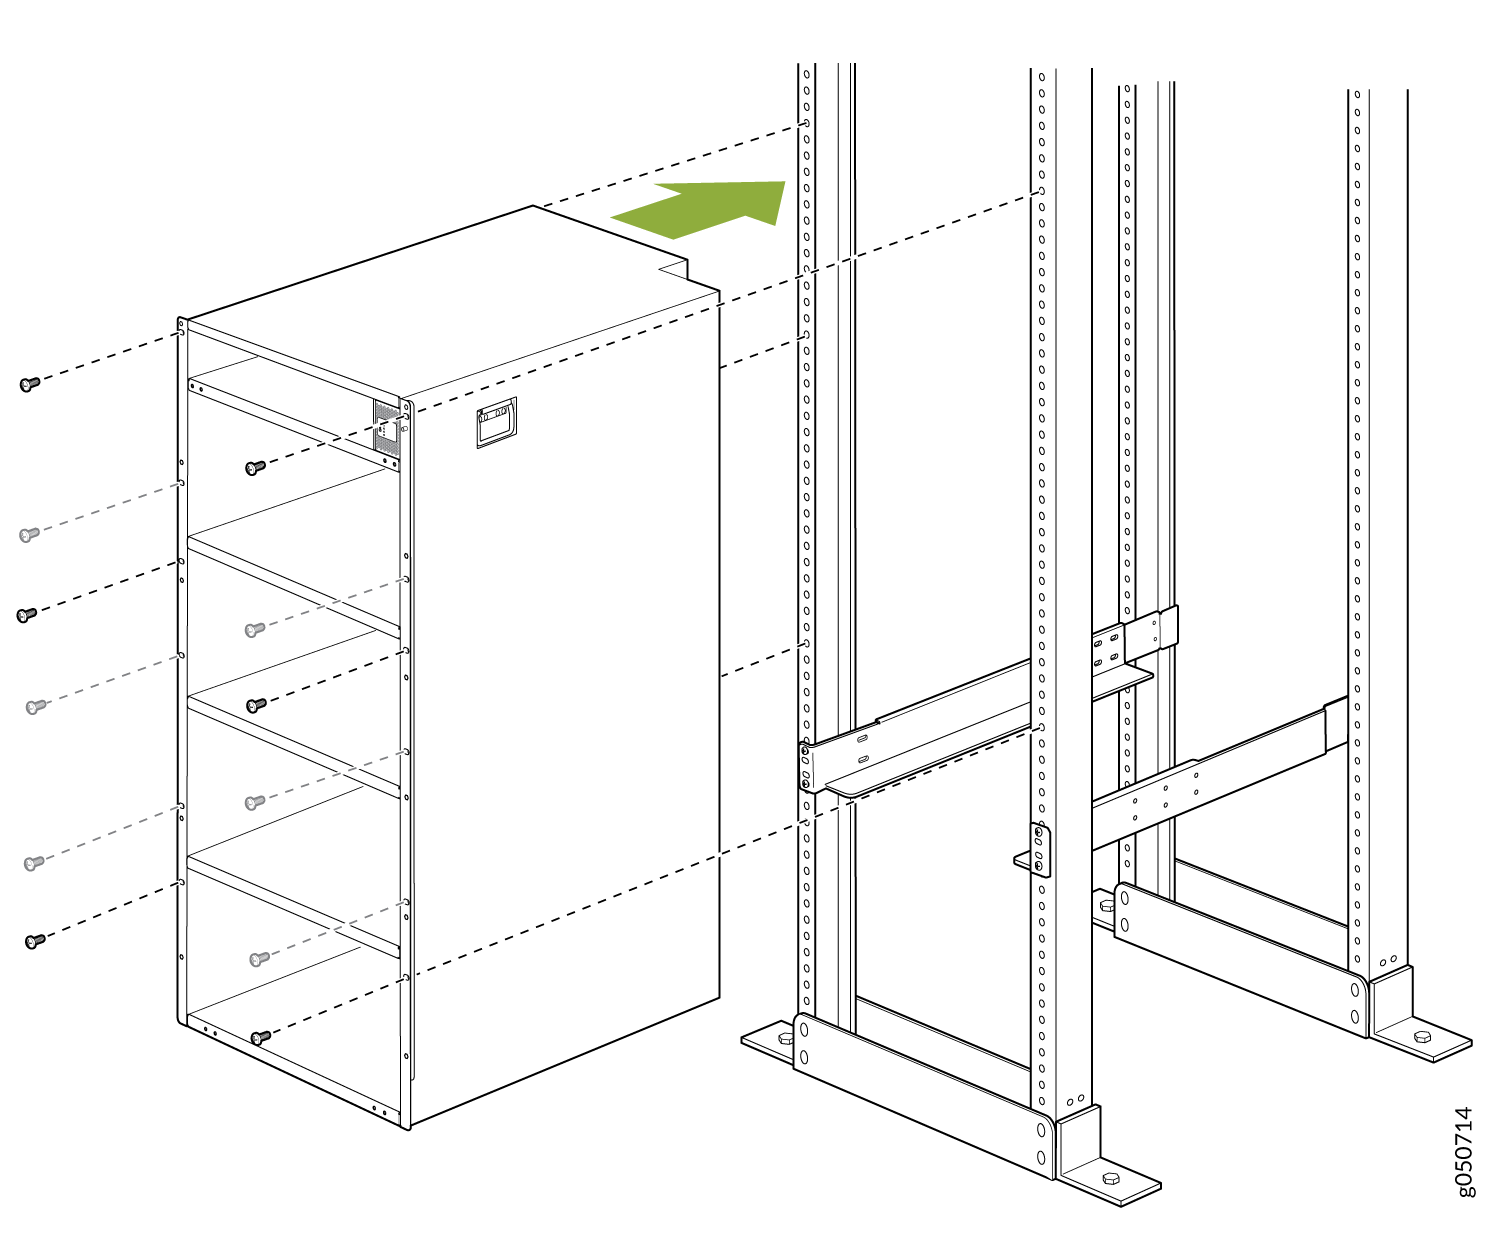
To install the switch using a mechanical lift:
Install the QFX10016
What's in the Box?
Along with your QFX10016, you’ll also find:
-
An accessory kit which includes:
-
AC Power cord (country specific).
-
Power cord retainer clips.
-
Electrostatic discharge (ESD) wrist strap with cable.
-
A Phillips (+) screwdriver, number 1, 2, or 3, depending on the size of your rack-mounting screws.
-
Mounting brackets. These support the chassis in the rack and are as follows:
-
1 left front mounting bracket. The bracket is labeled “LEFT FRONT” on the side of the bracket that faces the interior of the rack, near the holes for attaching the bracket to the rack.
-
1 right front mounting bracket. The bracket is labeled “RIGHT FRONT” on the side of the bracket that faces the interior of the rack, near the holes for attaching the bracket to the rack.
-
2 rear mounting brackets. These brackets are labeled “REAR” on the side of the bracket that faces the interior of the rack, near the holes for attaching the bracket to the rack. The rear brackets are interchangeable; you can use either of the rear brackets with the right or left front-mounting bracket.
-
-
Cable lug.
-
Chassis. The chassis ships in a cardboard box that has a two-layer wooden pallet base with foam cushioning between the layers. The switch chassis is bolted to the pallet base. The shipper has the option to either ship the front panel separately or to ship along with the chassis. If the front panel arrives with the chassis, set aside the front panel box until you are ready to verify the contents of the order.
Note:We no longer include the RJ-45 console cable with the DB-9 adapter as part of the device package. If the console cable and adapter are not included in your device package, or if you need a different type of adapter, you can order the following separately:- RJ-45 to DB-9 adapter (JNP-CBL-RJ45-DB9)
- RJ-45 to USB-A adapter (JNP-CBL-RJ45-USBA)
- RJ-45 to USB-C adapter (JNP-CBL-RJ45-USBC)
If you want to use RJ-45 to USB-A or RJ-45 to USB-C adapter you must have X64 (64-Bit) Virtual COM port (VCP) driver installed on your PC. See, https://ftdichip.com/drivers/vcp-drivers/ to download the driver.
Note:If your laptop or PC does not have a DB-9 male connector pin and you want to connect your laptop or PC directly to the device, use a combination of the RJ-45 to DB-9 female adapter supplied with the device and a USB to DB-9 male adapter. You must provide the USB to DB-9 male adapter.
-
What Else Do I Need?
To Unpack the QFX10016
-
A 13/32 in. (10 mm) open-end or socket wrench to remove the bracket bolts from the shipping pallet.
-
A box cutter or packing knife to slice open the nylon straps and tape that seal the crate and boxes.
To Install the Mounting Brackets
-
A Phillips (+) screwdriver, number 2, to install the screws that connect the rear-mounting and front-mounting brackets.
-
16 mounting screws appropriate for your rack to attach the 4 mounting bracket pieces to the rack.
To Install using a Mechanical Lift
-
A mechanical lift rated for 1000 lbs. (453.6 kg).
-
12 mounting screws appropriate for your rack.
If you are installing more than one switch in a rack or cabinet, install the first switch at the bottom of the rack.
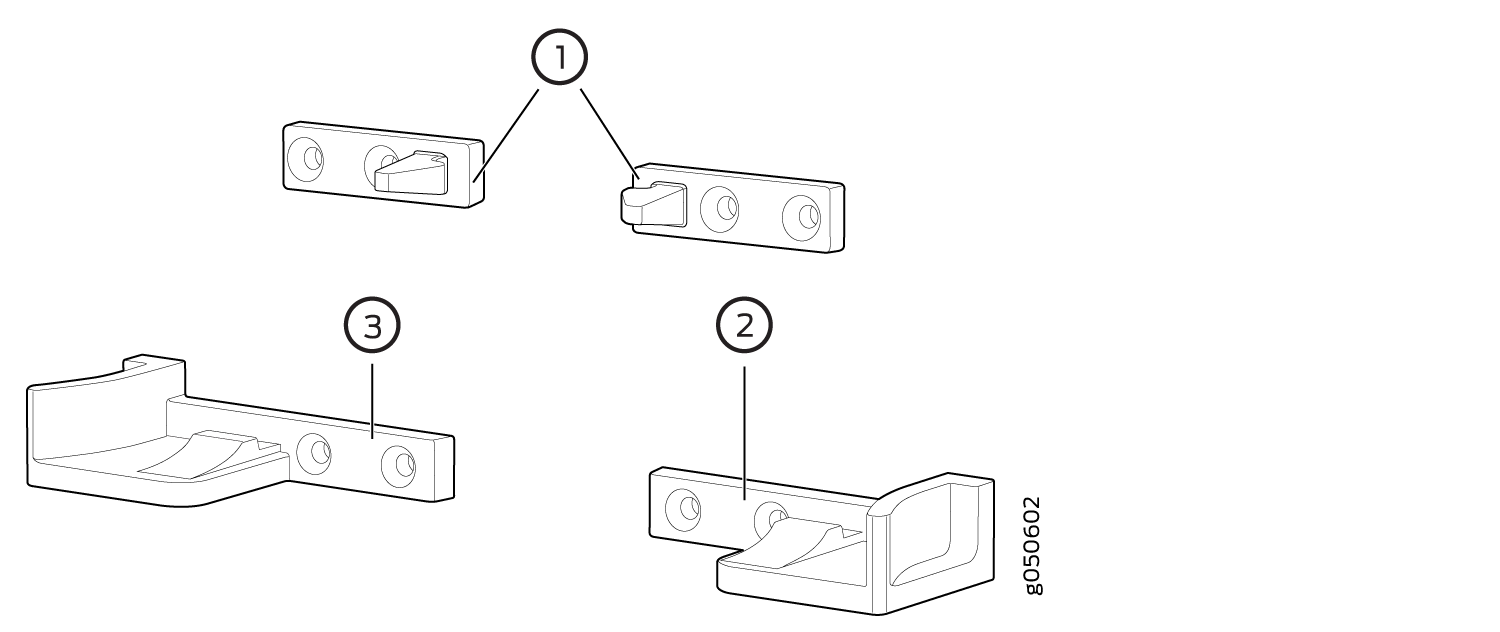
To Install the Front Panel
-
A Phillips (+) screwdriver, number 2.
-
Front panel (provided with the switch chassis).
-
Right base bracket (provided).
-
Left base bracket (provided).
-
2 interchangeable latch brackets (provided).
-
8 Phillips flat head mounting screws (provided).
To Ground the Chassis
-
Protective earthing terminal lug (provided).
-
Grounding cable for your QFX10016 (not provided)—The grounding cable must be 6 AWG (13.3 mm²), minimum 90° C wire, or as permitted by the local code.
-
Grounding lug for your grounding cable (provided)—This bracket attaches to the lower left corner of the QFX10016 switch chassis next to PSU 9, providing a protective earthing terminal for the switch. The grounding lug required is a Panduit LCD6-10A-L or equivalent.
-
Any Phillips screwdriver to tighten the two screws that are mounted on the chassis.
To Install a DC Power Supply
-
DC power source cables (not provided) with the cable lugs (provided) attached. The provided terminal lugs in a QFX10016 are sized for 4 AWG (21.1 mm2) power source cables. The DC power source cables that you provide must be 4 AWG (21.1 mm2), minimum 60°C wire. We recommend that you install heat-shrink tubing insulation around the crimped section of the power cables and lugs.
-
13/32 in. (10 mm) nut driver or socket wrench.
-
Phillips (+) screwdrivers, numbers 1 and 2.
-
Multimeter.
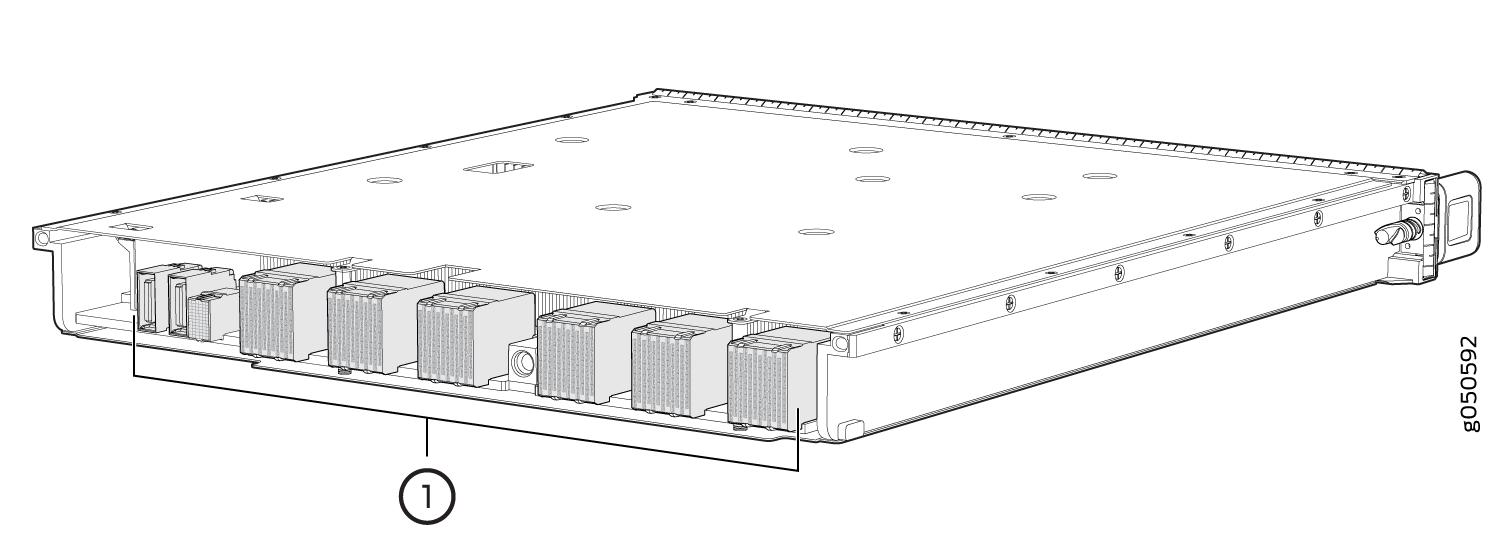
Install the Line Cards
To install a line card in the switch chassis:
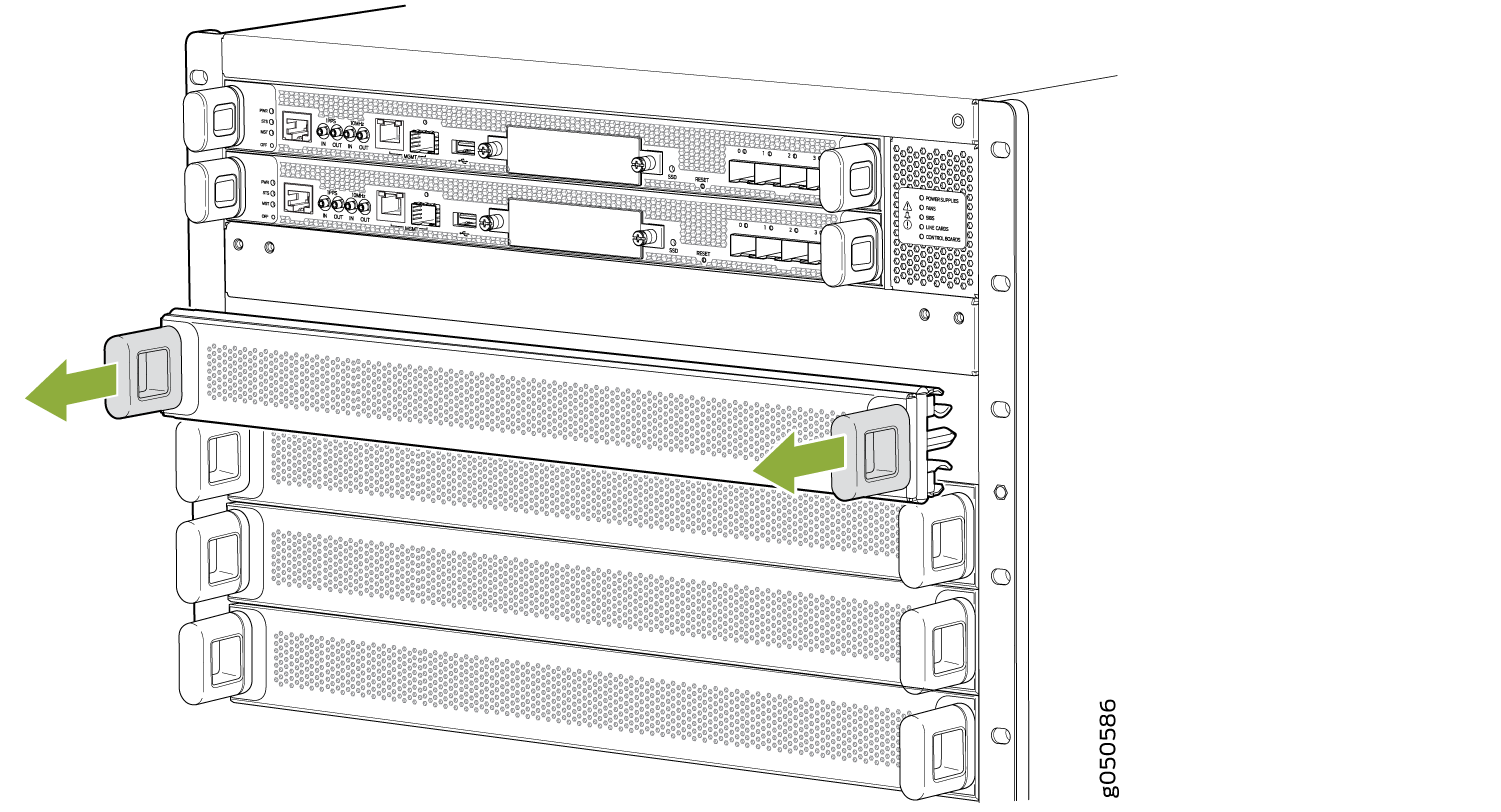
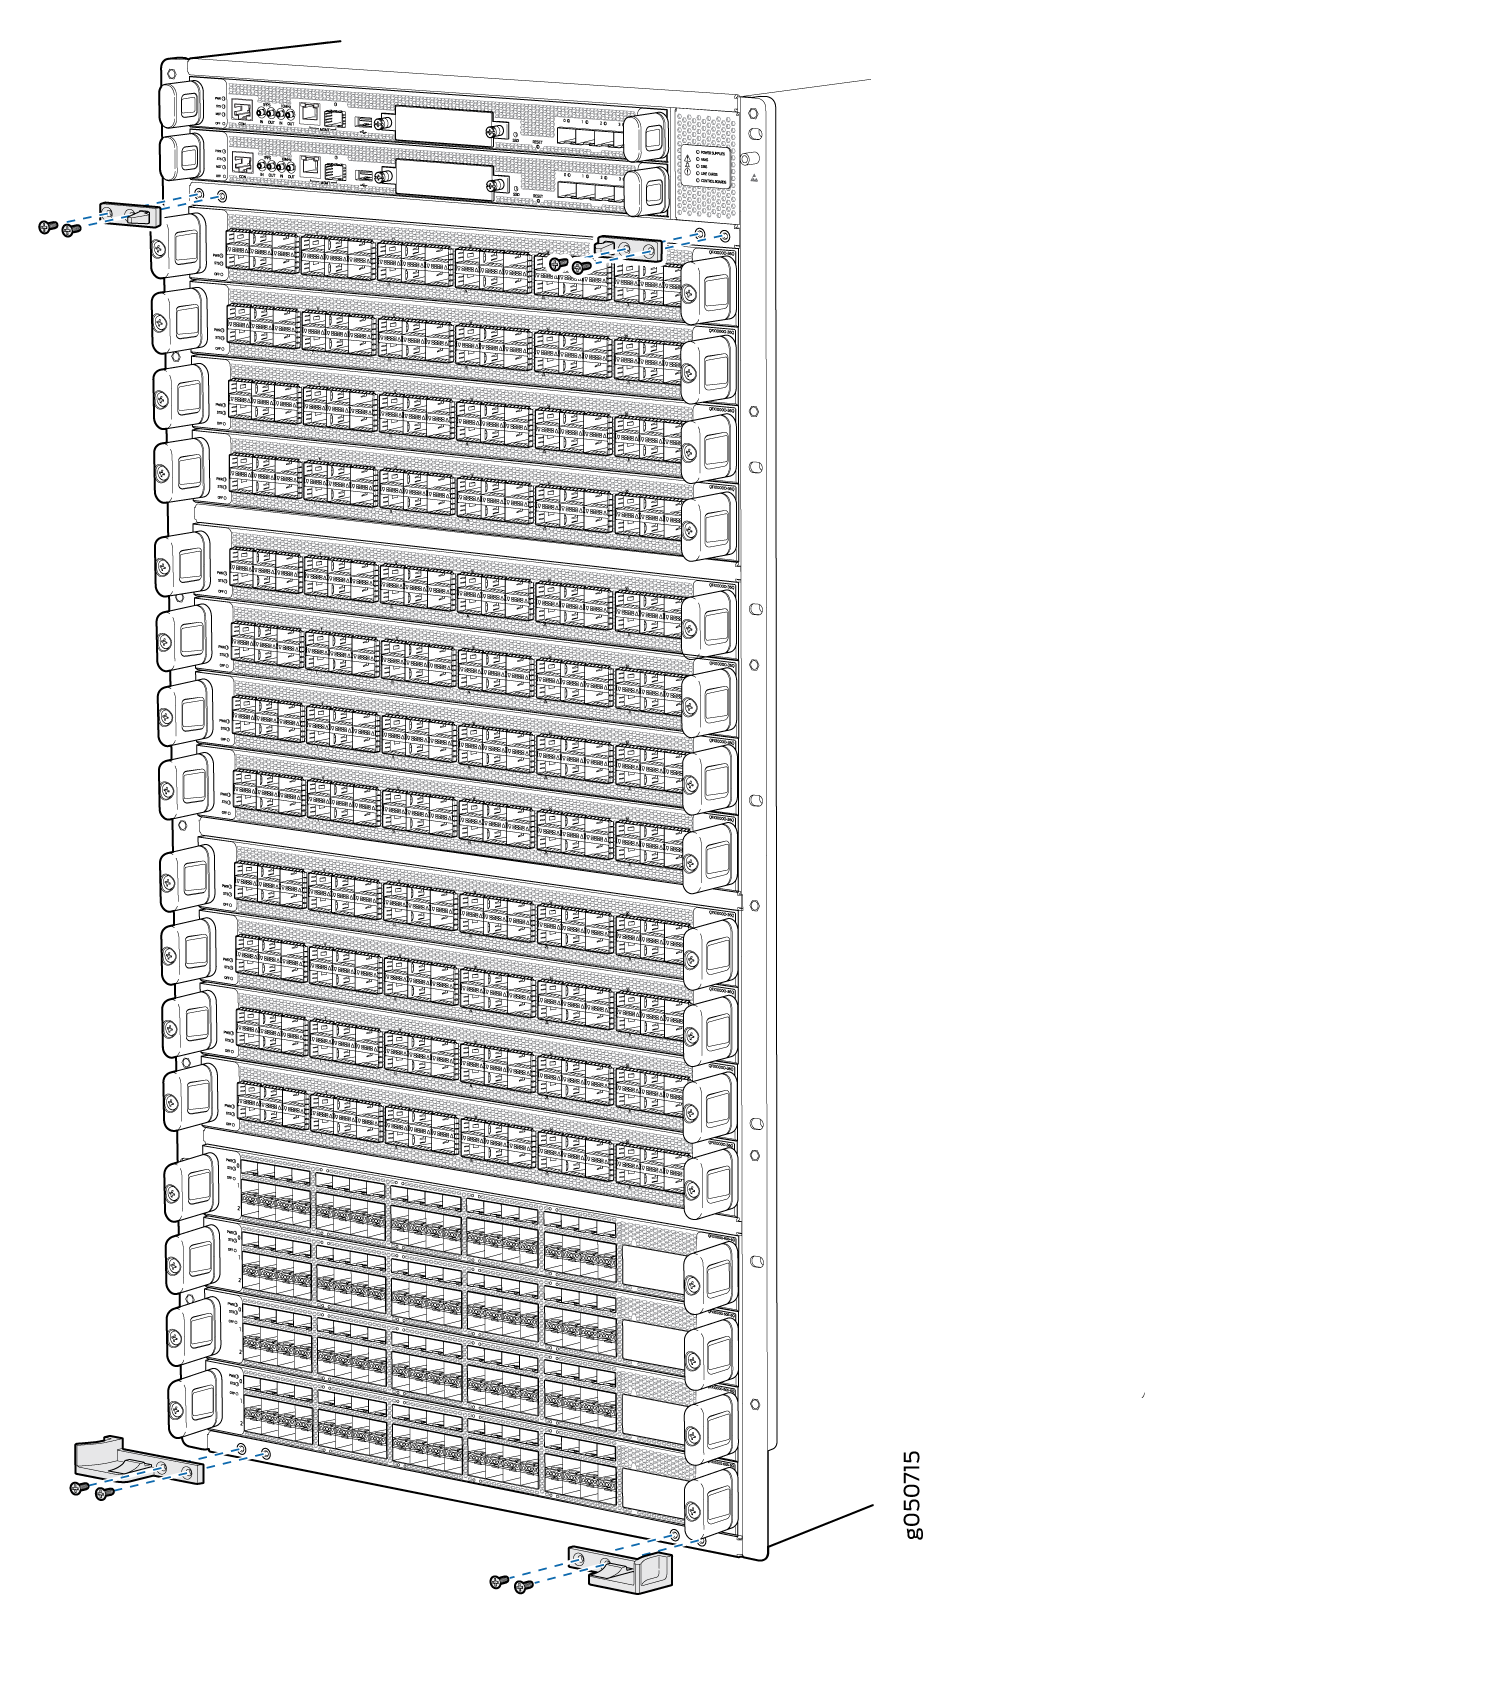
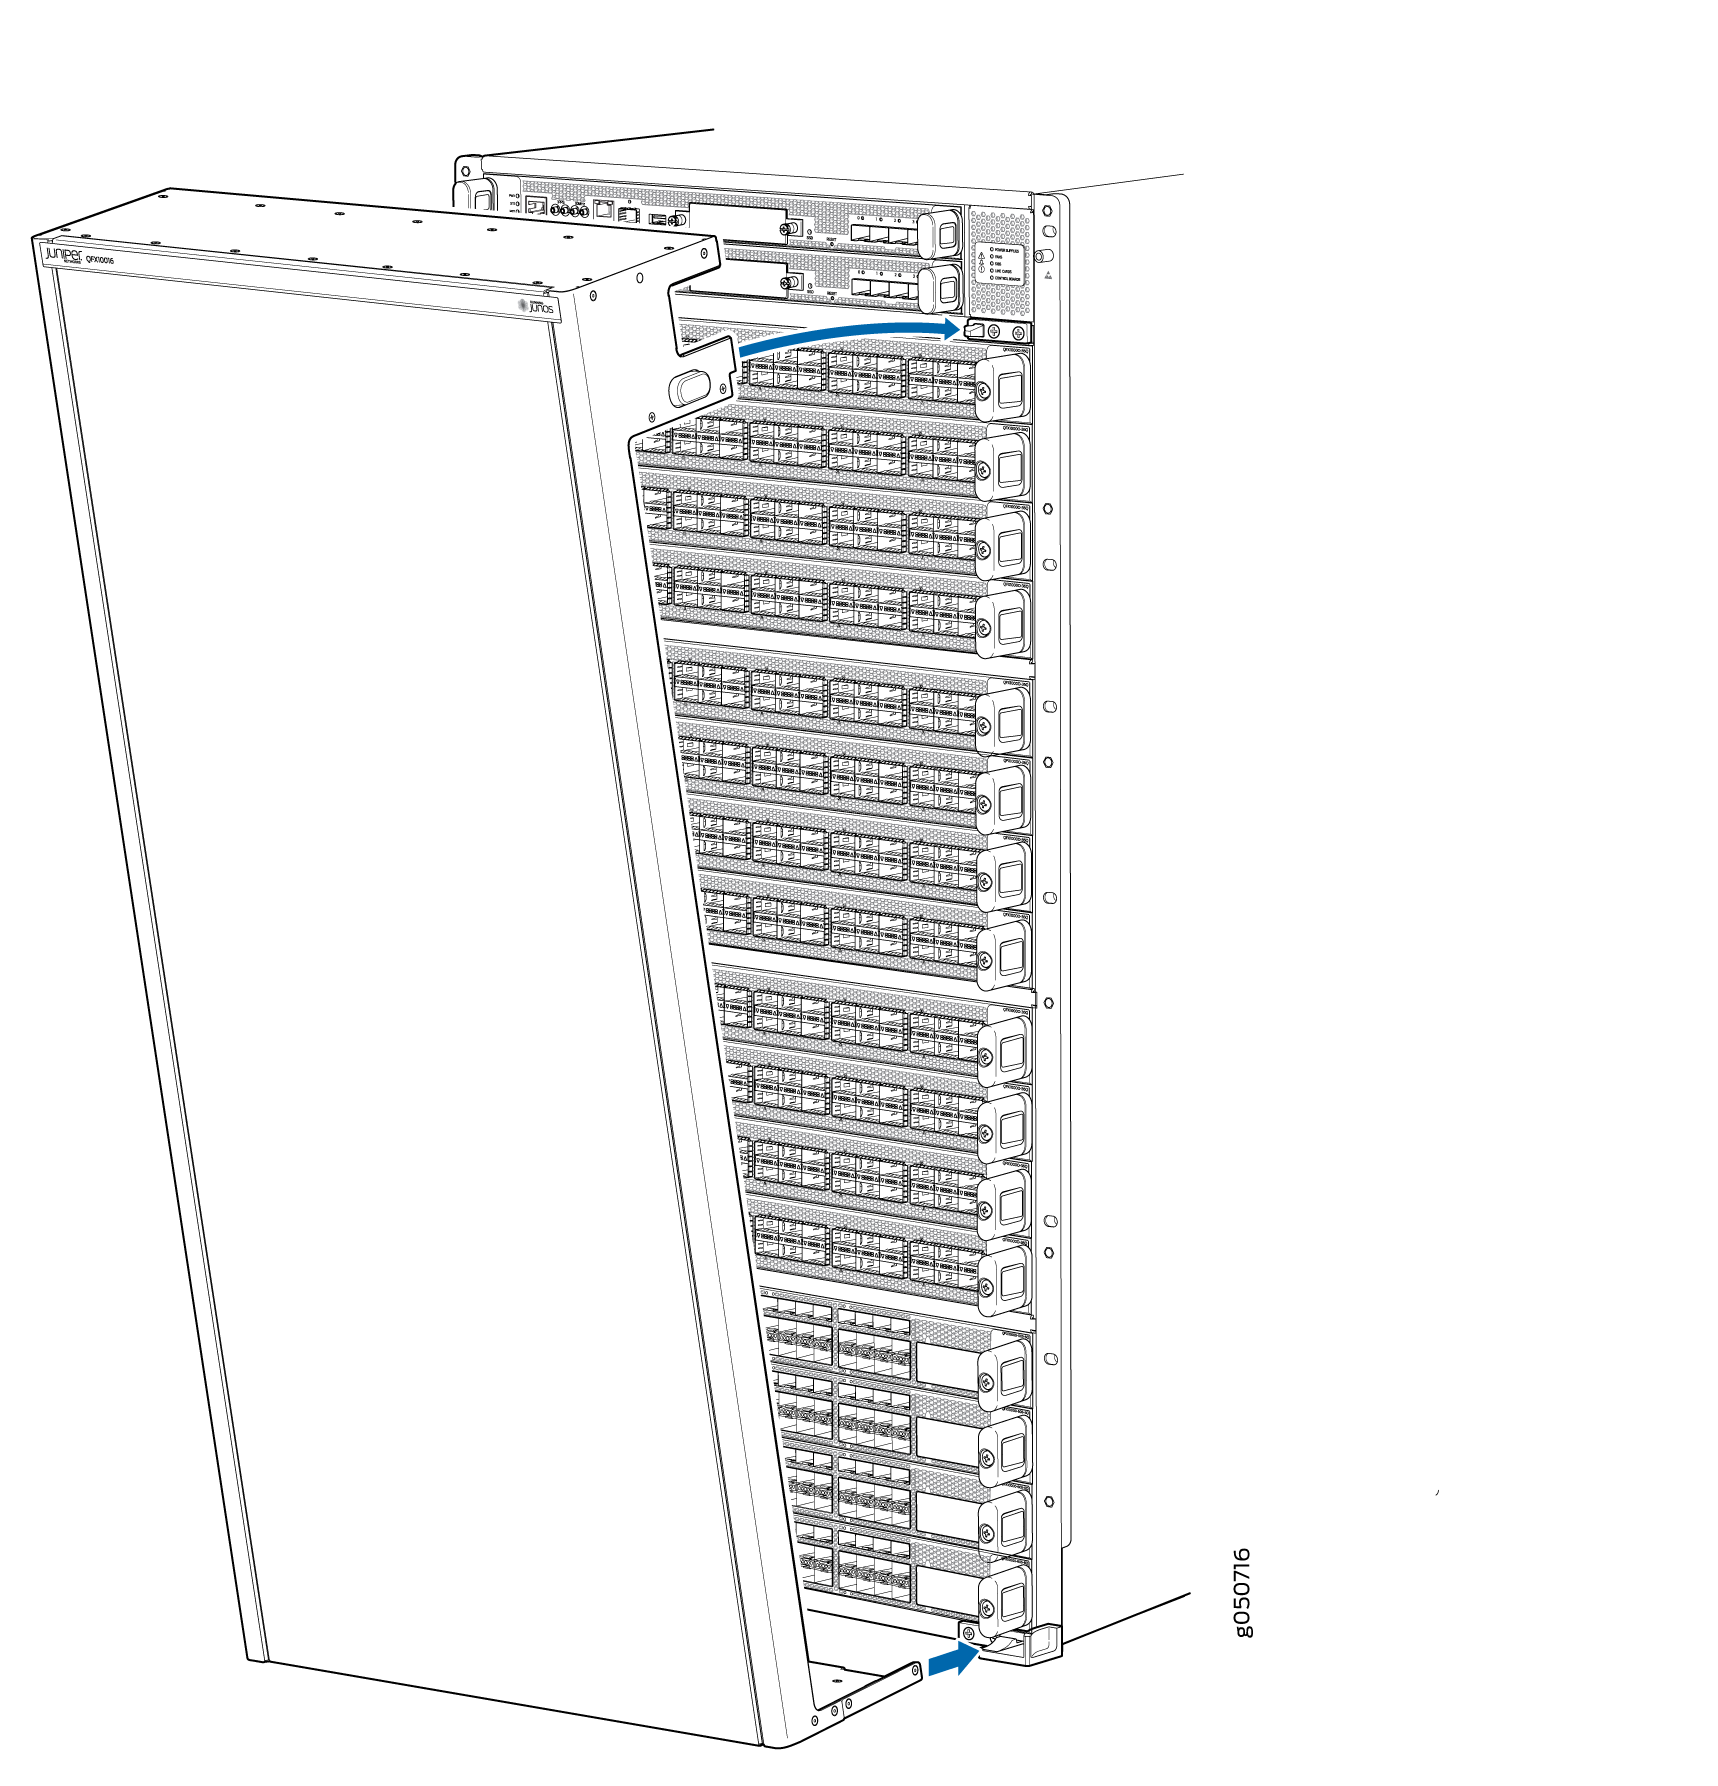
Install the Front Panel
To install the front panel:
Connect Power to the Chassis
Before supplying power to the QFX10016, ensure that you complete these tasks:
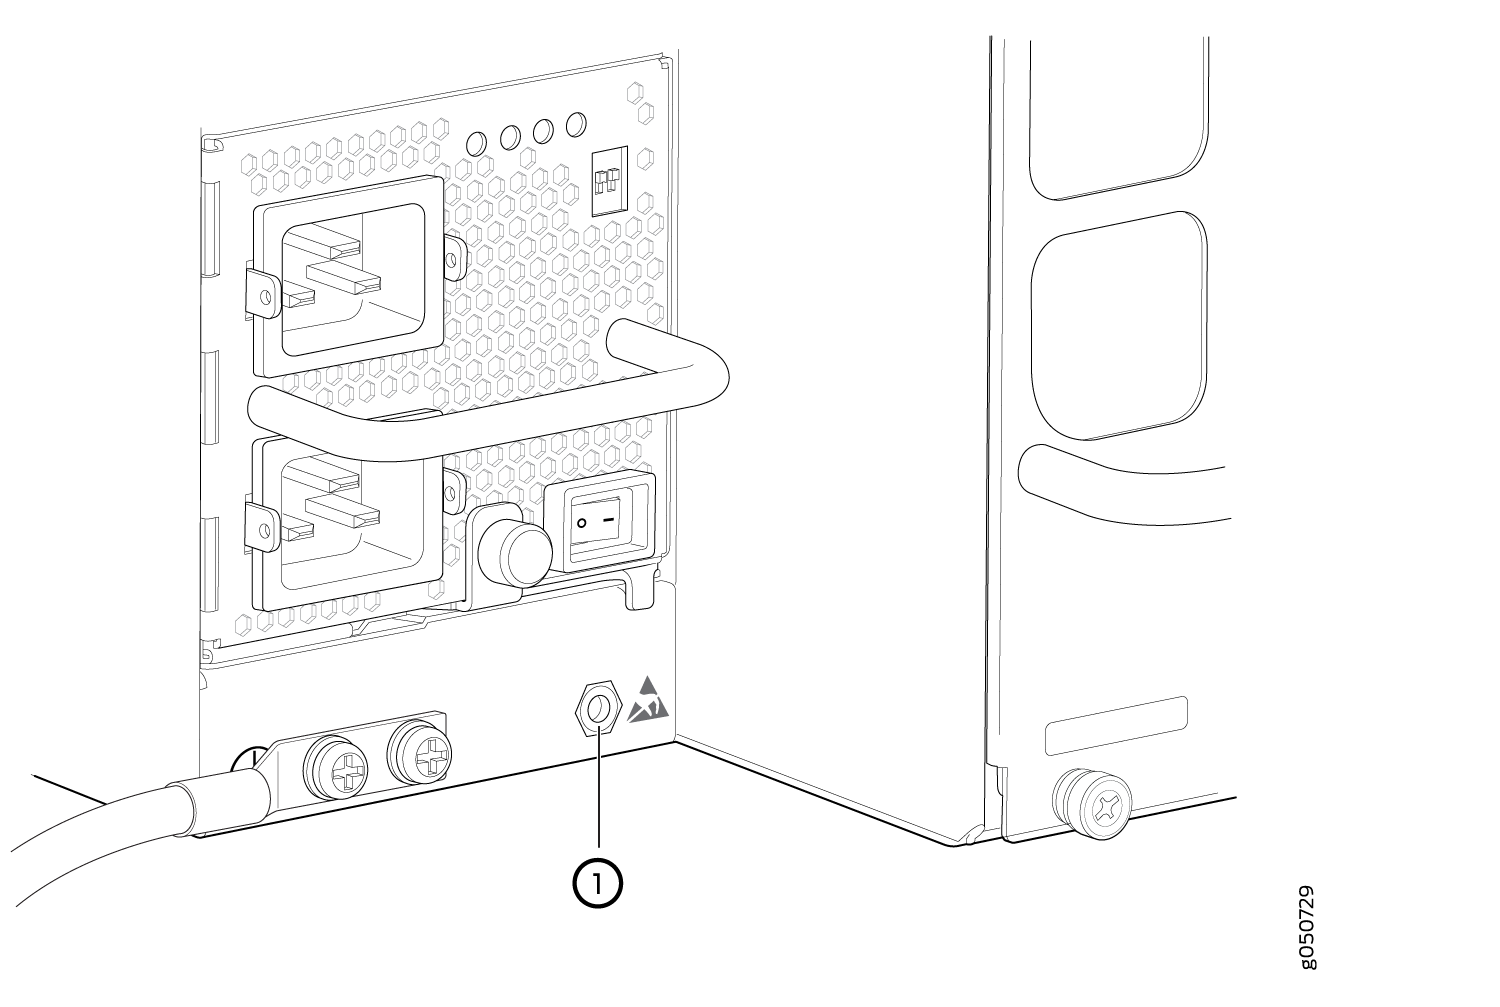
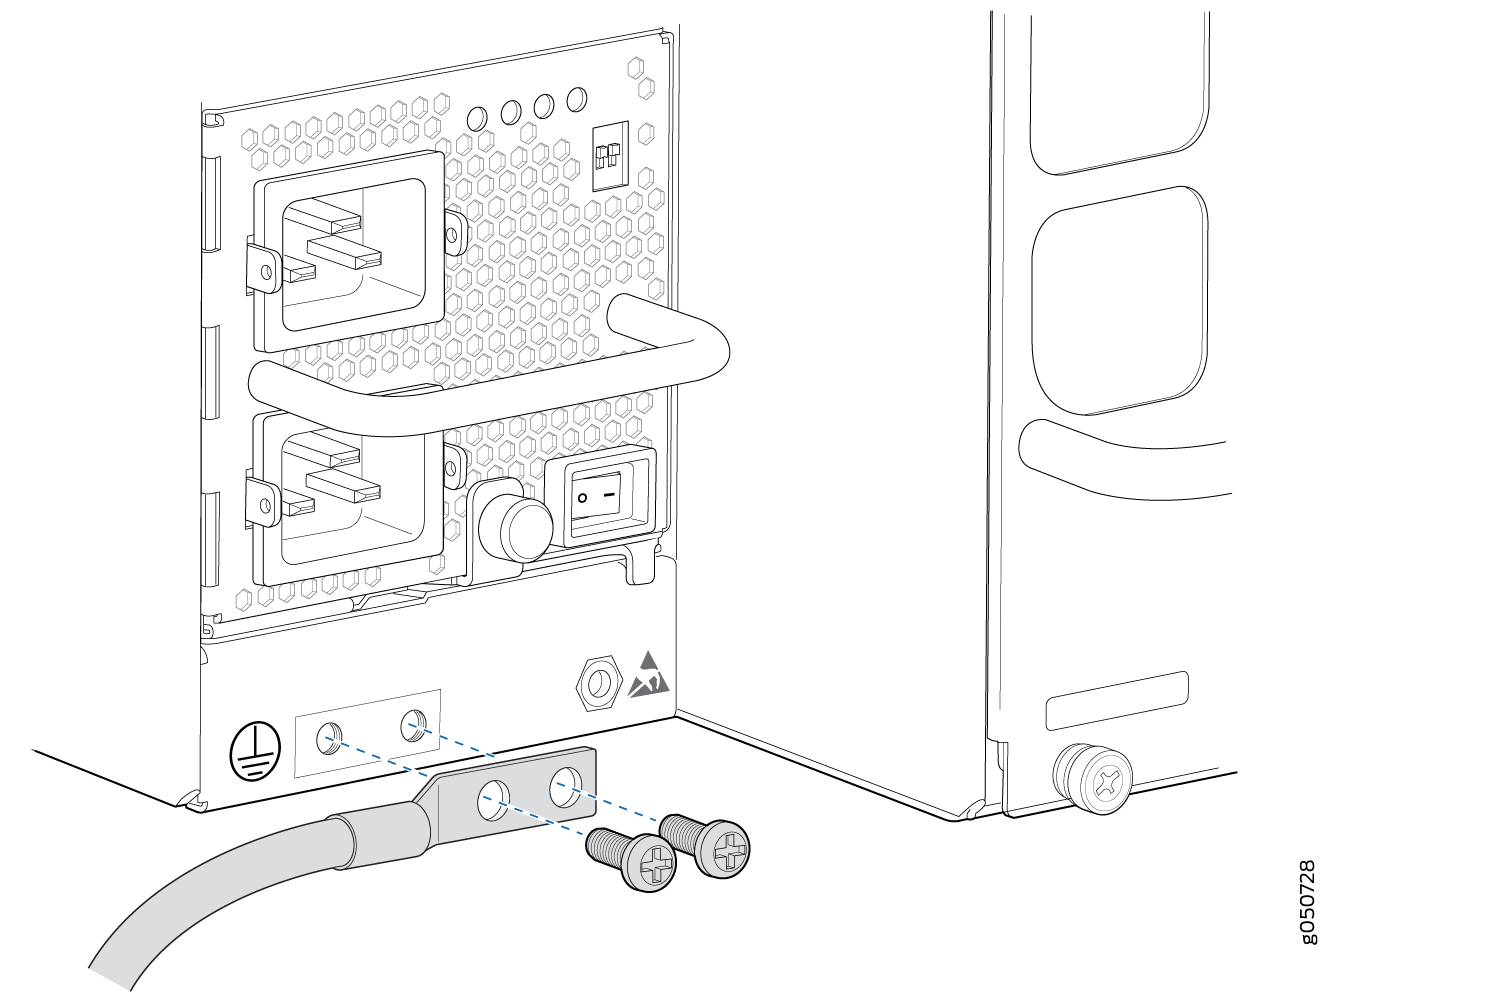
Ground the Chassis
For installations that require a separate grounding conductor to the chassis, you must attach a protective earthing terminal bracket on the chassis. There are mounting holes for the terminal bracket on the left-rear side of the chassis to connect to the earth ground.
Before you connect earth ground to the protective earthing terminal of a QFX10016, ensure that a licensed electrician has attached an appropriate grounding lug to the grounding cable.
Using a grounding cable with an incorrectly attached lug can damage the switch.
An AC-powered QFX10016 gains additional grounding when you plug the power supply in the switch into a grounded AC power outlet by using an AC power cord appropriate for your geographical location.
To connect earth ground to a QFX10016:
Install AC Power Supplies
Do not mix AC and DC power supplies in the same chassis.
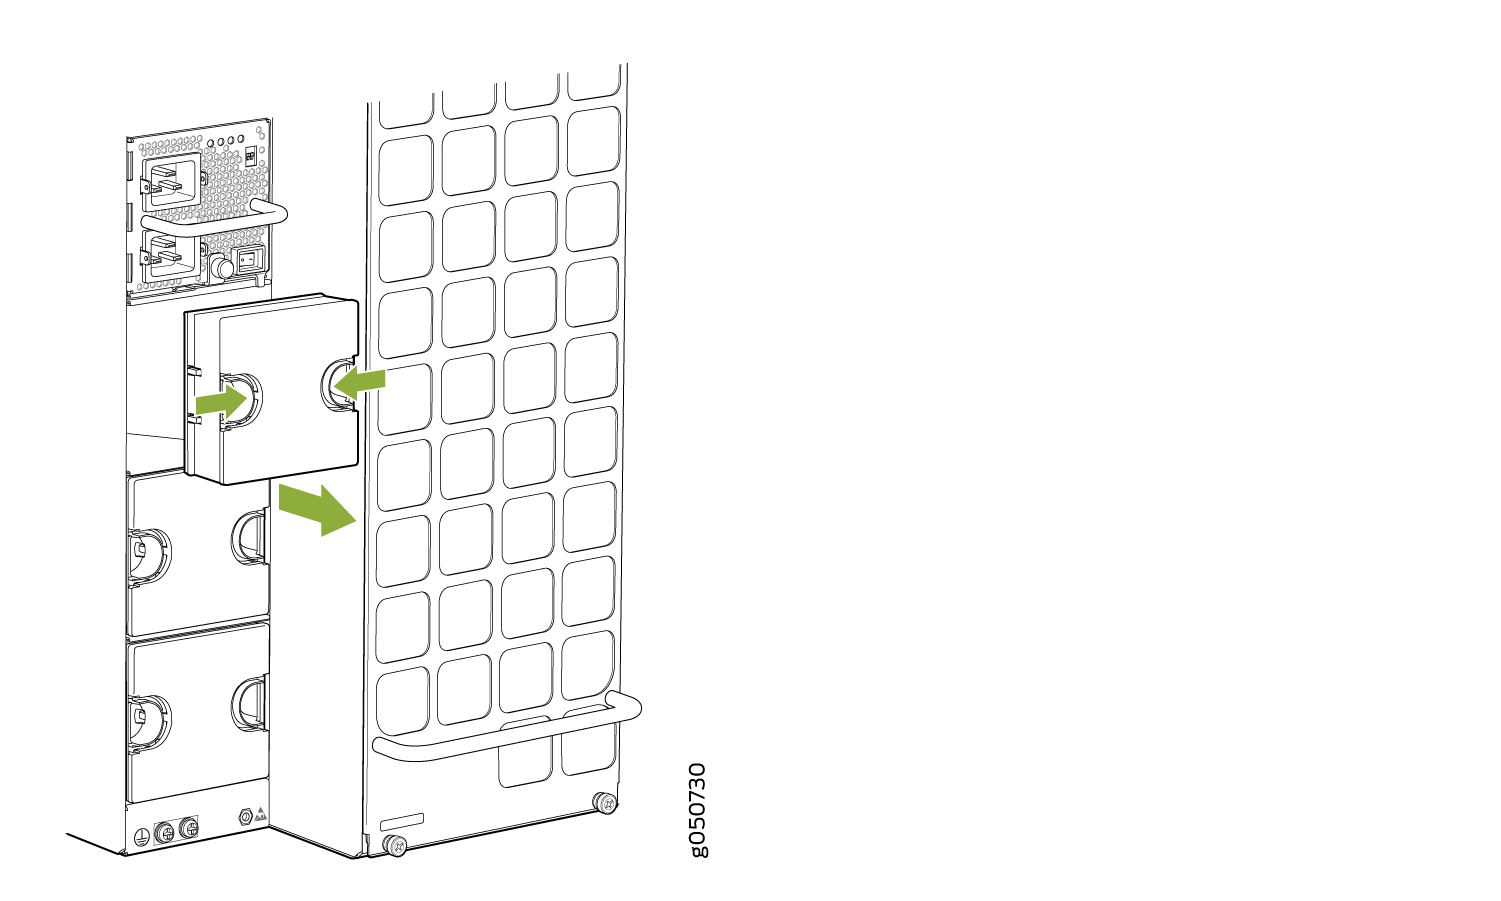
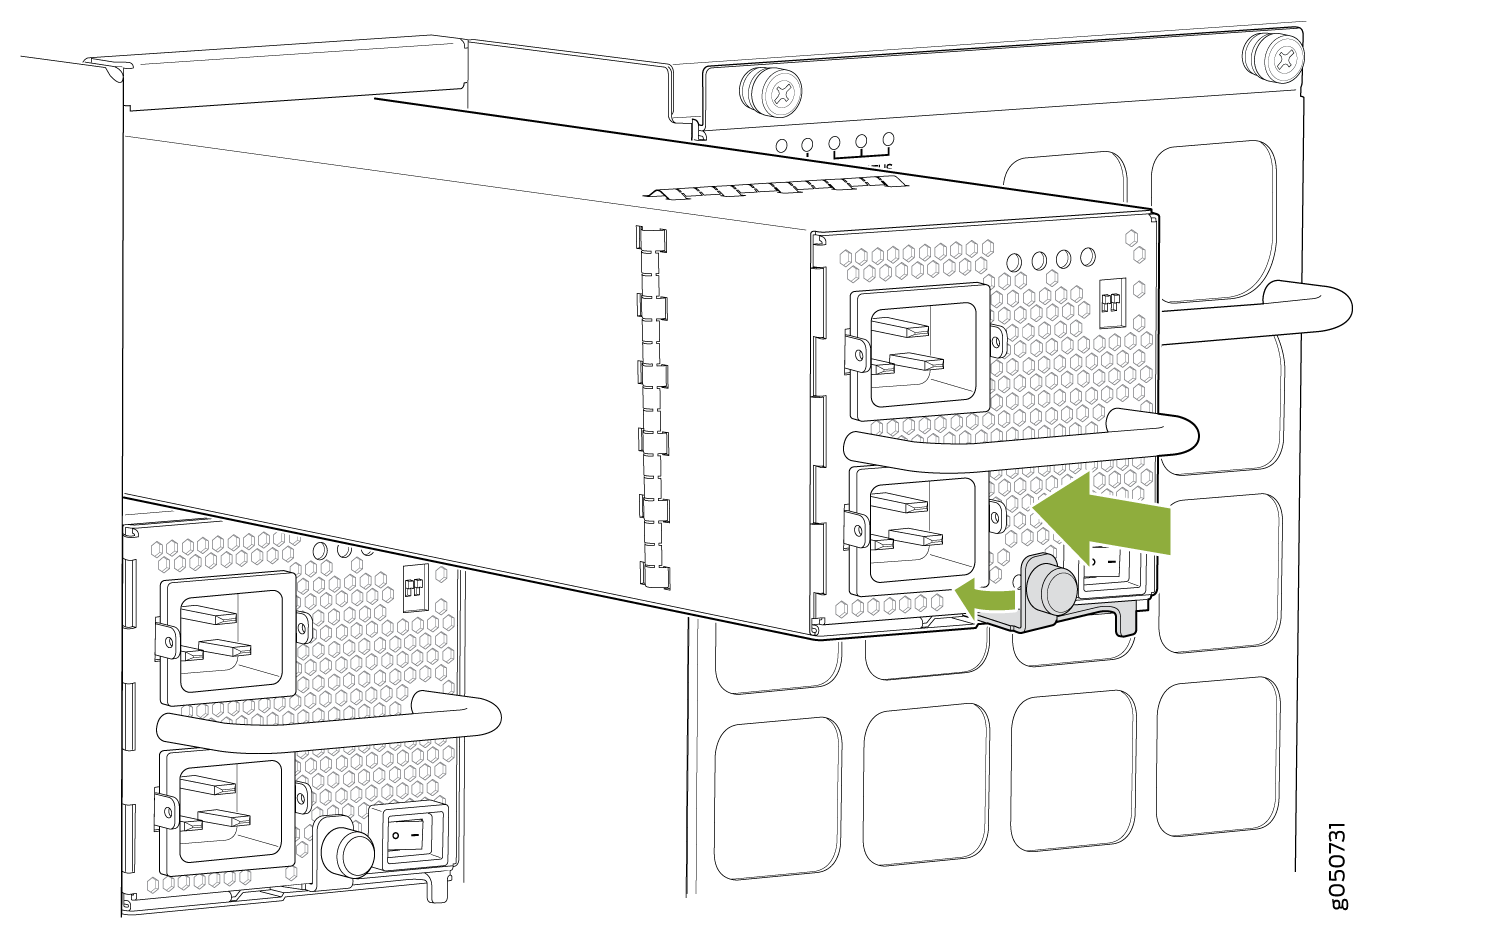
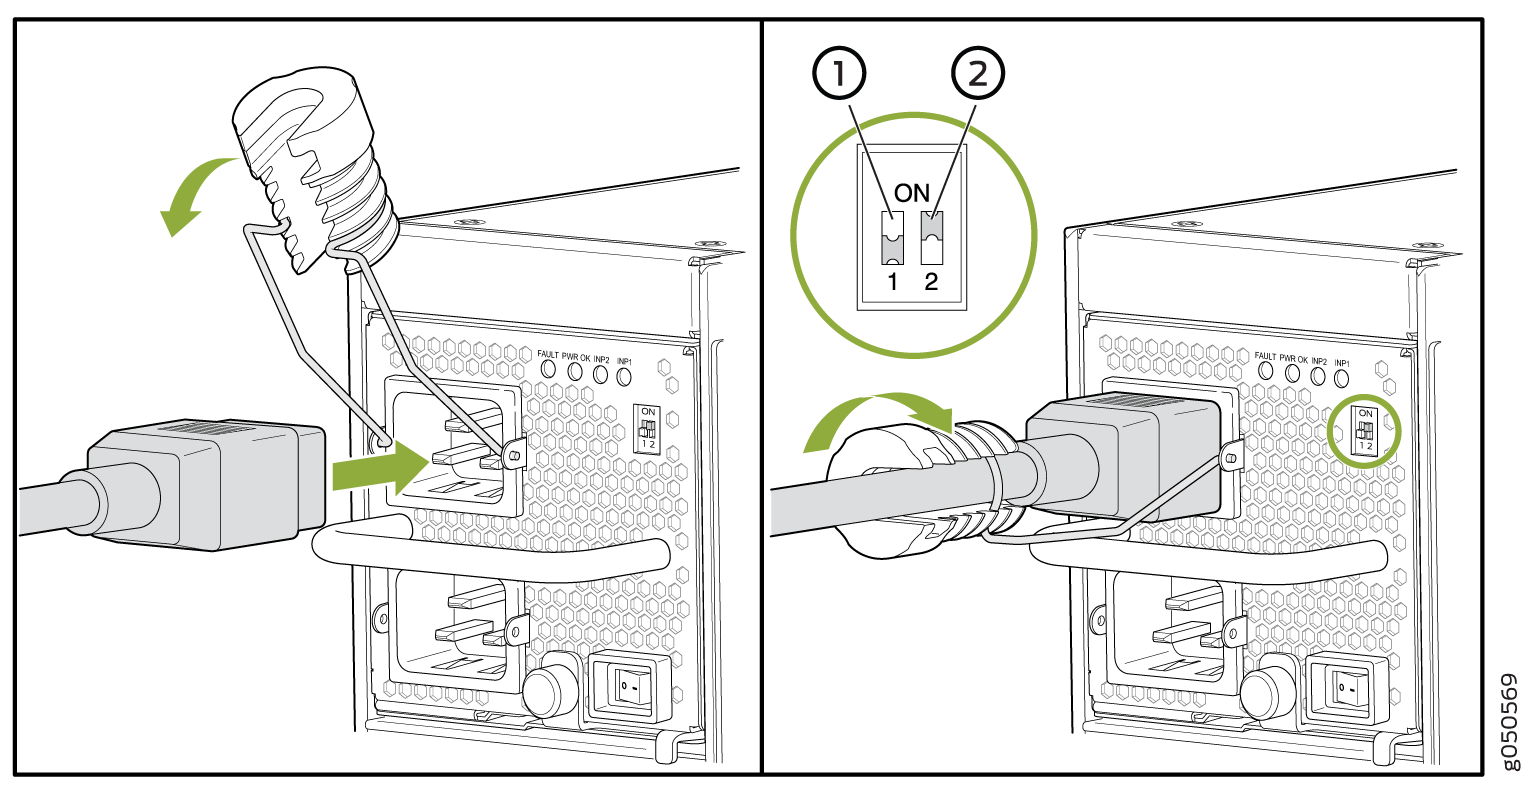
To install an AC power supply in a QFX10016 :
Install DC Power Supplies
Do not mix AC and DC power supplies in the same chassis.
Before you install a DC power supply in the chassis, ensure that you have followed all safety warnings and cautions:
Before performing DC power procedures, ensure that power is removed from the DC circuit. To ensure that all power is off, locate the circuit breaker on the panel board that services the DC circuit, switch the circuit breaker to the OFF position, and tape the switch handle of the circuit breaker in the OFF position.
Before you connect power to the switch, a licensed electrician must attach a cable lug to the grounding and power cables that you supply. A cable with an incorrectly attached lug can damage the switch (for example, by causing a short circuit).
To meet safety and electromagnetic interference (EMI) requirements and to ensure proper operation, you must connect QFX10016 switches to earth ground before you connect them to power. For installations that require a separate grounding conductor to the chassis, use the protective earthing terminal on the switch chassis to connect to earth ground. For instructions on connecting a QFX10016 switch to ground using a separate grounding conductor, see Ground the Chassis.
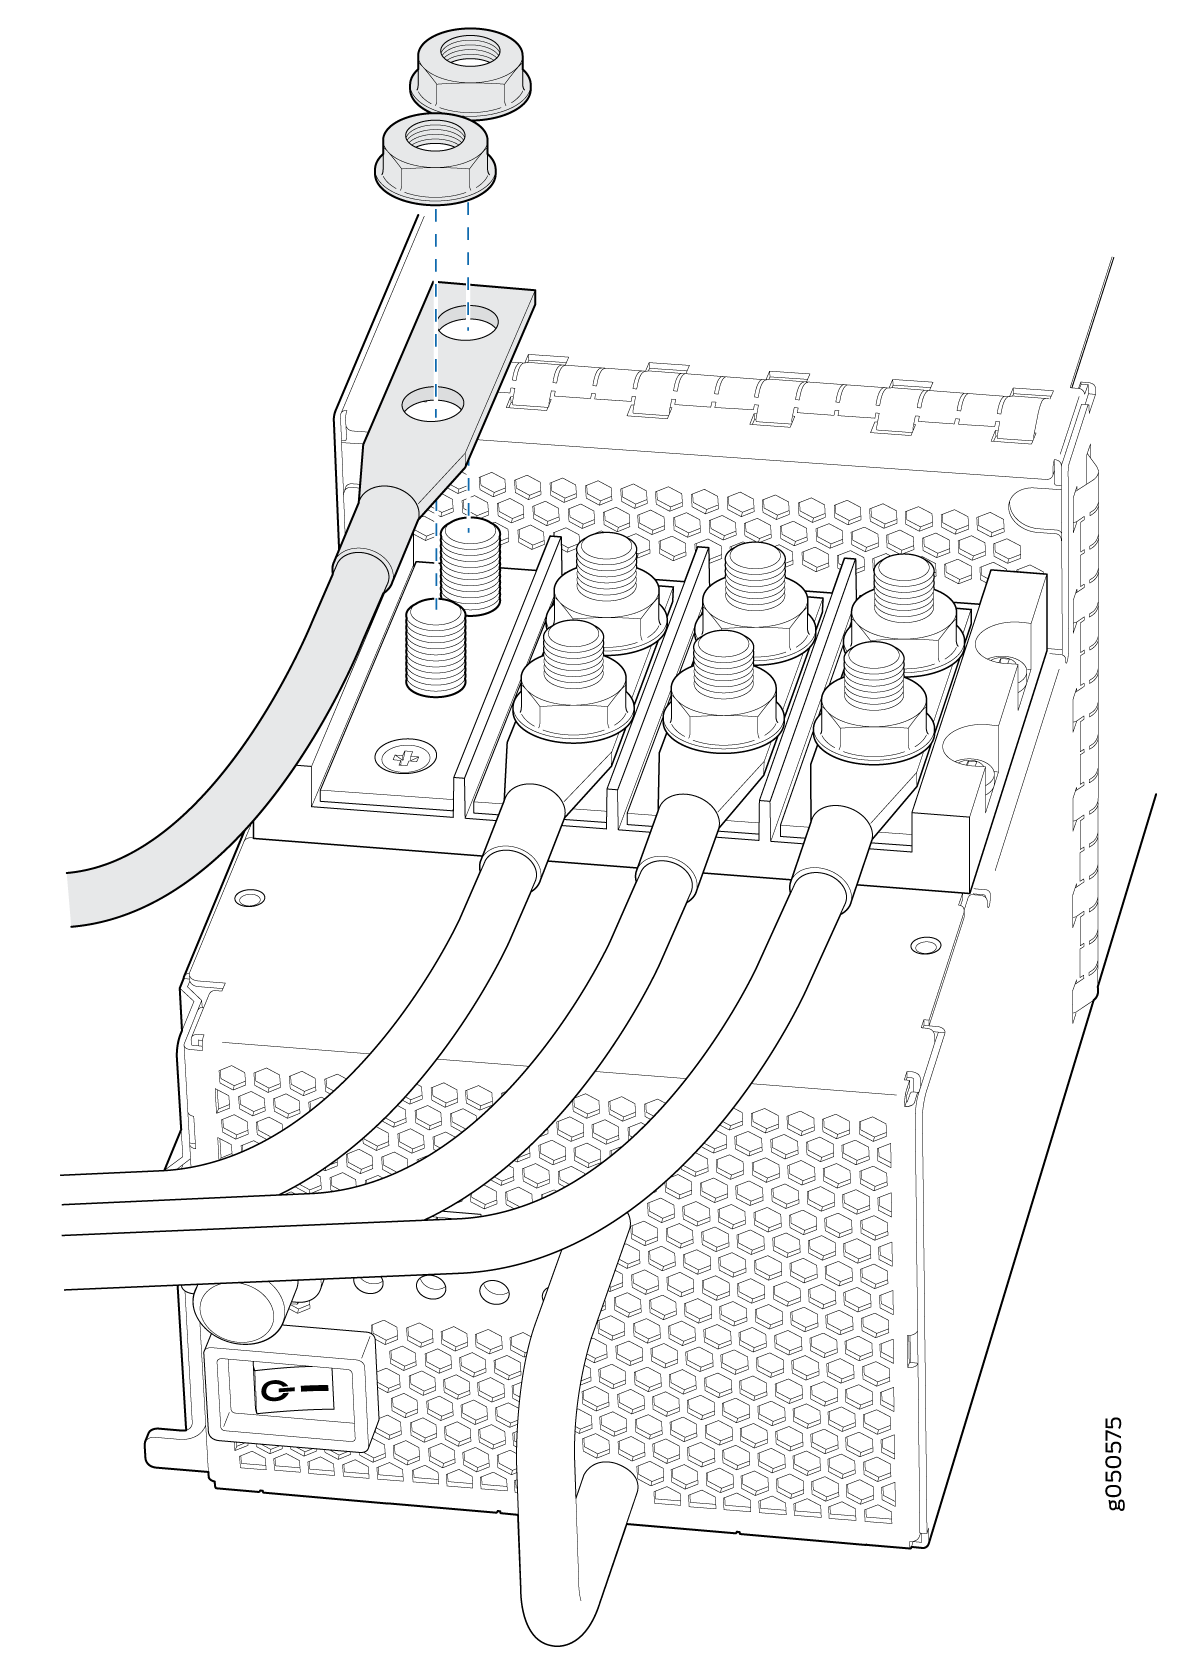
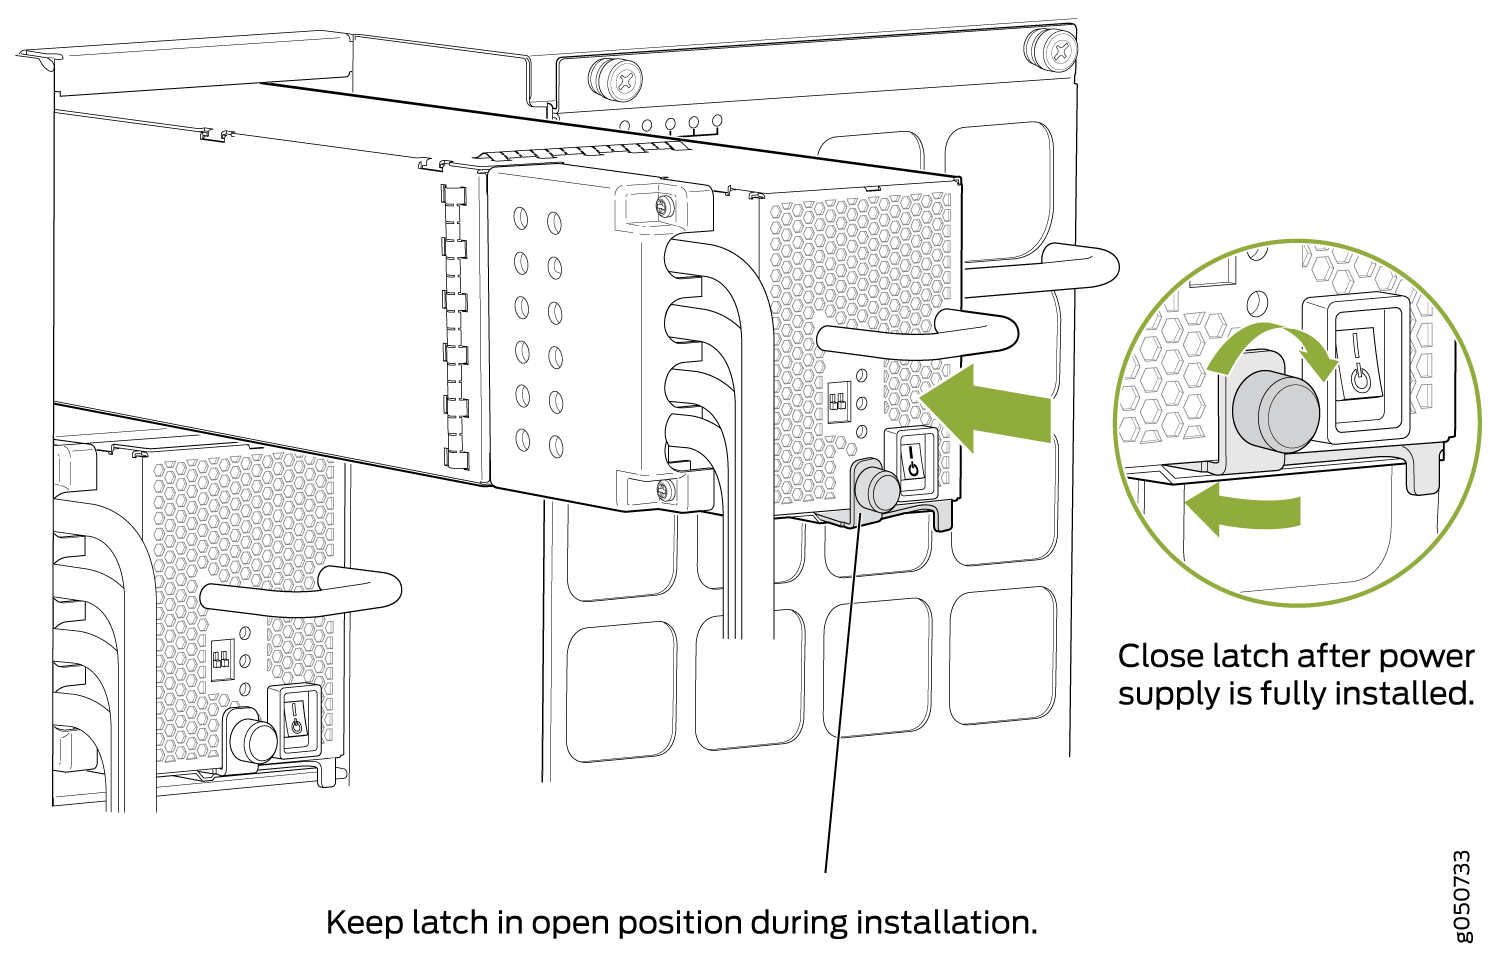
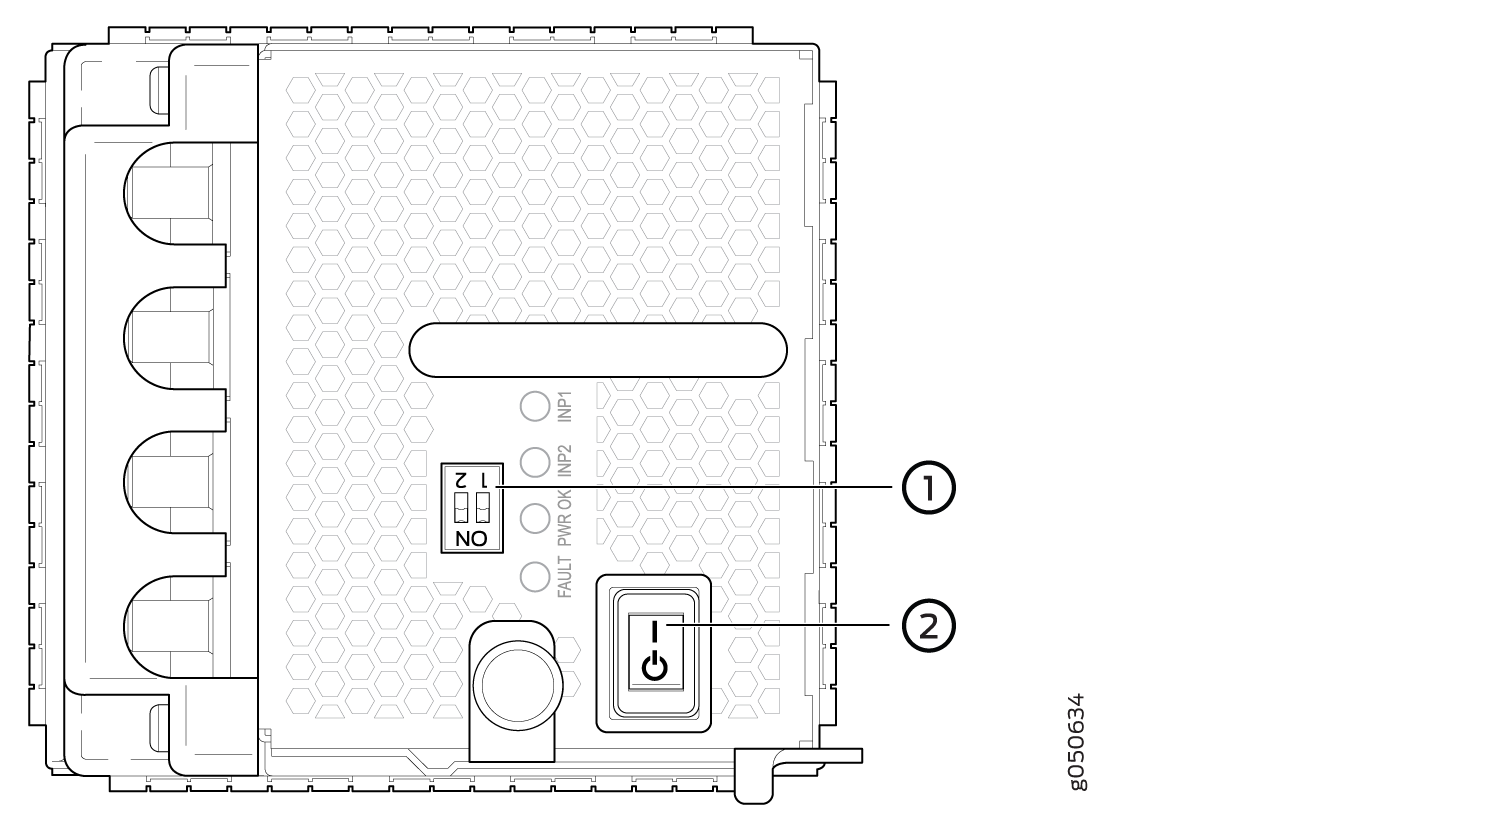
To install a DC power supply in a QFX10016:

