Configure and Deploy Adaptive Threat Profiling
An SRX Series Firewall that has already been enrolled with Juniper ATP Cloud should include all the necessary configuration to begin leveraging adaptive threat profiling.
To begin, validate that the device already contains a URL for security-intelligence (SecIntel).
-
Check the URL for the feed server.
Your output should look similar to the following:
show services security-intelligence url
https://cloudfeeds.sky.junipersecurity.net/api/manifest.xml
Note:If the URL is not present in the configuration, try re-enrolling the device in Juniper ATP Cloud. See Enroll an SRX Series Firewall using Juniper ATP Cloud Web Portal.
-
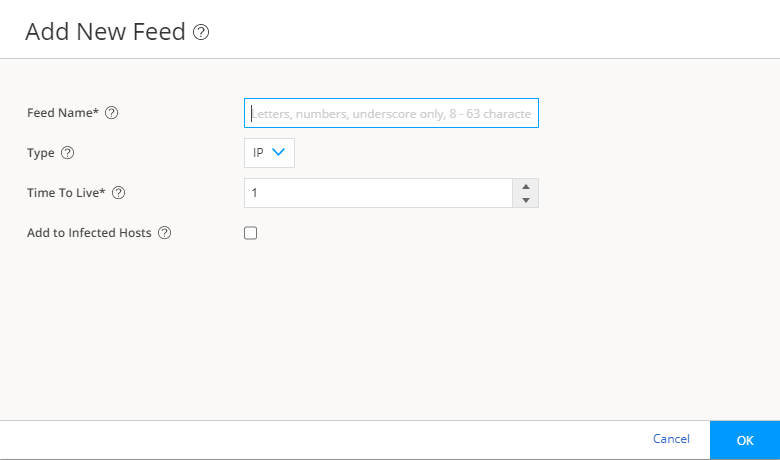
Create an adaptive threat profiling feed in Juniper ATP Cloud. Log into Juniper ATP Cloud UI, select Configure > Adaptive Threat Profiling. The Adaptive Threat Profiling page appears as shown in Figure 1. In this example, we will use the feed name High_Risk_Users with a time-to-live (TTL) of seven days.
Figure 1: Add New Feed
-
Click OK to save changes. For more information, see Create an Adaptive Threat Profiling Feed.
-
Ensure that the feed has been downloaded by your SRX Series Firewall. This is done automatically at regular intervals but can take a few seconds.
A manual download of the SecIntel database can speed up this process, if necessary.
> request services security-intelligence download

> request services security-intelligence download status |match High_Risk_Users

Feed High_Risk_Users (20200615.1) root-logical-system of category SecProfiling download succeeded.
You can deploy adaptive threat profiling on the SRX Series Firewalls in the following ways:
-
As a detection solution
-
As an enforcement solution
-
As both detection and enforcement solution
To use adaptive threat profiling to detect threats, you can define adaptive threat profiling actions in the following locations:
-
Within the security policy on deny, reject, and permit rules, where you can add the source and/or destination address of the flow to a feed of your choice.
[edit security policies global policy Threat_Profiling]
admin@vSRX# set then permit application-services security-intelligence ?
Possible completions:
> add-destination-identity-to-feed  Add Destination Identity to Feed
> add-destination-ip-to-feed  Add Destination IP to Feed
> add-source-identity-to-feed  Add Source Identity to Feed
> add-source-ip-to-feed  Add Source IP to Feed
-
Within an IDP Policy as an application-service that adds the origin of the exploit (the attacker) or the target of the exploit to a feed of your choice.
[edit security idp idp-policy Threat_Profiling rulebase-ips rule Scanners]
admin@vSRX# set then application-services security-intelligence ?
Possible completions:
  add-attacker-ip-to-feed  Specify the desired feed-name
  add-target-ip-to-feed  Specify the desired feed-name
To take effect, you must apply the IDP policy to a traditional policy or unified policy.
[edit security policies global policy Threat_Profiling]
admin@vSRX# set then permit application-services idp-policy Threat_?
Possible completions:
 <idp-policy>         Specify idp policy name
  Threat_Profiling     [security idp idp-policy]
Once the feed is created, it can then be referenced as a dynamic address group within a security policy as the source-address or destination-address match criteria.
In the following example, we have created a rule which allows authenticated users access to the Enterprise’s Crown Jewels, but are excluding any source-addresses that are part of the High_Risk_Users dynamic address group (sourced from the threat feed of the same name).
[edit security policies global policy Access_To_Crown_Jewels]
admin@vSRX# show
match {
    source-address High_Risk_Users;
    destination-address Crown_Jewels;
    source-address-excluded;
    source-identity authenticated-user;
    dynamic-application any;
}
then {
    permit;
    log {
        session-close;
    }
}
Use the following command to view the feed summary and status:
show services security-intelligence sec-profiling-feed status
show services security-intelligence sec-profiling-feed status Category name	:SecProfiling
Feed name	:High_Risk_Users
Feed type		:IP
Last post time	:2020-02-06 10:54:10 PST Last post status code:200
Last post status	:succeeded
show security dynamic-address category-name SecProfiling
show security dynamic-address category-name SecProfiling
No.     IP-start          IP-end            Feed                 Address
1       10.1.1.100        10.1.1.100        High_Risk_Users      High_Risk_Users
2       192.168.0.10      192.168.0.10      High_Risk_Users      High_Risk_Users
3       192.168.0.88      192.168.0.88      High_Risk_Users      High_Risk_Users
Dynamic-address entries will only be displayed by this command if the feed name being referenced (High_Risk_Users in the example), has been used as a source or destination address in a security policy.
Feed contents can always be viewed in the Juniper ATP Cloud portal, regardless of their state on the SRX Series Firewalls.
