Installing a Standalone Red Hat OpenShift Container Platform 3.11 Cluster with Contrail Using Contrail OpenShift Deployer
This topic covers Contrail Networking in Red Hat Openshift environments that are using Contrail Networking Release 21-based releases.
Starting in Release 22.1, Contrail Networking evolved into Cloud-Native Contrail Networking. Cloud-Native Contrail offers significant enhancements to optimize networking performance in Kubernetes-orchestrated environments. Cloud-Native Contrail supports Red Hat Openshift and we strongly recommend using Cloud-Native Contrail for networking in environments using Red Hat Openshift.
For general information about Cloud-Native Contrail, see the Cloud-Native Contrail Networking Techlibrary homepage.
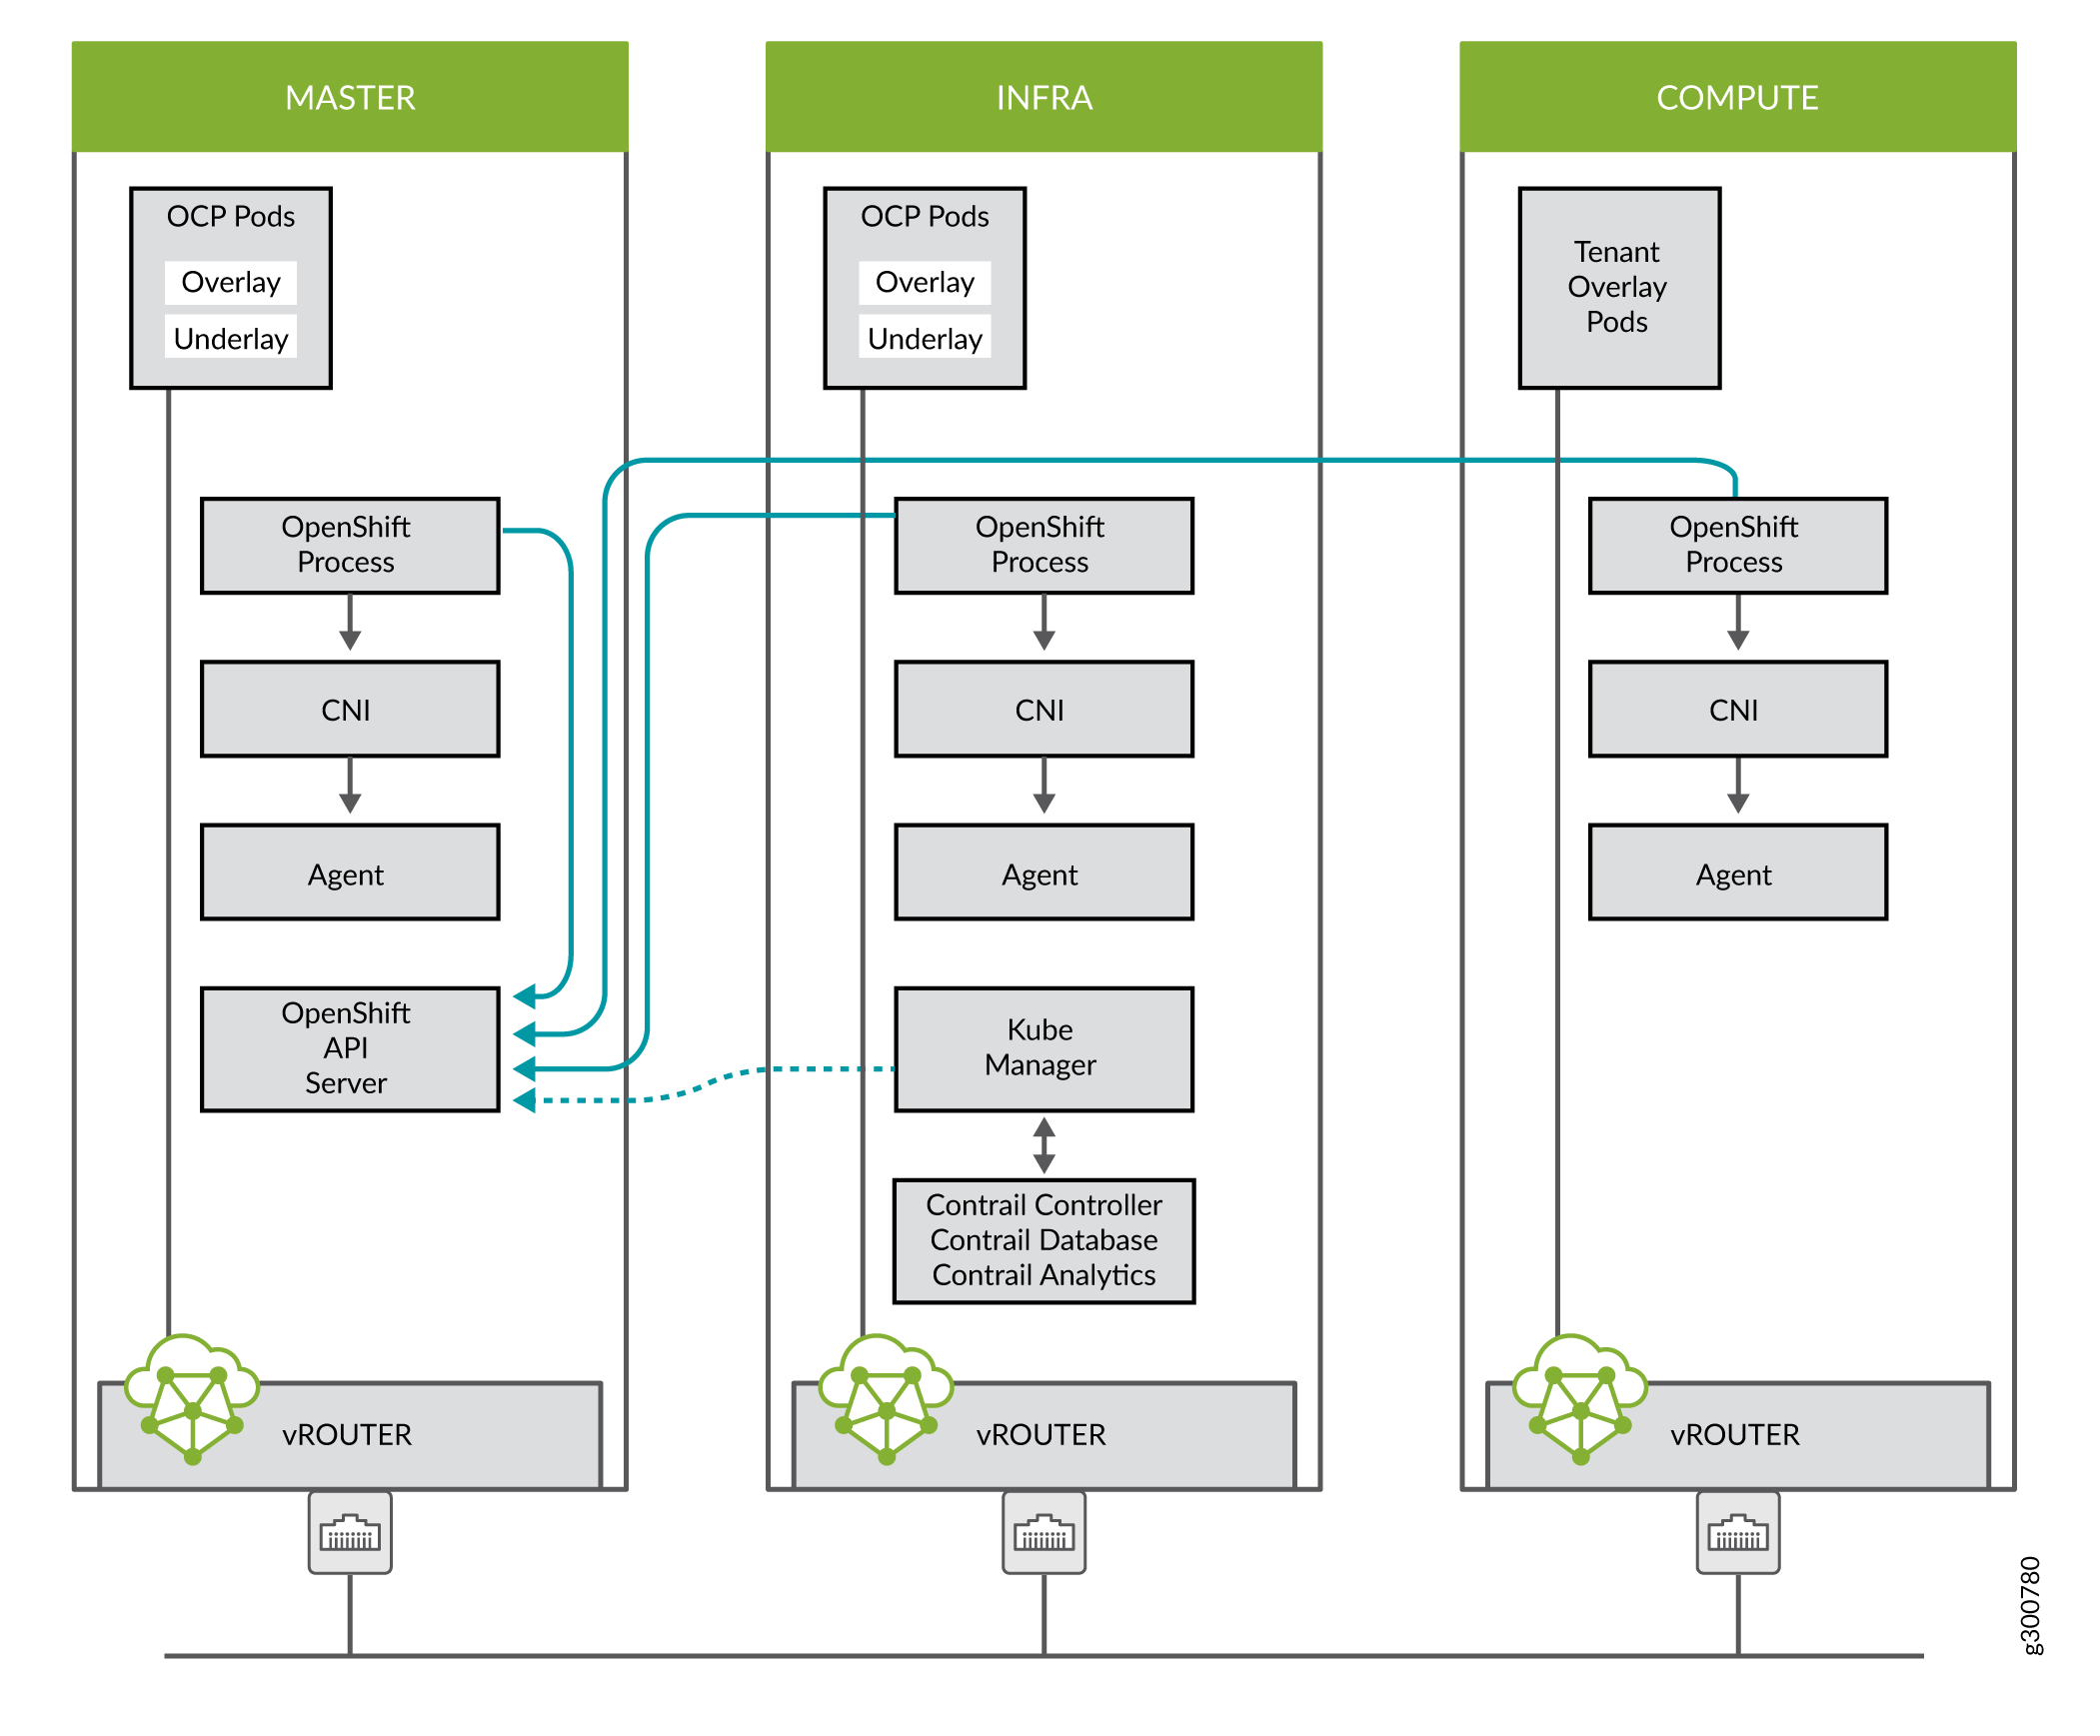
You can install Contrail Networking together with a standalone Red Hat OpenShift Container Platform 3.11 cluster using Contrail OpenShift deployer. Consider the topology illustrated here.
Prerequisites
The recommended system requirements are:
System Requirements |
Primary Node |
Infrastructure Node |
Compute Node |
|---|---|---|---|
CPU/RAM |
8 vCPU, 16 GB RAM |
16 vCPU, 64 GB RAM |
As per OpenShift recommendations. |
Disk |
100 GB |
250 GB |
If you use NFS mount volumes, check disk capacity and mounts. Also, openshift-logging with NFS is not recommended.
Perform the following steps to install a standalone OpenShift 3.11 cluster along with Contrail Networking using contrail-openshift-deployer.
OpenShift 3.11 cluster upgrades are not supported.
Sample inventory/ose-install File
[OSEv3:vars]

###########################################################################
### OpenShift Basic Vars
###########################################################################
openshift_deployment_type=openshift-enterprise
deployment_type=openshift-enterprise
containerized=false
openshift_disable_check=docker_image_availability,memory_availability,package_availability,disk_availability,package_version,docker_storage

# Default node selectors
openshift_hosted_infra_selector="node-role.kubernetes.io/infra=true"

oreg_auth_user=<>
oreg_auth_password=<>

###########################################################################
### OpenShift Master Vars
###########################################################################

openshift_master_api_port=8443
openshift_master_console_port=8443
openshift_master_cluster_method=native

# Set this line to enable NFS
openshift_enable_unsupported_configurations=True


###########################################################################
### OpenShift Network Vars
###########################################################################

openshift_use_openshift_sdn=false
os_sdn_network_plugin_name='cni'
openshift_use_contrail=true

###########################################################################
### OpenShift Authentication Vars
###########################################################################

# htpasswd Authentication
openshift_master_identity_providers=[{'name': 'htpasswd_auth', 'login': 'true', 'challenge': 'true', 'kind': 'HTPasswdPasswordIdentityProvider'}]

###########################################################################
### OpenShift Router and Registry Vars
###########################################################################

openshift_hosted_router_replicas=1
openshift_hosted_registry_replicas=1

openshift_hosted_registry_storage_kind=nfs
openshift_hosted_registry_storage_access_modes=['ReadWriteMany']
openshift_hosted_registry_storage_nfs_directory=/export
openshift_hosted_registry_storage_nfs_options='*(rw,root_squash)'
openshift_hosted_registry_storage_volume_name=registry
openshift_hosted_registry_storage_volume_size=10Gi
openshift_hosted_registry_pullthrough=true
openshift_hosted_registry_acceptschema2=true
openshift_hosted_registry_enforcequota=true
openshift_hosted_router_selector="node-role.kubernetes.io/infra=true"
openshift_hosted_registry_selector="node-role.kubernetes.io/infra=true"

###########################################################################
### OpenShift Service Catalog Vars
###########################################################################

openshift_enable_service_catalog=True

template_service_broker_install=True
openshift_template_service_broker_namespaces=['openshift']

ansible_service_broker_install=True

openshift_hosted_etcd_storage_kind=nfs
openshift_hosted_etcd_storage_nfs_options="*(rw,root_squash,sync,no_wdelay)"
openshift_hosted_etcd_storage_nfs_directory=/export
openshift_hosted_etcd_storage_labels={'storage': 'etcd-asb'}
openshift_hosted_etcd_storage_volume_name=etcd-asb
openshift_hosted_etcd_storage_access_modes=['ReadWriteOnce']
openshift_hosted_etcd_storage_volume_size=2G


###########################################################################
### OpenShift Metrics and Logging Vars
###########################################################################
# Enable cluster metrics
openshift_metrics_install_metrics=True

openshift_metrics_storage_kind=nfs
openshift_metrics_storage_access_modes=['ReadWriteOnce']
openshift_metrics_storage_nfs_directory=/export
openshift_metrics_storage_nfs_options='*(rw,root_squash)'
openshift_metrics_storage_volume_name=metrics
openshift_metrics_storage_volume_size=2Gi
openshift_metrics_storage_labels={'storage': 'metrics'}

openshift_metrics_cassandra_nodeselector={"node-role.kubernetes.io/infra":"true"}
openshift_metrics_hawkular_nodeselector={"node-role.kubernetes.io/infra":"true"}
openshift_metrics_heapster_nodeselector={"node-role.kubernetes.io/infra":"true"}

# Enable cluster logging. ((
####openshift_logging_install_logging=True
openshift_logging_install_logging=False
#openshift_logging_storage_kind=nfs
#openshift_logging_storage_access_modes=['ReadWriteOnce']
#openshift_logging_storage_nfs_directory=/export
#openshift_logging_storage_nfs_options='*(rw,root_squash)'
#openshift_logging_storage_volume_name=logging
#openshift_logging_storage_volume_size=5Gi
#openshift_logging_storage_labels={'storage': 'logging'}
#openshift_logging_es_cluster_size=1
#openshift_logging_es_nodeselector={"node-role.kubernetes.io/infra":"true"}
#openshift_logging_kibana_nodeselector={"node-role.kubernetes.io/infra":"true"}
#openshift_logging_curator_nodeselector={"node-role.kubernetes.io/infra":"true"}

###########################################################################
### OpenShift Prometheus Vars
###########################################################################

## Add Prometheus Metrics:
openshift_hosted_prometheus_deploy=True
openshift_prometheus_node_selector={"node-role.kubernetes.io/infra":"true"}
openshift_prometheus_namespace=openshift-metrics

# Prometheus
openshift_prometheus_storage_kind=nfs
openshift_prometheus_storage_access_modes=['ReadWriteOnce']
openshift_prometheus_storage_nfs_directory=/export
openshift_prometheus_storage_nfs_options='*(rw,root_squash)'
openshift_prometheus_storage_volume_name=prometheus
openshift_prometheus_storage_volume_size=1Gi
openshift_prometheus_storage_labels={'storage': 'prometheus'}
openshift_prometheus_storage_type='pvc'

# For prometheus-alertmanager
openshift_prometheus_alertmanager_storage_kind=nfs
openshift_prometheus_alertmanager_storage_access_modes=['ReadWriteOnce']
openshift_prometheus_alertmanager_storage_nfs_directory=/export
openshift_prometheus_alertmanager_storage_nfs_options='*(rw,root_squash)'
openshift_prometheus_alertmanager_storage_volume_name=prometheus-alertmanager
openshift_prometheus_alertmanager_storage_volume_size=1Gi
openshift_prometheus_alertmanager_storage_labels={'storage': 'prometheus-alertmanager'}
openshift_prometheus_alertmanager_storage_type='pvc'

# For prometheus-alertbuffer
openshift_prometheus_alertbuffer_storage_kind=nfs
openshift_prometheus_alertbuffer_storage_access_modes=['ReadWriteOnce']
openshift_prometheus_alertbuffer_storage_nfs_directory=/export
openshift_prometheus_alertbuffer_storage_nfs_options='*(rw,root_squash)'
openshift_prometheus_alertbuffer_storage_volume_name=prometheus-alertbuffer
openshift_prometheus_alertbuffer_storage_volume_size=1Gi
openshift_prometheus_alertbuffer_storage_labels={'storage': 'prometheus-alertbuffer'}
openshift_prometheus_alertbuffer_storage_type='pvc'


#########################################################################
### Openshift HA
#########################################################################

# Openshift HA
openshift_master_cluster_hostname=load-balancer-0-3eba0c20dc494dfc93d5d50d06bbde89
openshift_master_cluster_public_hostname=load-balancer-0-3eba0c20dc494dfc93d5d50d06bbde89


#########################################################################
### Contrail Variables
########################################################################

service_subnets="172.30.0.0/16"
pod_subnets="10.128.0.0/14"

# Below are Contrail variables. Comment them out if you don't want to install Contrail through ansible-playbook
contrail_version=5.1
contrail_container_tag=<>
contrail_registry=hub.juniper.net/contrail
contrail_registry_username=<>
contrail_registry_password=<>
openshift_docker_insecure_registries=hub.juniper.net/contrail
contrail_nodes=[10.0.0.5,10.0.0.3,10.0.0.4]
vrouter_physical_interface=eth0


###########################################################################
### OpenShift Hosts
###########################################################################
[OSEv3:children]
masters
etcd
nodes
lb
nfs
openshift_ca

[masters]
kube-master-2-3eba0c20dc494dfc93d5d50d06bbde89
kube-master-1-3eba0c20dc494dfc93d5d50d06bbde89
kube-master-0-3eba0c20dc494dfc93d5d50d06bbde89

[etcd]
kube-master-2-3eba0c20dc494dfc93d5d50d06bbde89
kube-master-1-3eba0c20dc494dfc93d5d50d06bbde89
kube-master-0-3eba0c20dc494dfc93d5d50d06bbde89

[lb]
load-balancer-0-3eba0c20dc494dfc93d5d50d06bbde89

[nodes]
kube-master-2-3eba0c20dc494dfc93d5d50d06bbde89 openshift_node_group_name='node-config-master'
controller-0-3eba0c20dc494dfc93d5d50d06bbde89 openshift_node_group_name='node-config-infra'
compute-1-3eba0c20dc494dfc93d5d50d06bbde89 openshift_node_group_name='node-config-compute'
controller-2-3eba0c20dc494dfc93d5d50d06bbde89 openshift_node_group_name='node-config-infra'
kube-master-1-3eba0c20dc494dfc93d5d50d06bbde89 openshift_node_group_name='node-config-master'
kube-master-0-3eba0c20dc494dfc93d5d50d06bbde89 openshift_node_group_name='node-config-master'
compute-0-3eba0c20dc494dfc93d5d50d06bbde89 openshift_node_group_name='node-config-compute'
controller-1-3eba0c20dc494dfc93d5d50d06bbde89 openshift_node_group_name='node-config-infra'

[nfs]
load-balancer-0-3eba0c20dc494dfc93d5d50d06bbde89

[openshift_ca]
kube-master-2-3eba0c20dc494dfc93d5d50d06bbde89
kube-master-1-3eba0c20dc494dfc93d5d50d06bbde89
kube-master-0-3eba0c20dc494dfc93d5d50d06bbde89
The /etc/resolv.conf must have write permissions.
Caveats and Troubleshooting Instructions
If a Java error occurs, install the
yum install
java-1.8.0-openjdk-devel.x86_64
package and rerundeploy_cluster.If the service_catalog parameter does not pass but the cluster is operational, check whether the /etc/resolv.conf has
cluster.localin its search line, and the nameserver as host IP address.NTP is installed by OpenShift and must be synchronized by the user. This does not affect any Contrail functionality but is displayed in the
contrail-statusoutput.If the
ansible_service_brokercomponent of OpenShift is not up and itsansible_service_broker_deploydisplays an error, it means that theansible_service_brokerpod did not come up properly. The most likely reason is that theansible_service_brokerpod failed its liveliness and readiness checks. Modify the liveliness and readiness checks of this pod when it’s brought online to make it operational. Also, verify that theansible_service_brokerpod uses the correct URL from Red Hat.