Backup and Restore of Contrail Service Orchestration (CSO) Databases
This document introduces the backup and restore capabilities available in Contrail Service Orchestration (CSO). It provides an overview of the concepts, command options, and some examples of how to manage these functions. Although CSO is a GUI-based application, the backup and restore operations can only be managed from the CLI of the installer virtual machine (installer-vm). See the Operations for details.
CSO Database Backup and Restore
The Contrail Service Orchestration (CSO) architecture is made up of several virtual machines, each handling pieces of the workload required to make CSO function. These virtual machines store and access their working data in various databases. In order for CSO to function properly, all of the running databases must be functioning properly. Backup and restore of this critical data is key to ensuring that your CSO installation is running at its best. A full backup of all platform, OpCo, tenant, and customer data can be run manually or periodically and that data can be restored from the backups when and if the need arises.

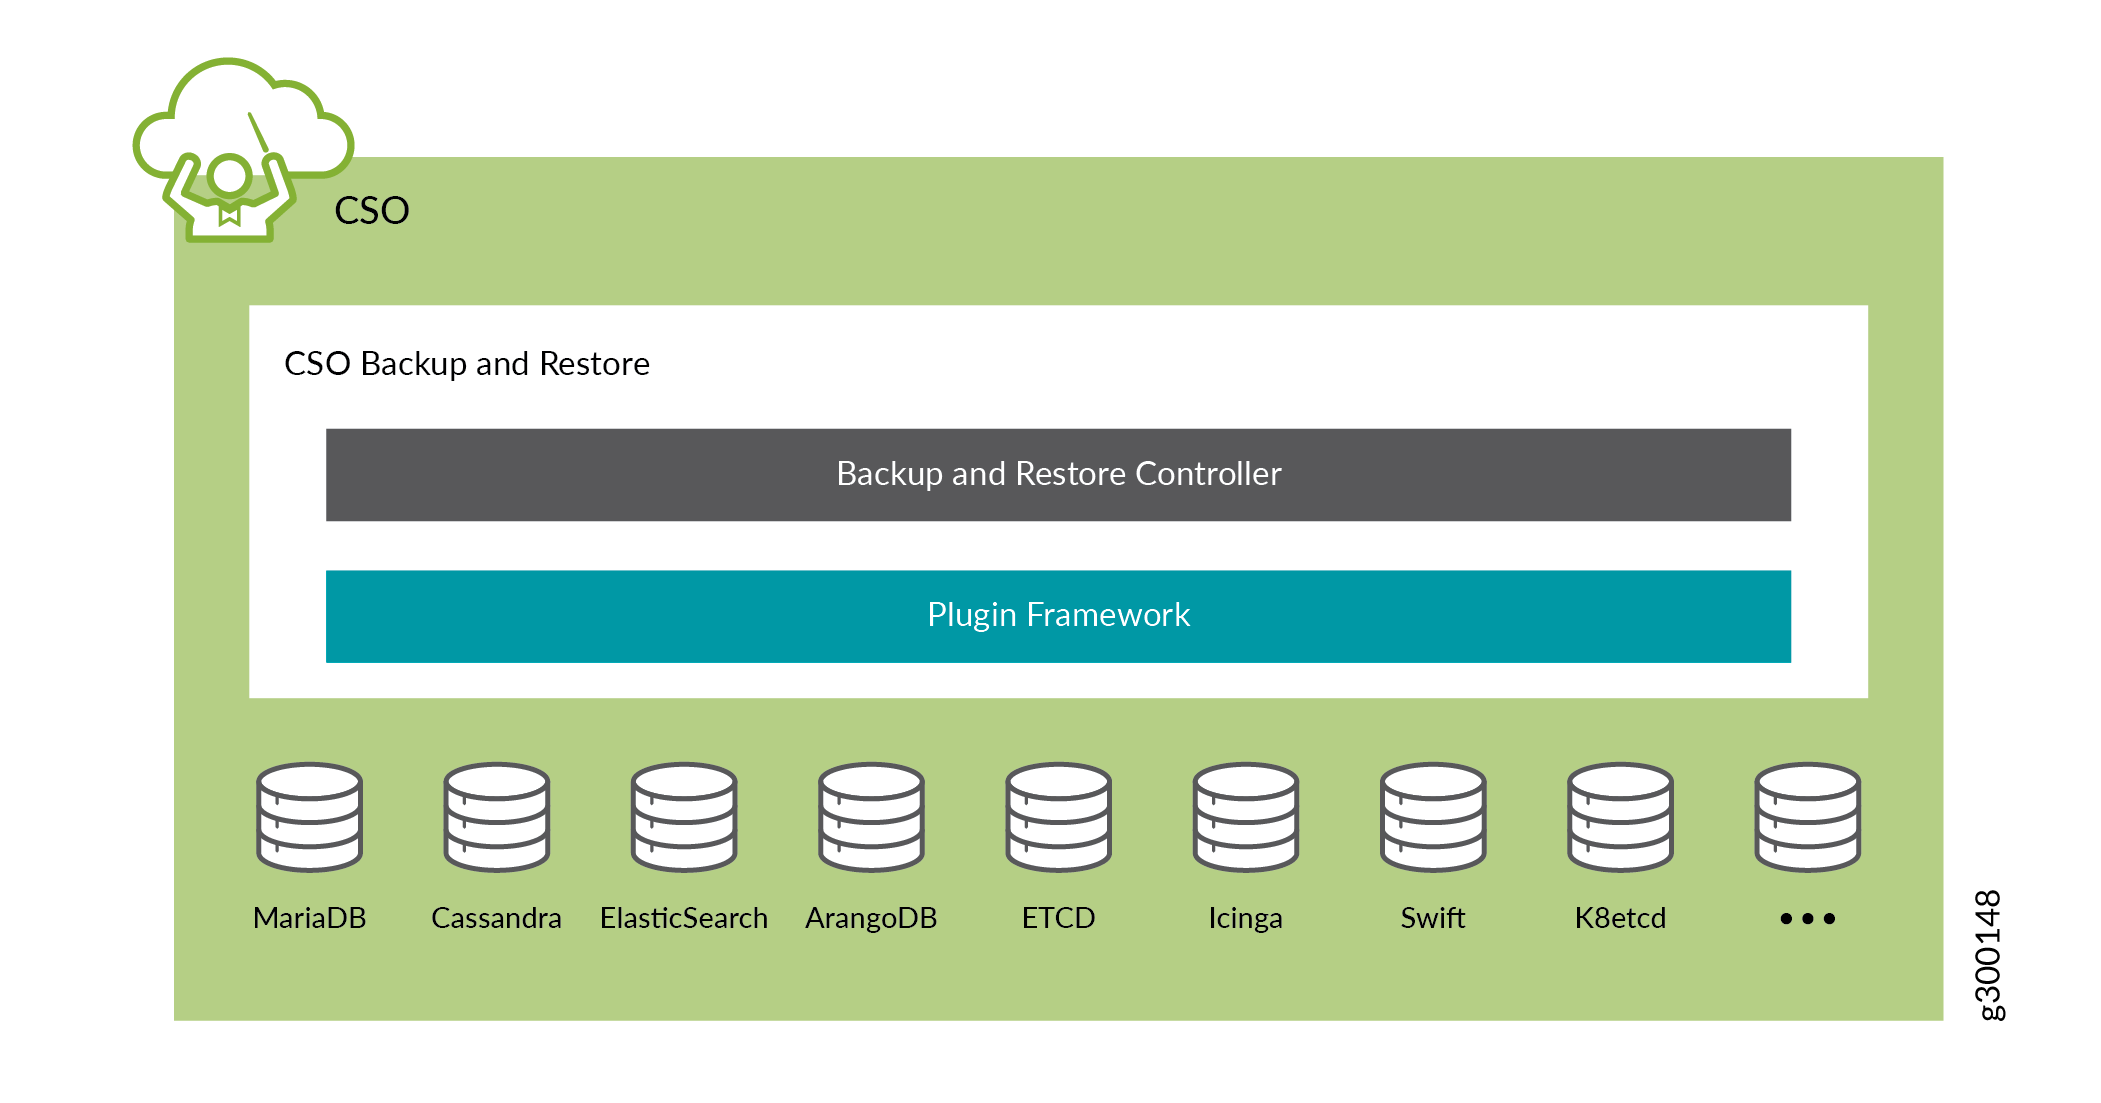
Figure 1 shows a conceptual image of how backup and restore is implemented in CSO 4.1. The database systems that are currently backed up within the framework are: MariaDB, Cassandra, ElasticSearch, ArangoDB, Zookeeper, and ETCD. The system also backs up encrypted passwords, and system certificates so that restoring data from any specific backup puts CSO back into the state it was in at the time of that backup.
Any changes made between the last backup and the current restoration are lost. Generally, backups are made on a system-wide basis meaning that individual op-co or tenant data can not be backed up or restored apart from the rest of the system data.
While it is possible to backup and restore individual databases, there are risks when doing this since the restored database might not be able to fully synch with the current states of the existing databases. This is especially true if there is a long period of time between the backup and restore operations.
The backup and restore operations work on small, medium, and large deployments both with or without high-availability (HA). This document describes the configuration, scheduling, and operation of backup and restore procedures in CSO.
Configuration
Backup and restore are critical tasks that touch every data storage system used by CSO. Juniper relieves you of the burden of configuring backup details by automatically setting up everything needed to backup and restore CSO during the installation process. No configuration is needed.
Major Components
Although there is no major interaction between the user and the underlying components that make up the backup framework, it is helpful to know the functions that each of the components perform. Table 1 lists the major components and a brief description of each.
Component |
Description |
|---|---|
Backup and Restore Controller |
|
Plug-in Framework |
|
Plug-in |
|
Operations
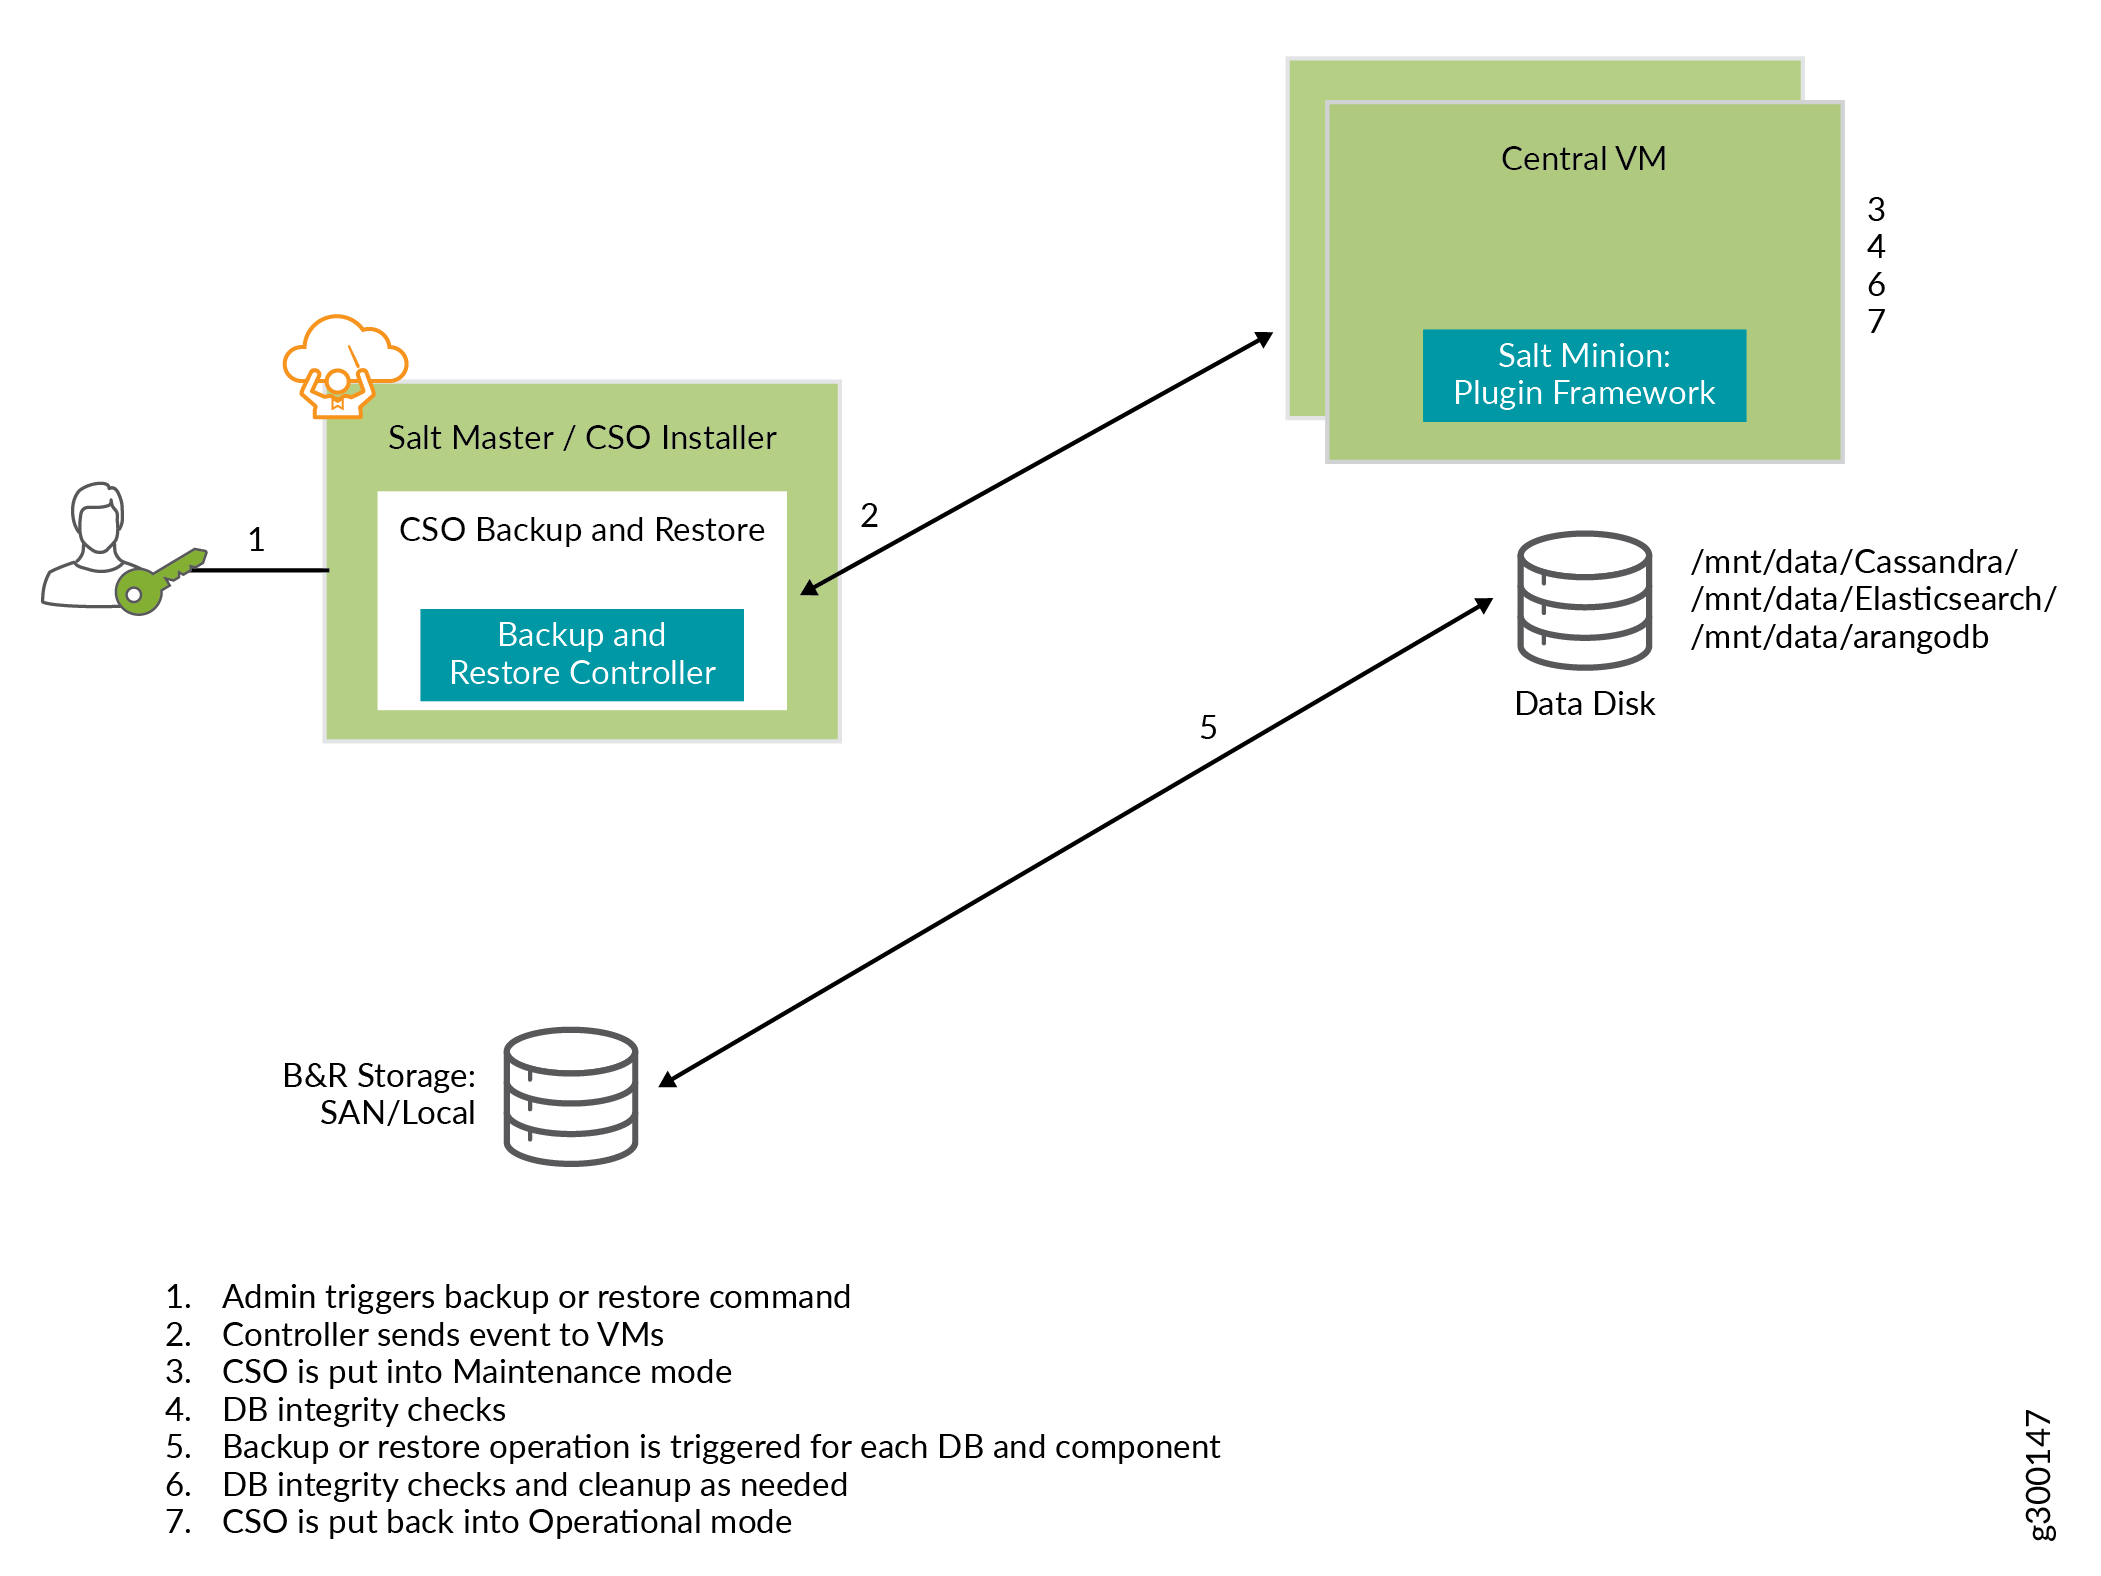
All of the backup and restore operations are performed using the command line interface (CLI) of the installer-vm machine. The user in charge of the operations logs onto the installer-vm over ssh and performs any needed operations. Figure 2 shows the flow of backup and restore operations.

For backup operations, run the cso_backupnrestore command on the installer-vm, using the proper arguments for backing
up an individual database or all of the databases. When this happens,
the backup and restore controller communicates the backup request
to the individual plug-ins using the SaltStack message bus. The plug-ins
that reside on the various central and regional vms receive the message
and trigger the needed action.
Backups are stored in the /backups/ directory on
the installer-vm. This location can not be changed. Ensure that there
is sufficient storage space on the installer-vm or startup server
to store the backup data.
For restore operations, the same cso_backupnrestore command is used with different options as described in Table 2 below. When restoring
from a backup, CSO puts itself into maintenance mode so that no changes
can be made. System stability is confirmed, and the needed restore
commands are sent to the plug-ins for each database as needed. Once
the restore is finished, CSO checks for system stability again, does
any required cleanup and puts itself back into operational mode.
Command Usage
The CLI command used to create backups or restore files from
backup is named cso_backupnrestore.
Options available for the cso_backupnrestore command
are shown in Table 2. Only one of the arguments can be used with any one of the options.
Option |
Purpose |
Arguments |
|---|---|---|
|
Specify operation (REQUIRED) |
backup, restore, healthcheck, reindex, backupdetails, listbackups, scheduledbackup |
|
Specify the name of the snapshot created by backup operation or restored by restore operation. |
backup name |
|
Specify which database to backup or restore [default ‘*’](OPTIONAL) |
For backup: only ‘*’ is allowed. For restore: Comma separated list with any or all of: cassandra, elasticsearch, zookeeper, mariadb, etcd, arrangodb. ’*’ restores all databases |
|
Specify whether the restore operation is for disaster recovery or not [Default no]. |
yes or no |
|
Set cron job parameters for backup operation. Only valid in combination with By default, this option sets the |
m-h-dom-mon-dow-m [-m yes]
-m yes option overrides default and puts CSO into maintenance mode for cron-based backups. |
Backup and Restore Examples
Requirements
IP address of the installer virtual machine (installer-vm) of your CSO instance
Root access to the installer-vm using the ssh protocol
The following commands must be run at the command line interface of the installer-vm of CSO. The location and access credentials needed to access the installer-vm in your CSO installation should be known to you or the person or group who installed CSO.
Backup
This example performs a simple backup of all CSO databases into the directory /backup/MAR09/
cso_backupnrestore -b backup -s MAR09
Scheduled Backup Using Cron-job
This example creates a scheduled backup that runs in maintenance mode every Sunday afternoon at 1:00 PM and stores the backup in the /bakups/DAILY/<timestamp>/ directory. The timestamp directory is created when the backup starts.
cso_backupnrestore -b scheduledbackup -z 0-13-*-*-0 -m yes
Restore
This example restores the backup located in the /backups/DAILY-09/2019-03-16T04/ directory.
cso_backupnrestore -b restore -s /backups/DAILY-09/2019-03-16T04 -r no
This example performs a disaster recovery restore operation from the backup located in the /backups/DAILY-09/2019-03-16T04/ directory.
cso_backupnrestore -b restore -s /backups/DAILY-09/2019-03-16T04 -r yes
Health Check Example
This example performs a health check on the CSO installation.
cso_backupnrestore -b healthcheck
Reindex Example
This example performs a reindex of the Elasticsearch database.
cso_backupnrestore -b reindex
