Secure Web Proxy
Secure web proxy allow you to selectively bypass an external proxy server based on specific application types. This topic explains the fundamentals of secure web proxy functionality and provides step-by-step guidance on how to configure it .
Secure Web Proxy Overview
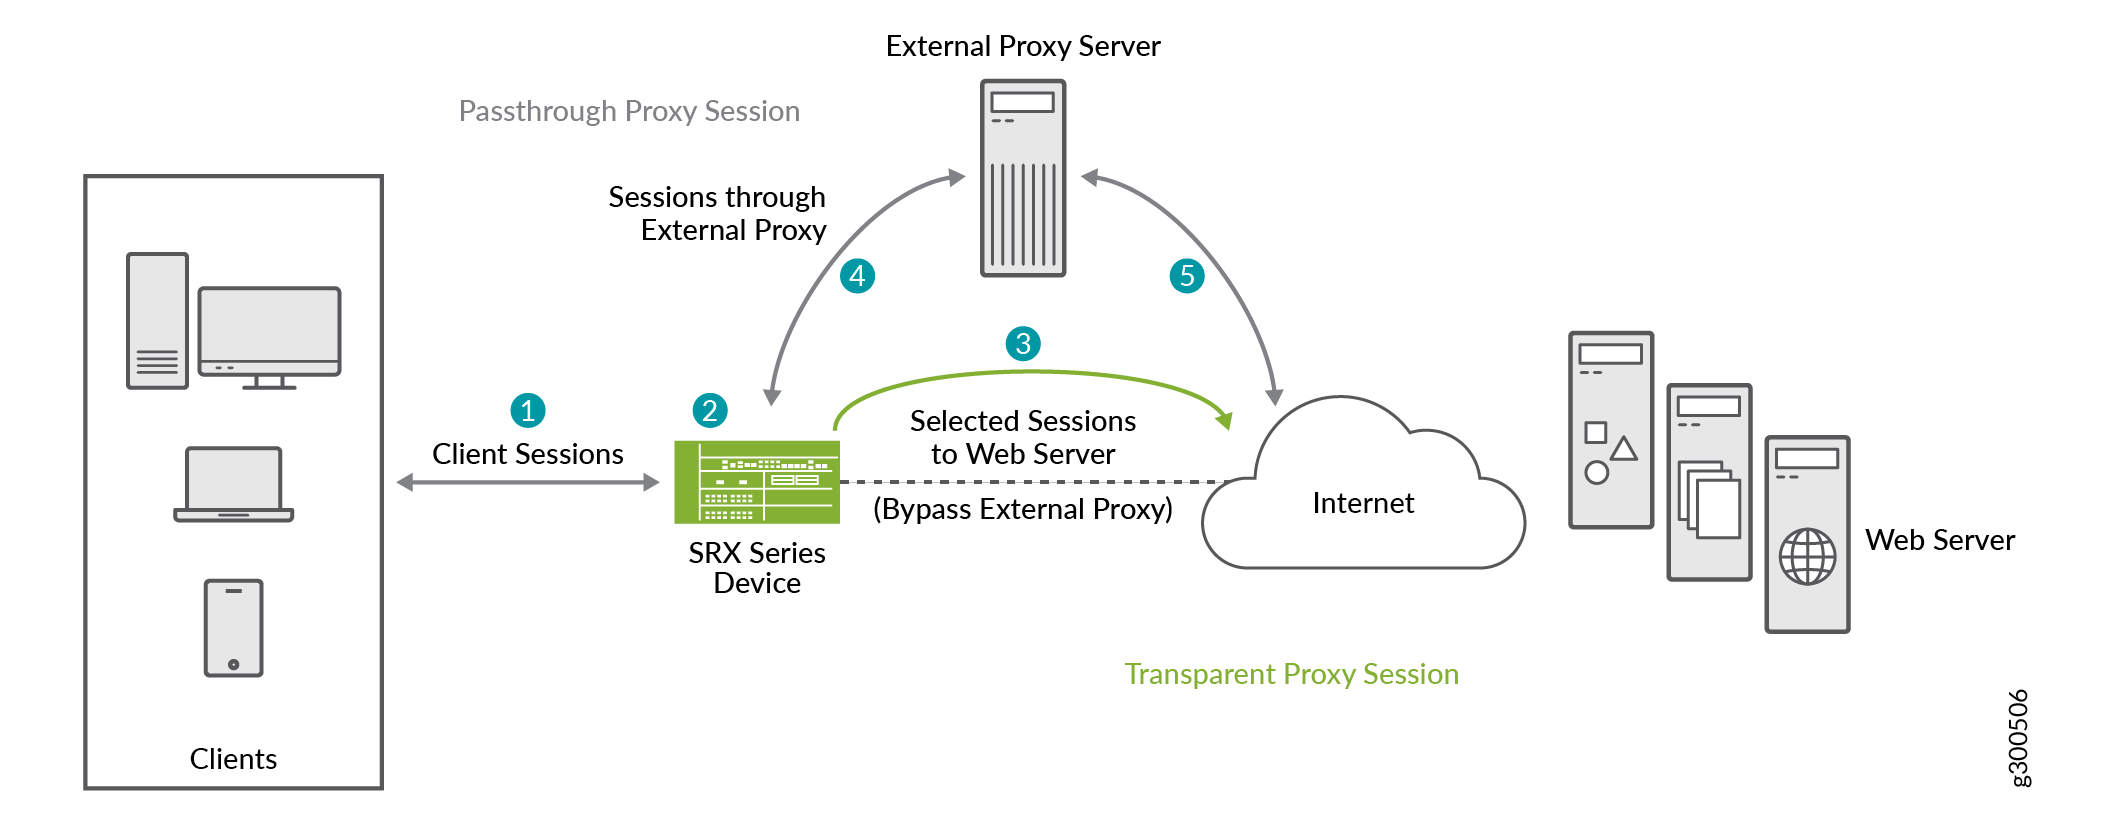
You can use secure Web proxy to send traffic to an external proxy server and bypass the proxy server for the selected application traffic. Bypassed application traffic will be sent directly to the target webserver.
To use secure Web proxy, you must configure a secure Web proxy profile with external proxy server details and dynamic application that you want to bypass the external proxy server. When the security device receives a request from a client, the device examines the HTTP header for the application. The device applies Web proxy profile for the traffic that matches the security policy rules. Permitted application traffic that matches the dynamic-application specified in the Web proxy profile, is directed to the webserver. Otherwise, the permitted traffic is re-directed to the configured external proxy server.
As a result, your security device performs transparent proxy between the client and the webserver for the specified applications and provides better quality of service for the application traffic.
- Benefit
- Limitations
- Transparent Web Proxy and Secure Web Proxy
- How Secure Web Proxy Works on SRX Series Firewalls
Benefit
-
Secure Web proxy provides better quality of service for the selected application traffic by providing direct connections to the webserver
Limitations
-
An SRX Series Firewall operating in chassis cluster mode does not support the secure Web proxy functionality.
-
Advanced policy-based routing (APBR), when applied along with secure Web proxy, works fine. However, other Layer 7 services might not work along with Secure Web Proxy as expected.
-
If you have configured unified policies (security policies with dynamic applications) on your SRX Series Firewall, the Secure Web Proxy feature may not function properly.
- Secure Web proxy feature is not supported when device is operating in transparent-bridge mode.
- Secure Web Proxy feature does not work when the client device and its proxy server are deployed in the same network segment.
- SRX Series Firewalls operating in Multinode High Availability setup do not support the secure Web proxy functionality.
Transparent Web Proxy and Secure Web Proxy
we've renamed the secure web proxy as transparent web proxy. Read one of the following topic for configuring using transparent proxy
-
If you are using transparent web proxy, see Transparent Web Proxy.
-
If you are using secure web proxy, continue reading this topic.
How Secure Web Proxy Works on SRX Series Firewalls
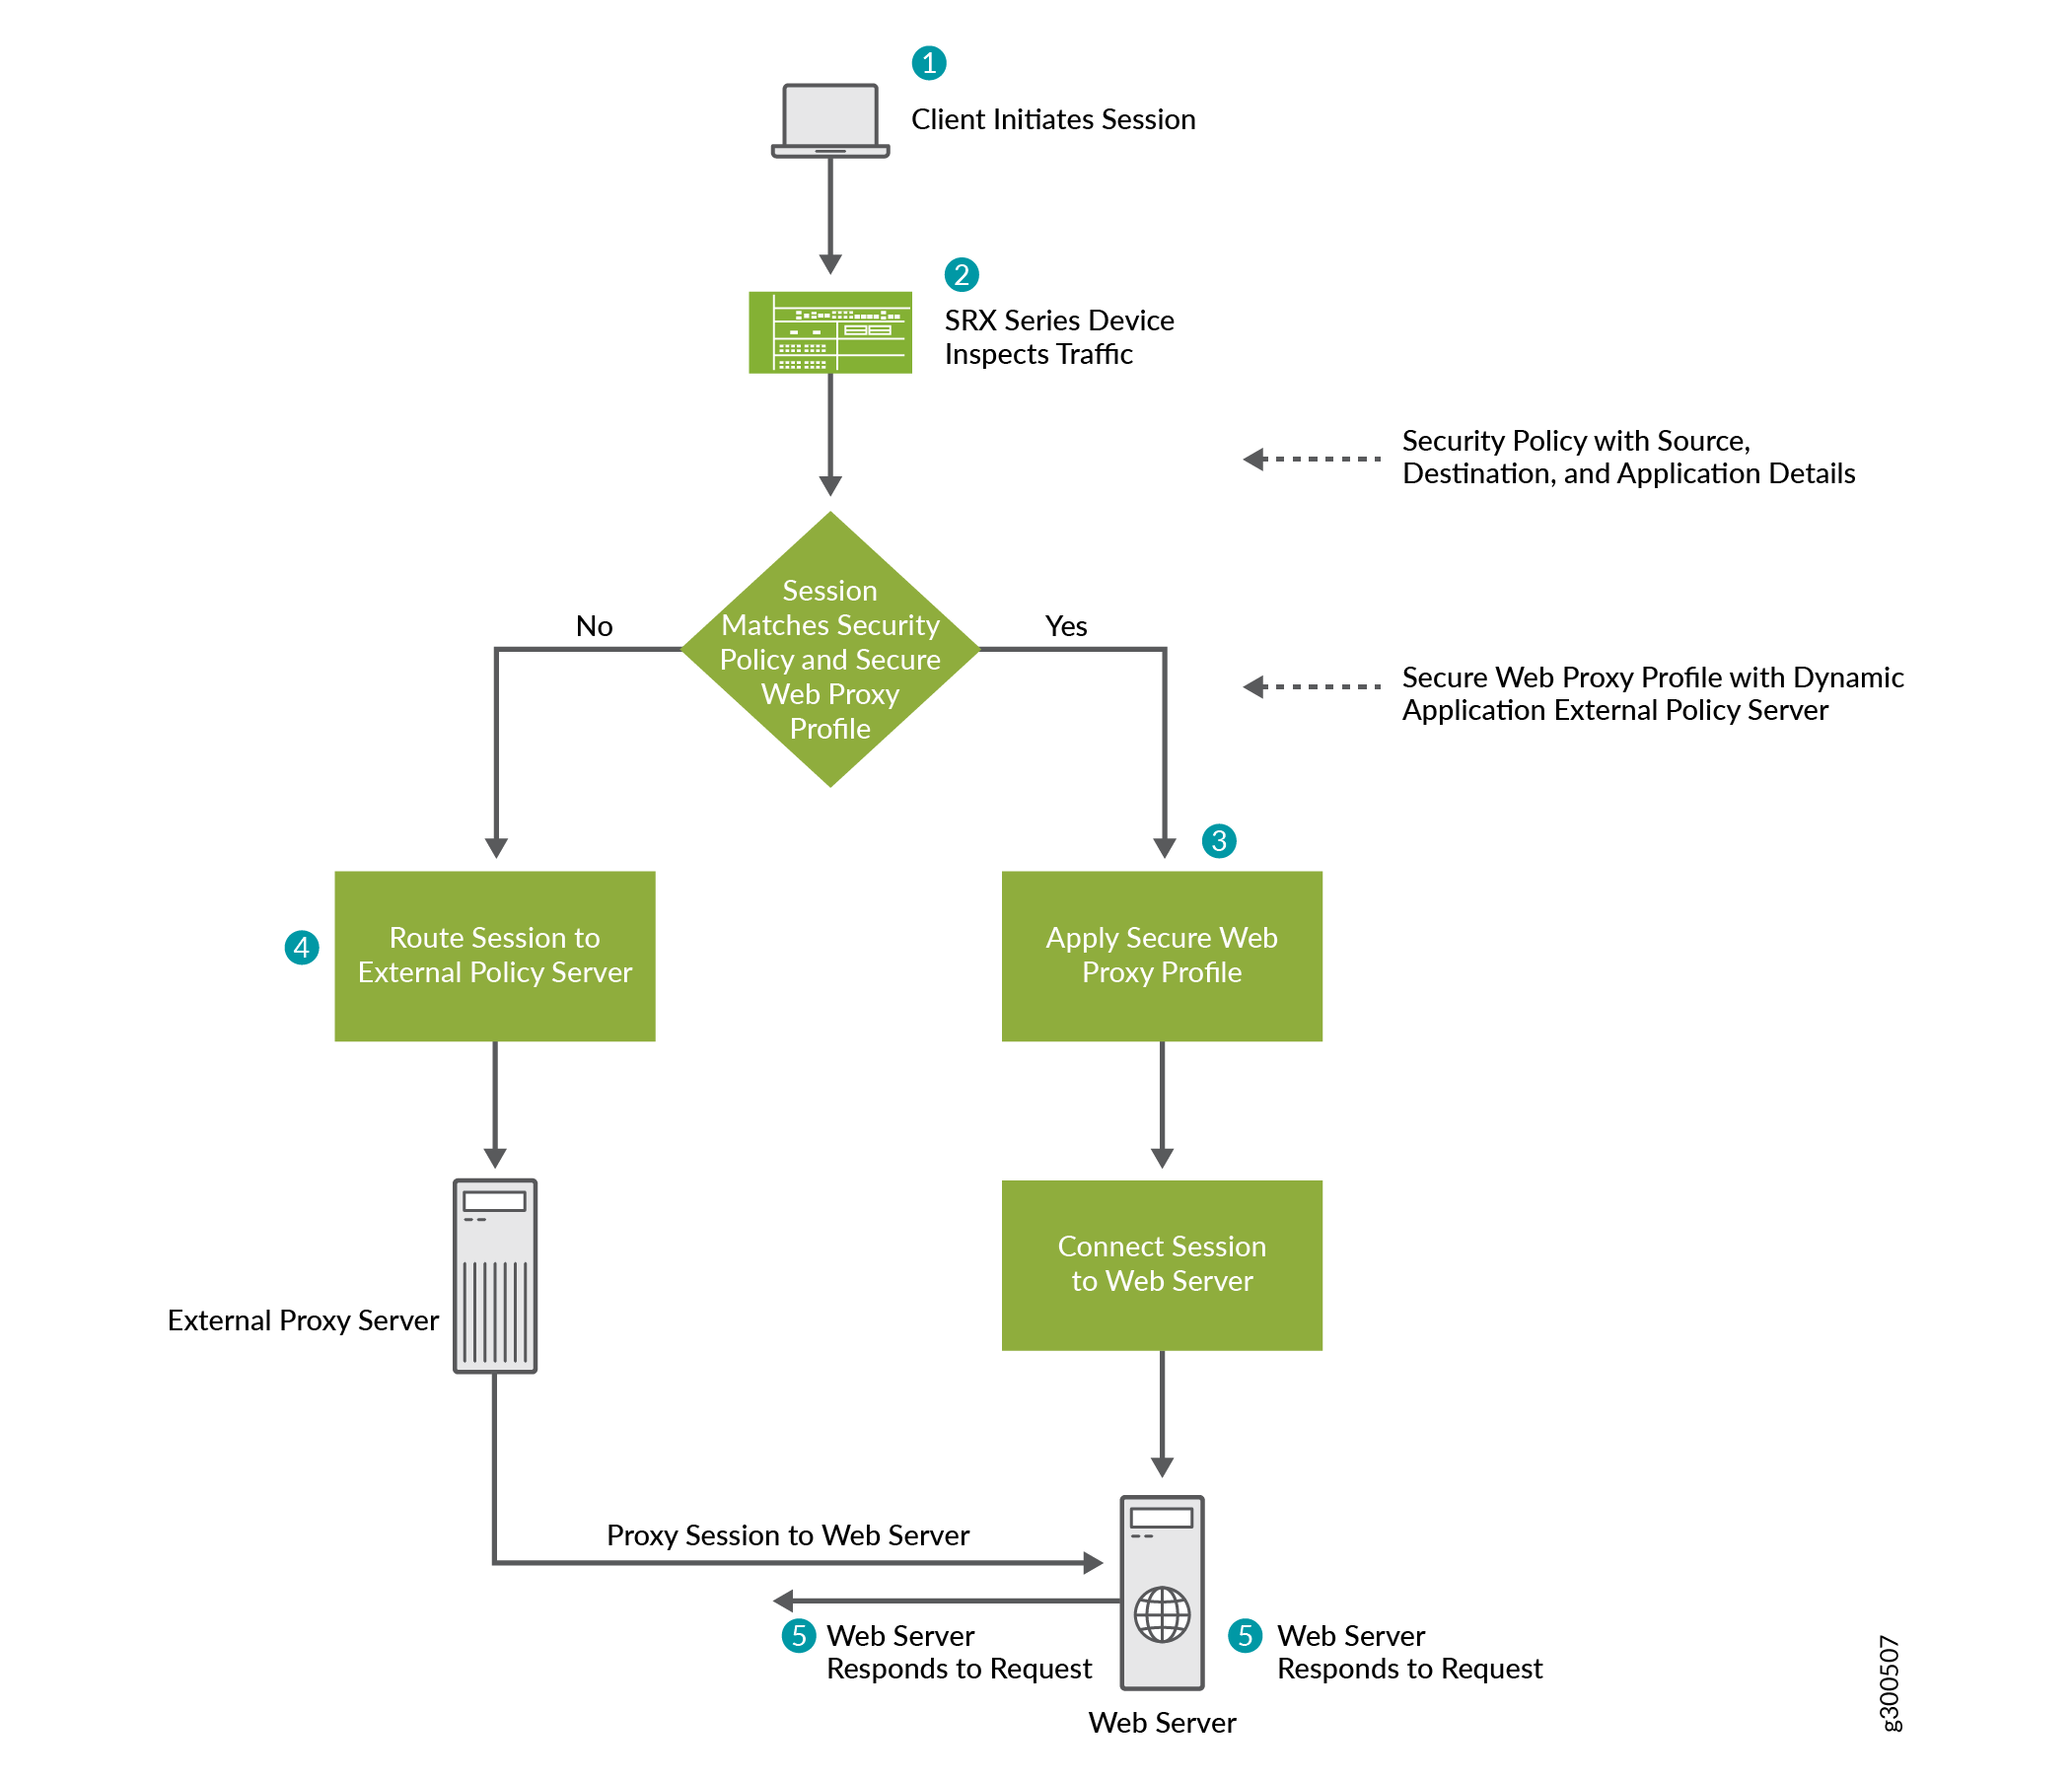
Following illustrations show how a security device provides the secure Web proxy service.


To use secure Web proxy on your SRX Series Firewall, you must:
-
Create a secure Web proxy profile, which includes the details about the external proxy server and the dynamic application or application group that can bypass the external proxy server.
-
Create a security policy to manage the traffic passing through the device.
-
Attach the secure Web proxy profile to the security policy and apply the profile as an application service for the permitted traffic.
When a client initiates a request, the SRX Series Firewall examines the application traffic and identifies which traffic can bypass the external proxy server based on the secure Web proxy profile and security policy rules.
For example, if you use Microsoft Office 365, you can specify an Office 365 application group, such as junos:OUTLOOK or junos:OFFICE365-CREATE-CONVERSATION, in the secure Web proxy profile. The SRX Series Firewall forwards the Office 365 application traffic directly to the Office 365 server, bypassing the external proxy server. Connections that do not match the applications are routed to the external proxy server.
The SRX Series Firewall performs secure Web proxy through the following steps:
-
The client's browser sends an HTTP connect request to the external proxy server.
-
The SRX Series Firewall intercepts the TCP connections. The device identifies the application in the HTTP header and does a DNS resolution.
-
If the traffic parameters match the security policy rules and the secure Web proxy profile specifications, the SRX Series Firewall operates in transparent mode. The device uses the client's IP address in transparent mode to initiate a new connection with the web server, bypassing the external proxy server.
-
The SRX Series Firewall sends the connect response from the web server to the client.
-
For the remaining traffic, the SRX Series Firewall operates in pass-through mode and allows the HTTP connect request to go to the external proxy server.
Example—Configure Secure Web Proxy on an SRX Series Firewall
This example shows how to configure secure Web proxy on SRX Series Firewalls.
Hardware and Software Requirements
This example uses the following hardware and software components:
-
A Juniper Networks SRX Series Firewall
-
Junos OS Release 19.2R1 or later. We’ve tested this example using Junos OS Release 19.2R1.
-
IP address and port number of the external proxy server.
Topology
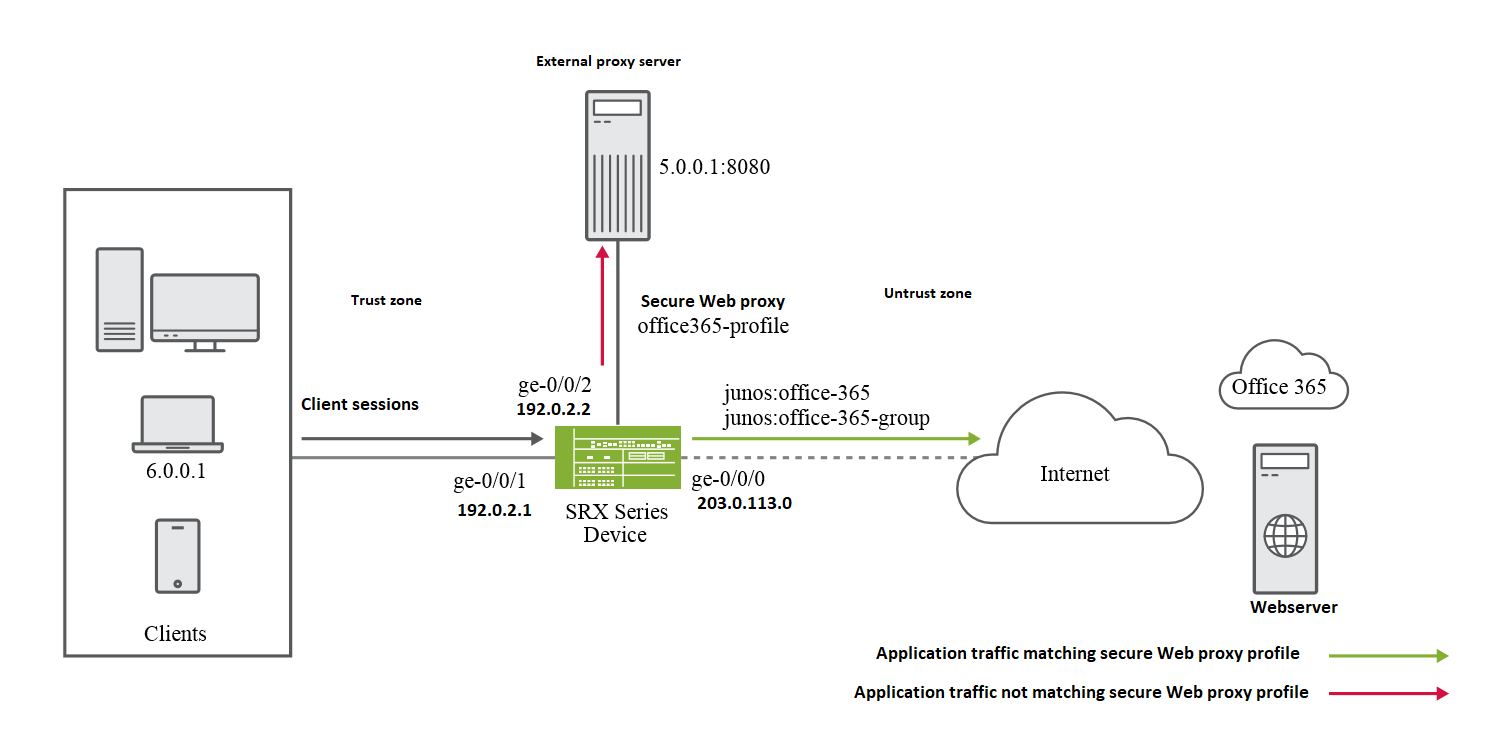
The following illustration shows the topology used in this example:

In this example, the interfaces ge-0/0/1 and ge-0/0/2 are in the trust zone and are connected to the client and external proxy server, respectively. The interface ge-0/0/0 is in the untrust zone and is connected to the webserver through the Internet gateway. You configure a secure Web proxy profile, specifying Office 365 applications and external proxy details.
After you complete the configuration, the SRX Series Firewall will forward the Office 365 traffic directly to the webserver, bypassing the external proxy server for Office 365 traffic.
Configuration
CLI Quick Configuration
To quickly configure this example, copy the following commands, paste them into a text file, remove any line breaks, change any details necessary to match your network configuration, copy and paste the commands into the CLI at the [edit] hierarchy level, and then enter commit from configuration mode.
set interfaces ge-0/0/0 unit 0 family inet address 203.0.113.0
set interfaces ge-0/0/1 unit 0 family inet address 192.0.2.1
set interfaces ge-0/0/2 unit 0 family inet address 192.0.2.2
set security zones security-zone untrust interfaces ge-0/0/0.0 host-inbound-traffic system-services all
set security zones security-zone trust interfaces ge-0/0/1.0 host-inbound-traffic system-services all
set security zones security-zone trust interfaces ge-0/0/2.0 host-inbound-traffic system-services all
set services application-identification application-group office-365-group applications junos:OUTLOOK
set services application-identification application-group office-365-group applications junos:OFFICE365-CREATE-CONVERSATION
set services web-proxy secure-proxy profile office365-profile proxy-address external_proxy ip 5.0.0.1/32
set services web-proxy secure-proxy profile office365-profile proxy-address external_proxy port 8080
set services web-proxy secure-proxy profile office365-profile dynamic-web-application junos:office-365
set services web-proxy secure-proxy profile office365-profile dynamic-web-application-group office-365-group
set security policies from-zone trust to-zone untrust policy 1 match source-address any
set security policies from-zone trust to-zone untrust policy 1 match destination-address any
set security policies from-zone trust to-zone untrust policy 1 match application any
set security policies from-zone trust to-zone untrust policy 1 then permit application-services web-proxy profile-name office365-profile
Step-by-Step Procedure
The following example requires you to navigate various levels in the configuration hierarchy. For instructions on how to do that, see Using the CLI Editor in Configuration Mode in the CLI User guide.
In this procedure you configure interfaces and security zones.
-
Configure the interfaces.
[edit]user@host# set interfaces ge-0/0/0 unit 0 family inet address 203.0.113.0 user@host# set interfaces ge-0/0/1 unit 0 family inet address 192.0.2.1 user@host# set interfaces ge-0/0/2 unit 0 family inet address 192.0.2.2 -
Assign the interfaces to the security zones and configure the inbound traffic for all system services.
[edit]user@host#set security zones security-zone untrust interfaces ge-0/0/0.0 host-inbound-traffic system-services alluser@host#set security zones security-zone trust interfaces ge-0/0/1.0 host-inbound-traffic system-services alluser@host#set security zones security-zone trust interfaces ge-0/0/2.0 host-inbound-traffic system-services all -
Configure a custom application group for Office 365.
[edit]user@host# set services application-identification application-group office-365-group applications junos:OUTLOOK user@host# set services application-identification application-group office-365-group applications junos:OFFICE365-CREATE-CONVERSATION -
Create a security proxy profile by specifying the Office 365 application details and the IP address and port details of the external proxy server.
[edit]user@host#set services web-proxy secure-proxy profile office365-profile proxy-address external_proxy ip 5.0.0.1/32user@host#set services web-proxy secure-proxy profile office365-profile proxy-address external_proxy port 8080user@host#set services web-proxy secure-proxy profile office365-profile dynamic-web-application junos:office-365user@host#set services web-proxy secure-proxy profile office365-profile dynamic-web-application-group office-365-group -
Define the security policy for the traffic originating from the client to the Internet gateway device.
[edit]user@host#set security policies from-zone trust to-zone untrust policy 1 match source-address anyuser@host#set security policies from-zone trust to-zone untrust policy 1 match destination-address anyuser@host#set security policies from-zone trust to-zone untrust policy 1 match application any -
Define the policy action to apply the secure Web proxy profile on the permitted traffic.
[edit]user@host#set security policies from-zone trust to-zone untrust policy 1 then permit application-services web-proxy profile-name office365-profile
The SRX Series Firewall forwards the Office 365 application traffic directly to the Office 365 server, bypassing the external proxy server. Other sessions that do not match the Office 365 application are routed to the external proxy server.
Results
From configuration mode, confirm your configuration by entering the
show services web-proxy secure-proxy, show
security policies, and show security zones
commands. If the output does not display the intended configuration, repeat
the instructions in this example to correct the configuration.
[edit ]user@host# show services web-proxy secure-proxyprofile office365-profile { proxy-address external_proxy { ip 5.0.0.1/32; port 8080; } dynamic-web-application junos:office-365 dynamic-web-application-group office-365-group }
[edit]user@host# show security policiesfrom-zone trust to-zone untrust { policy 1 { match { source-address any; destination-address any; application any; } then { permit { application-services { web-proxy { profile-name office365-profile; } } } } } }
[edit]user@host# show security zonessecurity-zone untrust { interfaces { ge-0/0/0.0 { host-inbound-traffic { system-services { all; } } } } } security-zone trust { interfaces { ge-0/0/1.0 { host-inbound-traffic { system-services { all; } } } ge-0/0/2.0 { host-inbound-traffic { system-services { all; } } } } }
Verification
- Verify Session Details
- Display Secure Web Proxy Session Statistics
- Platform-Specific Secure Web Proxy Behavior
Verify Session Details
Purpose
Verify the details of the session in which the secure Web proxy is applied.
Action
From operational mode, enter the show security flow
session command.
Session ID: 477, Policy name: 1/5, Timeout: 1796, Valid
  		In: 6.0.0.1/63638 --> 5.0.0.1/8080;tcp, Conn Tag: 0x0, If: ge-0/0/0.0, Pkts: 22, Bytes: 2451,
	 	 Out: 5.0.0.1/8080 --> 6.0.0.1/63638;tcp, Conn Tag: 0x0, If: ge-0/0/1.0, Pkts: 0, Bytes: 0,

		Session ID: 478, Policy name: 1/5, Timeout: 1796, Valid
  		In: 6.0.0.1/63638 --> 13.107.7.190/443;tcp, Conn Tag: 0x0, If: ge-0/0/0.0, Pkts: 1, Bytes: 44,
	    Out: 13.107.7.190/443 --> 6.0.0.1/63638;tcp, Conn Tag: 0x0, If: ge-0/0/2.0, Pkts: 31, Bytes: 28898,
Meaning
In the sample output, the ID-477 is the client session and the ID-478 is the proxy session. In the second session, notice that the traffic from client 6.0.0.1 is directly going to the webserver 13.107.7.190.
Display Secure Web Proxy Session Statistics
Purpose
Display the details of the session in which the secure Web proxy is applied.
Action
From operational mode, enter the show services web-proxy session
detail and show services web-proxy session
summary commands.
user@host> show services web-proxy session detail

Web Proxy sessions:
Client Session ID: 38569, Proxy Session ID: 38570
Client: 6.0.0.1/53454 ---> 5.0.0.1/8080
Proxy : 6.0.0.1/53454 ---> 13.107.7.190/443
Proxy Request: CONNECT:www.office.com:443
Dynamic Web App: junos:OFFICE365-CREATE-CONVERSATION

Client Session ID: 38562, Proxy Session ID: 38564
Client: 6.0.0.1/53451 ---> 5.0.0.1/8080
Proxy : 6.0.0.1/53451 ---> 40.126.5.35/443
Proxy Request: CONNECT:login.microsoftonline.com:443
Dynamic Web App: junos:OFFICE365-CREATE-CONVERSATION

Client Session ID: 38567, Proxy Session ID: 38568
Client: 6.0.0.1/53453 ---> 5.0.0.1/8080
Proxy : 6.0.0.1/53453 ---> 13.107.246.10/443
Proxy Request: CONNECT:aadcdn.msauth.net:443
Dynamic Web App: junos:OFFICE365-CREATE-CONVERSATION

Client Session ID: 38571, Proxy Session ID: 0
Client: 6.0.0.1/53455 ---> 5.0.0.1/8080
Proxy : 6.0.0.1/53455 ---> 52.96.40.242/443
Proxy Request: CONNECT:outlook.office365.com:443
Dynamic Web App: junos:OWA

Client Session ID: 38561, Proxy Session ID: 38565
Client: 6.0.0.1/53450 ---> 5.0.0.1/8080
Proxy : 6.0.0.1/53450 ---> 40.126.5.35/443
Proxy Request: CONNECT:login.microsoftonline.com:443
Dynamic Web App: junos:OFFICE365-CREATE-CONVERSATION
user@host> show services web-proxy session summary


Web Proxy sessions:
Client Session                                                                  Proxy Session
[477] 6.0.0.1/63638 ---> 5.0.0.1/8080                             [478] 6.0.0.1/63638 ---> 13.107.7.190/443
Meaning
In these samples, notice the details of the client session and the proxy session. You can also see proxy requests and dynamic web applications.
Platform-Specific Secure Web Proxy Behavior
Use Secure Web Proxy Feature Explorer to confirm platform and release support for specific features.
Use the following table to review platform-specific behavior for your platform:
|
Platform |
Difference |
|---|---|
|
SRX300, SRX320, SRX340, SRX345, SRX550, SRX1500, SRX4100, SRX4200, or vSRX Virtual Firewall |
Support Secure Web Proxy |
Change History Table
Feature support is determined by the platform and release you are using. Use Feature Explorer to determine if a feature is supported on your platform.
