- play_arrow Overview
- play_arrow Understanding How Class of Service Manages Congestion and Defines Traffic Forwarding Behavior
- Understanding How Class of Service Manages Congestion and Controls Service Levels in the Network
- How CoS Applies to Packet Flow Across a Network
- The Junos OS CoS Components Used to Manage Congestion and Control Service Levels
- Mapping CoS Component Inputs to Outputs
- Default Junos OS CoS Settings
- Packet Flow Through the Junos OS CoS Process Overview
- Configuring Basic Packet Flow Through the Junos OS CoS Process
- Example: Classifying All Traffic from a Remote Device by Configuring Fixed Interface-Based Classification
- Interface Types That Do Not Support Junos OS CoS
-
- play_arrow Configuring Class of Service
- play_arrow Assigning Service Levels with Behavior Aggregate Classifiers
- Understanding How Behavior Aggregate Classifiers Prioritize Trusted Traffic
- Default IP Precedence Classifier
- Default DSCP and DSCP IPv6 Classifiers
- Default MPLS EXP Classifier
- Default IEEE 802.1p Classifier
- Default IEEE 802.1ad Classifier
- Default Aliases for CoS Value Bit Patterns Overview
- Defining Aliases for CoS Value Bit Patterns
- Configuring Behavior Aggregate Classifiers
- Applying Behavior Aggregate Classifiers to Logical Interfaces
- Example: Configuring and Applying a Default DSCP Behavior Aggregate Classifier
- Example: Configuring Behavior Aggregate Classifiers
- Understanding DSCP Classification for VPLS
- Example: Configuring DSCP Classification for VPLS
- Configuring Class of Service for MPLS LSPs
- Applying DSCP Classifiers to MPLS Traffic
- Applying MPLS EXP Classifiers to Routing Instances
- Applying MPLS EXP Classifiers for Explicit-Null Labels
- Manage Ingress Oversubscription with Traffic Class Maps
- play_arrow Assigning Service Levels with Multifield Classifiers
- Overview of Assigning Service Levels to Packets Based on Multiple Packet Header Fields
- Configuring Multifield Classifiers
- Using Multifield Classifiers to Set Packet Loss Priority
- Example: Configuring and Applying a Firewall Filter for a Multifield Classifier
- Example: Classifying Packets Based on Their Destination Address
- Example: Configuring and Verifying a Complex Multifield Filter
- play_arrow Controlling Network Access with Traffic Policing
- Controlling Network Access Using Traffic Policing Overview
- Effect of Two-Color Policers on Shaping Rate Changes
- Configuring Policers Based on Logical Interface Bandwidth
- Example: Limiting Inbound Traffic at Your Network Border by Configuring an Ingress Single-Rate Two-Color Policer
- Example: Performing CoS at an Egress Network Boundary by Configuring an Egress Single-Rate Two-Color Policer
- Example: Limiting Inbound Traffic Within Your Network by Configuring an Ingress Single-Rate Two-Color Policer and Configuring Multifield Classifiers
- Example: Limiting Outbound Traffic Within Your Network by Configuring an Egress Single-Rate Two-Color Policer and Configuring Multifield Classifiers
- Overview of Tricolor Marking Architecture
- Enabling Tricolor Marking and Limitations of Three-Color Policers
- Configuring and Applying Tricolor Marking Policers
- Configuring Single-Rate Tricolor Marking
- Configuring Two-Rate Tricolor Marking
- Example: Configuring and Verifying Two-Rate Tricolor Marking
- Applying Firewall Filter Tricolor Marking Policers to Interfaces
- Policer Overhead to Account for Rate Shaping in the Traffic Manager
- play_arrow Defining Forwarding Behavior with Forwarding Classes
- Understanding How Forwarding Classes Assign Classes to Output Queues
- Default Forwarding Classes
- Configuring a Custom Forwarding Class for Each Queue
- Configuring Up to 16 Custom Forwarding Classes
- Classifying Packets by Egress Interface
- Forwarding Policy Options Overview
- Configuring CoS-Based Forwarding
- Example: Configuring CoS-Based Forwarding
- Example: Configuring CoS-Based Forwarding for Different Traffic Types
- Example: Configuring CoS-Based Forwarding for IPv6
- Applying Forwarding Classes to Interfaces
- Understanding Queuing and Marking of Host Outbound Traffic
- Forwarding Classes and Fabric Priority Queues
- Default Routing Engine Protocol Queue Assignments
- Assigning Forwarding Class and DSCP Value for Routing Engine-Generated Traffic
- Example: Writing Different DSCP and EXP Values in MPLS-Tagged IP Packets
- Change the Default Queuing and Marking of Host Outbound Traffic
- Example: Configure Different Queuing and Marking Defaults for Outbound Routing Engine and Distributed Protocol Handler Traffic
- Overriding the Input Classification
- play_arrow Defining Output Queue Properties with Schedulers
- How Schedulers Define Output Queue Properties
- Default Schedulers Overview
- Configuring Schedulers
- Configuring Scheduler Maps
- Applying Scheduler Maps Overview
- Applying Scheduler Maps to Physical Interfaces
- Configuring Traffic Control Profiles for Shared Scheduling and Shaping
- Configuring an Input Scheduler on an Interface
- Understanding Interface Sets
- Configuring Interface Sets
- Interface Set Caveats
- Configuring Internal Scheduler Nodes
- Example: Configuring and Applying Scheduler Maps
- play_arrow Controlling Bandwidth with Scheduler Rates
- Oversubscribing Interface Bandwidth
- Configuring Scheduler Transmission Rate
- Providing a Guaranteed Minimum Rate
- PIR-Only and CIR Mode
- Excess Rate and Excess Priority Configuration Examples
- Controlling Remaining Traffic
- Bandwidth Sharing on Nonqueuing Packet Forwarding Engines Overview
- Configuring Rate Limits on Nonqueuing Packet Forwarding Engines
- Applying Scheduler Maps and Shaping Rate to DLCIs and VLANs
- Example: Applying Scheduler Maps and Shaping Rate to DLCIs
- Example: Applying Scheduling and Shaping to VLANs
- Applying a Shaping Rate to Physical Interfaces Overview
- Configuring the Shaping Rate for Physical Interfaces
- Example: Limiting Egress Traffic on an Interface Using Port Shaping for CoS
- Configuring Input Shaping Rates for Both Physical and Logical Interfaces
- play_arrow Setting Transmission Order with Scheduler Priorities and Hierarchical Scheduling
- Priority Scheduling Overview
- Configuring Schedulers for Priority Scheduling
- Associating Schedulers with Fabric Priorities
- Hierarchical Class of Service Overview
- Hierarchical Class of Service Network Scenarios
- Understanding Hierarchical Scheduling
- Priority Propagation in Hierarchical Scheduling
- Hierarchical CoS for Metro Ethernet Environments
- Hierarchical Schedulers and Traffic Control Profiles
- Example: Building a Four-Level Hierarchy of Schedulers
- Hierarchical Class of Service for Network Slicing
- Configuring Ingress Hierarchical CoS
- play_arrow Controlling Congestion with Scheduler RED Drop Profiles, Buffers, PFC, and ECN
- RED Drop Profiles for Congestion Management
- Determining Packet Drop Behavior by Configuring Drop Profile Maps for Schedulers
- Managing Congestion by Setting Packet Loss Priority for Different Traffic Flows
- Mapping PLP to RED Drop Profiles
- Managing Congestion on the Egress Interface by Configuring the Scheduler Buffer Size
- Managing Transient Traffic Bursts by Configuring Weighted RED Buffer Occupancy
- Example: Managing Transient Traffic Bursts by Configuring Weighted RED Buffer Occupancy
- Understanding PFC Using DSCP at Layer 3 for Untagged Traffic
- Configuring DSCP-based PFC for Layer 3 Untagged Traffic
- PFC Watchdog
- CoS Explicit Congestion Notification
- Example: Configuring Static and Dynamic ECN
- play_arrow Altering Outgoing Packet Headers Using Rewrite Rules
- Rewriting Packet Headers to Ensure Forwarding Behavior
- Applying Default Rewrite Rules
- Configuring Rewrite Rules
- Configuring Rewrite Rules Based on PLP
- Applying IEEE 802.1p Rewrite Rules to Dual VLAN Tags
- Applying IEEE 802.1ad Rewrite Rules to Dual VLAN Tags
- Rewriting IEEE 802.1p Packet Headers with an MPLS EXP Value
- Setting IPv6 DSCP and MPLS EXP Values Independently
- Configuring DSCP Values for IPv6 Packets Entering the MPLS Tunnel
- Setting Ingress DSCP Bits for Multicast Traffic over Layer 3 VPNs
- Applying Rewrite Rules to Output Logical Interfaces
- Rewriting MPLS and IPv4 Packet Headers
- Rewriting the EXP Bits of All Three Labels of an Outgoing Packet
- Defining a Custom Frame Relay Loss Priority Map
- Example: Per-Node Rewriting of EXP Bits
- Example: Rewriting CoS Information at the Network Border to Enforce CoS Strategies
- Example: Remarking Diffserv Code Points to MPLS EXPs to Carry CoS Profiles Across a Service Provider’s L3VPN MPLS Network
- Example: Remarking Diffserv Code Points to 802.1P PCPs to Carry CoS Profiles Across a Service Provider’s VPLS Network
- Assigning Rewrite Rules on a Per-Customer Basis Using Policy Maps
- Host Outbound Traffic IEEE802.1p Rewrite
- play_arrow Altering Class of Service Values in Packets Exiting the Network Using IPv6 DiffServ
- Resources for CoS with DiffServ for IPv6
- System Requirements for CoS with DiffServ for IPv6
- Terms and Acronyms for CoS with DiffServ for IPv6
- Default DSCP Mappings
- Default Forwarding Classes
- Juniper Networks Default Forwarding Classes
- Roadmap for Configuring CoS with IPv6 DiffServ
- Configuring a Firewall Filter for an MF Classifier on Customer Interfaces
- Applying the Firewall Filter to Customer Interfaces
- Assigning Forwarding Classes to Output Queues
- Configuring Rewrite Rules
- DSCP IPv6 Rewrites and Forwarding Class Maps
- Applying Rewrite Rules to an Interface
- Configuring RED Drop Profiles
- Configuring BA Classifiers
- Applying a BA Classifier to an Interface
- Configuring a Scheduler
- Configuring Scheduler Maps
- Applying a Scheduler Map to an Interface
- Example: Configuring DiffServ for IPv6
-
- play_arrow Configuring Platform-Specific Functionality
- play_arrow Configuring Class of Service on ACX Series Universal Metro Routers
- CoS on ACX Series Routers Features Overview
- Understanding CoS CLI Configuration Statements on ACX Series Routers
- DSCP Propagation and Default CoS on ACX Series Routers
- Configuring CoS on ACX Series Routers
- Classifiers and Rewrite Rules at the Global, Physical, and Logical Interface Levels Overview
- Configuring Classifiers and Rewrite Rules at the Global and Physical Interface Levels
- Applying DSCP and DSCP IPv6 Classifiers on ACX Series Routers
- Schedulers Overview for ACX Series Routers
- Shared and Dedicated Buffer Memory Pools on ACX Series Routers
- CoS for PPP and MLPPP Interfaces on ACX Series Routers
- CoS for NAT Services on ACX Series Routers
- Hierarchical Class of Service in ACX Series Routers
- Storm Control on ACX Series Routers Overview
- play_arrow Configuring Class of Service on MX Series 5G Universal Routing Platforms
- Junos CoS on MX Series 5G Universal Routing Platforms Overview
- CoS Features and Limitations on MX Series Routers
- Configuring and Applying IEEE 802.1ad Classifiers
- Scheduling and Shaping in Hierarchical CoS Queues for Traffic Routed to GRE Tunnels
- Example: Performing Output Scheduling and Shaping in Hierarchical CoS Queues for Traffic Routed to GRE Tunnels
- CoS-Based Interface Counters for IPv4 or IPv6 Aggregate on Layer 2
- Enabling a Timestamp for Ingress and Egress Queue Packets
- play_arrow Configuring Class of Service on PTX Series Packet Transport Routers
- CoS Features and Limitations on PTX Series Routers
- CoS Feature Differences Between PTX Series Packet Transport Routers and T Series Routers
- Understanding Scheduling on PTX Series Routers
- Virtual Output Queues on PTX Series Packet Transport Routers
- Example: Configuring Excess Rate for PTX Series Packet Transport Routers
- Identifying the Source of RED Dropped Packets on PTX Series Routers
- Configuring Queuing and Shaping on Logical Interfaces on PTX Series Routers
- Example: Configuring Queuing and Shaping on Logical Interfaces in PTX Series Packet Transport Routers
- Example: Configuring Strict-Priority Scheduling on a PTX Series Router
- CoS Support on EVPN VXLANs
- Understanding CoS CLI Configuration Statements on PTX Series Routers
- Classification Based on Outer Header of Decapsulation Tunnel
-
- play_arrow Configuration Statements and Operational Commands
Traffic Burst Management on MIC and MPC Interfaces Overview
You can manage the impact of bursts of traffic on your network by configuring a burst-size value with the shaping rate or the guaranteed rate. The value is the maximum bytes of rate credit that can accrue for an idle queue or scheduler node. When a queue or node becomes active, the accrued rate credits enable the queue or node to catch up to the configured rate.
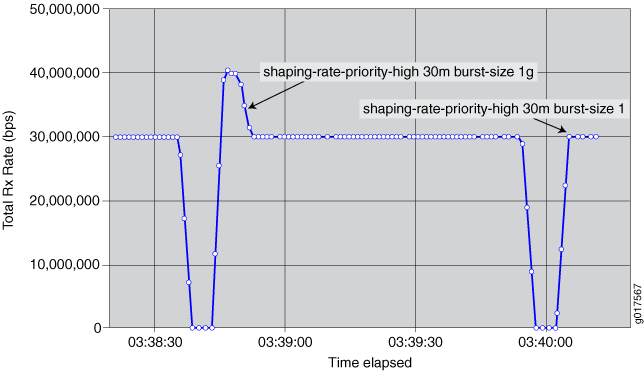
In Figure 1, the network administrator configures a large burst-size value for the shaping rate, then configures a small burst-size value. The larger burst size is subject to a maximum value. The smaller burst size is subject to a minimum value that enables the system to achieve the configured rates.
In both configurations, the scheduler node can burst beyond its shaping rate for a brief interval. The burst of traffic beyond the shaping rate is more noticeable with the larger burst size than the smaller burst size.
Guidelines for Configuring the Burst Size
Typically, the default burst-size (100 ms) for both scheduler nodes and queues on MIC and MPC interfaces is adequate for most networks. However, if you have intermediate equipment in your network that has very limited buffering and is intolerant of bursts of traffic, you might want to configure a lower value for the burst size.
Use caution when selecting a different burst size for your network. A burst size that is too high can overwhelm downstream networking equipment, causing dropped packets and inefficient network operation. Similarly, a burst size that is too low can prevent the network from achieving your configured rate.
When configuring a burst size, keep the following considerations in mind:
The system uses an algorithm to determine the actual burst size that is implemented for a node or queue. For example, to reach a shaping rate of 8 Mbps, you must allocate 1MB of rate credits every second. A shaping rate of 8 Mbps with a burst size of 500,000 bytes of rate-credit per seconds enables the system to transmit at most 500,000 bytes, or 4 Mbps. The system cannot implement a burst size that prevents the rate from being achieved.
For more information, see How the System Calculates the Burst Size.
There are minimum and maximum burst sizes for each platform, and different nodes and queue types have different scaling factors. For example, the system ensures the burst cannot be set lower than 1 Mbps for a shaping rate of 8 Mbps. To smoothly shape traffic, rate credits are sent much faster than once per second. The interval at which rate credits are sent varies depending on the platform, the type of rate, and the scheduler level.
When you have configured adjustments for the shaping rate (either by percentage or through an application such as ANCP or Multicast OIF), the system bases the default and minimum burst-size calculations on the adjusted shaping rate.
When you have configured cell shaping mode to account for ATM cell tax, the system bases the default and minimum burst-size calculations on the post-tax shaping rate.
The guaranteed rate and shaping rate share the value specified for the burst size. If the guaranteed rate has a burst size specified, that burst size is used for the shaping rate; if the shaping rate has a burst size specified, that bursts size is used for the guaranteed rate. If you have specified a burst size for both rates, the system uses the lesser of the two values.
The burst size configured for the guaranteed rate cannot exceed the burst-size configured for the shaping rate. Starting in Junos OS Release 15.1, the CLI no longer generates a commit error when the guaranteed-rate burst size is statically configured to be more than the shaping-rate burst size. This behavior changed with the advent of enhanced subscriber management. The system logs an error when the guaranteed-burst rate is higher, whether it is configured statically, dynamically with predefined variables, or by means of a change of authorization request.
If you have not configured a guaranteed rate, logical interfaces and interface sets receive a default guaranteed rate from the port speed. Queues receive a default guaranteed rate from the parent logical interface or interface set.
Burst-size is not supported with
per-priority-shaping
.
How the System Calculates the Burst Size
When calculating the burst size, the system uses an exponent of a power of two. For example:
Shaping-rate in bps * 100 ms / (8 bits/byte * 1000 ms/s)
= 1,875,000 bytes
The system then rounds this value up. For example, the system uses the following calculation to determine the burst size for a scheduler node with a shaping rate of 150 Mbps:
Max (Shaping rate, Guaranteed rate) bps * 100 ms / (8 bits/byte
* 1000 ms/s) = 1,875,000 bytes
Rounded up to the next higher power of two = 2,097,150
(which is 2**21, or 0x200000)
The system assigns a single burst size to each of the following rate pairs:
Shaping rate and guaranteed rate
Guaranteed high (GH) and guaranteed medium (GM)
Excess high (EH) and excess low (EL)
Guaranteed low (GL)
To calculate the burst size for each pair, the system:
Uses the configured burst-size if only one of the pair is configured.
Uses the lesser of the two burst sizes if both values are configured.
Uses the next lower power of two.
To calculate the minimum burst size, the system uses the greater of the two rates.
Change History Table
Feature support is determined by the platform and release you are using. Use Feature Explorer to determine if a feature is supported on your platform.