Example: Configuring 802.1X-PEAP and MAC RADIUS Authentication with EX Series Switches and Aruba ClearPass Policy Manager
This configuration example illustrates how to:
Configure an EX Series switch, Aruba ClearPass Policy Manager, and a laptop running Windows 7 for 802.1X PEAP authentication
Configure an EX Series switch and Aruba ClearPass for MAC RADIUS authentication
Configure an EX Series switch and Aruba ClearPass to implement dynamic VLANs and firewall filters
Requirements
This example uses the following hardware and software components for the policy infrastructure:
An EX4300 switch running Junos OS Release 14.1X53-D30 or later
An Aruba ClearPass Policy Manager platform running 6.3.3.63748 or later
Laptops running Microsoft Windows 7 Enterprise
Overview and Topology
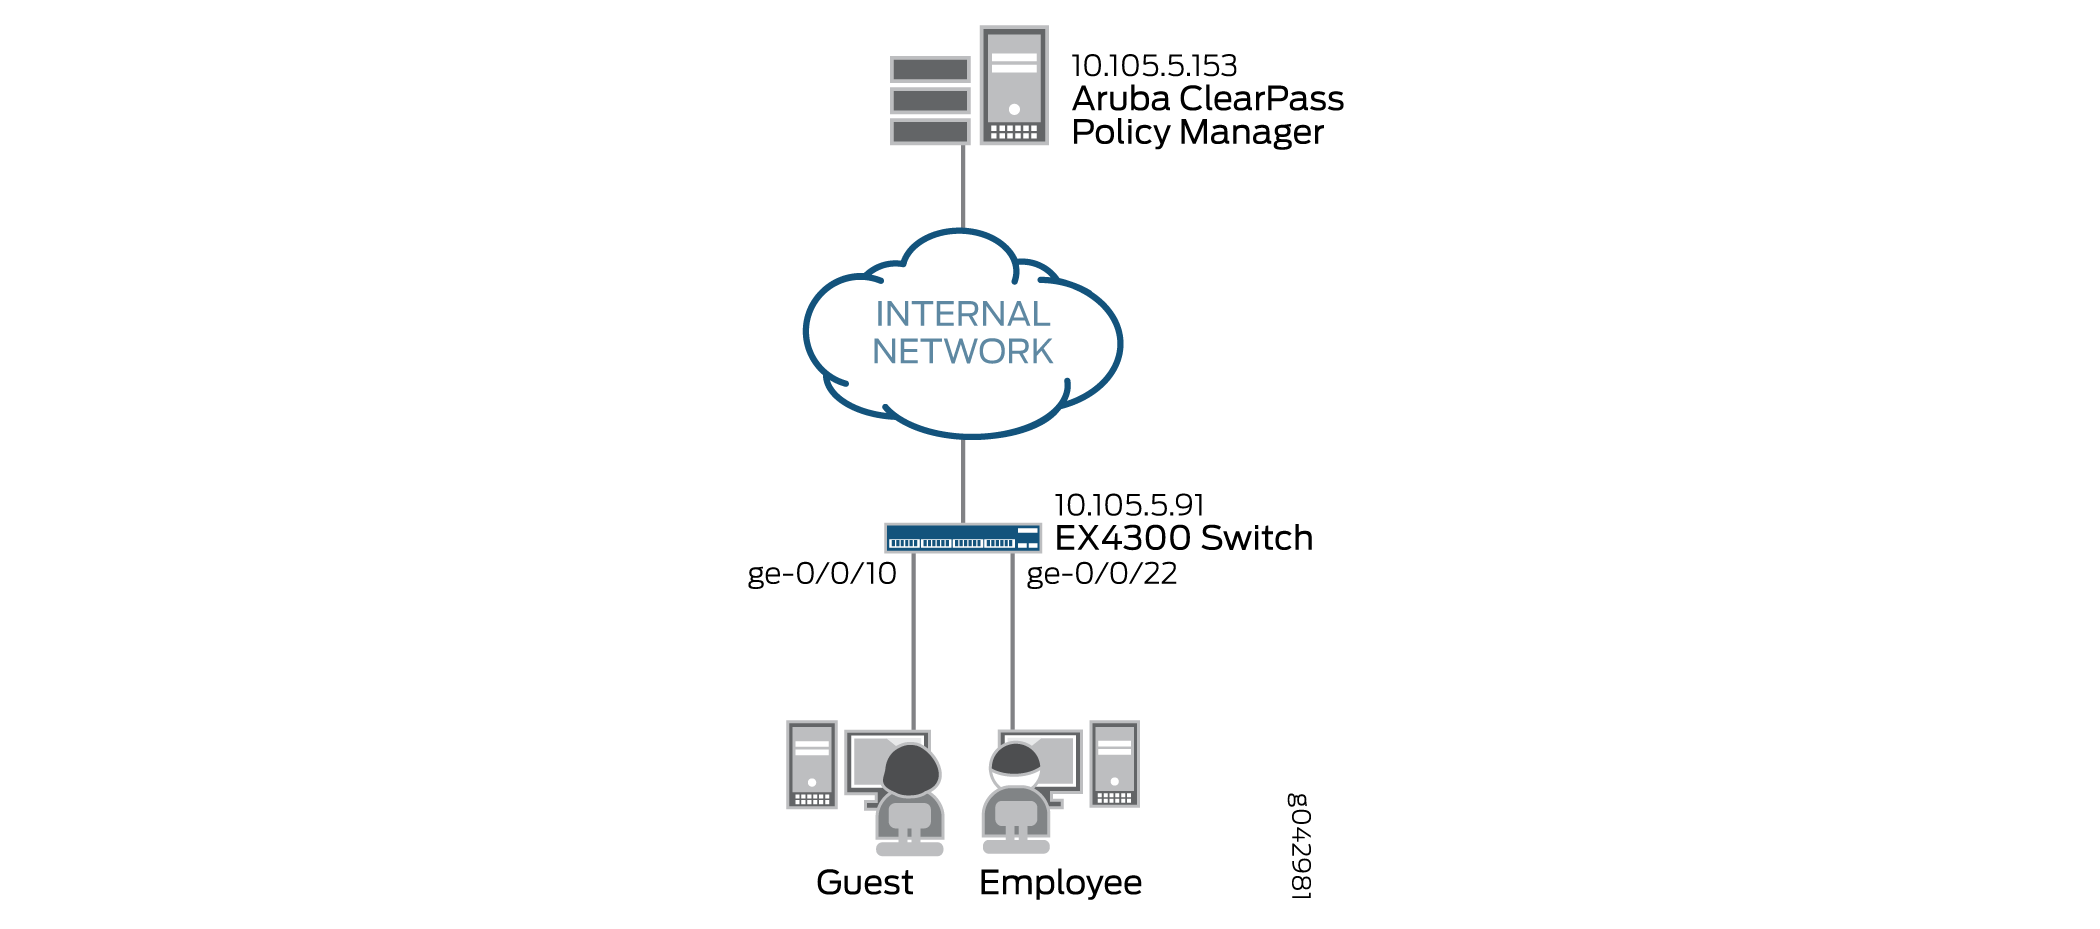
In this example, the policy infrastructure components are configured to authenticate the following endpoints:
An employee laptop that is configured for 802.1X PEAP authentication.
In the example configuration, Aruba ClearPass Policy Manager is configured to authenticate 802.1X users using its local user database. If the authenticated employee is listed in the database as belonging to the finance department, Aruba ClearPass returns the VLAN ID 201 to the switch in a RADIUS attribute. The switch then dynamically configures the laptop access port to be in VLAN 201.
A guest laptop that is not configured for 802.1X authentication.
In this case, the switch detects that the endpoint does not have an 802.1X supplicant. Because MAC RADIUS authentication is also enabled on the interface, the switch then attempts MAC RADIUS authentication. If the laptop MAC address is not in the Aruba ClearPass MAC address database—as would be the case for a guest laptop—Aruba ClearPass is configured to return the name of the firewall filter the switch should enforce on the access port. This firewall filter, which is configured on the switch, allows the guest to access to the entire network except subnet 192.168.0.0/16.
Figure 1 shows the topology used in this example.
Configuration
This section provides step-by-step instructions for:
- Configuring the EX4300 Switch
- Configuring Aruba ClearPass Policy Manager
- Configuring the Windows 7 Supplicant on the Laptop
Configuring the EX4300 Switch
CLI Quick Configuration
To quickly configure this example, copy the following commands, paste them in a text file, remove any line breaks, change any details necessary to match your network configuration, copy and paste the commands into the CLI at the [edit] hierarchy level, and then enter commit from configuration mode.
[edit]
set access radius-server 10.105.5.153 dynamic-request-port 3799
set access radius-server 10.105.5.153 secret password
set access radius-server 10.105.5.153 source-address 10.105.5.91
set access profile Aruba-Test-Profile accounting-order radius
set access profile Aruba-Test-Profile authentication-order radius
set access profile Aruba-Test-Profile radius authentication-server 10.105.5.153
set access profile Aruba-Test-Profile radius accounting-server 10.105.5.153
set access profile Aruba-Test-Profile radius options nas-identifier 10.105.5.153
set protocols dot1x authenticator authentication-profile-name Aruba-Test-Profile
set protocols dot1x authenticator interface ge-0/0/10 mac-radius
set protocols dot1x authenticator interface ge-0/0/22 mac-radius
set protocols dot1x authenticator interface ge-0/0/10 supplicant multiple
set protocols dot1x authenticator interface ge-0/0/22 supplicant multiple
set interfaces ge-0/0/10 unit 0 family ethernet-switching vlan members v201
set interfaces ge-0/0/22 unit 0 family ethernet-switching vlan members v201
set vlans v201 vlan-id 201
set firewall family ethernet-switching filter mac_auth_policy_1 term Block_Internal from ip-destination-address 192.168.0.0/16
set firewall family ethernet-switching filter mac_auth_policy_1 term Block_Internal then discard
set firewall family ethernet-switching filter mac_auth_policy_1 term Allow_All then accept
Step-by-Step Procedure
The general steps to configure an EX4300 switch are:
Configure the connection to the Aruba ClearPass Policy Manager.
Create the access profile used by the 802.1X protocol. The access profile tells the 802.1X protocol which authentication server to use and the authentication methods and order.
Configure the 802.1X protocol.
Configure Ethernet switching on the ge-0/0/10 and ge-0/0/22 access ports.
Create the firewall policy to be used when a guest laptop connects to a port.
To configure the EX4300 switch:
Provide the RADIUS server connection information.
[edit access]
user@Policy-EX4300-01# set radius-server 10.105.5.153 dynamic-request-port 3799
user@Policy-EX4300-01# set radius-server 10.105.5.153 secret password
user@Policy-EX4300-01# set radius-server 10.105.5.153 source-address 10.105.5.91
Configure the access profile.
[edit access]
user@Policy-EX4300-01# set profile Aruba-Test-Profile accounting-order radius
user@Policy-EX4300-01# set profile Aruba-Test-Profile authentication-order radius
user@Policy-EX4300-01# set profile Aruba-Test-Profile radius authentication-server 10.105.5.153
user@Policy-EX4300-01# set profile Aruba-Test-Profile radius accounting-server 10.105.5.153
user@Policy-EX4300-01# set profile Aruba-Test-Profile radius options nas-identifier 10.105.5.153
Configure the 802.1X protocol to use Aruba-Test-Profile and to run on each access interface. In addition, configure the interfaces to use MAC RADIUS authentication and to allow more than one supplicant, each of which must be individually authenticated.
[edit protocols]
user@Policy-EX4300-01# set dot1x authenticator authentication-profile-name Aruba-Test-Profile
user@Policy-EX4300-01# set dot1x authenticator interface ge-0/0/10 mac-radius

user@Policy-EX4300-01# set dot1x authenticator interface ge-0/0/22 mac-radius

user@Policy-EX4300-01# set dot1x authenticator interface ge-0/0/10 supplicant multiple
user@Policy-EX4300-01# set dot1x authenticator interface ge-0/0/22 supplicant multiple
Configure the access ports.
[edit interfaces]
user@Policy-EX4300-01# set ge-0/0/10 unit 0 family ethernet-switching vlan members v201
user@Policy-EX4300-01# set ge-0/0/22 unit 0 family ethernet-switching vlan members v201
Configure VLAN 201, which is used for employees that are members of the Finance department.
[edit]
user@Policy-EX4300-01# set vlans v201 vlan-id 201
Note that for dynamic VLAN assignment to work, the VLAN must exist on the switch before authentication is attempted. If the VLAN doesn’t exist, authentication fails.
Configure the firewall filter to be used when a guest laptop connects to a port.
[edit firewall]
user@Policy-EX4300-01# set family ethernet-switching filter mac_auth_policy_1 term Block_Internal from ip-destination-address 192.168.0.0/16
user@Policy-EX4300-01# set family ethernet-switching filter mac_auth_policy_1 term Block_Internal then discard
user@Policy-EX4300-01# set family ethernet-switching filter mac_auth_policy_1 term Allow_All then accept
Results
From configuration mode, confirm your configuration
by entering the following show commands.
user@Policy-EX4300-01# show access
radius-server {
    10.105.5.153 {
        dynamic-request-port 3799;
        secret "$9$FYxf3A0Ehrv87yl7Vs4DjfTz3Ct0BIcre"; ## SECRET-DATA
        source-address 10.105.5.91;
    }
}
profile Aruba-Test-Profile {
    accounting-order radius;
    authentication-order radius;
    radius {
        authentication-server 10.105.5.153;
        accounting-server 10.105.5.153;
        options {
            nas-identifier 10.105.5.153;
        }
    }
} user@Policy-EX4300-01# show protocols
dot1x {
authenticator {
authentication-profile-name Aruba-Test-Profile;
interface {
ge-0/0/10.0 {
supplicant multiple;
mac-radius;
}
ge-0/0/22.0 {
supplicant multiple;
mac-radius;
}
}
}
} user@Policy-EX4300-01# show interfaces
ge-0/0/10 {
unit 0 {
family ethernet-switching {
vlan {
members v201;
}
}
}
}
ge-0/0/22 {
unit 0 {
family ethernet-switching;
vlan {
members v201;
}
}
}
}
user@Policy-EX4300-01# show vlans
v201 {
    vlan-id 201;
} user@Policy-EX4300-01# show firewall
family ethernet-switching {
filter mac_auth_policy_1 {
term Block_Internal {
from {
ip-destination-address {
192.168.0.0/16;
}
}
then discard;
}
term Allow_All {
then accept;
}
}
}
If you are done configuring the device, enter commit from configuration mode.
Configuring Aruba ClearPass Policy Manager
Step-by-Step Procedure
The general steps for configuring Aruba ClearPass are:
Add the Juniper Networks RADIUS dictionary file.
Add the EX4300 as a network device.
Ensure that the server certificate used for 802.1X PEAP authentication has been installed.
Add the local user used in this example and assign the user to the Finance group.
Create two enforcement profiles:
A profile that defines the RADIUS attributes for the dynamic firewall filter.
A profile that defines the RADIUS attributes for the dynamic VLAN.
Create two enforcement policies:
A policy that is invoked when MAC RADIUS authentication is used.
A policy that is invoked when 802.1X authentication is used.
Define the MAC RADIUS authentication service and the 802.1X authentication service.
Ensure that the MAC RADIUS authentication service is evaluated before the 802.1X authentication service.
To configure Aruba ClearPass:
Add the Juniper Networks RADIUS dictionary file.
Step-by-Step Procedure
Copy the following contents to a file named Juniper.dct on your desktop.
################################################################################
# Juniper.dct - Radius dictionary for JUNOS devices

# (See README.DCT for more details on the format of this file)
################################################################################
# Use the Radius specification attributes
#
@radius.dct

#
# Juniper specific parameters
#
MACRO Juniper-VSA(t,s) 26 [vid=2636 type1=%t% len1=+2 data=%s%]

ATTRIBUTE Juniper-Local-User-Name               Juniper-VSA(1,  string)  r
ATTRIBUTE Juniper-Allow-Commands                Juniper-VSA(2,  string)  r
ATTRIBUTE Juniper-Deny-Commands                 Juniper-VSA(3,  string)  r
ATTRIBUTE Juniper-Allow-Configuration           Juniper-VSA(4,  string)  r
ATTRIBUTE Juniper-Deny-Configuration            Juniper-VSA(5,  string)  r

ATTRIBUTE Juniper-Interactive-Command           Juniper-VSA(8,  string)  r
ATTRIBUTE Juniper-Configuration-Change          Juniper-VSA(9,  string)  r
ATTRIBUTE Juniper-User-Permissions              Juniper-VSA(10, string)  r
ATTRIBUTE Juniper-CTP-Group                     Juniper-VSA(21, integer) r
VALUE Juniper-CTP-Group Read_Only 1
VALUE Juniper-CTP-Group Admin 2
VALUE Juniper-CTP-Group Privileged_Admin 3
VALUE Juniper-CTP-Group Auditor 4
ATTRIBUTE Juniper-CTPView-APP-Group             Juniper-VSA(22,integer) r
VALUE Juniper-CTPView-APP-Group Net_View 1
VALUE Juniper-CTPView-APP-Group Net_Admin 2
VALUE Juniper-CTPView-APP-Group Global_Admin 3
ATTRIBUTE Juniper-CTPView-OS-Group              Juniper-VSA(23, integer) r
VALUE Juniper-CTPView-OS-Group Web_Manager 1
VALUE Juniper-CTPView-OS-Group System_Admin 2
VALUE Juniper-CTPView-OS-Group Auditor 3

ATTRIBUTE Juniper-Primary-Dns                   Juniper-VSA(31, ipaddr)  r
ATTRIBUTE Juniper-Primary-Wins                  Juniper-VSA(32, ipaddr)  r
ATTRIBUTE Juniper-Secondary-Dns                 Juniper-VSA(33, ipaddr)  r
ATTRIBUTE Juniper-Secondary-Wins                Juniper-VSA(34, ipaddr)  r
ATTRIBUTE Juniper-Interface-id                  Juniper-VSA(35, string)  r
ATTRIBUTE Juniper-Ip-Pool-Name                  Juniper-VSA(36, string)  r
ATTRIBUTE Juniper-Keep-Alive                    Juniper-VSA(37, integer) r
ATTRIBUTE Juniper-CoS-Traffic-Control-Profile   Juniper-VSA(38, string)  r
ATTRIBUTE Juniper-CoS-Parameter                 Juniper-VSA(39, string)  r
ATTRIBUTE Juniper-encapsulation-overhead        Juniper-VSA(40, integer) r
ATTRIBUTE Juniper-cell-overhead                 Juniper-VSA(41, integer) r
ATTRIBUTE Juniper-tx-connect-speed              Juniper-VSA(42, integer) r
ATTRIBUTE Juniper-rx-connect-speed              Juniper-VSA(43, integer) r
ATTRIBUTE Juniper-Firewall-filter-name          Juniper-VSA(44, string)  r
ATTRIBUTE Juniper-Policer-Parameter             Juniper-VSA(45, string)  r
ATTRIBUTE Juniper-Local-Group-Name              Juniper-VSA(46, string)  r
ATTRIBUTE Juniper-Local-Interface               Juniper-VSA(47, string)  r
ATTRIBUTE Juniper-Switching-Filter              Juniper-VSA(48, string)  r
ATTRIBUTE Juniper-VoIP-Vlan                     Juniper-VSA(49, string)  r


################################################################################
# Juniper.dct - Juniper Networks dictionary
################################################################################
In Aruba ClearPass, navigate to Administration > Dictionaries > RADIUS and click on Import to import the Juniper.dct file.
Add the EX4300 switch as a network device.
Step-by-Step Procedure
Under Configuration > Network > Devices, click Add.

On the Device tab, enter the hostname and IP address of the switch and the RADIUS shared secret that you configured on the switch. Set the Vendor Name field to Juniper.
Ensure that a server certificate for 802.1X PEAP authentication exists.
Under Administration > Certificates > Server Certificate, verify that Aruba ClearPass has a valid server certificate installed. If it does not, add a valid server certificate. The Aruba ClearPass documentation and your Certificate Authority can provide more details on how to obtain certificates and import them into ClearPass.
Add a test user to the local user repository.
This user will be used to verify 802.1X authentication.
Step-by-Step Procedure
Under Configuration -> Identity -> Local Users, click Add.
In the Add Local User window, enter the user ID (usertest1), user name (Test User), password, and select Employee as the user role. Under Attributes, select the Department attribute and type Finance under Value.
Configure a dynamic filter enforcement profile.
This profile defines the RADIUS filter ID attribute, assigning to it the name of the firewall filter you configured on the switch. The attribute is sent to the switch when the endpoint’s MAC address is not in the MAC database, enabling the switch to dynamically assign the firewall filter to the access port.
Step-by-Step Procedure
Under Configuration > Enforcement > Profiles, click Add.
On the Profile tab, set Template to RADIUS Based Enforcement and type the profile name, Juniper_DACL_1, in Name field.
On the Attributes tab, set Type to Radius:IETF, Name to Filter-Id (11), and type the name of firewall filter, mac_auth_policy_1, in the Value field.
Configure a dynamic VLAN enforcement profile.
This profile defines the RADIUS attributes for specifying VLAN 201. These RADIUS attributes are sent to the switch when a user who belongs to the Finance department authenticates using 802.1X, enabling the switch to dynamically assign VLAN 201 to the access port.
Step-by-Step Procedure
Under Configuration > Enforcement > Profiles, click Add.
On the Profile tab, set Template to RADIUS Based Enforcement and type the name of the profile, Juniper_Vlan_201, in the Name field.
On the Attributes tab, define the RADIUS attributes as shown.
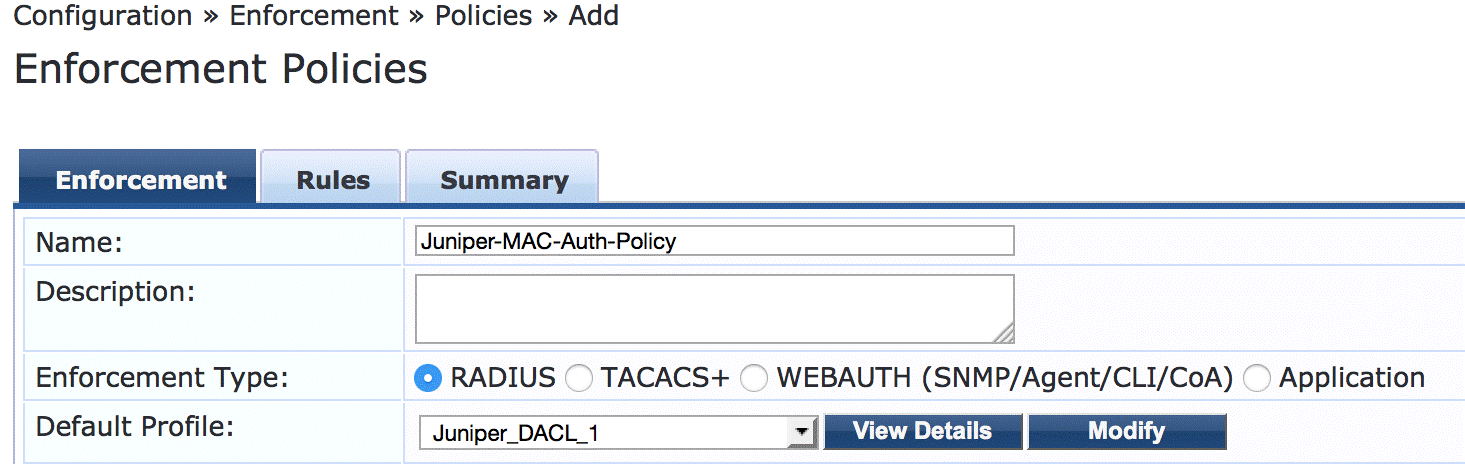
Configure the MAC RADIUS authentication enforcement policy.
This policy tells Aruba ClearPass to take one of the following actions, depending on whether the endpoint’s MAC address is in the RADIUS database:
If the address is in the RADIUS database, send an Access Accept message to the switch.
If the address is not in the RADIUS database, send an Acess Accept message to the switch along with the name of the firewall filter defined in the MAC RADIUS authentication profile.
Step-by-Step Procedure
Under Configuration > Enforcement > Policies, click Add.
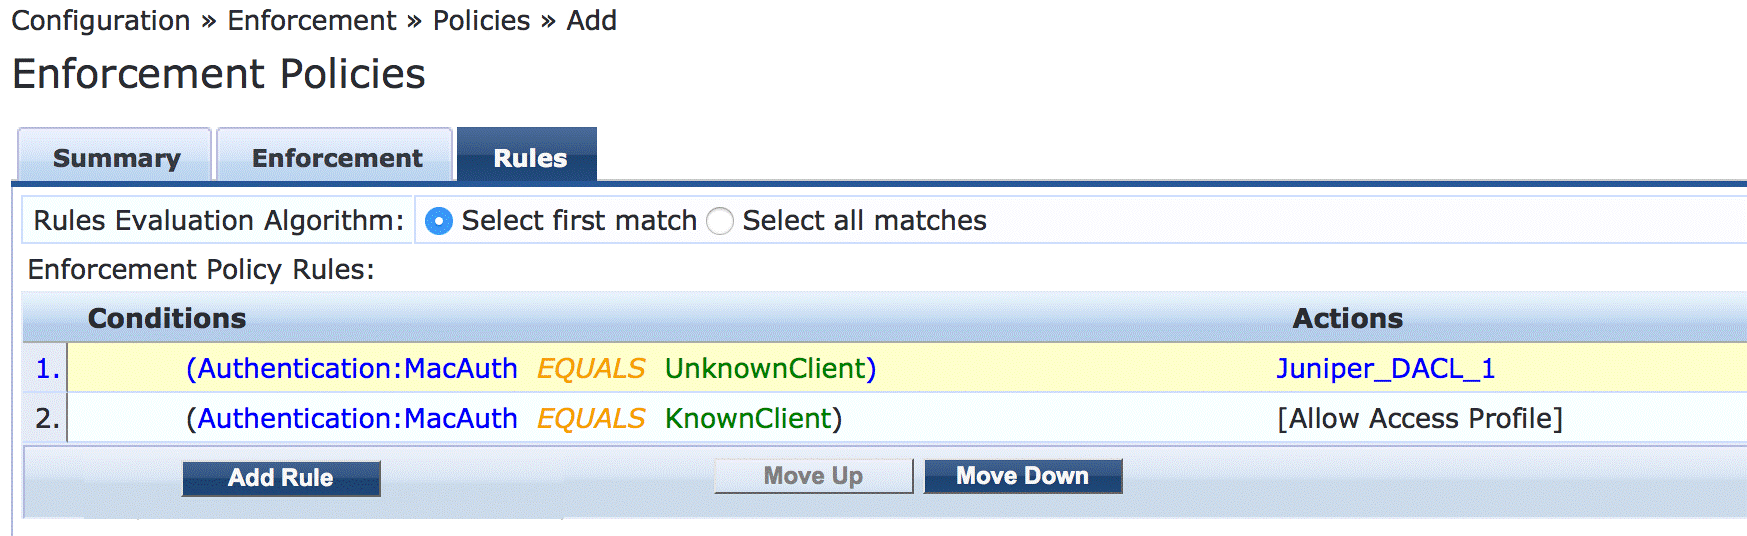
On the Enforcement tab, type the name of policy (Juniper-MAC-Auth-Policy) and set Default Profile to Juniper_DACL_1 (the profile you defined in Step 5.)
On the Rules tab, click Add Rule and add the two rules shown.
You must add the rules sequentially by creating the first rule in the Rules Editor and clicking Save before you create the second rule.
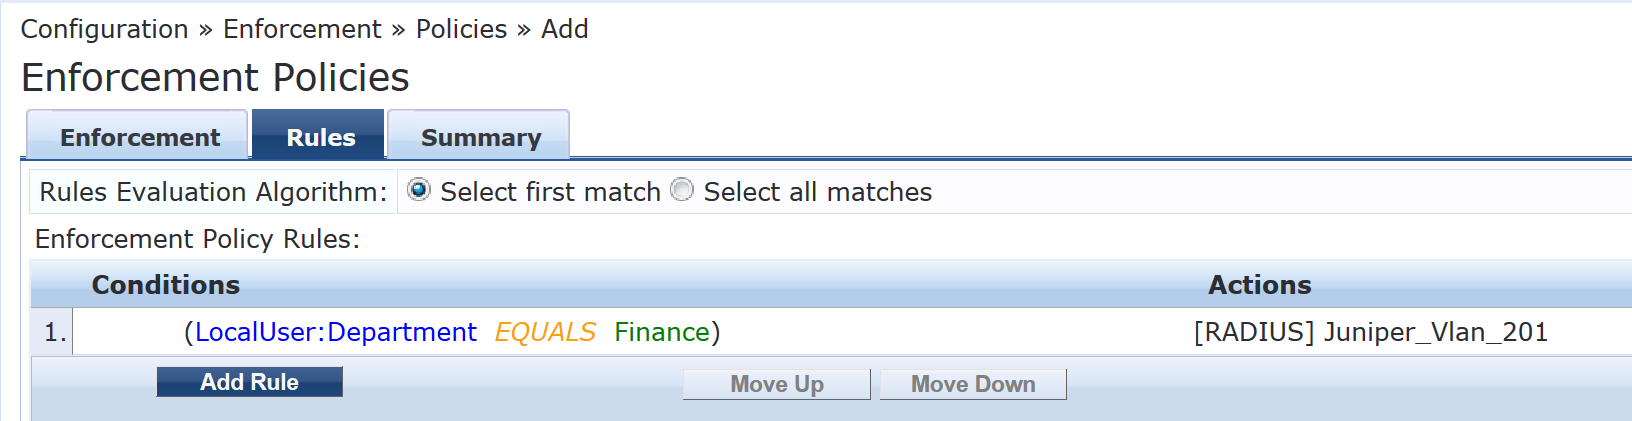
Configure the 802.1X enforcement policy.
This policy tells Aruba ClearPass to take one of the following actions, depending on whether the user belongs to the Finance department or not:
If the user belongs to the Finance department, send an Access Accept message to the switch and the VLAN 201 information defined in the 802.1X enforcement profile.
If the user does not belong to Finance department, send an Access Accept message to the switch.
Step-by-Step Procedure
Under Configuration > Enforcement > Policies, click Add.
On the Enforcement tab, type the name of policy (Juniper_Dot1X_Policy) and set Default Profile to [Allow Access Profile]. (This is a prepackaged profile that comes with Aruba ClearPass.)
On the Rules tab, click Add Rule and add the rule shown.
Configure the MAC RADIUS authentication service.
The configuration for this service results in MAC RADIUS authentication being performed when the RADIUS User-Name attribute and the Client-MAC-Address attribute received have the same value.
Step-by-Step Procedure
Under Configuration > Services, click Add.
On the Services tab, fill out the fields as shown.
On the Authentication tab, remove [MAC AUTH] from the Authentication Methods list and add [EAP MD5] to the list.
On the Enforcement tab, select Juniper-MAC-Auth-Policy.

Configure the 802.1X authentication service.
Step-by-Step Procedure
Under Configuration > Services, click Add.
On the Service tab, fill out the fields as shown.

On the Authentication tab, set Authentication Sources to [Local User Repository][Local SQL DB].
On the Enforcement tab, set Enforcement Policy to Juniper_Dot1X_Policy.
Verify that the MAC RADIUS authentication service policy is evaluated before the 802.1X authentication service policy.
Because Aruba ClearPass is configured to recognize MAC RADIUS authentication requests by the RADIUS User-Name attribute and the Client-MAC-Address attribute having the same value, it is more efficient to have the MAC RADIUS service policy evaluated first.
In the Services main window, verify that Juniper-MAC-Auth-Policy appears before Juniper-MAC_Dot1X_Policy in the services list, as shown. If it does not, click Reorder and move Juniper-MAC-Auth-Policy above Juniper-MAC_Dot1X_Policy.
Configuring the Windows 7 Supplicant on the Laptop
Step-by-Step Procedure
This network configuration example uses the native 802.1X supplicant on the Windows 7 laptop. This supplicant must be configured for 802.1X PEAP authentication.
The general steps for configuring the Windows 7 supplicant are:
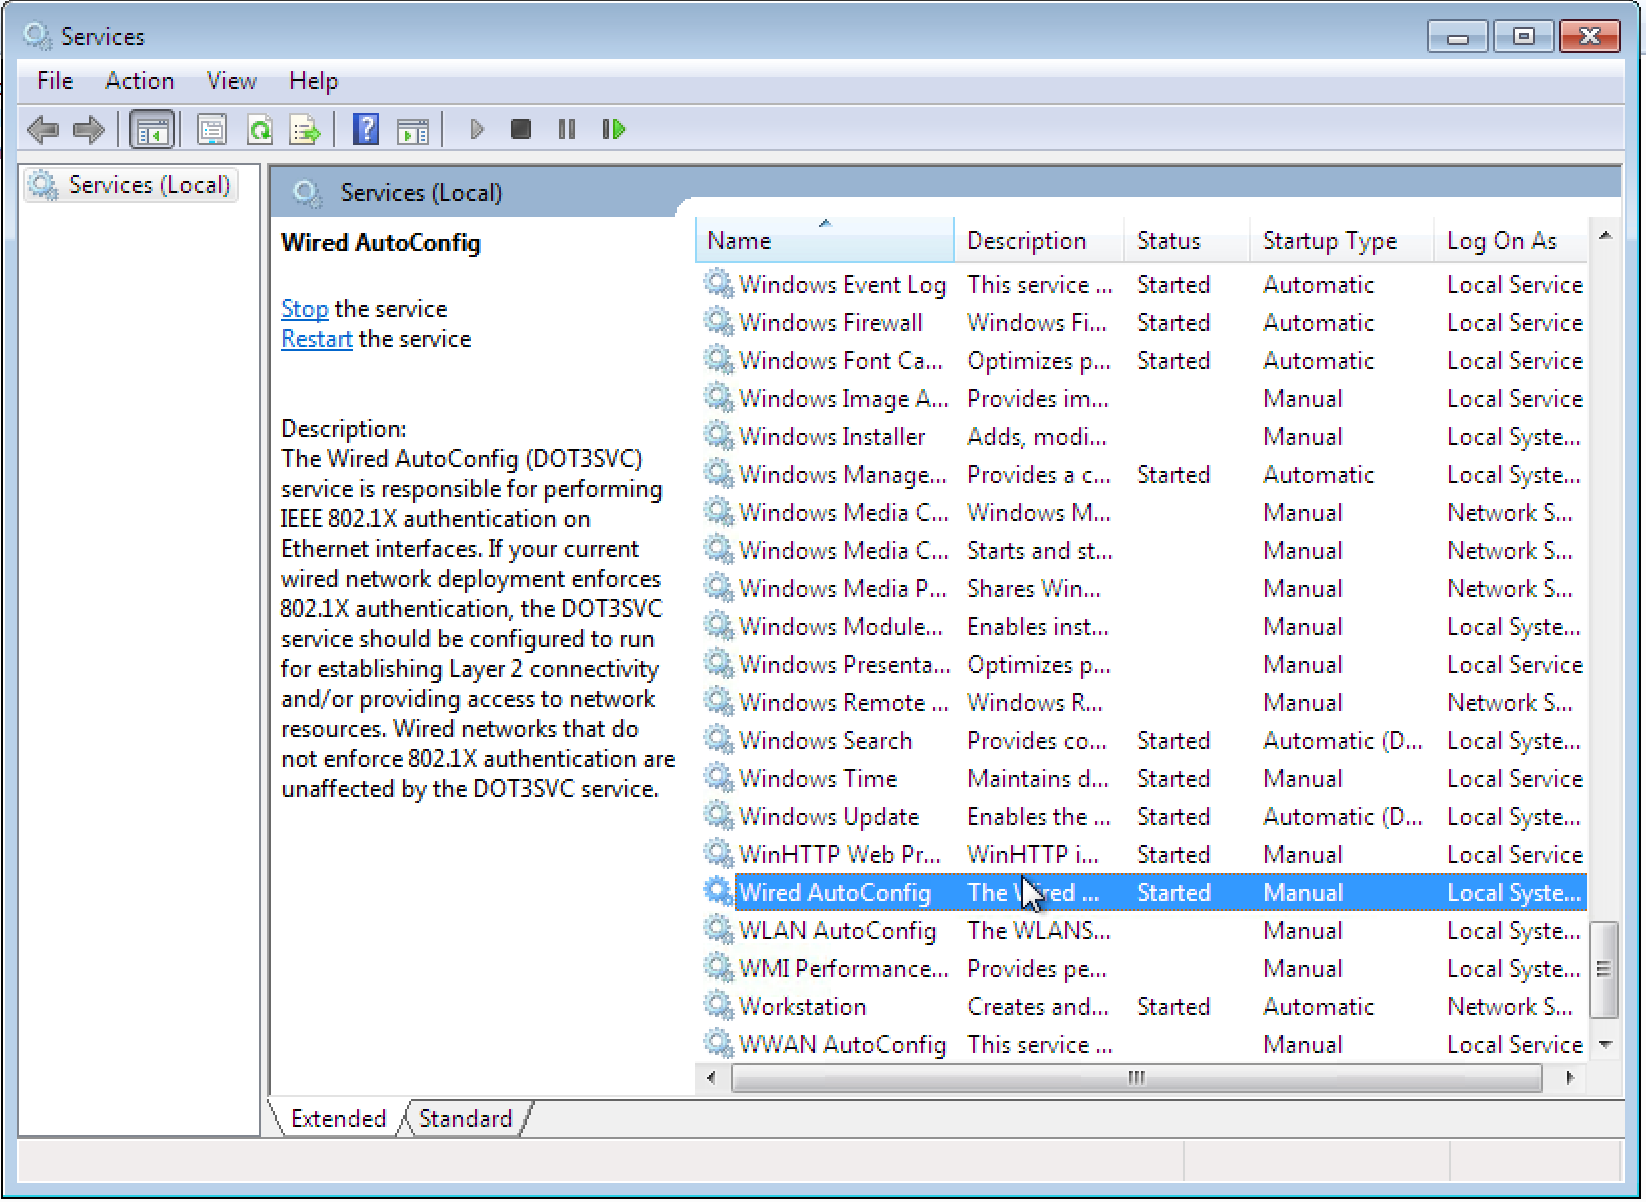
Ensure that the Wired AutoConfig service is started.
Enable 802.1X PEAP authentication for the Local Area Connection.
Configure the settings for server certificate validation.
Configure the user credential settings.
Ensure that the Wired AutoConfig service is started on the laptop.
Select Control Panel > Administrative Tools > Services. Started should appear in the Wired AutoConfig Status field.
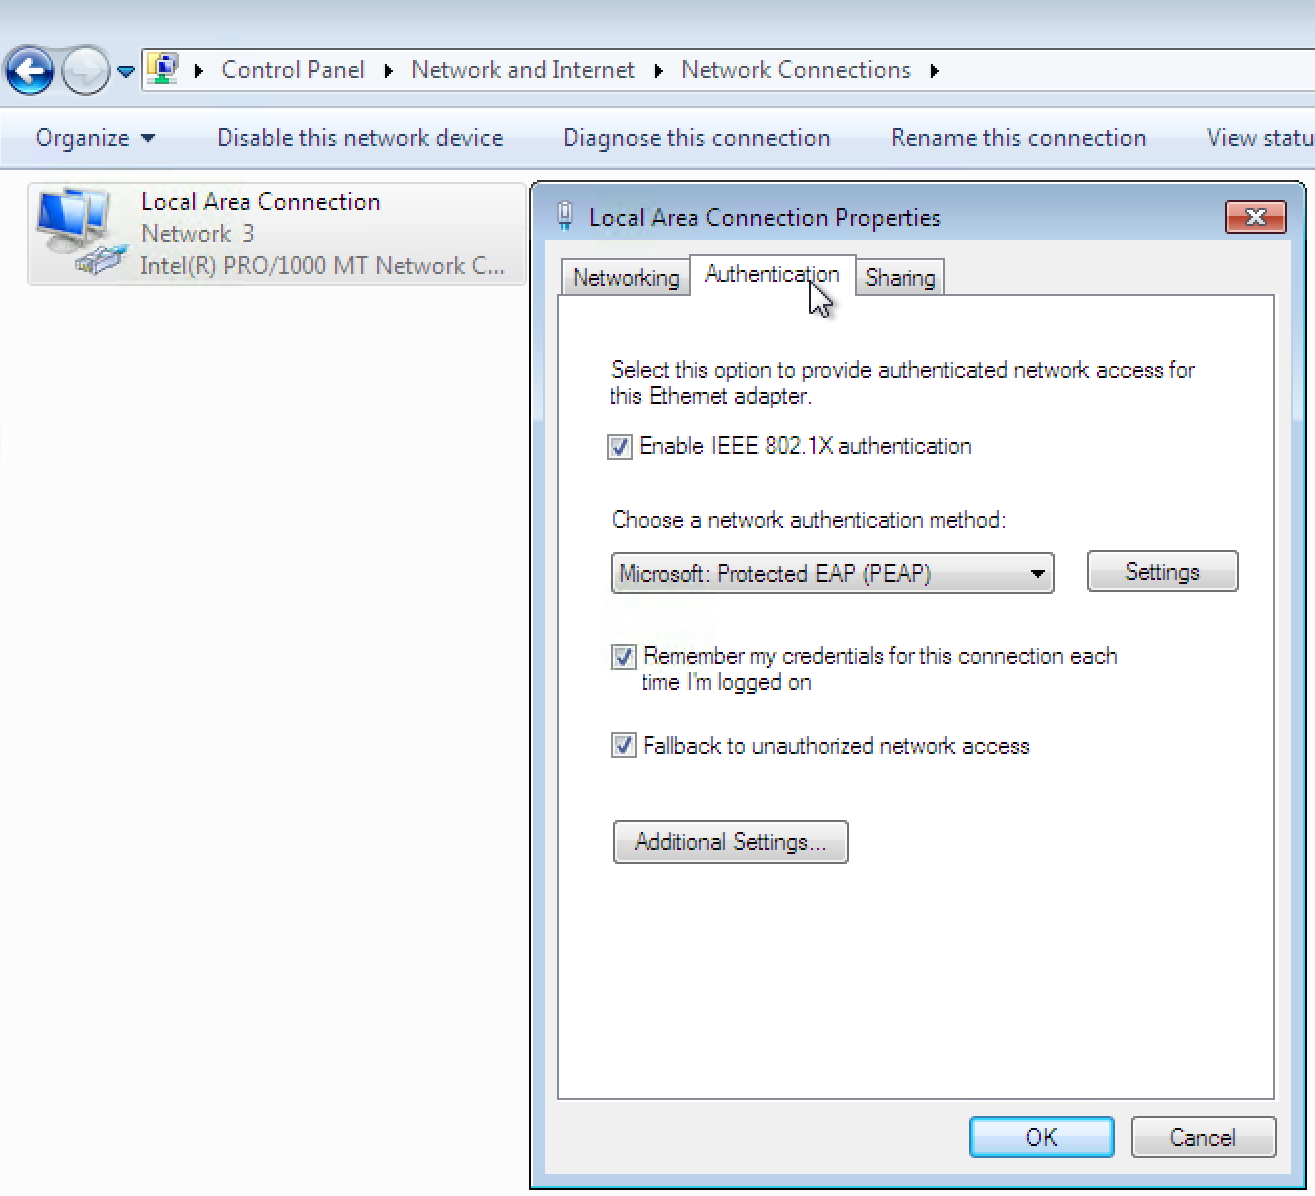
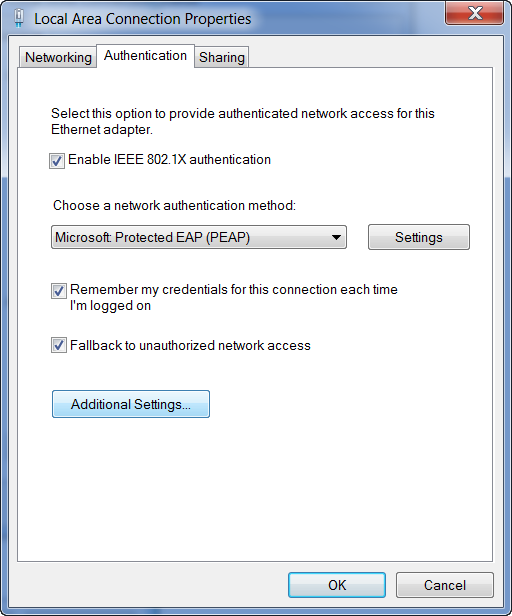
Enable 802.1X PEAP authentication for the Local Area Connection.
Step-by-Step Procedure
Under Control Panel > Network and Sharing Center > Change Adaptor Settings, right-click Local Area Connection and then click Properties.
On the Authentication tab of the Local Area Connection Properties window, configure the properties as shown.
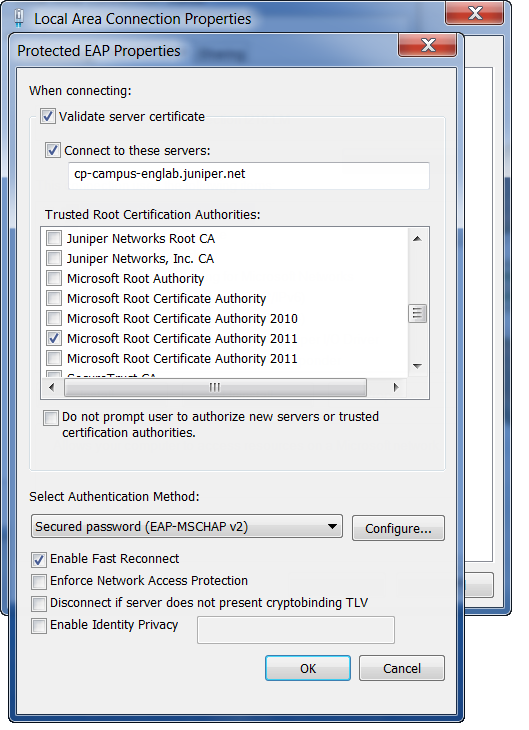
Configure whether or not the laptop validates the Aruba ClearPass server certificate.
Click Settings to display the Protected EAP Properties window.
If you do not want the laptop to validate the ClearPass server certificate, uncheck Validate server certificate.
If you do want the laptop to validate the ClearPass server certificate, check Validate server certificate, type the name of the ClearPass server, and select the trusted root certificate authority for the ClearPass server certificate. The server name must match the CN in the server certificate.
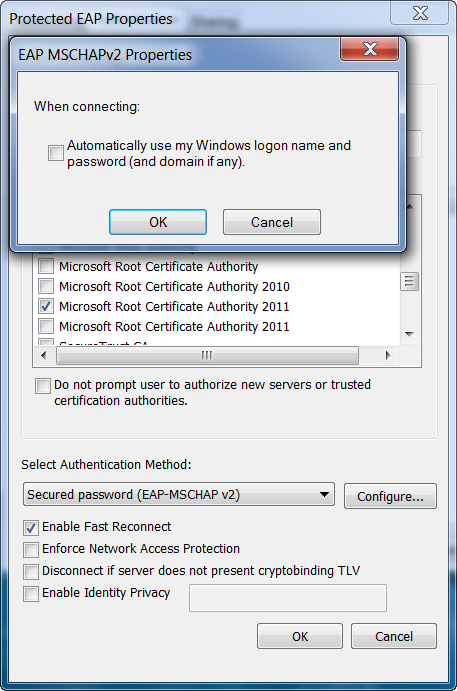
Configure the user credentials settings.
This configuration example does not use the Windows Active Directory credentials for user authentication. Instead, it uses the credentials of the local user defined on the Aruba ClearPass server.
Step-by-Step Procedure
In the Protected EAP Properties window, click Configure to configure Secured password (EAP-MSCHAP v2). Clear the Automatically use my Windows logon name and password check box.
If your Aurba ClearPass server were configured to use Windows Active Directory to authenticate users, you would leave this option selected.
Finish configuring the Protected PEAP Properties by clicking OK.
On the Authentication tab of the Local Area Connection Properties, click Additional Settings.
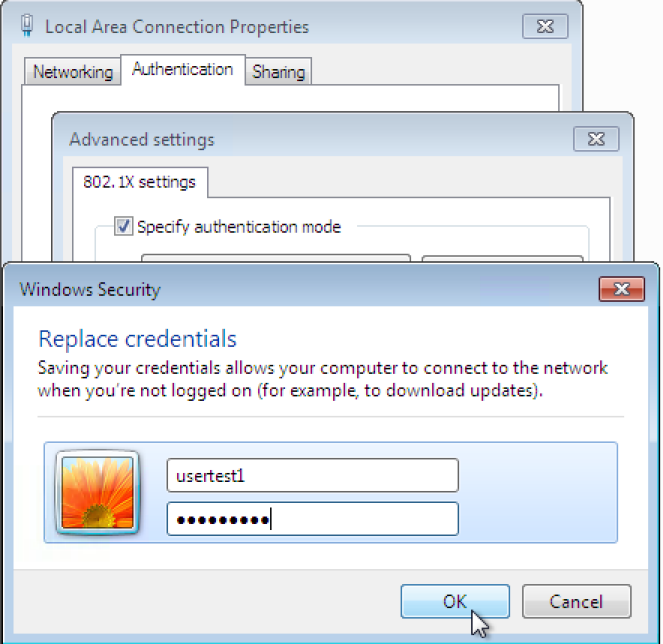
In Advanced settings, select User Authentication for the authentication mode and click Replace credentials.
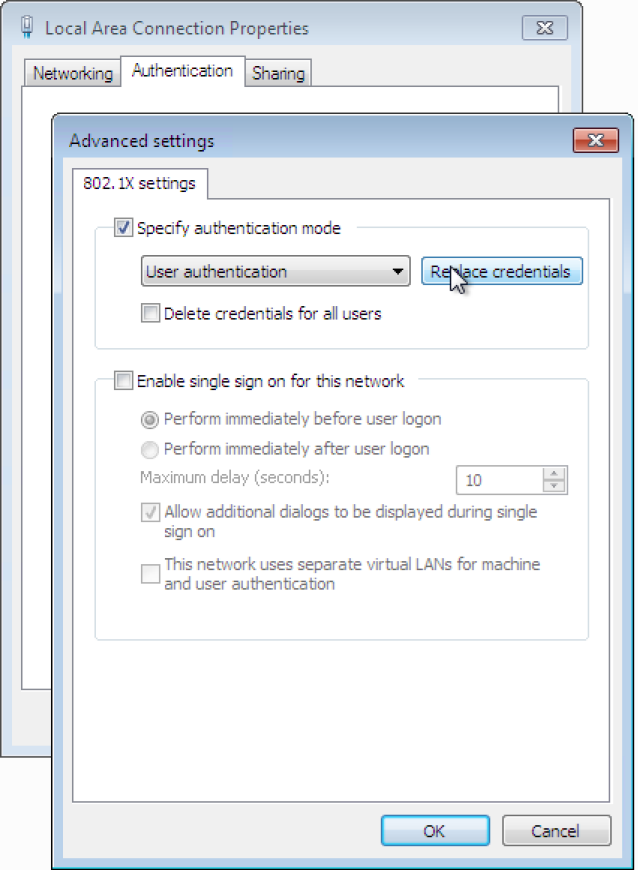
Enter the user ID (usertest1) and password of the local user that you added to local user database on the Aruba ClearPass server.
Verification
Confirm that the configuration is working properly.
- Verifying Authentication on the EX4300 Switch
- Verifying Status of Authentication Requests on Aruba ClearPass Policy Manager
Verifying Authentication on the EX4300 Switch
Purpose
Verify that the test user, usertest1, is being authenticated and placed in the correct VLAN.
Action
Connect the Windows 7 laptop configured as described in Configuring the Windows 7 Supplicant on the Laptop to ge-0/0/22 on the EX4300 switch.
On the switch, type the following command:
user@Policy-EX4300-01> show dot1x interface ge-0/0/22.0
802.1X Information:
Interface     Role           State           MAC address          User
ge-0/0/22.0   Authenticator  Authenticated   00:50:56:9B:03:7F    usertest1
For more details, including the dynamic VLAN assignment, type:
user@Policy-EX4300-01> show dot1x interface ge-0/0/22.0 detail
ge-0/0/22.0
  Role: Authenticator
  Administrative state: Auto
  Supplicant mode: Single
  Number of retries: 3
  Quiet period: 60 seconds
  Transmit period: 30 seconds
  Mac Radius: Enabled
  Mac Radius Restrict: Disabled
  Reauthentication: Enabled
  Configured Reauthentication interval: 3600 seconds
  Supplicant timeout: 30 seconds
  Server timeout: 30 seconds
  Maximum EAPOL requests: 2
  Guest VLAN member: not configured
  Number of connected supplicants: 1
    Supplicant: usertest1, 00:50:56:9B:03:7F
      Operational state: Authenticated
      Backend Authentication state: Idle
      Authentication method: Radius
      Authenticated VLAN: V201
      Session Reauth interval: 3600 seconds
      Reauthentication due in 3397 seconds
Meaning
802.1X authentication is working as configured—usertest1 has been successfully authenticated and placed in VLAN 201.
You can use the show dot1x command to also verify that the guest laptop is being properly authenticated using MAC RADIUS authentication.
Verifying Status of Authentication Requests on Aruba ClearPass Policy Manager
Purpose
Verify that the endpoints are being correctly authenticated and that the correct RADIUS attributes are being exchanged between the switch and Aruba ClearPass.
Action
Go to Monitoring > Live Monitoring > Access Tracker to display the status of the authentication requests.
The Access Tracker monitors authentication requests as they occur and reports on their status.

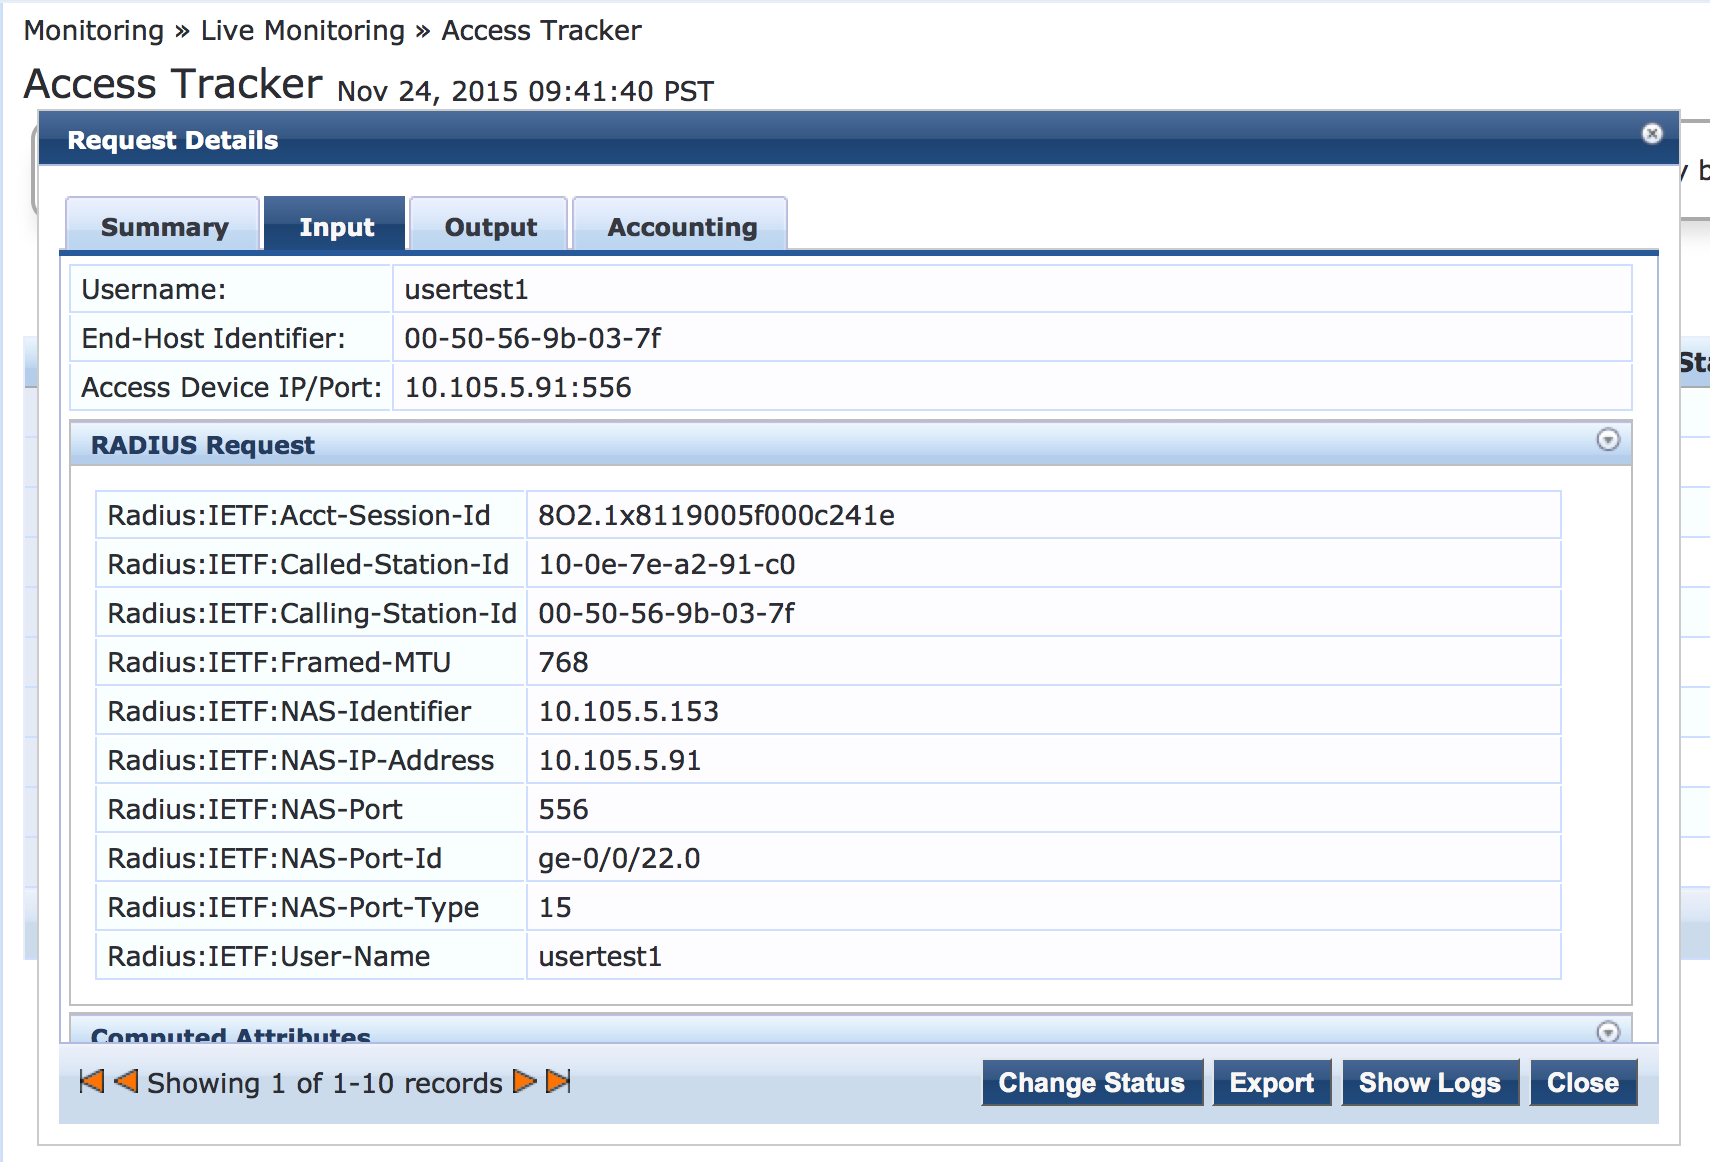
To verify the RADIUS attributes sent by the switch to Aruba ClearPass for a particular request, click the request and then click the Input tab in the Request Details window.
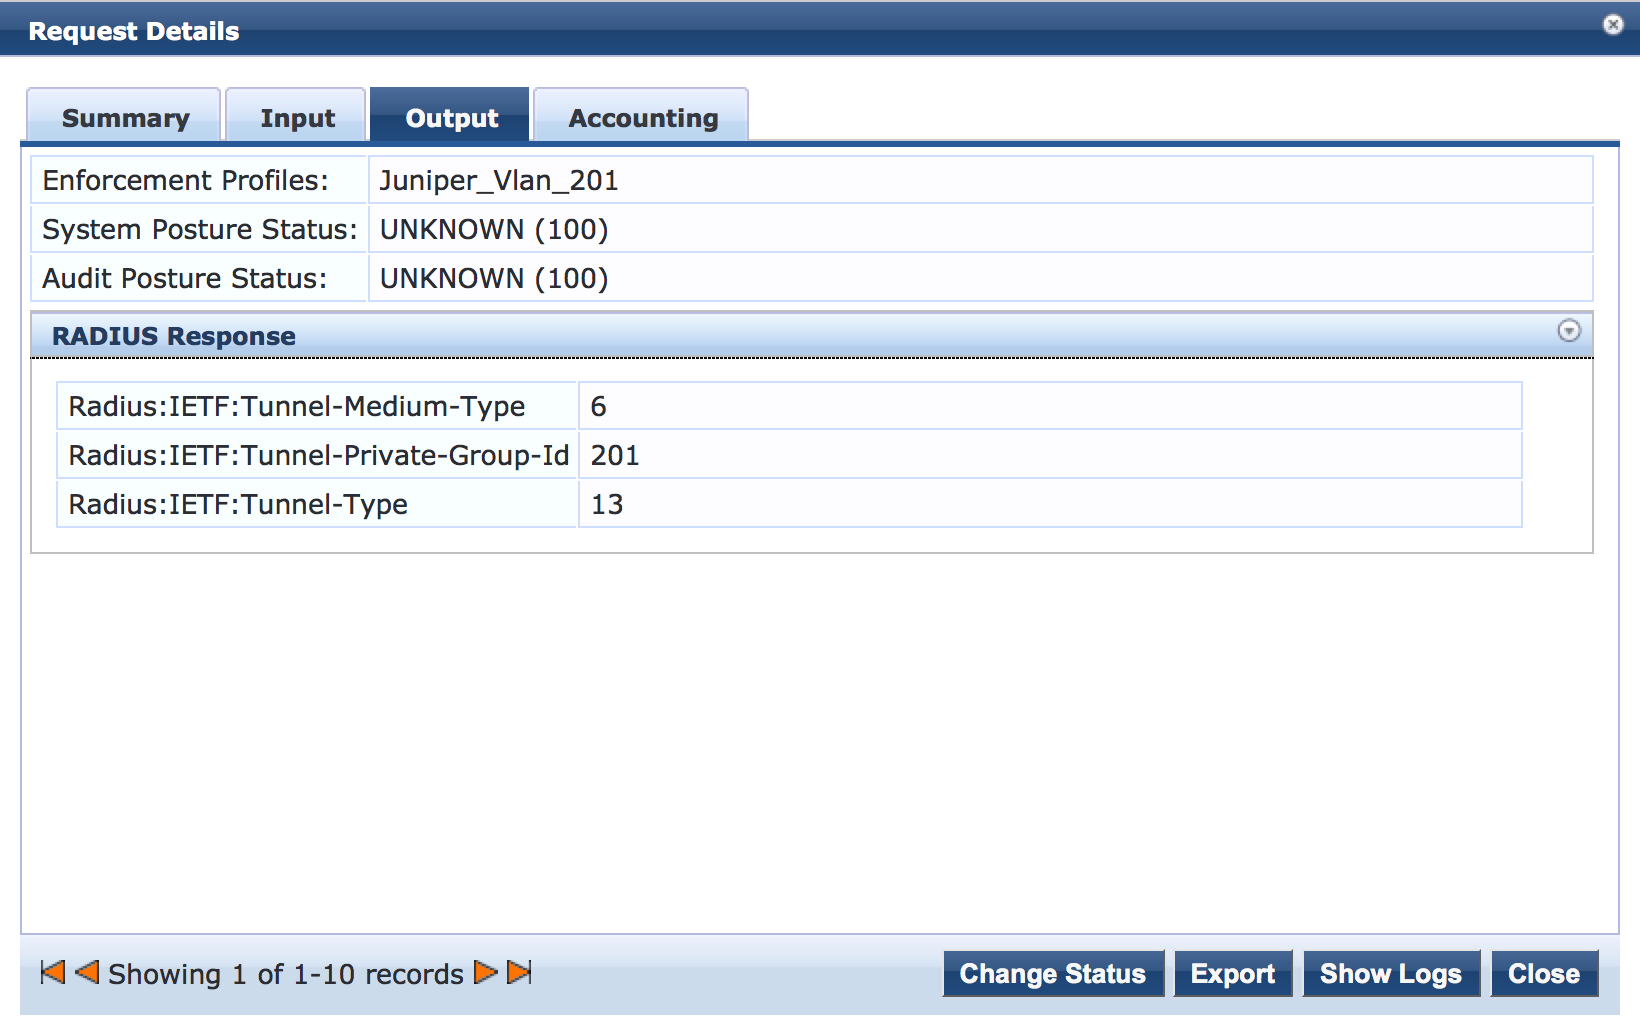
To verify the RADIUS attributes that Aruba ClearPass sent back to the switch for this request, click the Output tab.
Meaning
The Login Status field of the Access Tracker shows that the employee laptop and guest laptop are being successfully authenticated. The request details for the authentication request from usertest1 shows that the switch is sending the correct RADIUS attributes to Aruba ClearPass and that ClearPass is returning to the switch the correct RADIUS attributes specifying VLAN 201.