Appendix B: Administering Common Certificate Authorities
This topic provides some basic concepts and examples of administrative procedures using a Microsoft certificate authority (CA) and an open source CA from OpenSSL. This information may help you to work with the administrator to enroll and use certificates on a Junos OS device.
The choice of CA depends on whether you want a standalone CA solution or will rely on a third party such as Verisign; this topic assumes that you want a standalone server for which you will be the CA administrator.
This topic includes the following sections:
Certificate Authorities Overview
Juniper Networks supports the following vendors of CA:
Verisign
Entrust
Microsoft Win2000 Advanced Server
Although Juniper Networks does not support the Open source code from OpenSSL officially, you can use it with Junos OS if set up properly.
Microsoft Windows 2000 Certificate Authority
The Microsoft CA, provided on Windows 2000 advanced server, provides CA services through a web interface, including support for a CRL Distribution Point (CDP). Microsoft also supports a patch to activate Simple Certificate Enrollment Protocol (SCEP). Microsoft does not support OCSP.
In your Web browser, type the Web address http://<host.domain>/certsrv. where <host.domain> is the IP address of Microsoft CA server.
The initial welcome page is displayed, as shown in Figure 1.
Figure 1: Downloading Microsoft CA Certificate—Initial Welcome Page
Select Retrieve the CA certificate or certificate revocation list and click Next.
The Retrieve the CA Certificate or Certificate Revocation List page is displayed.
Select the CA you want to use, and then click Download CA certificate, as shown in Figure 2.
Figure 2: Retrieve the CA Certificate or Certificate Revocation List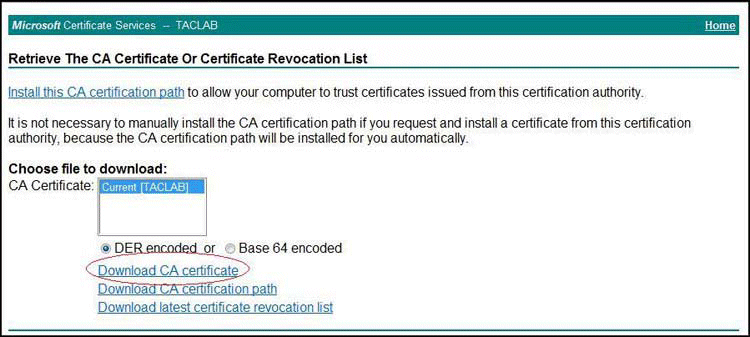
A pop-up window appears that allows you to choose the location in which to save the certificate. Choose a location on your local file system and save the certificate with a .cer extension (for example, certnew.cer).
Select the
Download latest certificate revocation
list
option on the Retrieve The CA Certificate or Certificate Revocation List page, as shown in Figure 3.Figure 3: Download Latest Certificate Revocation List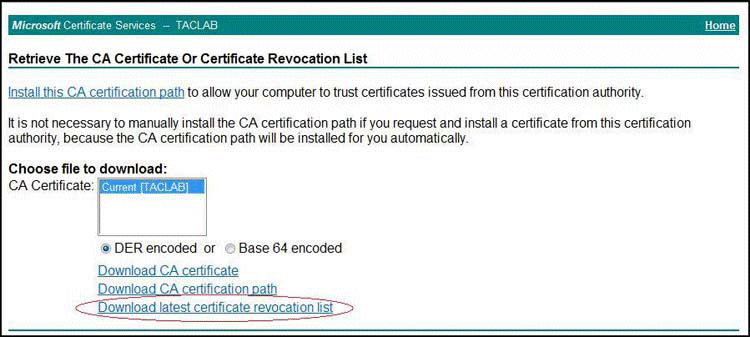
A pop-up window appears that allows you to choose the location in which to save the CRL. Choose a location on your local file system, and save the CRL with a .crl extension (for example, certcrl.crl).
Return to the initial Welcome screen to request a certificate. Select Request a Certificate and click Next, as shown in Figure 4.
Figure 4: Request Certificate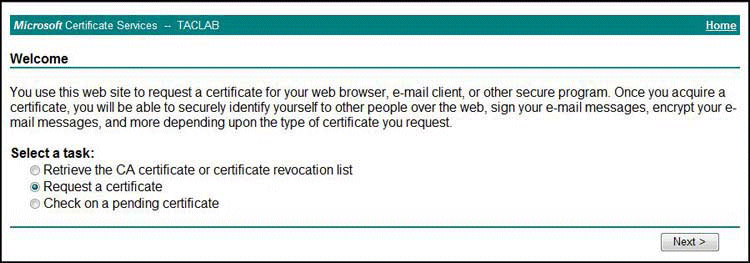
On the Choose Request Type page, select the Advanced request option, as shown in Figure 5.
Figure 5: Select Advanced Request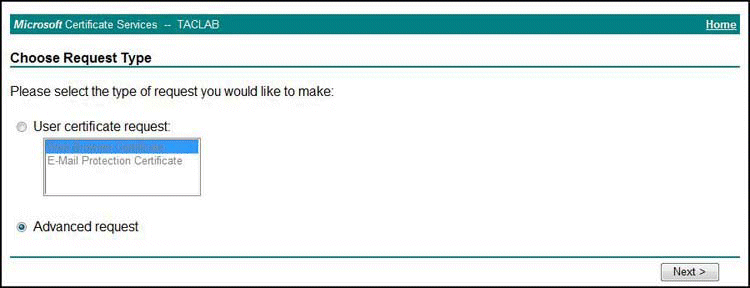
On the Advanced Certificate Requests page, select the
PKCS #10option, as shown in Figure 6.Figure 6: Advanced Certificate Requests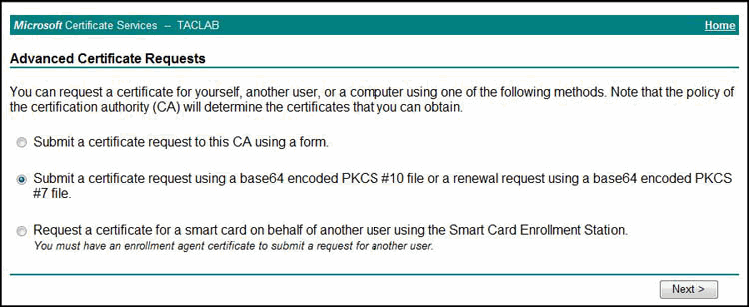
On the Submit a Saved Request page, you can paste a copy of the certificate request into the page, as shown in Figure 7, and click Submit.
Figure 7: Submit a Saved Request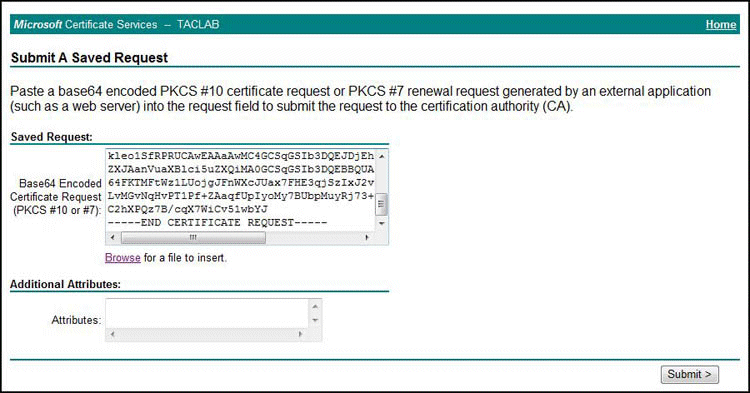
If the CA setup is configured to issue certificates automatically, then the Certificate Issued window is displayed as shown in Figure 8.
Click Download CA certificate to download your new local certificate, as shown in Figure 8.
Figure 8: Download New Local Certificate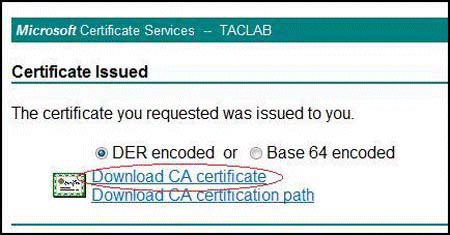 Note:
Note:In Figure 8, the downloaded certificate is your local Junos OS device certificate; not a CA certificate, as appears on the screen.
If the CA is not configured to issue certificates automatically, then you or a CA administrator must manually authorize the certificate request and generate the certificate.
To retrieve a certificate that an administrator has issued, you can return to the Microsoft CA home page (http://servername/certsrv).
On the Microsoft CA home page, click Check on a Pending Certificate.
If the certificate has been issued, the Certificate Issued Web page appears. From here you can view the certificates.
Double-click the .cer file, and then click the Details tab to see all the certificate fields and their values, as shown in Figure 9.
Figure 9: View Certificate Details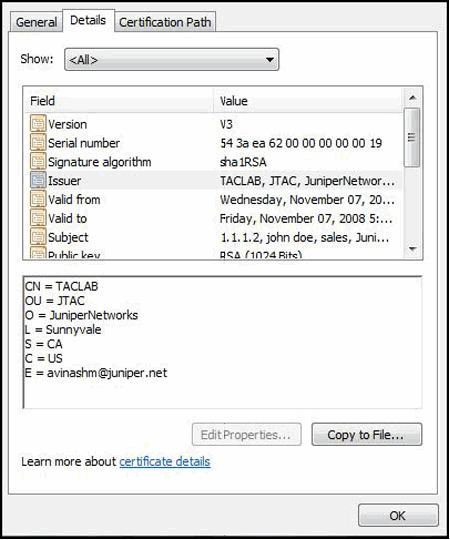
On the Details tab, validate the SubjectAlternativeName field for a certificate. Ensure that the SubjectAlternativeName includes the IKE ID types and values that are used in the Junos OS device IKE gateway definition, as shown in Figure 10.
Figure 10: Validate SubjectAlternativeName Values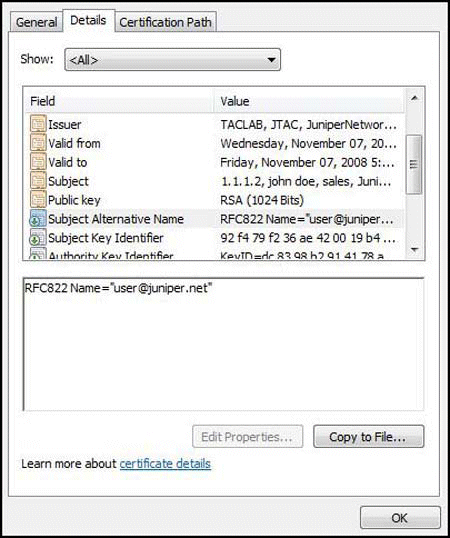
On the Details tab, you can also check the availability of a CDP. Figure 11 shows the CDP field and value. Ensure that the hostname can be identified and reached by the Junos OS device.
Figure 11: View CDP Field and Value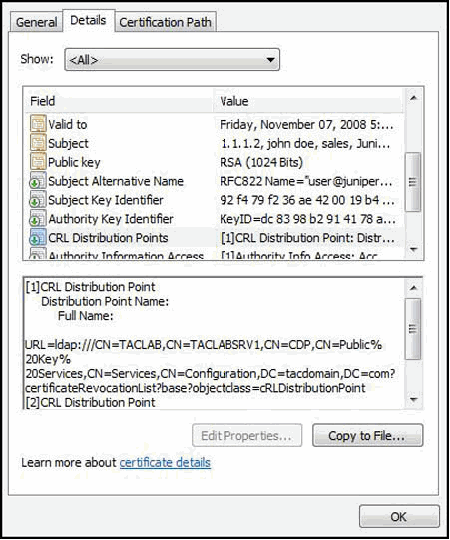
View certificate revocation list (CRL) information on the Certificate Revocation List Information screen, as shown in Figure 12.
Figure 12: View Certificate Revocation List Information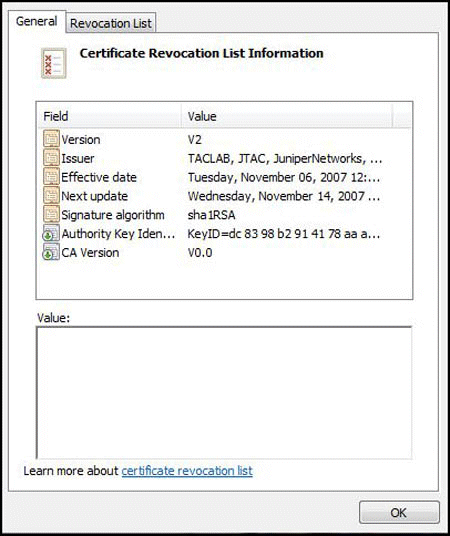
OpenSSL CA Overview
The OpenSSL code available at http://www.openssl.org/ provides free and simple command-line functionality to use in certificate authorization applications. GUI or Web interface support is not available in this functionality. All input (for example, p10 certificate requests) and all output (signed certificates and certificate revocation lists [CRLs]) are usually available in Privacy-Enhanced Mail (PEM)-encoded format.
To use OpenSSL, download and install the openssl.exe executable and perform the one-time CA setup. Here is an example using a Windows system:
Create a working directory, and use the
cdcommand to make sure that you are in your home directory.Copy the openssl.exe and openssl.cfg files to the home directory.
To view a sample copy of the openssl.cfg file, see OpenSSL.cfg File Sample.
From the working directory, create some additional subdirectories as shown below:
mkdir demoCA
mkdir demoCA\private
Create the CA’s own key pair and CA certificate.
openssl req -x509 -newkey rsa:1024 -keyout demoCA\private\key.pem \out demoCA\ca-cert.pem -config openssl.cfg
Warning: the private key for the CA will not be encrypted here.
Download the
ca-cert.pemfile into the Junos OS device as the certificate authority (CA) certificate.Set up a "database" for the certificates that will be generated by this CA.
mkdir demoCA\certstore
echo 01 > demoCA\ca-cert.srl
Create a new but empty file called index.txt in the demoCA directory.
edit demoCA\index.txt
Save and exit the application.
The CA is now initialized.
This procedure provides information about setting the basic configuration items and certificate request for each Junos OS device that needs a certificate:
When a PKCS10 file is generated, save that certificate request into a file called jsNAME.pkcs10.
Go to the OpenSSL CA's working directory (the parent directory of the demoCA subdirectory created earlier) to sign the certificate request (PKCS10 file) generated by the Junos OS device.
Although the
SubjectAlternativeNamefield information is in the Junos OS device's PKCS10 certificate request, the OpenSSL CA cannot sign it as it is. The OpenSSL server may attempt to strip that part out of the certificate request. To have the certificate populated with aSubjectAlternativeNamefield, you must edit a setting in the openssl.cfg file itself. However, that file must be modified for every certificate you sign. Use the step below to edit the openssl.cfg file:edit openssl.cfg
Search for the
SubjectAltNamefield. Reset theSubjectAltNamefield to the correct value for the particular Junos OS device certificate you are about to sign. For example:subjectAltName=DNS:ssg5.juniper.net
To create and sign the certificate, issue the command below, assuming
The certificate request from the Junos OS device is available in — jsNAME.pkcs10
The generated certificate will be stored in jsNAME.cer
openssl ca -config openssl.cfg -in jsNAME.pkcs10 -out jsNAME.cer
The Junos OS device's local certificate is now generated as the
jsNAME.cerfile and can be loaded into the Junos OS device. A copy of this certificate is also created in the demoCA\certstore subdirectory with a name of NN.pem where NN is the serial number of this certificate.Note:This certificate is in PEM format. To view the certificate with the Microsoft certificate viewer, the certificate needs to be converted to the DER encoding format by editing the jsNAME.cer file. Delete everything except the ----BEGIN/END certificate--- lines and all the data between those lines. This allows Microsoft Windows to decode the file properly to display its contents. The OpenSSL CLI can also convert the PEM-encoded certificate to DER encoding. See the OpenSSL documentation for details.
To revoke a certificate and generate a new CRL:
Find the serial number of the certificate. For example, to revoke a certificate with serial number 01, use the command below:
openssl ca -config openssl.cfg -revoke demoCA\certstore\01.pem
If you encounter an error, then you can manually move the file by using the following command:
mv demoCA\index.txt.new demoCA\index.txt
Next, generate the new CRL as shown below:
openssl ca -config openssl.cfg -gencrl -out crl.crl
The
crl.crlfile can now be loaded onto the Junos OS device. Load the CA certificate, CRL, and local certificate following the same steps as described in this document.
OpenSSL.cfg File Sample
A sample of an OpenSSL.cfg file is shown below:
#
# OpenSSL example configuration file.
# This is mostly being used for generation of certificate requests.
#
# This definition stops the following lines choking if HOME isn't
# defined.
HOME = .
RANDFILE = $ENV::HOME\\.rnd
# Extra OBJECT IDENTIFIER info:
#oid_file = $ENV::HOME\\.oid
oid_section = new_oids
# To use this configuration file with the "-extfile" option of the
# "openssl x509" utility, name here the section containing the
# X.509v3 extensions to use:
# extensions =
# (Alternatively, use a configuration file that has only
# X.509v3 extensions in its main [= default] section.)
[ new_oids ]
# We can add new OIDs in here for use by 'ca' and 'req'.
# Add a simple OID like this:
# testoid1=1.2.3.4
# Or use config file substitution like this:
# testoid2=${testoid1}.5.6
###################################################################
[ ca ]
default_ca = CA_default # The default ca section
###################################################################
[ CA_default ]
dir = .\\demoCA # Where everything is kept
certs = $dir\\certs # Where the issued certs are kept
crl_dir = $dir\\crl # Where the issued crl are kept
database = $dir\\index.txt # database index file.
new_certs_dir = $dir\\certstore # default place for new certs.
certificate = $dir\\ca-cert.pem # The CA certificate
serial = $dir\\ca-cert.srl # The current serial number
crl = $dir\\crl.pem # The current CRL
private_key = $dir\\private\\key.pem # The private key
RANDFILE = $dir\\private\\.rand # private random number file
x509_extensions = usr_cert # The extentions to add to the cert
# Extensions to add to a CRL. Note: Netscape communicator chokes
# on V2 CRLs so this is commented out by default to leave a V1 CRL.
# crl_extensions = crl_ext
default_days = 365 # how long to certify for
default_crl_days= 30 # how long before next CRL
default_md = md5 # which md to use.
preserve = no # keep passed DN ordering
# A few difference way of specifying how similar the request should
# look. For type CA, the listed attributes must be the same, and
# the optional and supplied fields are just that :-)
policy = policy_match
# For the CA policy
[ policy_match ]
countryName = optional
stateOrProvinceName = optional
organizationName = optional
organizationalUnitName = optional
commonName = supplied
emailAddress = optional
# For the 'anything' policy
# At this point in time, you must list all acceptable 'object'
# types.
[ policy_anything ]
countryName = optional
stateOrProvinceName = optional
localityName = optional
organizationName = optional
organizationalUnitName = optional
commonName = supplied
emailAddress = optional
###################################################################
[ req ]
default_bits = 1024
default_keyfile = privkey.pem
distinguished_name = req_distinguished_name
attributes = req_attributes
x509_extensions = v3_ca # extensions to add to the self signed cert
# Passwords for private keys if not present they will be prompted
# for input_password = secret
# output_password = secret
# This sets a mask for permitted string types of which there are
# several options.
#
# default: PrintableString, T61String, BMPString.
# pkix : PrintableString, BMPString.
# utf8only: only UTF8Strings.
# nombstr : PrintableString, T61String (no BMPStrings or
# UTF8Strings).
# MASK:XXXX a literal mask value.
# WARNING: current versions of Netscape crash on BMPStrings or
UTF8Strings
# so use this option with caution!
string_mask = nombstr
# req_extensions = v3_req # extensions to add to a cert request
[ req_distinguished_name ]
countryName = Country Name (2 letter code)
countryName_default = US
countryName_min = 2
countryName_max = 2
stateOrProvinceName = State or Province Name (full name)
stateOrProvinceName_default = Illinois
localityName = City or local name
localityName_default = Chicago
0.organizationName = demo-company.com
0.organizationName_default = netscreen.com
# we can do this but it is not needed normally :-)
#1.organizationName = Second Organization Name (eg, company)
#1.organizationName_default = Sales
organizationalUnitName = Org Unit
organizationalUnitName_default = CSE
commonName = Common Name
commonName_default = test-CA
commonName_max = 64
emailAddress = Email Address
emailAddress_default = admin@juniper.net
emailAddress_max = 40
# SET-ex3 = SET extension number 3
[ req_attributes ]
challengePassword = secretkey
challengePassword_min = 4
challengePassword_max = 20
unstructuredName = juniper.net
[ usr_cert ]
# These extensions are added when 'ca' signs a request.
# This goes against PKIX guidelines. Some CAs do this and some
# software requires this to avoid interpreting an end user
# certificate as a CA.
basicConstraints=CA:FALSE
# Here are some examples of the usage of nsCertType. If it is
# omitted the certificate can be used for anything *except* object
# signing. This is OK for an SSL server.
#
# nsCertType = server
# For an object signing certificate this would be used.
# nsCertType = objsign
# For normal client use this is typical
#
# nsCertType = client, email
#
# and for everything including object signing:
# nsCertType = client, email, objsign
#
# This is typical in keyUsage for a client certificate.
# keyUsage = nonRepudiation, digitalSignature, keyEncipherment
# This will be displayed in Netscape's comment listbox.
nsComment = "OpenSSL Generated Certificate"
# PKIX recommendations harmless if included in all certificates.
subjectKeyIdentifier=hash
authorityKeyIdentifier=keyid,issuer:always
# This stuff is for subjectAltName and issuerAltname.
# Import the email address.
# subjectAltName=email:copy
subjectAltName=DNS:ssg5.juniper.net
# Copy subject details
# issuerAltName=issuer:copy
#nsCaRevocationUrl = http://www.domain.dom/ca-crl.pem
#nsBaseUrl
#nsRevocationUrl
#nsRenewalUrl
#nsCaPolicyUrl
#nsSslServerName
[ v3_req ]
# Extensions to add to a certificate request
basicConstraints = CA:FALSE
keyUsage = nonRepudiation, digitalSignature, keyEncipherment
[ v3_ca ]
# Extensions for a typical CA
# PKIX recommendation.
subjectKeyIdentifier=hash
authorityKeyIdentifier=keyid:always,issuer:always
# This is what PKIX recommends but some broken software chokes on
# critical extensions.
#basicConstraints = critical,CA:true
# So we do this instead.
basicConstraints = CA:true
# Key usage: this is typical for a CA cert. However since it will
# prevent it being used as a test self-signed cert it is best
# left out by default.
# keyUsage = cRLSign, keyCertSign
# Some might want this also
# nsCertType = sslCA, emailCA
# Include email address in subject alt name: a PKIX recommendation
# subjectAltName=email:copy
# Copy issuer details
# issuerAltName=issuer:copy
# DER hex encoding of an extension: beware experts only!
# obj=DER:02:03
# Where 'obj' is a standard or added object
# You can even override a supported extension:
# basicConstraints= critical, DER:30:03:01:01:FF
[ crl_ext ]
# CRL extensions.
# Only issuerAltName and authorityKeyIdentifier make any sense in a
# CRL.
# issuerAltName=issuer:copy
authorityKeyIdentifier=keyid:always,issuer:always