Config Editor (Router and Switch)
NorthStar Planner provides a convenient and easy-to-use config editor for editing router configuration files. This editor functions similarly to other text editors, but contains some special operations and built-in recognition of configuration file keywords to facilitate the editing of config files. Supported router configs include Cisco (IOS, XR, CatOS, Nexus), Foundry, Juniper Networks (Junos OS, EX, ERX), Riverstone (RapidOS, ROS-X), Tellabs, Alcatel, Extreme, Huawei, Redback, Starent, and Zyxel.
To access, simply double-click on a configuration file within the File Manager. Alternatively, if your network model was built up from config files via File > Import Network Wizard, you can also right-click on the router in the Map window or the Network Info window Nodes view and select Show Config File. This will open up your config file in the Config Editor as shown in Figure 1.
For those using the Online module of NorthStar Planner, if you have opened the Live network, right-clicked on a node in the Map, and selected Show Config File, the config editor will only allow you to view the configs, and not edit them. This is because they represent the actual state of the configurations in the network.
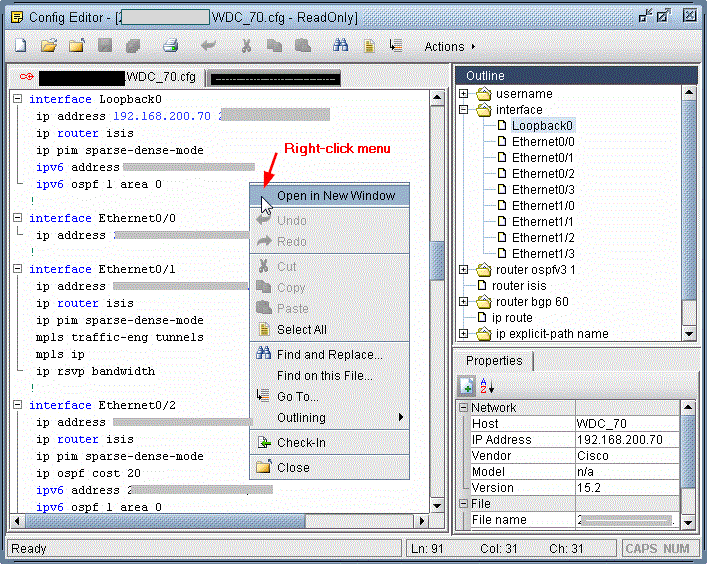
To edit, simply modify by inserting or deleting characters in the text area. Then, press the Save icon. To close a file, select Actions > File > Close. To open a config file from your local machine rather than the server, select Actions > File > Open Local. Editing tools can be found in the toolbar, in the right-click menu that appears in the left pane, and in the Actions menu.
Most of the editor functionality is self-explanatory or standard. The following lists some specific capabilities of the Config Editor:
Config Editor Open Multiple Files
Compare Two Files
Keep Track of Revisions Made to a File
Navigate the Config File Quickly With the Outline
Find and Replace , including ability to search globally within all configuration files in your current network model
Collect and Refresh Configuration Files (NorthStar Planner Online Module Only)
Insert an Entire Text File
Set Color-Coding and Other Options
To open a config file located on the server, press the Openicon on the toolbar. Or select Actions > File > Open. To open a config file located on your local machine, select Actions > File > Open Local.
A new tab is created in the left pane of the Config Editor for each file that is opened.
You can perform side by side comparison of config files by opening a config file in a new window. To do so, first select the tab of the desired config file. Right-click somewhere over the config’s pane and select Open in New Window. A new instance of the Config Editor will appear and the selected config is moved from the original window over to the new window.
Compare Two Files
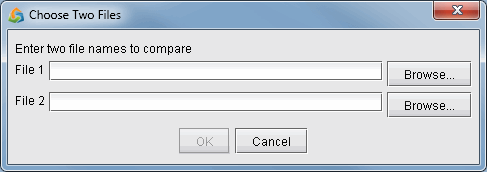
To compare two files, select Actions > Tools > Compare > Two Files. You are prompted to specify two files located on the server machine, as shown in Figure 2. Use the “Browse” buttons to navigate to the desired file. Then, press “OK”. The File Diff window will appear showing the side-by-side results of the “diff”.
Note that these same comparison capabilities are also available via the Revision Manager. You can access the Revision Manager directly through the Config Editor via Actions > Tools > Revision Manager. If you have already set up revision information for the current network, you can compare two files using Actions > Tools > Compare > With Revision. See Tools Menu: Revision Manager (IP Models) for more information on how to use the Revision Manager.
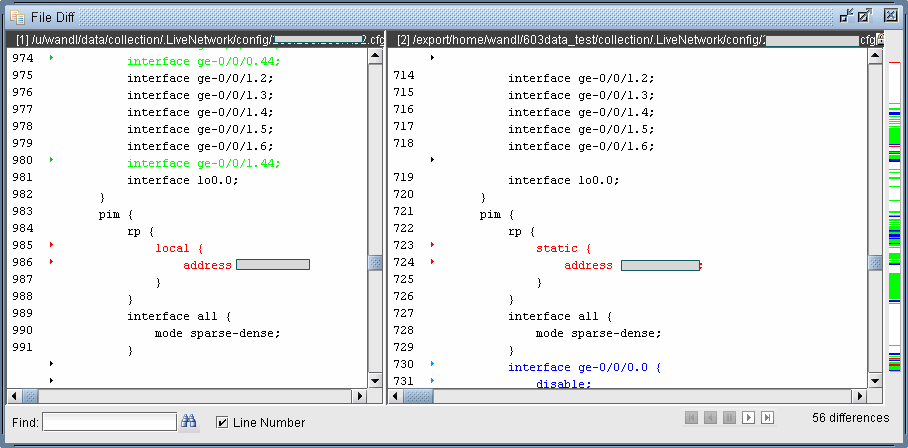
Entries in GREEN indicate that a line was added. BLUE indicates a line was removed. RED indicates the line has changed. The green, blue, and red markers on the right bar of the window can help you quickly scroll to the points where differences have been detected.
Keep Track of Revisions Made to a File
You can use track changes made to a file, using Actions > Tools > Revision Manager. After the initial setup of the revision system, you can “Check In” your config file to create a new revision/version number. See Tools Menu: Revision Manager (IP Models) for more information on how to use the Revision Manager.
Navigate the Config File Quickly With the Outline
The Config Editor divides each router configuration file into blocks. In Junos OS, for example, blocks are clearly defined by brackets. For other hardware, the Config Editor divides blocks based on certain major commands. The Outline section of the Config Editor, located in the upper right hand side of the window, lists a high-level “outline” of these major commands. Click on any point in the outline to immediately jump to that section of the config file. Press the “+” and “-” boxes to the left of an entry to expand and collapse the entry, respectively. You can also hide or show the Outline Pane using the toggling menu options Actions > Hide Outline Pane and Actions > Show Outline Pane.
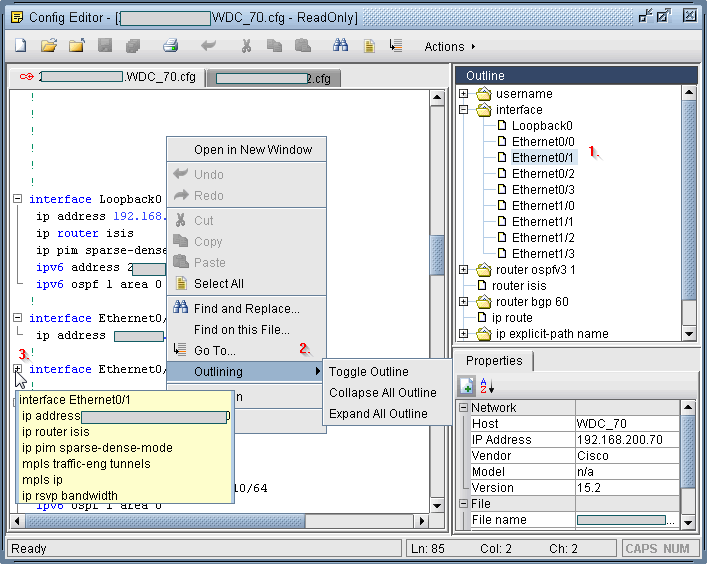
Clicking on an entry in the Outline pane will cause the Config Editor to jump to that section of the config file, highlight the first line of that section, and expand that block. In Figure 22, Tunnel7 is expanded in the left pane.
Right-clicking within the left pane reveals three Outlining options. If your mouse cursor is placed somewhere in the config file text in the left pane, and you select Toggle Outline, then the section containing the cursor will expand if currently collapsed, or collapse if currently expanded. You can accomplish the same thing by clicking directly on the “+” and “-” boxes to the left of each config section. “Collapse All Outline” and “Expand All Outline” will collapse or expand all sections, or blocks, in the current config file view. Note that these operations are also available via the Config Editor’s Actions menu on the window’s top menu bar.
Holding your mouse cursor over a “+” box to the left of a collapsed block in the config file will pop up a tooltip showing the contents of that section.
Find and Replace
The Actions > Search submenu contains the following features:
Find and Replace: This is a standard Find and Replace editor function.
Find on this File: This opens the Find function in the Config Editor toolbar.
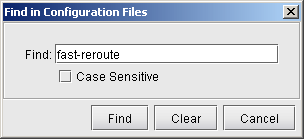
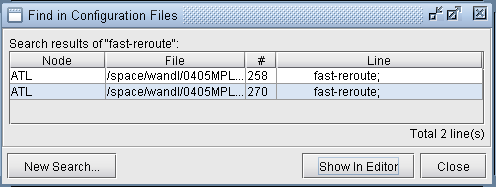
Find in Configuration Files: This function allows you to perform a global search on all config files associated with the currently opened network model, not just the config files that are opened in the Config Editor. Results are displayed in a table, as shown in Figure 24. Within this table, you can double-click on an entry or press the “Show in Editor” button. The corresponding config file is displayedin the Config Editor (or opened if you have not yet opened it) and the occurrence of the word is highlighted.
Go To: Jump to a specific line in the file.
Collect and Refresh Configuration Files (NorthStar Planner Online Module Only)
This feature is located in Actions > Tools > Collect and Refresh Configuration. It is available for NorthStar Planner only, and accessible only if you are in online, or live, mode (select File > Open Live Network ). This option applies to just the config that is currently being viewed in the Config Editor. It allows you retrieve the router’s configuration file from the live network and update your copy within the Config Editor.
Insert an Entire Text File
If you have config file statements in another file that you wish to insert at a particular point of the current config file, select Actions > Edit > Insert Text File. Browse for a text file that is located on the server. If your text file is located on your local machine, select Actions > Edit > Insert Local Text File instead.
Set Color-Coding and Other Options
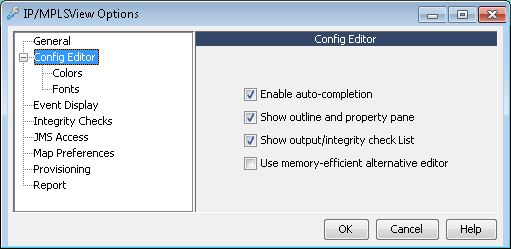
You can set Config Editor color coding, font, and general preferences via Actions > Options. Note that you can also access these preferences by selecting Tools > Options > General from the software’s main menu bar. In the Options window, click on Config Editor.
Function |
Description |
|---|---|
Enable auto-completion |
If this is enabled, then as you type within the Config Editor, Auto-completion will suggest the complete word based on its database of keywords for the particular hardware. Only major keywords for certain hardware models are supported. |
Show outline and property pane |
If this is unchecked, then the Outline and Property panes of the Config Editor is hidden, providing more room for the main config editing panel. |
Show output/integrity check list |
If this is enabled, then the Config Editor displays a list of items found from Integrity Checks report. |
Use memory-efficient alternative editor |
If you click this option, then the next time you open a config file, it is opened in NorthStar Planner’s standard editor. That is, the configuration file will not be outlined in blocks, there is no color-coding of keywords, auto-completion, etc. |
Item |
Description |
|---|---|
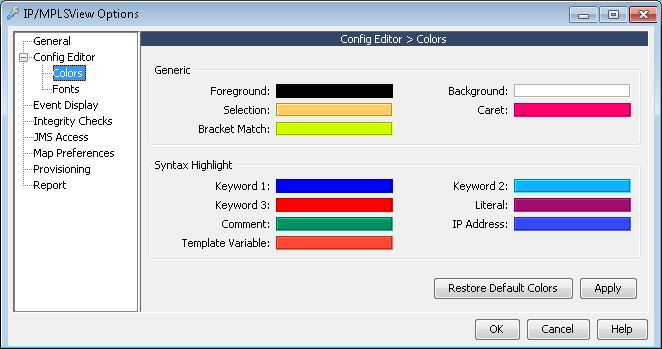
Foreground, Background |
Foreground is the text color. Background is the color of the page. |
Selection |
Whatever text that is selected is highlighted in this color. Select text by dragging the mouse. |
Caret |
The cursor |
Bracket Match |
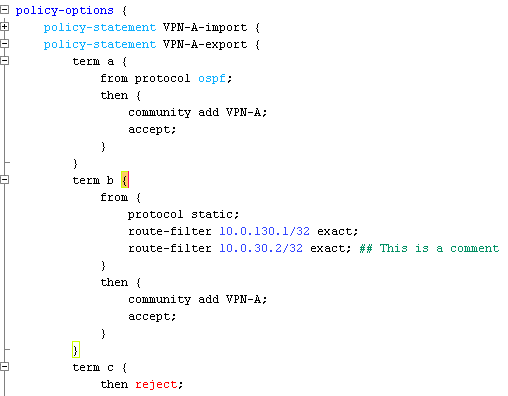
For config files that use brackets, when you select an open bracket (‘{‘), the matching close bracket (‘}’) will also be highlighted. |
Keyword 1,2,3 |
These are colors assigned to different levels of config file keywords. These keywords are pre-defined by the Config Editor, and selected based on both importance and how well they facilitate readability of the file. In general, Keyword 1 = major commands, Keyword 2 = sub-major commands, Keyword 3 = commands with “negative” meaning (for example, “shutdown”, “disable”, “inactive”, etc.).
|
Literal |
Any user-specified string, such as an interface description, often in double quotes. |
Comment |
Comments |
IP Address |
All instances of IP addresses |
