Adding Multiple Tunnels
The Add Multiple Tunnels window can be used to add a mesh of tunnels between two sets of nodes.
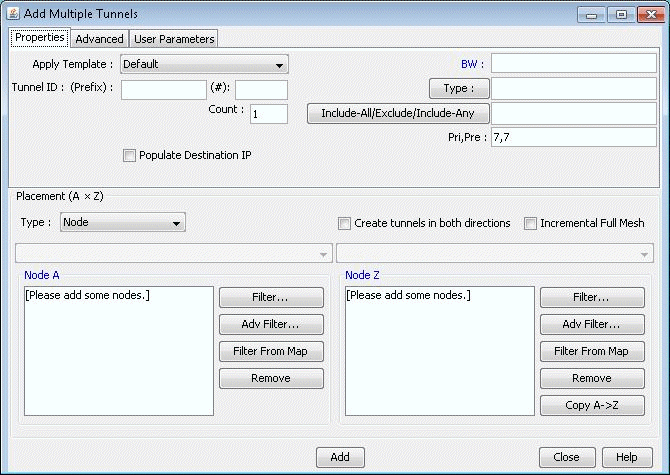
Select Modify > Elements > Tunnels, Add > Multiple Tunnels from the Modify pull-down menu. Alternatively, select Add>Multiple Tunnels from the Network Info window Tunnels view. An Add Multiple Tunnels window should appear, similar to the one shown below.

The generated tunnel names will consist of a prefix defined in the Tunnel ID (Prefix) field and an incrementing number that starts with the number specified in the Tunnel ID (#) field. If no start number is specified, the tunnels will be named according to the NodeA and NodeZ endpoints.
Various options can be configured in the top right section of the window, including BW, Type, Affinity/Mask (Cisco) or Include-All/Exclude/Include-Any (Juniper), Pri,Pre (setup priority/holding priority), Service, Path. Config. Options, and a user definable Comment field.
A tunnel will be created for each NodeA - NodeZ pair defined in the bottom half of the window where NodeA is the source and NodeZ is the destination. The NodeA and NodeZ boxes can populated using the Filter or Filter From Map button. The Filter button opens a Find Nodes window to specify what nodes to add. The Filter From Map button adds the nodes highlighted on the map. The Remove button removes the selected node(s) from the Node A or Node Z list.
The Copy A-> Z button copies the nodes that are on the Node A list to the Node Z list. As a shortcut, users may also select a particular category from the Type menu in the Placement (A * Z) section such as Group, Area, VPN, or Multicast Group. This will activate the drop-down menu(s) above the the NodeA and NodeZ boxes with available entries for the selected category. Selecting an entry from the selection will automatically update the NodeA and NodeZ boxes.
The Create tunnels in both directions option will generate an additional full mesh of tunnels from Z to A. This option is useful when the Node A and Node Z list are not the same. Selecting the Incremental Full Mesh option is recommended when there is overlap between the Node A and Node Z list, to avoid creating more than one tunnel for the same source-destination pair.
The Incremental Full Mesh option will only generate tunnels needed for the full mesh.
Note that you can also choose to create an incremental full mesh for tunnels within a particular tunnel ID range. To do this, first create a Tunnel user parameter and tunnel ID group based on that user parameter before opening the Add Multiple Tunnels window as discussed in Adding and Assigning Tunnel ID Groups. Then select the User Parameters tab of the Add Multiple Tunnels window and select that tunnel ID group. Tunnels will be treated as already existing in the mesh if they have a source and destination listed in the Placement section and they are named “Tunnel<id>” where <id> is a number within the ID range of the selected tunnel ID group.
