- play_arrow Introduction
- play_arrow Router Data Extraction
- play_arrow Routing Protocols
- play_arrow Equal Cost Multiple Paths
- play_arrow Static Routes
- play_arrow Policy-Based Routes
- play_arrow Border Gateway Protocol
- NorthStar Planner Border Gateway Protocol Overview
- Border Gateway Protocol Recommended Instructions
- BGP Data Extraction
- BGP Reports
- BGP Options
- BGP Map
- BGP Live Status Check
- BGP Routing Table
- BGP Routes Analysis
- BGP Information at a Node
- BGP Neighbor
- Apply, Modify, or Add BGP Polices
- BGP Subnets
- Getipconf Usage Notes
- BGP Report
- play_arrow Virtual Private Networks
- NorthStar Planner Virtual Private Networks Overview
- Importing VPN Information from Router Configuration Files
- Viewing the Integrity Checks Reports
- Accessing VPN Summary Information
- Accessing Detailed Information for a Particular VPN
- VPN Topology View
- Route-Target Export/Import Relationships
- Additional Methods to Access VPN Information
- VPN Path Tracing
- VPN Design and Modeling Using the VPN Wizard
- L3 (Layer 3) VPN
- L3 Hub-and-Spoke VPN
- L2M (Layer2-Martini) VPN
- L2K (Layer2-Kompella) VPN
- VPLS-BGP VPN (for Juniper)
- VPLS-LDP VPN
- L2CCC (Circuit Cross-Connect) VPN
- Inter-AS VPN
- Forming VPN Customer Groups
- Deleting or Renaming VPNs
- VPN Configlet Generation
- Adding Traffic Demands in a VPN
- VPN Traffic Generation
- VPN-Related Reports
- VPN Monitoring and Diagnostics
- play_arrow GRE Tunnels
- play_arrow Multicast
- NorthStar Planner Multicast Overview
- NorthStar Planner Recommended Multicast Instructions
- Creating Multicast Groups
- Creating Multicast Demands
- Viewing Multicast Demands in the Network
- Comparing Multicast with Unicast
- Multicast SPT Threshold
- Multicast Reports
- Multicast Simulation
- Collecting Multicast Path Data from Live Network
- Importing Multicast Path Data
- Multicast Data Processing
- Viewing Multicast Trees
- play_arrow Class of Service
- NorthStar Planner Class of Service Overview
- NorthStar Planner Recommended CoS Instructions
- The QoS Manager
- Define Class Maps
- Create Policies for Classes
- Attach Policies to Interfaces
- Adding Traffic Inputs
- Using the Text Editor
- Reporting Module
- IP Flow Information
- Link information
- Traffic Load Analysis
- Traffic Load by Policy Class
- CoS Alias File
- Bblink File
- Policymap File
- Demand File
- Traffic Load File
- play_arrow Routing Instances
- play_arrow Traffic Matrix Solver
- play_arrow LSP Tunnels
- NorthStar Planner LSP Tunnels Overview
- Viewing Tunnel Info
- Viewing Primary and Backup Paths
- Viewing Tunnel Utilization Information from the Topology Map
- Viewing Tunnels Through a Link
- Viewing Demands Through a Tunnel
- Viewing Link Attributes/Admin-Group
- Viewing Tunnel-Related Reports
- Adding Primary Tunnels
- Adding Multiple Tunnels
- Mark MPLS-Enabled on Links Along Path
- Modifying Tunnels
- Path Configuration
- Specifying a Dynamic Path
- Specifying Alternate Routes, Secondary and Backup Tunnels
- Adding and Assigning Tunnel ID Groups
- Making Specifications for Fast Reroute
- Specifying Tunnel Constraints (Affinity/Mask or Include/Exclude)
- Adding One-Hop Tunnels
- Tunnel Layer and Layer 3 Routing Interaction
- play_arrow Optimizing Tunnel Paths
- play_arrow Tunnel Sizing and Demand Sizing
- play_arrow Tunnel Path Design
- Tunnel Path Design Overview
- Tunnel Path Design Instructions
- Designing Tunnel Paths Overview
- Backup Path Configuration Options
- Default Diversity Level
- Evaluate/Tune Options
- Advanced Options
- Viewing Design Results
- Tunnel Modifications
- Exporting and Importing Diverse Group Definitions
- Advanced Path Modification
- play_arrow Inter-Area MPLS-TE
- play_arrow Point-to-Multipoint (P2MP) Traffic Engineering
- NorthStar Planner P2MP Traffic Engineering Overview
- Point-to-Multipoint Traffic Engineering Instructions
- Import a Network That Already has Configured P2MP LSP Tunnels
- Examine the P2MP LSP Tunnels
- Create P2MP LSP Tunnels and Generate Corresponding LSP Configlets
- Examine P2MP LSP Tunnel Link Utilization
- Perform Failure Simulation and Assess the Impact
- play_arrow Diverse Multicast Tree Design
- Diverse Multicast Tree Design Overview
- Diverse Multicast Tree Instructions
- Open a Network That Already Has a Multicast Tree
- Set the Two P2MP Trees of Interest to be in the Same Diversity Group
- Using the Multicast Tree Design Feature to Design Diverse Multicast Trees
- Using the Multicast Tree Design Feature
- play_arrow DiffServ Traffic Engineering Tunnels
- DiffServ Traffic Engineering Tunnels Overview
- Using DS-TE LSP
- Hardware Support for DS-TE LSP
- NorthStar Planner Support for DS-TE LSP
- Configuring the Bandwidth Model and Default Bandwidth Partitions
- Forwarding Class to Class Type Mapping
- Link Bandwidth Reservation
- Creating a New Multi-Class or Single-Class LSP
- Configuring a DiffServ-Aware LSP
- Tunnel Routing
- Link Utilization Analysis
- play_arrow Fast Reroute
- NorthStar Planner Fast Reroute Overview
- Fast Reroute Supported Vendors
- Import Config and Tunnel Path
- Viewing the FRR Configuration
- Viewing FRR Backup Tunnels
- Viewing Primary Tunnels Protected by a Bypass Tunnel
- Modifying Tunnels to Request FRR Protection
- Modifying Links to Configure Multiple Bypasses (Juniper only)
- Modifying Links to Trigger FRR Backup Tunnel Creation (Cisco)
- FRR Design
- FRR Auto Design
- FRR Tuning
- Viewing Created Backup Tunnels
- Generating LSP Configlets for FRR Backup Tunnels
- Failure Simulation—Testing the FRR Backup Tunnels
- Exhaustive Failure
- Link, Site and Facility Diverse Paths
- play_arrow Cisco Auto-Tunnels
- play_arrow Integrity Check Report
- play_arrow Virtual Local Area Networks
- play_arrow Overhead Calculation
- play_arrow Router Reference
Loading the Configuration Files
The following steps are to define the set of configuration files to be used in the CAT project.
Select the Configurations tab and right-click in the left panel.
Figure 1: Configurations tab right-click options
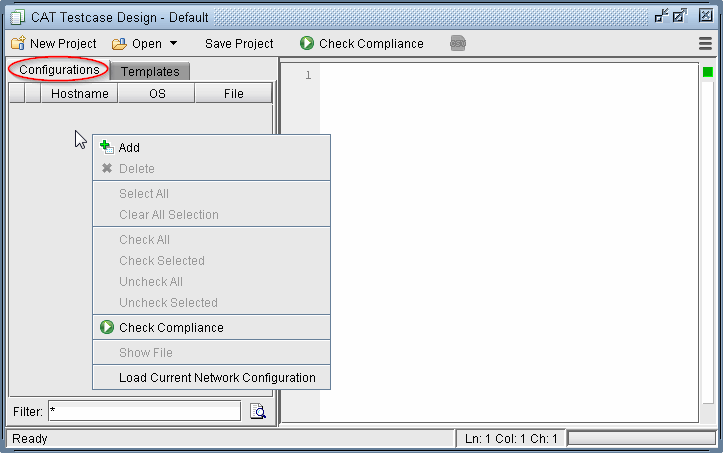
Select Load Current Network Configurations to load the configurations of the currently opened network. This option is only available if the current network opened has imported configuration files.
If no network has been opened or if you want to load a different set of configuration files, select Add from the pop-up menu. A file chooser will open that allows you to navigate to the directory on the server where the configuration files are saved. Select the configuration file(s) to be added to the project.
Figure 2: Selecting Configuration Files to add to the Configurations Tab
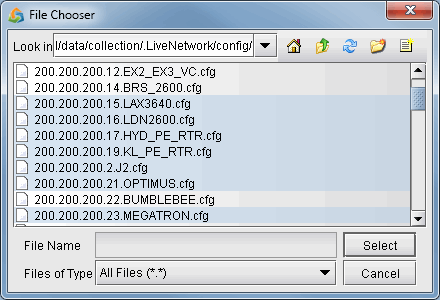
Use <Shift>-click to select a range of items from the currently highlighted entry. Alternatively, use <Ctrl>-click to select an individual entry. The shortcut Ctrl-A can also be used to select all configurations in the directory.
Click Select to add the configurations to the Configurations tab. A checkbox next to each file indicates if it will be included in the compliance assessment.
The configuration files will now be populated in the Configurations tab. Right-click and select Show File will display the configuration file in the right panel. Double-clicking opens the configuration file in the Config Editor window.
Figure 3: Configuration File Loaded
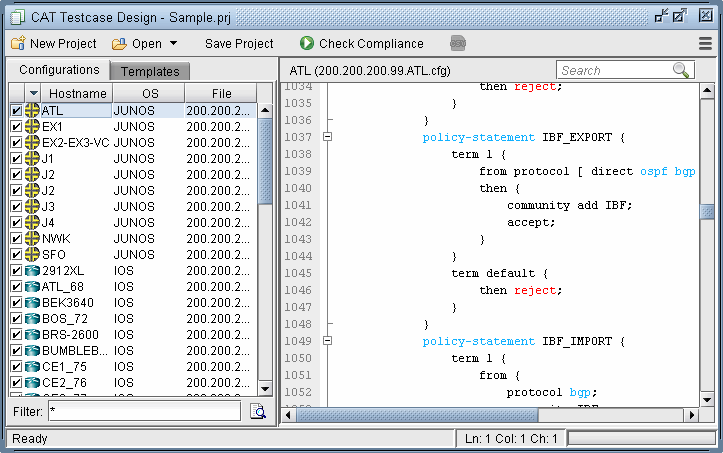
Configuration files that are not desired in the project can be deleted by right-clicking and selecting Delete.
Click Save Project to save the changes to the project.