NorthStar Integration with HealthBot
Overview
The integration of the NorthStar Controller and HealthBot products is an ongoing development effort and is being released with a phased approach. This topic describes the status of the integration as of NorthStar Controller Release 5.1.0 with HealthBot Release 2.1.
NorthStar Controller can use HealthBot as its analytics collector in a side-by-side installation scenario. You install and manage NorthStar and HealthBot independently, but configure some analytics collector functions in NorthStar to be handled by HealthBot instead of Elasticsearch. As of NorthStar Controller Release 5.1.0, only Juniper nodes are supported (as opposed to multi-vendor support), and only the following analytics collections can be handled by HealthBot:
Junos Telemetry Interface (JTI) LSP statistics
JTI interface statistics (logical and physical)
Link latency statistics using RPM probes
LDP demand statistics using LDP show commands
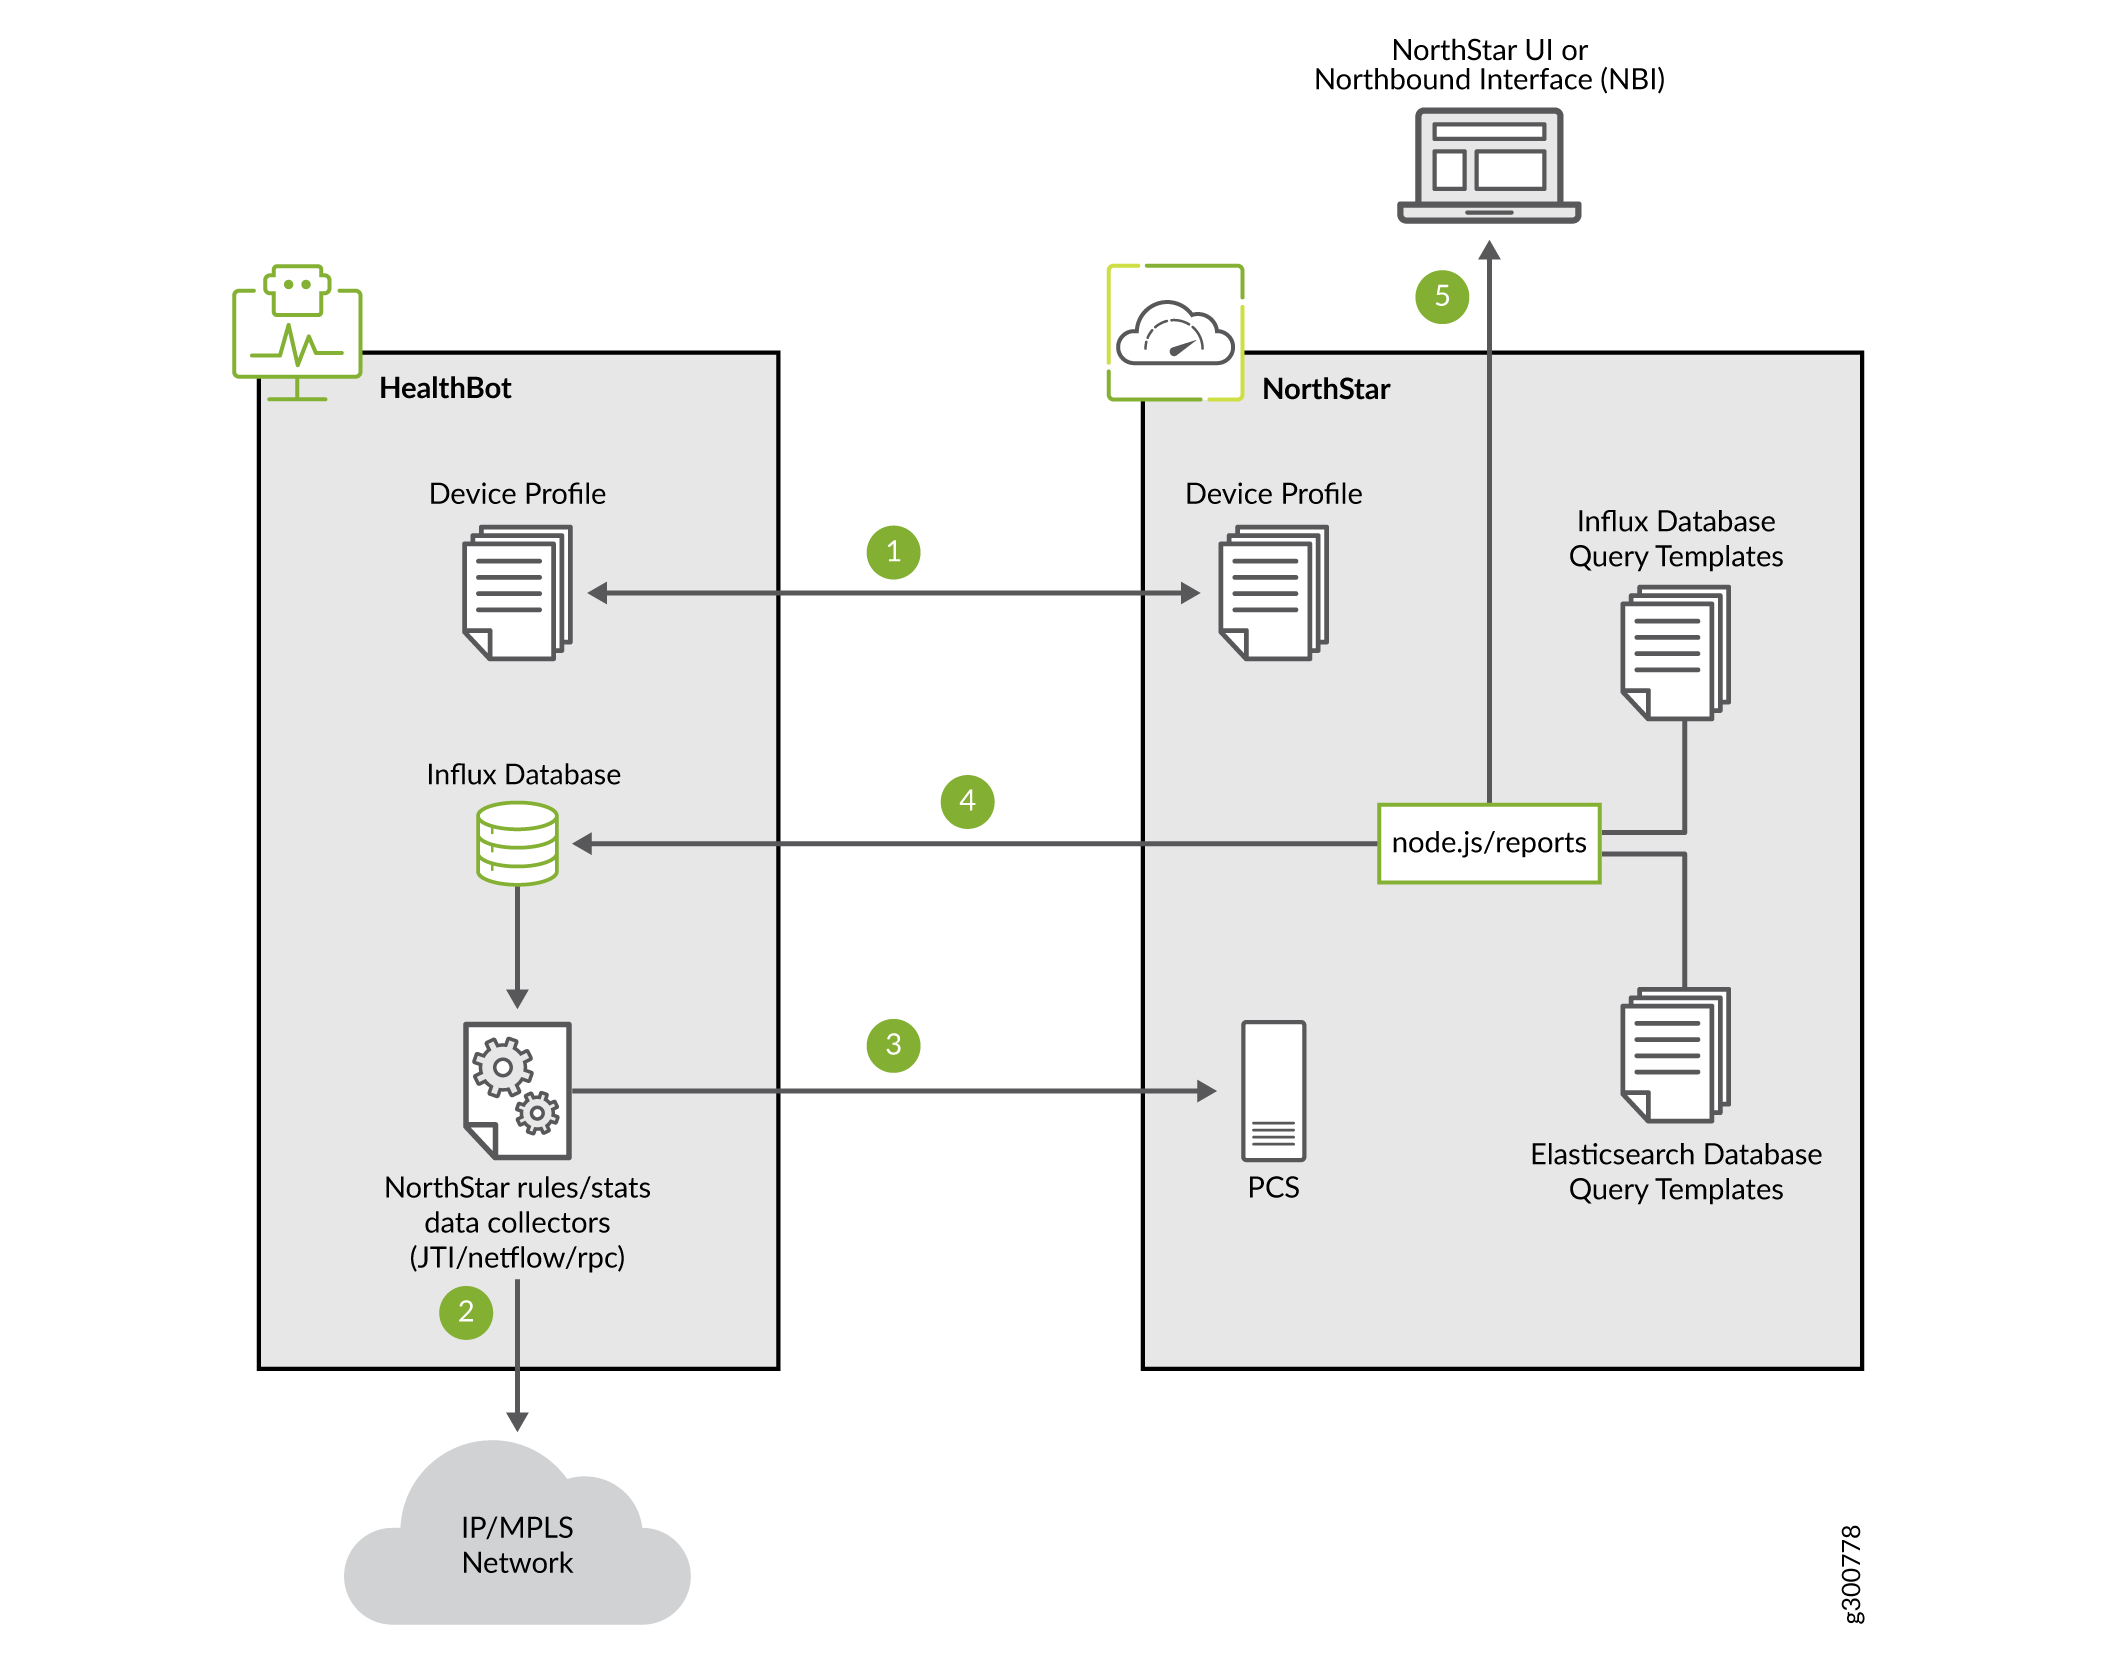
Figure 1 summarizes the relationships between components of HealthBot and NorthStar. The numbers correspond to the following processes:
NorthStar pushes the device list and profile information to HealthBot.
NorthStar provides to HealthBot a set of rules to use for data collection from the network devices.
The NorthStar rules enable HealthBot to automatically notify NorthStar about live sample data collection over AMQP.
NorthStar node.js and the NorthStar reports generator query the HealthBot database based on jinja templates.
Statistics and data from HealthBot are available for viewing in the NorthStar UI or other northbound interface (NBI).

Refer to your HealthBot documentation for information about rules and playbooks, and general HealthBot operation. We provide the following basic HealthBot terminology for reference.
HealthBot Term |
Description |
|---|---|
Rule |
Package of components, or blocks, needed to extract specific information from the network or from a Junos device. Rules conform to a tailored domain specific language (DSL) for analytics applications. |
Playbook |
Collection of rules for addressing a specific use case. |
Playbook instance |
Specific instance of a playbook applied over a device or network group. |
User-defined functions (UDF) |
User-defined functions are used inside of rules. |
Update HealthBot with NorthStar Data Collection Rules and Playbook
To prepare HealthBot to provide collection data to NorthStar, perform the following steps.
Confirm that the HealthBot services are up and running.
Install python3 module requests and pika on the HealthBot server. For example:
pip3 install requests; pip3 install pika
Copy the NorthStar rules from the NorthStar application server to a temporary directory on the HealthBot server.
[root@northstar]# cp /opt/northstar/northstar_bundle_x.x.x/hb_config/hb-rules-config.tar.gz /var/tmp
On the HealthBot server, untar the rules file.
[root@healthbot]# tar xvf hb-rules-config.tar.gz
On the HealthBot server, run the script that inserts the NorthStar rules and playbook into HealthBot so they become visible in the HealthBot UI, and updates the user-defined functions (UDF) for NorthStar. This script also fetches the credentials required for communication between NorthStar and HealthBot.
[root@healthbot]:~/ns/installation# ./install-ns-rules.sh
The script prompts you for:
The NorthStar server IP or VIP address or host name
The NorthStar admin username and password
The HealthBot application server IP address
The HealthBot admin username and password
You will see the progress of the script:
 root@healthbot:~/ns/installation# ./install-ns-rules.sh
Copying config file /opt/northstar/data/northstar.cfg from Northstar APP server, Please enter below info
---------------------------------------------------------------------------------------------------------
Please enter Northstar application server IP/VIP address or host name: 10.53.64.97
Please enter Northstar Web Admin username: admin
Please enter Northstar Web Admin password:
Please enter HealtBot application server IP address: 10.53.64.96
Please enter HealthBot Web Admin username: admin
Please enter HealthBot Web Admin password:
retrieving config file from application server...

Saving to /root/ns/input/northstar.cfg

Copying NS input files to /var/local/healthbot/input

Starting Northstar rules and playbook upload/creation
Rule/yml file directory: /root/ns/rules
Successfully import the yml file: ns-ldp-demand-stats.yml
Successfully import the yml file: ns-rpm-probe-ifl.yml
Successfully import the rule file: ns-jti-logical-interface.rule
Successfully import the rule file: ns-jti-label-switched-path.rule
Successfully import the rule file: ns-ldp-demand-stats.rule
Successfully import the rule file: ns-jti-physical-interface.rule
Successfully import the rule file: ns-rpm-probe-ifl.rule
Successfully created the playbook: "northstar"

Updating UDF....
Running /root/ns/installation/udf-config.sh in iagent engine..
Success! See /tmp/.iagent_modification.log for logs
Running /root/ns/installation/udf-config.sh in jtimon engine..
Success! See /tmp/.jtimon_modification.log for logs
Running /root/ns/installation/udf-config.sh in fluentd engine..
Success! See /tmp/.fluentd_modification.log for logs
Running /root/ns/installation/udf-config.sh in telegraf engine..
Success! See /tmp/.telegraf_modification.log for logs
Running /root/ns/installation/udf-config.sh in itsdb engine..
Success! See /tmp/.itsdb_modification.log for logs
Verify connectivity between HealthBot and NorthStar by running the following script on the HealthBot server.
[root@healthbot]# /ns_config/installation/ns_setup.py -t
Test connectivity with input/northstar.cfg

#
mq_host=10.53.64.97
mq_port=5672
mq_username=northstar
mq_password_enc=eF0A0DhJ0GiKcHlAfEnFgMpB

Connected to rabbitmq on 10.53.64.97 successfully
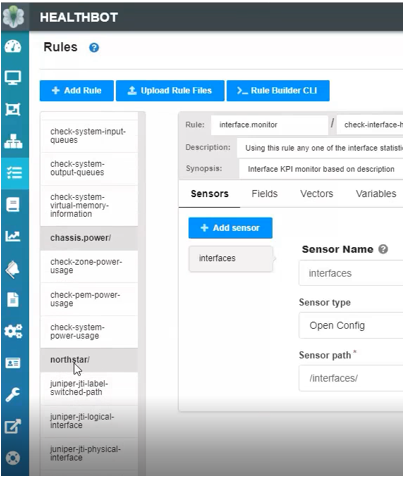
Upon successful completion of the script, you should be able to see the NorthStar rules in the HealthBot UI as shown in Figure 2.

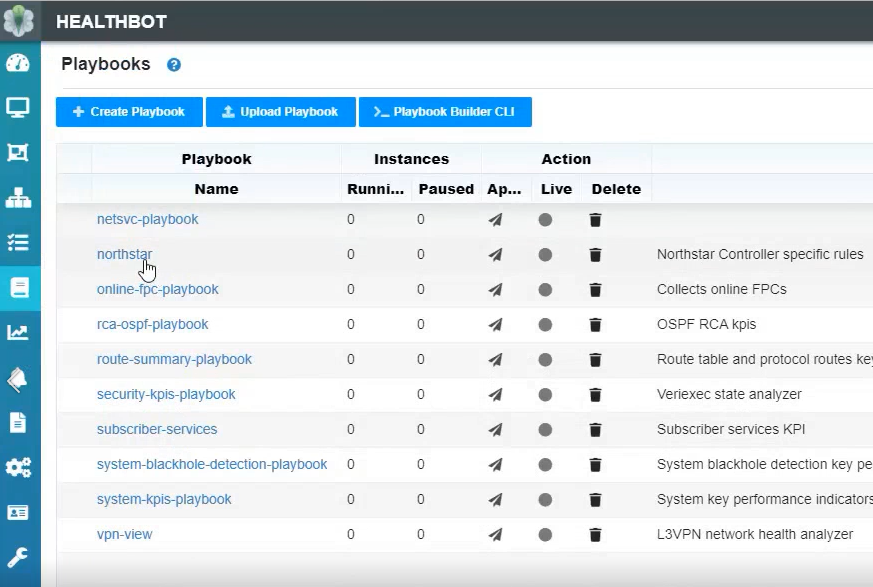
You can also confirm that the NorthStar playbook is visible as shown in Figure 3.

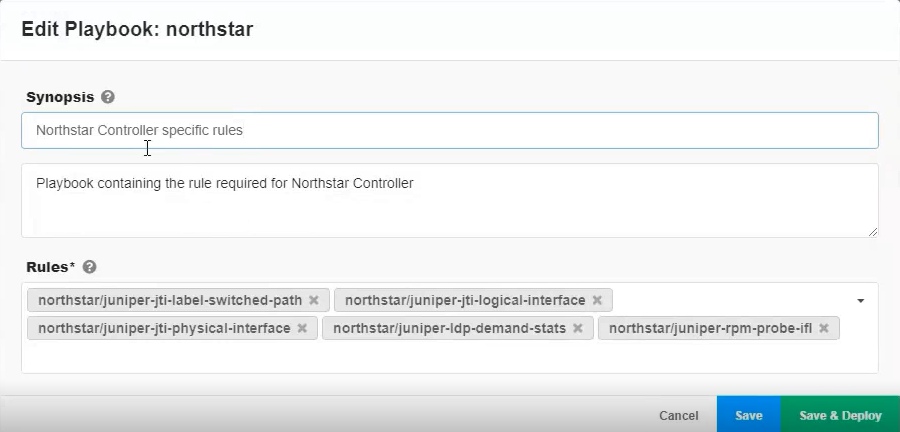
Click on the NorthStar playbook to see that the NorthStar rules are associated with the playbook as shown in Figure 4. You could remove rules from here if needed.

Configure the NorthStar Side
To prepare NorthStar to receive analytics data from HealthBot, perform the following steps.
Change the collection type from the default (Elasticsearch) to HealthBot by running the net_setup.py script with the config-healthbot-collector option.
[root@northstar]# /opt/northstar/utils/net_setup.py --config-healthbot-collector
The script prompts you to confirm that you want to make the change, and then asks you to provide the following information:
The HealthBot web server IP address
The HealthBot UI username and password
The HealthBot database IP address (this is generally the same as the HealthBot web server IP address)
The script then updates the configuration files and restarts the NorthStar web server. A success message displays when the process is complete.
Configure HealthBot-related parameters using the NorthStar CLI:
[root@ns1 root]# /opt/northstar/utils/cmgd_cli
root@ns1> edit
Entering configuration mode

[edit]
root@ns1# set northstar analytics healthbot openconfig-port 32767

[edit]
root@ns1# set northstar analytics healthbot iagent-port 830

[edit]
root@ns1# set northstar analytics healthbot native-port 4000

[edit]
root@ns1# set northstar analytics healthbot device-group-name northstar

[edit]
root@ns1# set northstar analytics healthbot playbook-name northstar

[edit]
root@ns1# set northstar analytics healthbot playbook-instance ns

[edit]
root@ns1# set northstar analytics healthbot rules northstar/juniper-jti-label-
switched-path,northstar/juniper-jti-logical-interface,northstar/juniper-jti-
physical-interface,northstar/juniper-ldp-demand-stats,northstar/juniper-rpm-probe-ifl;

[edit]
root@ns1# commit
root@ns1# exit
Exiting configuration mode

root@ns1> show configuration northstar analytics healthbot
openconfig-port 32767;
iagent-port 830;
native-port 4000;
device-group-name northstar;
playbook-name northstar;
playbook-instance ns;
rules northstar/juniper-jti-label-switched-path,northstar/juniper-jti-logical-
interface,northstar/juniper-jti-physical-interface,northstar/juniper-ldp-demand-
stats,northstar/juniper-rpm-probe-ifl;
Configure each Juniper device in the network to send JTI and RPM probes data to the HealthBot server. See Configuring Routers to Send JTI Telemetry Data and RPM Statistics to the Data Collectors for instructions.
In the NorthStar UI, navigate to Administration > Device Profile to push the device profile information to HealthBot and apply the NorthStar playbook instance.
Because you set the collection type to HealthBot, the Device Profile window in the NorthStar UI includes a button to Update Devices to HealthBot as shown in Figure 5.
Figure 5: Device Profile Window with Update Devices Button
You do not select devices before clicking the button - clicking the button updates to HealthBot all the device information for all the Juniper devices that are managed by NorthStar. You will see a success message when the process is complete.
You can verify the device information was shared with HealthBot by looking at the HealthBot UI Dashboard, under Devices as shown in Figure 6. All the Juniper devices pushed to HealthBot are listed there. Click on any one of the device names to see the details of the profile information in a pop-up window.
Figure 6: NorthStar Devices in the HealthBot Dashboard
Notice also in Figure 6 that a NorthStar device group (far left) was created. Click the name of the group to see a list of all the devices whose information you pushed to HealthBot.
Under Playbooks in the HealthBot UI, you can confirm that a NorthStar playbook instance has been created as shown in Figure 7. The display indicates that one instance of the playbook is running.
Figure 7: NorthStar Playbook Instance in the HealthBot UI
Click the arrow beside the playbook name to see the details of the instance including its device group, devices, and rules.
Viewing Data in the NorthStar UI
Viewing collected data in the NorthStar UI is not different with HealthBot as the collection type, except that in this phase of the NorthStar/HealthBot integration, there are some limitations. The following are not yet supported:
Total LSP traffic charts
Top traffic for LSP, node, interface, and interface delay charts
Netflow collection
SR stats (SID traffic)
as-demands reports and demand groups reports
Note:These reports are available using Elasticsearch native collection.
