Map Popup Menus
The following menu options are general options available in the map’s right-click menu.
Map Views
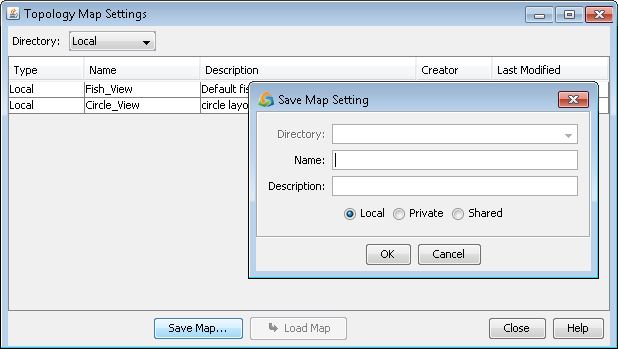
For each offline network, you can save multiple map views, corresponding to different graphical locations and groupings of network devices. Map settings such as zoom, color legend sliders, and applied filters are also saved. For each map view that is saved, there is a subdirectory which contains map-related files for that view, including graphcoord, group, and graphcoordaux files.
Click Save Map and enter a Name and optional Description to save a new map view. Local is for offline networks. Private and Shared are for Live networks.
Local saves map settings to the network spec directory in subdirectory /userSettings
Private saves map settings to your home directory in subdirectory /wandlnetworks/livenetwork_output_directory/userSettings/livenetwork/
Shared saves map settings to the Live network directory /u/wandl/data/userSettings/livenetwork/
Select a map view and click Load Map to load a previously saved map view.
To overwrite an existing map view, select an entry, click Save Map, and use the same Name.
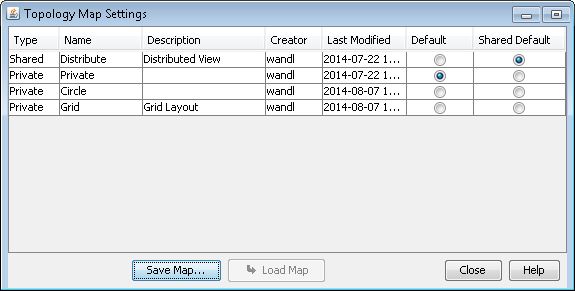
For the Live Network (File > Open Live Network), you can specify a default private view. Administrators can create shared views that will appear in everyone’s map view list. Administrators can also set one as the default shared view. To set your personal default view, select the radio button under the Default column.
Administrators must set one default shared view by selecting the radio button under the Shared Default column. The Shared Default is the view every user will see when opening the Live Network and used by the Web for group reports and features. If you have selected a different Default view, your view has higher priority than the Shared Default and it is loaded when opening the Live Network.
Grouping Popup Menus
The Grouping menu contains functions for creating network elements groups in the topology map. In this menu, you can find options for specifying groups within the topology. These functions are especially helpful when the network is large and contain many devices and elements.
Group Selected: The Group Selected Nodes button merges a set of nodes into a single group on the topology map. This is useful if you want to partition the network into groups or hierarchies.
Ungroup Selected: This function will ungroup any groups you have selected in the topology window. This permanently removes the group from the system. A group must be collapsed and then selected before this function can be accessed.
Ungroup All: This function permanently ungroups all groups in the topology map.
Collapse Containing Group: This function will collapse the group containing the selected node, displaying it as a small group symbol with its contents hidden.
Collapse All: This function will collapse any groups, displaying them as small group symbols with their contents hidden.
Expand All: This function will expand any collapsed group in the topology. The groups are displayed as circular discs and the contents are visible.
Expand Selected: This function will expand selected groups.
Modify Parent Group of Selected: Moves the selected node from one group to another group of your choice.
AutoGroup: This function will allow the program to use its node-grouping algorithm to auto-group nodes. Nodes can be grouped by AS, area, lat/lon, access domain, tree, LAN, hardware type, regular expression, and/or NPA/NXX, depending on what type of network it is. (Options may vary depending upon the hardware type.) You can create more than one grouping levels. If selecting more than one level, the first selection will create the top-most (parent) groups. The second level will subdivide the nodes in a group further into sub-groups, and so forth. For more details, refer to the AutoGroup section.
Sibling Mesh: When this option is selected, a fully-meshed set of lines is drawn among the members of each expanded group. Different groups get different colors.
AutoGroup
Select the nodes that you want to autogroup. Next, right-click over the nodes and select Grouping > AutoGroup for the following first level groups. Click AutoGroup only selected instead of all nodes. if you wish to autogroup only the selected nodes.
To create flexible grouping, the “Regexp” button can be used to group according to a regular expression.
Look in the field: Indicates the field to use for the match criteria (for example, Node ID, Node Name, IP Address)
Find the first match for: Indicates the regular expression that should match in order to form a group.
(Optional) Substitute it into: Specifies a name for the new group(s). To create different groups based on the pattern being matched, you can save a part of the expression being matched for into a buffer by surrounding it in parentheses in the “Find the first match for” textbox. Then in the “Substitute it into” textbox, the buffer number can be accessed by preceding it with the ‘$’ symbol. Note that you can have more than one buffer. To create a buffer, surround the expression with a left and right parenthesis. The first buffer in the expression is accessible using $1, the second is accessible using $2, and so forth.
Case-sensitive: Specifies whether the string to match is case-sensitive
AutoGroup Examples
Suppose you have routers with the following IDs: P1_ATL, P2_ATL, P3_ATL, P1_NYC, P2_NYC, P3_NYC, P1_CHI, P2_CHI, P3_CHI. Entering either of the criteria in the table below would create the following groups: ATL, NYC, and CHI , each containing 3 routers.
Look in the field |
Find the first match for |
Substitute it into |
|---|---|---|
ID |
.*_([A-Z]*) |
$1 |
ID |
.._(...) |
$1 |
If you wish to group the devices only by the first two characters of the ID, the following criteria could be used.
Look in the field |
Find the first match for |
Substitute it into |
|---|---|---|
ID |
.. |
Note that local area networks (LANs) not matching the criteria is given a group of their own, such as GROUP0. To move these LANs into the same group as their attached router, select Network Elements > Nodes in the Standard map. Right-click the GROUP0 containing the LANs, and select Grouping>Ungroup this Group. Then right-click the map and select Grouping>Move LANs to Siblings’ Groups.
Selection Options
Select > All Points: This function will select all network elements on the topology map.
Select > Neighbors: Highlights all neighbors of the node that was right-clicked over.
Select > Nodes on Selected Links: Highlights the two endpoints of every selected link.
Select > Single-End Neighbors: When you right click on a node, there is an option to select single-end neighbors. Selecting this will highlight any peripheral nodes (single-ended nodes, attached to only one link) that are connected to the selected node. The selected node will remain highlighted. Typically, the selected node is a router, and the nodes that are subsequently highlighted are loopbacks and single-ended LANs.
Select > Tree: Available when you right-click on a node, this option will find the largest tree in the network that contains the selected node and highlight all nodes in that tree. A tree is defined as any group of nodes that are connected to each other in such a way that there exists only one available path between any two nodes in the group. (Note: in selecting the tree, this option will stop once it hits a node that belongs to a cycle.)
Cut Selection: This allows you to cut from the network all currently selected nodes and any links that (both) originate and terminate at the selected nodes. This action is reflected in the topology map. The cut elements are stored in the clipboard and can be pasted back into the network (multiple times if desired) at a location specified by you.
Copy Selection: Clicking this when one or more nodes are selected will copy to the clipboard the selected nodes and any links that (both) originate and terminate at the selected nodes.
Paste: This will paste the most recently cut or copied elements onto the topology map. Once pasted onto the map, the elements can be dragged around with the mouse and positioned at an appropriate location. Numerical characters are appended to the names of each pasted element in an ascending order to maintain an unique identity for each element. Any XML router-config data associated with the pasted nodes are carried over as well.
Custom URLs
Custom menu items can be added to the main map’s right-click menu that pop up a browser going to a user-defined URL. The URL can be specified as a function of the node, group, or link that is right-clicked over. To create custom menu items, create a server-side file /u/wandl/data/custom/menuitems.txt. This file should be saved as Unicode UTF-16 format. Each line should have two comma-separated items:
menuItem,URLtoView
where menuItem is substituted with the text that you will see in the right-click popup menu and URLtoView is the URL that the browser will request. A specific value can be inserted into the URL depending upon the node, link, or group that is right-clicked over. To specify a node’s field, use the syntax ${Node.key}, substituting key with the attribute of interest, which can be found through the node’s Advanced Filter. For example, putting ${Node.ID} in a URLtoView will insert the ID field of the node right-clicked over into the URL. Similarly, use the syntax ${Link.key} and ${Group.key} to indicate a link or group attribute, where key is one of the available attributes available through Advanced Filter for links or groups, respectively. The following is an example file:
Explain Node Type,http://en.wikipedia.com/wiki/${Node.Type}
Search Link Name,http://www.google.com/search?q=${Link.Name}
JUNIPER,https://www.juniper.net
Labels Menu
When selecting one of the menu options below, you are prompted to choose what to label and with what text.
Node Labels: Allows you to turn on or off labels for nodes displayed in the topology map.
Group Labels: Allows you to turn on or off labels for groups displayed in the topology map.
Link Labels: Allows you to turn on or off labels for links displayed in the topology map.
What to Label
Option |
Explanation |
|---|---|
All |
Displays the label for all elements in the given category |
None |
Removes the label for all elements in the given category |
Only Current Selection |
Displays the label only for selected elements in the given category, removes labels for nonselected elements |
Add Current Selection |
Adds label(s) for selected elements in the given category, preserves pre-existing labels of nonselected elements |
Remove Current Selection |
Removes label(s) for selected elements in the given category, preserves pre-existing labels of nonselected elements |
Label Text
A list of typical attributes that are used to label the item are given in the right-hand side of the table. For the node and link labels, you also have the option to customize the label in such a way that it includes other properties or more than one property. This option is available by selecting Customize... under the What Text? section and results in Customizing Labels.
By selecting Bottom Bar, you can also customize the map window bottom bar display this is shown when you hover the mouse over a map element such as a node or link.
Bottom Bar |
Description |
Nodes: Customize... |
Allows you to customize the label shown in the bottom bar when the pointer is over a node |
Nodes: Reset to Defaults |
Resets the node information given in the bottom bar to the default values. |
Links: Customize... |
Allows you to customize the label shown in the bottom bar when the pointer is over a link |
Links: Reset to Defaults |
Resets the link information given in the bottom bar to the default values. |
Customizing Labels
Options |
Description |
|---|---|
Add/Remove |
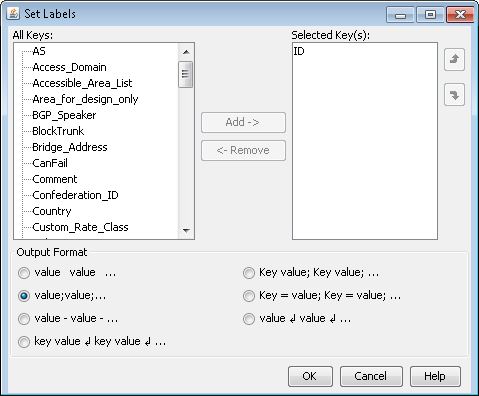
Add moves selected key from left hand side to the right hand side list |
Up/Down arrows |
Moves a selected field up and down to change the field order |
Output Format |
In the list of Output Formats, the Key is taken from the titles listed in the top panel, and the Value is the specific value for any particular Key.
|
Show/Hide Message
Toggles on or off any messages or text that are displayed in the topology map. Messages that are displayed in the map usually include total link cost.
International Map Labels
Each node, link, and group on the map can have one label in any language, defined in a single server-side file /u/wandl/data/custom/intllabel.txt, which must be saved in Unicode UTF-16 format. Each line of the file should have three items separated by commas:
LetterCode,ElementID,intlLabel
LetterCode is either N (for node), G (for group), or L (for link)
ElementID is either the nodeID field from the muxloc file (first column), link name from the bblink file, or group name from the group file.
intlLabel is the foreign text in Unicode.
Once this file is created, and the network is reopened, this label can then be displayed on the map by opening the Labels Menu , selecting Customize..., and then selecting the IntlLabel key. This label can also be displayed in the Network window node and link view panes by right-clicking the table header, selecting Table Options... and then adding the IntlLabel column. Finally, the IntlLabel attribute can also be used for advanced filters for nodes and links.
Layout
This function allows you to lay out the display of network elements in the topology map.
Circle Selected Nodes: When selected, the cursor becomes a cross hair. You should click once on the map to pick the center of a circle, and click a second time to choose the radius of the circle. All the points that are currently selected (highlighted) are moved onto the circumference of the circle at equally spaced intervals.
Distribute Selected Points: When selected, the cursor becomes a crosshair. You should click once on the map to pick the center of a circle, and click a second time to choose the radius of the circle. All the points that are currently selected (highlighted) are laid out on the map in a way that's easier to see. They are fitted inside the circle that you chose. If any of the points are collapsed groups, the groups are expanded, will have their contents distributed, and are collapsed again, and so on recursively.
Distribute Selected Points Within Groups: This option is available in the Layout menu only after selecting collapsed groups. For each selected group, the points are distributed for that group, and if multiple groups are selected, they are distributed in a way such that there is little overlap between the groups when they are expanded.
Straighten Selected Nodes: This feature is like Circle Nodes, but puts the selected points onto a horizontal line, equally spaced. (Rotate it with the Drag/Rotate tool to align the selected points vertically instead of horizontally.)
Flip: This feature flips the entire layout vertically or horizontally depending on your selection.
Stiffen: When there are multiple links between two nodes but some of the links are hidden from view, the parallel links may be spread apart too wide or unevenly or all to one side. In this case, selecting Stiffen Visible Curves will bring the parallel links closer together and center them. Select Unstiffen All to undo this stiffening. Option is only relevant when Draw Multiple Links as Curves is turned on in the Map Preferences.
Reset by Lat/Lon: Selecting this option will reset the network topology to its original geographical layout (provided that the LAT/LON coordinates are used in the network). This function is useful when you want to view the network in its geographical layout according to previously specified Lat/Lon values.
Set Lat/Lon From Map: Selecting this option will assign Lat/Lon values to all selected nodes based on their current location on the Map. This function is useful if you have manually moved nodes on the map to desired locations and wishes to save these locations for future sessions.
Quick Layout: Recomputes the X, Y coordinates of all the points using the program's algorithms to try to lay them out clearly. This is the same algorithm used when a Topology View is opened and no saved coordinates are available. If latitude/longitude coordinates are available, they are used to position the nodes, and nodes with the same Lat/Lon are laid out at the city’s location in a small radius around the city center. The full recalculation could take a long time for large networks.
Detail Layout: This topology layout algorithm attempts to distribute the nodes and links as a planar graph. Meaning the topology is drawn in such a way that links intersect only at nodes, or no links cross each other. This layout is useful to create a topology to display a minimal amount of links crossing over each other while keeping node groups together. Various parameters relating to the geographical Lat/Lon position, distance proximity to other nodes, link length, and groups can have their cost weights adjusted. Adjusting these weights will impact the algorithm’s topology display.
Grid Layout: This topology layout algorithm lays out nodes on a grid. The “Intersect Weight” field can be used to reduce line crossing-- the higher the value, the lower the number of line crossings. If you would like to rerun the calculation from the previous iteration’s layout, select the Continue from previous layout if possible checkbox. For Layout, Geographical Group places the groups at the mean lat/long position of the nodes within the group and rearranges the nodes within in a radius determined by the distance to the nearest neighbor. Abstract Group treats the network hierarchically and lays the groups out in a grid as "nodes" - then lays the nodes within the groups out within a radius determined by the distance to the nearest neighbor. "Abstract” will calculate the layout ignoring any group information. “Geographic Group” and “Abstract Group” will consider group information. Search Breadth: With a narrow search breadth, changes that make the solution worse are more likely to be rejected. At the end of the iterations, only changes that make the answer better are accepted. However, at the beginning, you can go backwards -- the probabilities of accepting an answer change as the iteration progresses. For the Iterations, specify the number of iterations to run for the optimization problem, for example, 500.
Internet Map at Click
When you right-click a point on the map and select this option, a third party Internet map opens, displaying the particular latitude/longitude point that you right-clicked.
Line Widths
Auto-assign Widths: Assigns widths based on trunk type. For example, a T3 is wider than a T1 and an ET1G is wider than an ET100M.
Reset Widths to Default: Restores widths to the default where all link widths are the same.
Alternatively, to manually set the widths, right-click on the link and select Set Line Width... from the Legends menu, Type submenu of the map window’s left pane.
Background Image
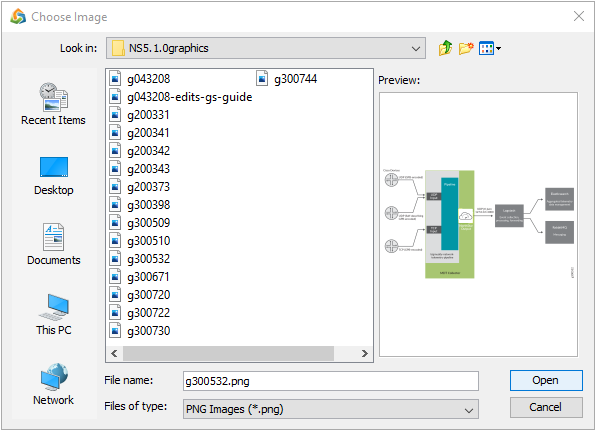
This allows you to choose a background image from your local or server machine to display on the Map window.
You can:
Select the folder where your images are stored (Look in:).
Select the file type to list (.jpg, .png, and so on).
Click an image to view a preview in the right pane.
Click Open to complete your selection. The image appears in your topology window.
Once you have a background image in place, right-click the image in the topology window and select Background Image to access the following options:
Load a different image (Load an Image File from Client).
Clear the background image so there isn’t one displayed.
Select Fixed, Fit Whole Window, Fit Horizontally, or Fit Vertically which specifies how the image is to be displayed in the window.
Resize Fixed Location, which allows you to resize the image by clicking and dragging the sizing handles that appear.
Country Maps
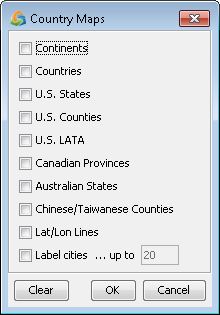
When you select this option, a dialog box appears. This option allows you to select the level of map detail to display on the background of the topology window, where the settings are remembered from session to session. For example, using this option, you can select a combination of Continents, Countries, and U.S. states to be displayed.
Find
This function searches for any node, link, or group and highlights the element on the topology.

Refresh
When selected, this function removes certain temporary interface labels and addresses, clears all highlighted network elements, and deselects all selected network elements.
Zoom
The Zoom menu contains functions for focusing in on a particular area of the topology map.
Zoom In: This function allows you to zoom in on a particular area of the topology map. To zoom in on the topology, click the Zoom In button and then click and drag a desired area in the topology map. Another method to select the zoom in area is to <Shift>-drag the rectangle. It will always match the aspect ratio of the map.
Zoom Out: This function allows you to zoom out from a particular area of the topology map.
Zoom To Fit: This function allows you to quickly fit the entire network topology in the topology window. Items hidden by the Subview or Label/Show panes are not included.
Zoom To Fit Selection: This makes the map zoom to fit the items that are selected.
Zoom to Region: Allows you to zoom to a specific geographic region in the topology. The regions which you can zoom to include the following: World, United States, Europe, Asia, and China.
When this function is selected, the program will allow you to print the current on-screen topology. You will first be asked which part to print (the entire topology window (Whole window) or just the topology map (Map only)). Next, you are given printer options.
Export
This function allows you to save the topology window as a graphics file in several formats.
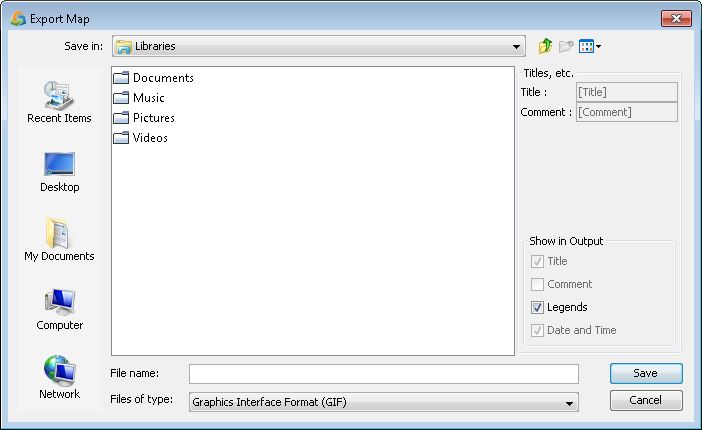
For non-Visio file types, selecting the Legends option will export the entire topology window and deselecting it will export only the map.
For Visio file types (VDX, CSV), the customizable Title and Comment fields, as well as the Legends and Date and Time can be included in the resulting Visio file.
Export Map to Visio
In the Export dialog, the last three options can be used to export to a file that can be imported into Visio and then edited or printed from Visio.
For Visio 2003, it is recommended that you export to a VDX file by selecting Visio 2003 and Later (VDX).
For Visio 2002 and earlier, it is recommended that you export to a .CSV file by selecting Visio 2002 and Earlier (CSV). After importing the .CSV file into Visio 2002, you can save the resulting Visio file as a Visio drawing (.VSD) file. Note that opening the .CSV format in Visio requires extra steps to put the NorthStar Planner stencils where Visio can find it.
The “Block Diagram for Visio 2003 and later” option is designed to be run after running Layout > Recalculate Grid Layout as described in the Layout section earlier in this topic.
Export Map to MapInfo
MapInfo requires two files, myMap.mif with the xy-coordinates, colors, and other graphical info, and myMap.mid with data per node or link for display in mouse-overs, tables, and reports.
After selecting a filename and this export option, you are prompted with a chooser to select a combination of node and link data to put into the mid file. After selecting the data to put into the mid file, click OK to create the .mif and .mid files for import into MapInfo.
Export Map to SVG
SVG can be exported from the map right-click menu item Export, or from File > Export to Web. Note that the exported SVG file depends upon existing settings in the topology map. These settings include whether the world map should be displayed, the boundaries of the world map, and whether node and link labels should be displayed.
When exporting to SVG, the resulting file can be viewed from a web browser such as Mozilla FirefoxTM. If you are using Internet ExplorerTM, version 9 or later should be used. Alternatively, a plug-in can be downloaded for SVG from http://www.adobe.com/svg/viewer/install/main.html.
Scheduling or Scripting an SVG Export
A CLI version of the SVG export, also used by the Web Report task in the Task Manager, can be found in /u/wandl/util/svg.sh. Since this SVG map may be generated when the network is closed, a configuration file is needed to specify SVG-related parameters. The syntax for calling this script is as follows:
/u/wandl/util/svg.sh <spec_file> <output_svg_file>
To customize the settings of this SVG export, edit the /u/wandl/util/svg/svg.cfg file. Variables include:
CANVASWIDTH, CANVASHEIGHT: Width and height of the map
TITLE: The title of the map
SHOWSPEC, SHOWDATE, SHOWLEGEND: Whether to show or hide the specification file path, creation date/time, and node & link legend
REMOVEASNODES,REMOVEETHERNETNODES,REMOVEISOLATEDNODES: Whether or not to hide AS pseudonodes, Ethernet pseudonodes, and/or isolated nodes. This can be used to reduce clutter on the map.
CURVEDLINKS: Whether or not to show links as curved or overlapping on a straight line
COLLAPSEGROUP: Whether or not to collapse groups into a single node
NODELABEL: How to label the node (for example, by NAME and/or IP)
LINKLABEL: How to label the link (for example, by NAME and/or TYPE).
INTFLABEL: How to label the interface (for example, by NAME and/or by UTIL).
UTILPERIOD: Which trafficload period to use to label the interface utilization
TITLEFONTSIZE, LEGENDFONTSIZE, NODEFONTSIZE, LINKFONTSIZE, INTFFONTSIZE: Font sizes
TITLEFONTCOLOR,LEGENDFONTCOLOR,NODEFONTCOLOR,LINKFONTCOLOR,IN TFFONTCOLOR: Font colors
COLORLINKBY: Links can be colored by type or utilization
UTILCOLOR = <NUMBER> = <COLOR>: To model the map utilization legend, specify in ascending order the utilization percentages and associated color between that number and the next number.
Upon scheduling the Web Report task, the resulting map(s) can then be viewed from http://serverip:8091/ (substitute serverip with your application server’s IP address). Select Reports >Network Reports. Then click on the link to the desired network, and click on “Standard Topology.” Icons are available for zoom in, zoom out, and zoom to fit (reset). Once zooming in, the map can be panned by clicking the map and dragging it in the desired direction. Additionally, link and node details can be seen by hovering the mouse over the link or node.
