Configuring the Multilayer Feature
This section describes transport controller configuration tasks in the web UI.
Transport layer elements can be viewed in both the web UI and NorthStar Planner.
NorthStar Controller can attempt connection to multiple IP addresses (configured as multiple devices) for the same transport controller profile in a round-robin fashion, until a connection is established. Once a connection is established, the transport topology elements are added and can be displayed on the topology map. This configuration is done by way of a profile group.
Navigate to Administration > Transport Controller to open the Transport Controller window shown in Figure 1.
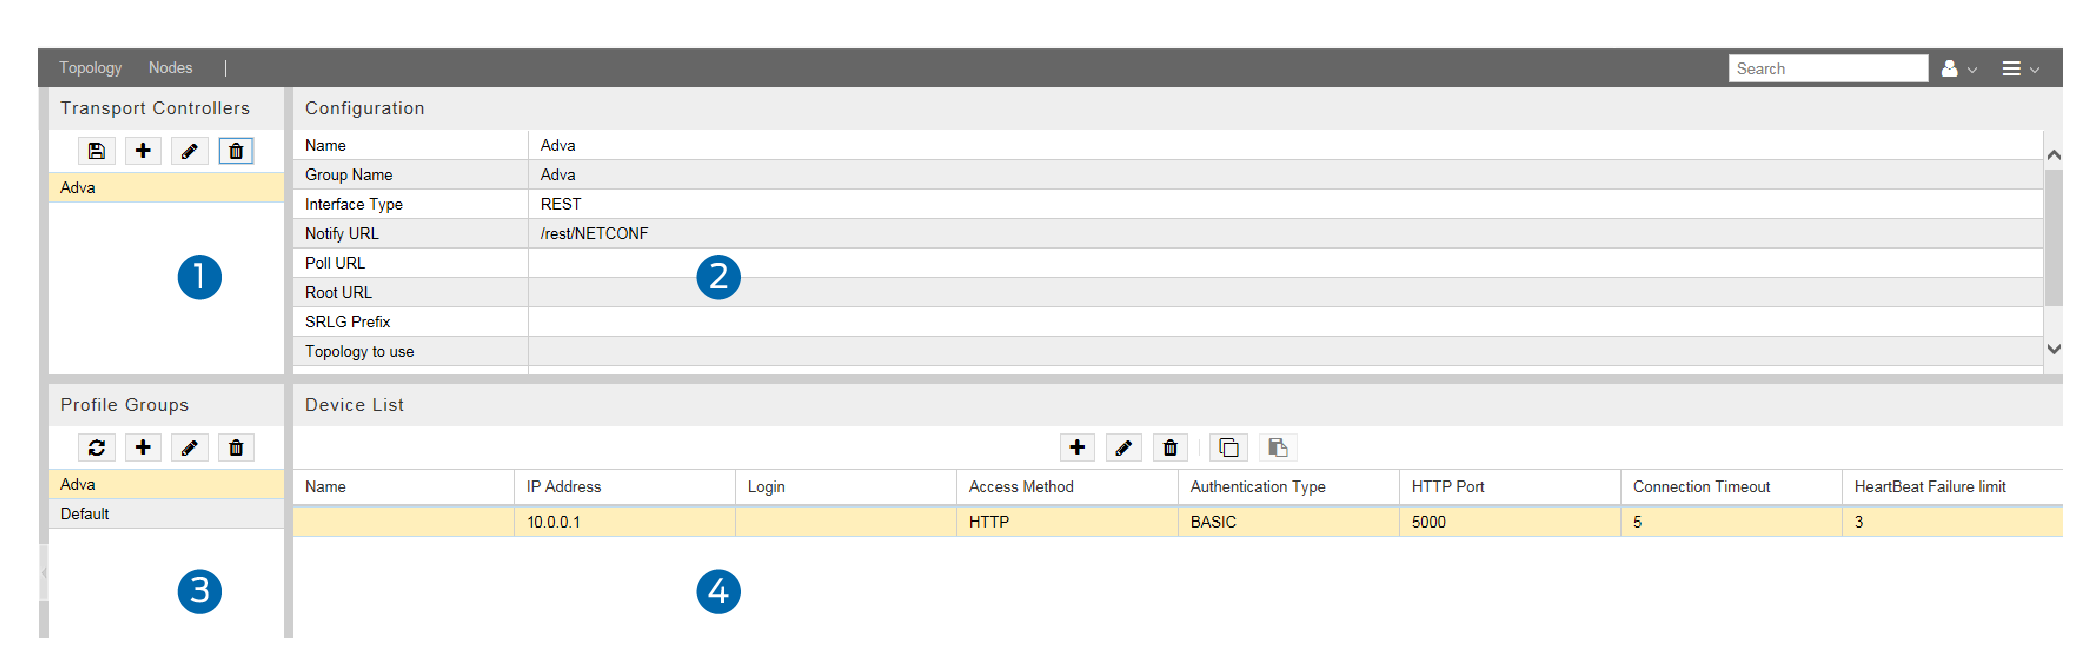
The Transport Controller window consists of the following panes (numbers correspond to the numbers in Figure 1):
Transport Controllers (upper left pane)—Lists configured transport controllers, and used to save, add, modify, and delete transport controllers.
Configuration (upper right pane)—Displays the properties of the transport controller selected in the Transport Controllers pane, and used to enter and modify transport controller properties.
Profile Groups (lower left pane)—Lists configured profile groups, and used to reload, add, modify, and delete profile groups.
Device List (lower right pane)—Lists the devices that are part of the profile group selected in the Profile Groups pane, and used to add, modify, delete, and copy devices.
The general configuration workflow is:
Create a profile group in the Profile Groups pane.
Select the group in the Profile Groups pane. In the Device List pane, create at least one device for the group. A group can have multiple devices.
Select (or create and select) the transport controller in the Transport Controllers pane.
In the Configuration pane for the selected transport controller, enter the requested information, including selecting the Group Name from the drop-down menu. The devices in the group are then associated with the transport controller.
Save the transport controller.
Adding or Deleting a Profile Group
The buttons across the top of the Profile Groups pane perform the functions described in Table 1.
Button |
Function |
|---|---|
|
Reloads the selected profile group. Used to update the device list in the UI when devices have been added using the REST API. |
|
Adds a new profile group. |
|
Deletes the selected profile group. |


To create a profile group, perform the following steps:
In the Profile Groups pane (lower left pane), click the Add (+) button to display the Create New Group window. Figure 2 shows the Create New Group window that is displayed.
Figure 2: Create New Group Window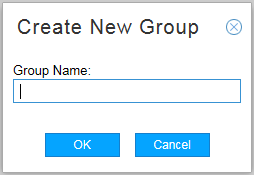
Enter a name for the new group and click OK.
To delete a selected group, click the Delete button, and respond to the request for confirmation.
Adding Devices
The buttons across the top of the Device List pane perform the functions described in Table 2.
Button |
Function |
|---|---|
|
Adds a new device. |
|
Modifies the selected device. |
|
Deletes the selected device. |

To create the devices that are part of the new profile group, perform the following steps:
In the Device List pane (lower right pane), click the Add (+) button to display the Add New Device window as shown in Figure 3.
Figure 3: Add New Device Window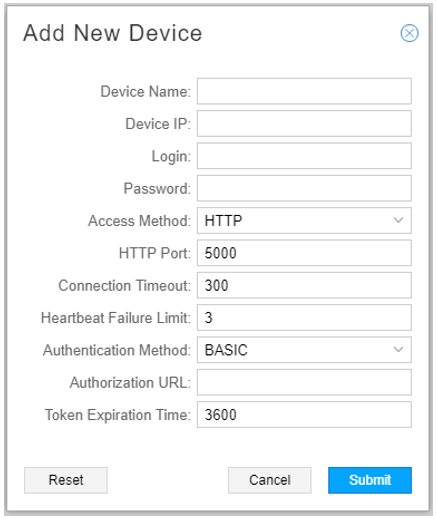
Enter the requested information. Some fields are populated with default values, but you can change them. Table 3 describes the fields in the Add New Device window.
Table 3: Add New Device Window Field Descriptions Field
Description
Device Name
Name of the device for display and reporting purposes.
Device IP (required)
The IP address used to connect to the HTTP server on the device. This address is typically provided by the vendor.
Login (required unless the authentication method is NOAUTH)
Username for authentication. The username must match the username configured on the server running the device being configured.
Password (required unless the authentication method is NOAUTH)
Password for authentication. The password must match the password configured on the server running the device being configured.
Access Method
Use the drop-down menu to select either HTTP or HTTPS. The default is HTTP.
HTTP Port
The HTTP port on the device. The default is 5000.
Connection Timeout
Number of seconds before a connection request to the device times out. The default is 300. Use the up and down arrows to increment or decrement this value or type a different value in the field.
Heartbeat Failure Limit
Number of connection retries before the device is considered down. The default is 3.
Authentication Method
Use the drop-down menu to select BASIC, NOAUTH, or BEARER. The default is BASIC.
Authorization URL
Used when the Authentication Method is BEARER. The server URL used to generate the bearer token based on the user name and password.
Token Expiration Time
Used when the Authentication Method is BEARER. Number of seconds the bearer token is valid.
The default is 3600.
Table 4 shows the fields that require specific values for particular transport controller vendors. Fields not listed are not typically vendor-specific. Confirm all values with the vendor before using them.
Table 4: Vendor-Specific Device Field Values Field
ProNX Optical Director
ADVA
Coriant
Ciena
Virtuora
Access Method
HTTP
HTTPS
HTTP
HTTPS
HTTPS
HTTP Port
8082
8080
8081
443
8443
Authentication Method
BEARER
BASIC
BASIC
BEARER
BASIC
Authorization URL
http://ip-addr:8084/ auth/authenticate
NA
NA
https://ip-addr/tron/ api/v1/tokens
NA
Token Expiration Time
3600s (the default)
NA
NA
3600s (the default)
NA
Click Submit.
Repeat the procedure to add all the devices for the profile group.
You can drag and drop device rows to change the order in the Device list. Changing the order in the list changes the order in which connection to the devices is attempted.
Configuring the Transport Controller Profile
The buttons across the top of the Transport Controllers pane perform the functions described in Table 5.
Button |
Function |
|---|---|
|
Saves the transport controller profile. |
|
Adds a new transport controller profile. |
|
Deletes the selected transport controller profile. |

To configure a transport controller profile, perform the following steps:
In the Transport Controllers pane (upper left pane), click the Add (+) button. The default name “newController” is added to the Transport Controllers pane in red text (red, because it has not yet been saved), and is selected so you can populate the properties in the Configuration pane (upper right pane).
In the Configuration pane, enter the requested information. Table 6 describes the transport controller configuration fields and identifies the ones that are required.
Table 6: Transport Controller Configuration Fields Field
Description
Name (required)
Name of the transport controller profile. The default name for a new profile is newController. We recommend you use the name of the vendor (ADVA, for example) as the name of the transport controller profile, so NorthStar Controller can use corresponding icons in the UI. Otherwise, it uses generic icons.
Group Name (required)
Use the drop-down menu to select a group name from those configured in the Profile Groups pane.
Model
Use the drop-down menu to select either ietf-te-topology-01, OpenROADM-2.0, or TAPI-2.1.
Interface Type (required)
Use the drop-down menu to select REST, RESTCONF, CIENA-REST, or VIRTUORA-REST. The default is REST.
Note:CIENA-REST is specifically for Ciena Transport Controller T-API. VIRTUORA-REST is specifically for Virtuora T-API.
Notify URL (required)
REST or RESTCONF URL on the transport controller that publishes topology change notifications.
Note:Topology change notifications are currently unsupported in T-API.
Poll URL
The server URL used to poll server liveness. If the interface type is RESTCONF and no value is entered, NorthStar Controller uses /.well-known/host-meta by default. If the interface type is REST, you must enter a value which you obtain from the vendor.
Root URL
Default root URL for RESTCONF datastores.
SRLG Prefix
Enables separation of shared risk link group (SRLG) spaces when multiple controllers are configured.
If a prefix is entered, the SRLG takes the form TSRLG_<prefix>_<SRLG>.
If no prefix is entered, the SRLG takes the form TSRLG_<SRLG>.
Topology to use
Specifies the topology to use in the event that a controller returns multiple topologies. This is your choice from the topologies provided, but there are typical topologies for each vendor. The field can be left empty, in which case all topologies are imported. If the value does not match a topology exported by the transport controller, no topology is shown.
Note:Topology filtering is currently unsupported in T-API.
Topology URL (required)
URL on the transport controller that provides the abstract topology.
Service URL
Used when the Model is OpenROADM-2.0. IP layer link that fetches services information.
Reconnect Interval
Number of seconds between reconnection attempts to the devices included in the profile group. The default is 300.
Table 7, Table 8, Table 9, Table 10, and Table 11 show the fields that require specific values for particular vendors. Confirm all values with the vendor before using them.
Table 7: proNX Optical Director: Typical Transport Controller Field Values ProNX Optical Director
Name
JuniperPOD
Model
OpenROADM-2.0
Interface Type
RESTCONF
Notify URL
/websockets/NETCONF-JSON
Poll URL
(None)
Topology to Use
optical
Topology URL
/restconf/data/ietf-network:network
Service URL
/restconf/data/org-openroadm-service:service-list
Table 8: ADVA: Typical Transport Controller Field Values ADVA
Name
ADVA
Model
ietf-te-topology-01
Interface Type
REST
Notify URL
/rest/NETCONF
Poll URL
/rest/data/ietf-te-topology:te-topologies-state
Topology to Use
ADVA_TOPOLOGY_1
Topology URL
/rest/data/ietf-te-topology:te-topologies-state
Service URL
NA
Table 9: Coriant: Typical Transport Controller Field Values Coriant
Name
Coriant
Model
ietf-te-topology-01
Interface Type
RESTCONF
Notify URL
/streams/NETCONF-JSON
Poll URL
(None)
Topology to Use
Customized_Topology_for_NorthStar_1_Demands
Topology URL
/rest/data/ietf-te-topology:te-topologies-state
Service URL
NA
Table 10: Ciena T-API: Typical Transport Controller Field Values T-API
Name
TAPI
Model
TAPI-2.1
Interface Type
CIENA-REST
Notify URL
(None)
Poll URL
/tron/api/v1/login-info
Root URL
(None)
Topology to Use
(None)
Topology URL
/mcpview/api/v1/tapi/core
Service URL
(None)
Table 11: Fujitsu Virtuora NC: Typical Transport Controller Field Values T-API
Name
Virtuora
Model
TAPI-2.1
Interface Type
VIRTUORA-REST
Notify URL
(None)
Poll URL
(None)
Root URL
(None)
Topology to Use
(None)
Topology URL
/cxf/tapi/v2
Service URL
(None)
Click the Save button in the Transport Controllers pane to save the transport controller profile. The profile name turns from red to black if saved successfully. If it does not become black when you attempt to save it, double check the data in the Configuration pane.
Updating Transport Topologies Acquired Via T-API
Currently, notifications are not supported for updating transport topologies acquired via T-API, but you can configure NorthStar to reload the transport topology at a specified interval. The polling-interval option controls this interval for interfaces without notification support.
To configure the interval, access the NorthStar CLI as described in Configuring NorthStar Settings Using the NorthStar CLI in the NorthStar Controller/Planner Getting Started Guide. Use the set northstar mladapter polling-interval command to configure your preferred number of seconds. Setting a value of 0 disables polling.