Specifying Alternate Routes, Secondary and Backup Tunnels
For a tunnel, NorthStar Planner provides the option to add alternate routes in case the primary route fails.
Specifying Alternate Routes (for Cisco Routers)
In the table in the lower half portion of the Add or Modify Tunnel windows, you can specify one or more routes using one or more of the methods explained above. Click Add Row to add an alternate path.
For each route you can enter in a priority for the route. In the case that the tunnel cannot be routed on the primary path, it will attempt to route on the path with the next highest priority. (The lower the Opt value, the higher the priority.) You can click on a cell beneath the Opt heading and overtype this field to enter in a number from 0 to 10. For each of these added rows, you can also configure a route or leave it as is for a dynamic route.
In the configlet generation, the Opt number will be displayed for Cisco in the “tunnel mpls traffic-eng path-option ...” command. For Juniper’s configlets, no Opt number will be displayed, but the tunnels will be specified in an order corresponding to the Opt field.
You can add up to 10 paths for this tunnel. Simply fill in the fields that are different from the default parameters in the top half of the window.
Not all fields are available for inputting. If your originating node is a Juniper node then all fields are available (Pathname, Opt, Configured, BW, Type, Affinity, Mask, Pri,Pre, Comment). If it is Cisco then only the first 3 fields are used (Pathname, Opt, and Configured). This is due in part to the way the device vendor implements the tunnels.
Specifying Secondary and Standby Tunnels (for Juniper Routers)
The tunnel ID, from node, to node, and IP address of the secondary/standby tunnel should be identical to that of the primary tunnel. Thus, to add a secondary or standby tunnel, you should first have the desired primary tunnel open in the Add Tunnel or Modify Tunnel windows.
In the fish sample network, open up the Modify Tunnel window for RHOUWDC (where HOU, the source node, is a Juniper router). In the bottom half of the window where it says Tunnels/Paths for this tunnel, click on “Add Row.” Note that the source node should be of a type that supports secondary or standby tunnels.
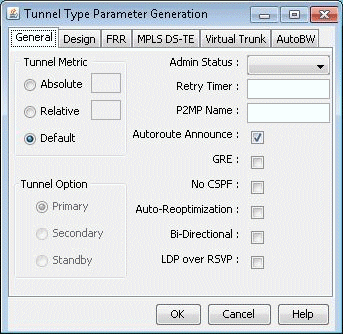
Right-click on the newly-added row and select the Edit Type menu option. The Tunnel Type Parameter Generation window will appear, from which you can select Secondary or Standby instead of Primary as shown in the Tunnel Option section of Figure 1. Click “OK”.
Figure 1: Tunnel Type Parameter Generation Window for Juniper Routers (Options May Vary)
For more details on other type options, see the NorthStar Planner User Interface Guide, chapter on The Network and Modify Menus, Tunnels, Tunnel Type Parameter Generation.
Secondary and standby tunnels are used when the primary tunnel fails. The difference is as follows:
A secondary tunnel is not routed until the primary tunnel fails.
A standby tunnel is routed while the primary tunnel is up.
Note:Secondary and standby tunnels should be listed immediately after the primary tunnel in the tunnel file. Furthermore, they should have the same tunnel ID, from node, to node and IP address.
For a secondary or standby path for Juniper, you only need to change the fields that are different from the primary path. You can highlight a row for a secondary or standby path by clicking on it. After highlighting it, right-click and select Edit Route, Edit Type, or Edit Affinity to bring up a window where you can make these modifications.
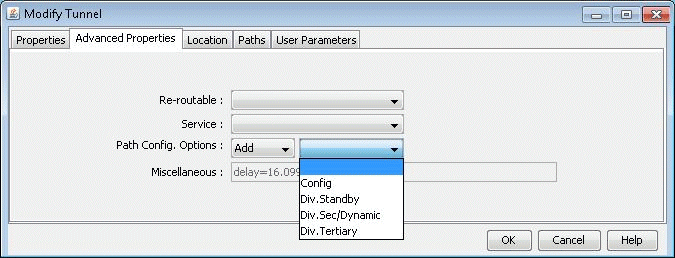
Another option is to have the program automatically add a diverse standby or secondary tunnel by using the Path Config. Options indicated in Path Config Options on page 252. In the Add Tunnel window, after specifying the primary tunnel parameters, select Div.Stdby or Div.Sec/Dynamic in the Path Config. Options drop-down menu to add a standby or secondary tunnel. Click OK to add the tunnel and its secondary or standby tunnel.
If the tunnel(s) are already in the network, then select tunnels to modify and click Modify... and then select “Selected Entries.” In the Modify Tunnel window, select “Add” followed by Div.Stdby or Div.Sec/Dynamic in the Path Config. Options to add a standby or secondary tunnel. Click OK to add the secondary or standby tunnel.
This is an Add operation, meaning that if the tunnel already had a standby tunnel and you add a secondary tunnel, it will consequently have both a standby and secondary tunnel. If you only wanted to select one of the types and not both, you should perform a subsequent modification specifying “Remove” followed by the original type (standby or secondary) that you want to remove and clicking “OK”.
Path Config Options
The Path Config Options and Re-routable dropdown selections can be used to specify requirements for secondary/standby paths as described in the table below.

Field |
Description |
|---|---|
Config |
Specifying Config will cause the Current Route to be set as the Configured Route. Afterwards, the user may generate LSP configlets based on the explicit path to be pushed back to the router. To add configured routes based on the loopback IP addresses of nodes, as opposed to interface IP addresses, specify configloopaddrinpath=1 in the dparam file prior to opening the network baseline. |
Div. Sec./Dynamic |
This option will cause NorthStar Planner to automatically add a secondary path entry for this LSP tunnel. (Note that “Div.Sec.” is indicative of Juniper because the word “secondary”, where as “Dynamic” is indicative of CISCO because the same word is used in IOS). |
Div. Stdby |
This option will cause NorthStar Planner to automatically create a hot standby path entry for this LSP tunnel. |
Re-routable |
Re-routable. This is a convenient way to indicate that if a tunnel is unable to route according to its other specified routes, then the originating node will search for a path not following the configured routes. This is equivalent to setting up a secondary route that is Dynamic. |
If Div. Sec. or Div. Stdby are specified, NorthStar Planner will automatically create path entries for the secondary or standby paths of the primary tunnel, respectively. In order to specify the paths, you can either do so manually using the methods described in this chapter, or you can have NorthStar Planner design the paths for you in Design > TE Tunnels > Path Design.
