Creating Multicast Groups
First, for the sake of simplicity, delete all the demands in the advanced dog network. This will make it easier to view the multicast demands that will be added later in this guide. Navigate to the Demands tab and in the resulting window, click the Delete button and then select All Entries.
On the menu bar click on Networks > Protocols > Multicast > Multicast Group to bring up the Multicast Group window.
Click the Add button in the Multicast Group window to bring up the Add Multicast Group window.
Enter in a Destination IP Address, Name, and RP (Rendezvous Point) Address for the multicast group. In this example, 10.10.10.8 (WDC) will be used as the RP. If RP Addresses are already defined on Nodes, then they will be populated in this drop-down box. Then, add the first six routers from the list of Available Routers to the Selected Routers list. For more information about the window display, see Viewing Demands Over GRE Tunnels.
Figure 1: Adding a Multicast Group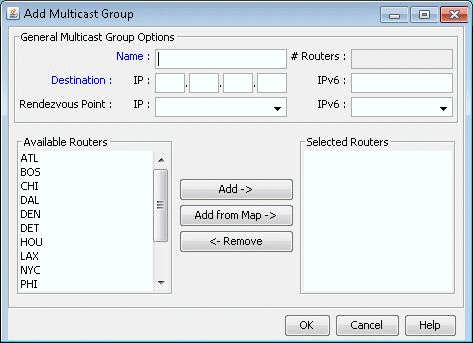
Click the Add button when all the properties of the multicast group have been set correctly. This will add the multicast group to the network. Close the Add Multicast Group and the Multicast Group windows as they are no longer needed.