Provision and Manage P2MP Groups
P2MP groups, or trees, can be provisioned to help conserve bandwidth. Bandwidth is replicated at branch points.
In the NorthStar Controller, you can provision P2MP groups; view and modify group attributes; and view, add, modify, or delete sub-LSPs. This is a separate workflow from provisioning P2P LSPs, and is initiated from the P2MP Group tab in the network information table.
NorthStar supports two provisioning methods for P2MP groups: NETCONF and PCEP. PCEP provisioning offers the advantage of real-time reporting. Functionality and support for the two provisioning methods are not identical; differences are noted in this documentation. IMPORTANT: See the release notes for Junos OS release requirements related to PCEP provisioning.
In Junos OS Release 15.1F6 and later, you can enable the router to send P2MP LSP information to a controller (like the NorthStar Controller) in real time, automatically. Without that configuration, you must run device collection for NorthStar to learn about newly provisioned P2MP LSPs.
In the Junos OS, the configuration is done in the [set protocols pcep] hierarchy for PCEs and for PCE groups. The following configuration statement allows PCEP to report the status of P2MP trees in real time, whether provisioned by NETCONF or by PCEP:
set protocols pcep pce pce-id p2mp-lsp-report-capability
For PCEP-provisioning, these additional configuration statements are also required:
set protocols pcep pce pce-id p2mp-lsp-update-capability
set protocols pcep pce pce-id p2mp-lsp-init-capability
After provisioning P2MP LSPs, if there is a PCEP flap, the UI display for RSVP utilization and RSVP live utilization might be out of sync. This is also true for P2P LSPs. You can display utilization metrics by navigating to Performance in the left pane of the UI. This is a UI display issue only. The next live update from the network or the next manual sync using Sync Network Model (Administration > System Settings > Advance Settings) corrects the UI display. In the System Settings window, you toggle between General and Advanced Settings using the button in the upper right corner of the window.
The following sections describe viewing, provisioning, and managing P2MP groups in the NorthStar Controller.
Automatic Rerouting Around Points of Failure
For PCEP-provisioned P2MP groups only, sub-LSPs are dynamically rerouted around points of failure along the path of the tree. You should not necessarily expect to see the Op Status in the network information table change during the route because it happens very quickly. The topology map displays a red F on any failed link or node, and you can see how the path is rerouted around those markers.
Viewing P2MP Groups and Their Sub-LSPs
P2MP group information is displayed in the P2MP Group tab of the network information table, and is also reflected in the topology map.
To display P2MP Group information, use the following steps:
On the tabs bar of the network information table, click the plus sign (+) and select P2MP Group from the drop-down menu as shown in Figure 1.
Note:When you launch the web UI, only the Node, Link, and Tunnel tabs are displayed by default; P2MP Group is one of the tabs you can optionally display.
Figure 1: Adding the P2MP Group Tab
The P2MP Group tab is added to the tab bar and the contents are displayed as shown in Figure 2.
Figure 2: P2MP Group Tab in the Network Information Table
Columns for group attributes are shown across the top. You can add columns and filter the display in the usual ways. See Sorting and Filtering Options in the Network Information Table for more information.
Click a row in the table to highlight the path in the topology map.
Right-click a row in the table to display either a graphical tree view of the group, or a list of the sub-LSPs that make up the group. Figure 3 shows these options.
Figure 3: Right-Click a P2MP Group
The tree diagram opens as a separate pop-up as show in Figure 4.
Figure 4: P2MP Group Graphical Tree Diagram
When you select to view sub-LSPs, the sub-LSPs that make up the group are displayed in a new tab in the network information table. On the list of sub-LSPs, you have all the display options normally available on the Tunnel tab. See Network Information Table Overview for more information.
Note:The sub-LSP tab in the network information table is for display purposes only; you cannot perform Add, Modify, or Delete functions from there. But the sub-LSPs are also displayed in the Tunnel tab, where you can perform those actions.
In the P2MP Group tab of the network information table, the Control Type column displays Device Controlled for NETCONF-provisioned groups and PCEInitiated for PCEP-provisioned groups.
NETCONF-provisioned P2MP group configuration statements can
be viewed in the router configuration file. To view PCEP-provisioned
P2MP group configuration, you must use the Junos OS command run show mpls lsp p2mp in operational mode because
the LSPs are PCE-initiated.
Add a P2MP Group
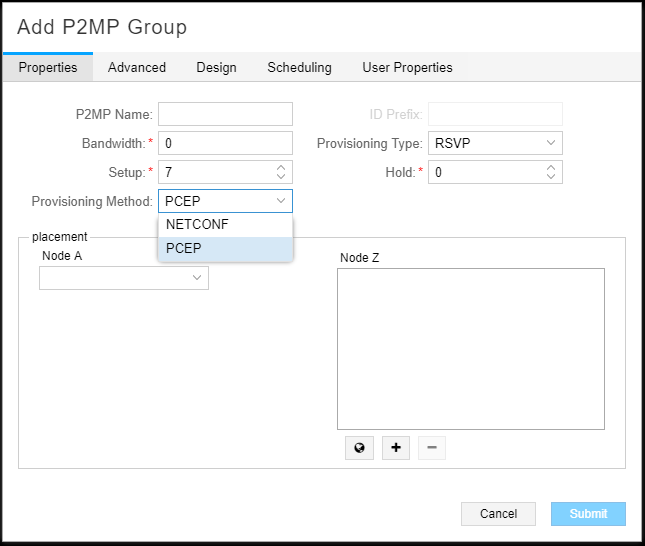
On the P2MP Group tab of the network information table, click Add at the bottom of the table. The Add P2MP Group window is displayed as shown in Figure 5. Red asterisks denote required fields.

Table 1 describes the data entry fields in the Properties tab of the Add P2MP Group window.
Field |
Description |
|---|---|
P2MP Name |
Required. A user-defined name for the P2MP group. Only alphanumeric characters, hyphens, and underscores are allowed. Other special characters and spaces are not allowed. |
ID Prefix |
You can enter a prefix to be applied to all of the tunnel names that are created. |
Bandwidth |
Required. Planned bandwidth immediately followed by units (no space in between). Valid units are:
Examples: 50M, 1000b, 25g. If you enter a value without units, bps is applied. |
Provisioning Type |
The default is RSVP, which is the only option supported for P2MP groups. Even if you select SR, RSVP is used. |
Setup |
Required. RSVP setup priority for the tunnel traffic. Priority levels range from 0 (highest priority) through 7 (lowest priority). The default is 7, which is the standard MPLS LSP definition in Junos OS. |
Hold |
Required. RSVP hold priority for the tunnel traffic. Priority levels range from 0 (highest priority) through 7 (lowest priority). The default is 7, which is the standard MPLS LSP definition in Junos OS. |
Provisioning Method |
Use the drop-down menu to select PCEP or NETCONF. The default is NETCONF. |
Node A |
Required. The name or IP address of the source node. Select from the drop-down list. |
Node Z |
At least one is required. The names or IP addresses of the destination nodes. To select nodes from the topology map, Shift-click the nodes on the map and then click the world button at the bottom of the Node Z field. To add all nodes in the network, click the plus (+) button. To remove a node, highlight it in the Node Z field and click the minus (-) button. |
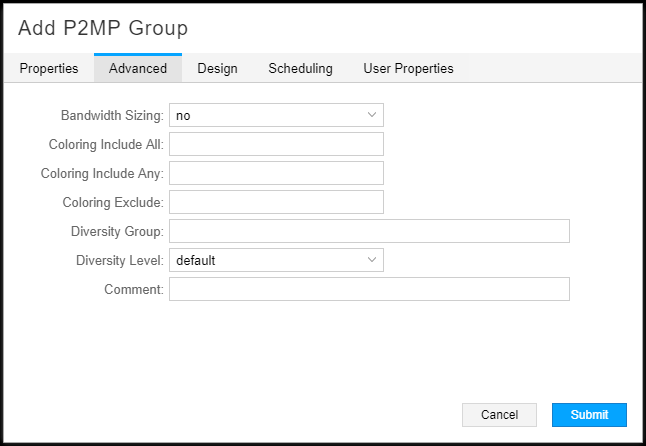
The Advanced tab includes the fields shown in Figure 6 and described in Table 2.

Field |
Description |
|---|---|
Bandwidth Sizing |
Controls whether bandwidth sizing is enabled for the P2MP group. Use the drop-down menu to select yes or no. The default is no. |
Coloring Include All |
Double click in this field to display the Modify Coloring Include All window. Select the appropriate bits. Click OK when finished. |
Coloring Include Any |
Double click in this field to display the Modify Coloring Include Any window. Select the appropriate bits. Click OK when finished. |
Coloring Exclude |
Double click in this field to display the Modify Coloring Exclude window. Select the appropriate bits. Click OK when finished. |
Diversity Group/Level |
Diverse P2MP is currently not supported via the web UI, so these fields are not used. Diverse P2MP computation via REST API is currently available for NETCONF P2MP groups, but not for PCEP P2MP groups. |
Comment |
Free-form comments if needed. |
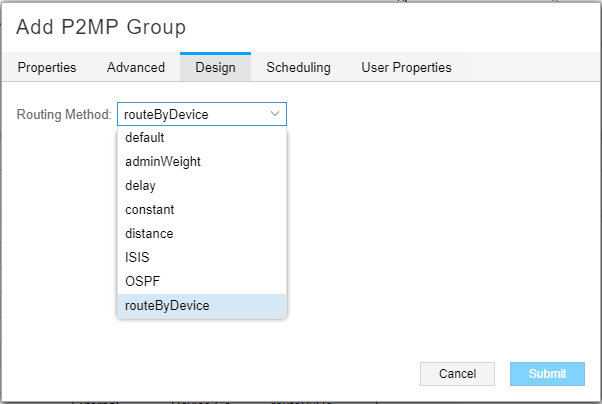
The Design tab includes the Routing Method options shown in Figure 7.

For NETCONF-provisioned P2MP, the default routing method is routeByDevice (since it uses NETCONF as the provisioning method). You can select a different routing method in which the PC server calculates the path for all the sub-LSPs. For PCEP-provisioned P2MP, select default as the routing method. Do not use routeByDevice for PCEP-provisioned P2MP because an empty ERO would be sent. The behavior for all routing methods is similar to P2P LSP provisioning.
The Scheduling tab is identical to the one you use to provision P2P LSPs.
For P2MP, the User Properties tab is used for P2MP tree to MVPN service mapping (not supported for PCEP-provisioned P2MP groups). See Templates for Netconf Provisioning for more information.
Once you are finished defining the group, click Submit. The group is added to the network information table, on the P2MP Group tab.
Naming of the sub-LSPs is automatic, based on the Prefix-ID if provided, and the A and Z node names.
For NETCONF-provisioning, if the routing method is routeByDevice, the path for all sub-LSPs is dynamic. For any other routing method, the path is preferred. This can be changed for individual sub-LSPs.
Do not change the routing method for PCEP-provisioned sub-LSPs; they should always have a routing method of “default”.
Modifying a P2MP Group
Modifying a P2MP Group
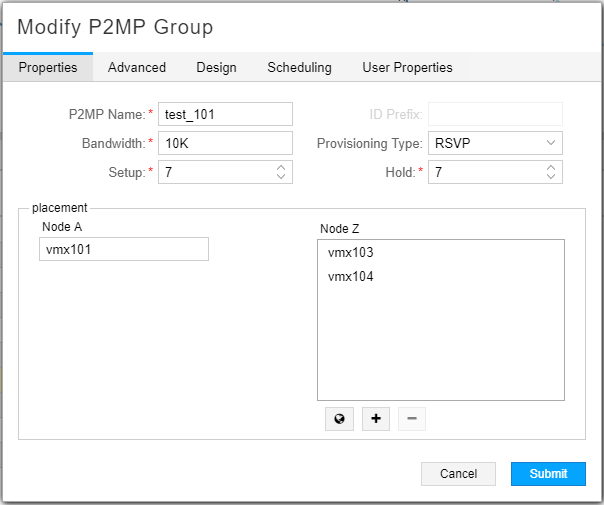
To modify a P2MP group, select the group in the P2MP Group tab of the network information table, and click Modify at the bottom of the table. The Modify P2MP Group window is displayed as shown in Figure 8.

Using the tabs on the Modify P2MP Group window, you can change the value of attributes (affects all sub-LSPs in the group), add or remove destination nodes (which adds or removes sub-LSPs), and set up or change scheduling for the group.
There are actually two ways you can remove sub-LSPs from a group:
In the Properties tab of the Modify P2MP Group window, select the destination node(s) in the Node Z field and click the minus sign (-).
In the Tunnel tab of the network information table, select the sub-LSP to be removed and click Delete at the bottom of the table.
When you have finished making changes, click Submit.
The following six attributes must be the same for all sub-LSPs in a P2MP group, and can therefore only be modified at the group level, using the Modify P2MP Group window:
Bandwidth
Setup
Hold
ColoringIncludeALL (cannot be modified for PCEP-provisioned groups in this release)
ColoringIncludeANY (cannot be modified for PCEP-provisioned groups in this release)
ColoringExclude (cannot be modified for PCEP-provisioned groups in this release)
You can modify other attributes on the individual sub-LSP level (path or Max Hop, for example). To modify sub-LSP attributes, select the tunnel in the Tunnel tab of the network information table and click Modify at the bottom of the table. If you attempt to modify one of the six group-level-only attributes at the sub-LSP level, an error message is displayed when you click Submit and the change is not made.
If the sub-LSPs tab in the network information table fails to update after modifying group or sub-LSP attributes, you can close the sub-LSPs tab and reopen it to refresh the display. There is also a refresh button at the bottom of the table that turns orange when prompting you for a refresh. When you click the refresh button, the web UI client retrieves the latest P2MP sub-LSP status from the NorthStar server.
Deleting a P2MP Group
When you delete a P2MP group, all sub-LSPs that are part of that group are also deleted.
To delete a P2MP group, select the group on the P2MP Group tab of the network information table and click Delete at the bottom of the table. Respond to the confirmation message to complete the deletion.
Alternatively, you can use the Tunnel tab of the network information table to delete all the sub-LSPs in the P2MP group, which also deletes the group itself.
