How to Migrate to Juniper Secure Connect
This topic is intended for the users who have existing dynamic VPN deployments and are planning to migrate to Juniper Secure Connect. If you are a new user of Juniper Secure Connect, you can skip this topic.
Before You Begin:
-
Learn about feature comparison. See Advantages of Juniper Secure Connect over Dynamic VPN.
-
Learn about feature enhancement. See Juniper Secure Connect Overview.
We recommend you that you back up the current working configuration if you need to rollback later or have rolled over the current configuration over your history of rollbacks for some reason.
For more information, see Rescue and Recovery of Configuration File.
Advantages of Juniper Secure Connect over Dynamic VPN
Dynamic VPN is a legacy offering from Juniper Networks. Read this topic to understand the differences between Juniper Secure Connect and Dynamic VPN, and why Juniper Secure Connect is preferred over Dynamic VPN.
Figure 1 shows the high-level comparison between Juniper Secure Connect and Dynamic VPN.
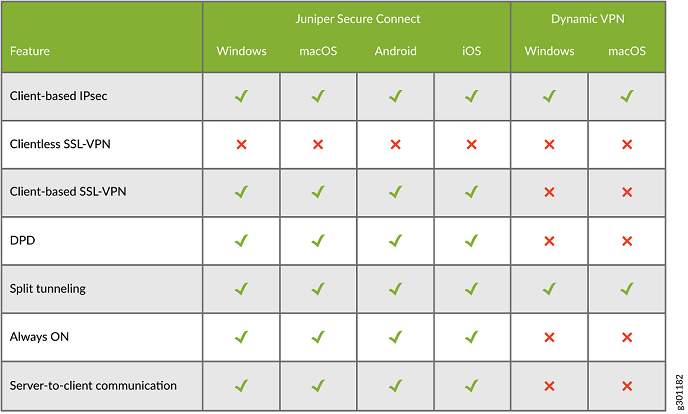
Table 1 shows the connection feature related differences between Dynamic VPN and Juniper Secure Connect on SRX Series Firewalls:
|
Connection Features |
Dynamic VPN |
Juniper Secure Connect |
|---|---|---|
|
Connection mode |
IPsec mode |
IPsec is the preferred mode. Juniper Secure Connect automatically changes the protocol to SSL-VPN on need basis to bypass restrictive networks where IPsec traffic is blocked. |
|
VPN connectivity mode |
Policy-based VPN, which requires each firewall policy to define the connectivity and VPN establishment. |
Route-based VPN connectivity. Allows you to define fine granular firewall policies including other services, such as Advanced Threat Prevention (ATP) Cloud, User Firewall, and so on. |
With Juniper Secure Connect offering more benefits, we do not provide Dynamic VPN as a solution for remote access VPN deployment. While we plan to discontinue support for Dynamic VPN, we recommend you to migrate existing Dynamic VPN deployments to Juniper Secure Connect. For migrating to Juniper Secure Connect, see Migrating from Junos OS Dynamic VPN to Juniper Secure Connect.
Licensing Requirements
As a first step, ensure that you have installed the license for Juniper Secure Connect if you need more than two concurrent users.
Configuration Requirements
Dynamic VPN documentation is archived at Junos OS and Junos OS Evolved 23.1 Portable Library. To access the documentation, download and unzip the archived file. Locate the vpn-ipsec.pdf file in the unzipped folder and navigate to Remote Access VPN chapter.
Complete the following Dynamic VPN tasks:
-
Update the firewall policies used for Dynamic VPN:
-
Verify the
from-zoneoption in the current Dynamic VPN policies. Thefrom-zoneoption will be the source-zone used in the Juniper Secure Connect VPN wizard. -
Remove firewall policies that refer to Dynamic VPN.
-
-
Delete IKE and IPsec configurations created for the Dynamic VPN configuration under
edit security dynamic-vpn,edit security ike, andedit security ipsechierarchies.
J-Web Wizard for Migration
You can use J-Web wizard for Juniper Secure Connect configuration.
We recommend that you start with a new deployment of Juniper Secure Connect because you may overlook one or more values when you migrate the current settings. When you set up a new Juniper Secure Connect:
-
Check whether you have any split tunneling rules. These rule specify remote protected resources behind the SRX Series Firewall that the client communicates with over the VPN tunnel. You can check your rules at the [
set security dynamic-vpn
                                          clients configuration-name
                                          remote-protected-resources
] hierarchy-level. The same split tunnel definitions are used in the Secure Connect VPN wizard as protected networks. -
Start a new deployment in the J-Web deployment wizard. We recommend enabling the Auto-create Firewall Policy option to create a firewall policy automatically.
-
You can reuse the access profiles and address-assignment pool in this workflow.
-
If you already have a route from your network pointing to the SRX Series Firewalls and have included that IP address in the address assignment pool or have defined through the RADIUS, you can disable the use of source NAT.
-
Now you are ready to start configuring Juniper Secure Connect.