Deploy Certificates for Juniper Secure Connect
Read this topic to understand about Juniper Secure Connect certificate deployment.
Before deploying Juniper Secure Connect, ensure that the SRX Series Firewall uses an appropriate certificate instead of the default system-generated certificate. You should choose either a signed certificate or a self-signed certificate or a signed certificate from Let's Encrypt. When the user initiates a connection to the SRX Series Firewall using Juniper Secure Connect, the application validates the gateway certificate.
How to Deploy a Certificate
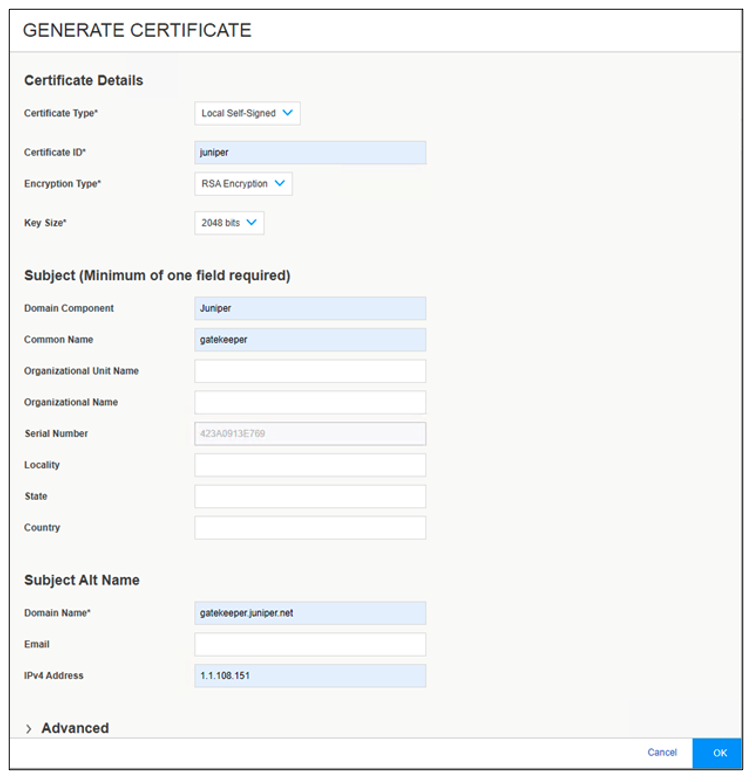
To deploy a certificate, you must generate and install the required certificates. You can generate a certificate request or a self-signed certificate by navigating to Device Administration > Certificates > Device in the J-Web interface as shown in Figure 1.
Figure 1 shows the minimum of values that you should configure. Ensure that these values matches with your own organization. If you initiate a Certificate Signing Request (CSR), the certificate must be signed by your CA before it is loaded on the SRX Series Firewall.
After creating a self-signed or loading a signed certificate, you must bind the certificate to the SRX Series Firewall by navigating to Device Administration > Basic Settings > System Services > HTTPS > HTTPS certificate and select the appropriate name.
To generate a self-signed certificate using command line interface (CLI), see Configure Multiple Domains and Certificates.
After loading the certificate to the SRX Series Firewall, you can validate the certificate by viewing the certificate information in your browser bar. The steps involved in viewing the certificate information depends on your browser and browser version. Figure 2 shows the certificate in Windows after downloading the public certificate. It shows the certificate information that you configured in the SRX Series Firewall.
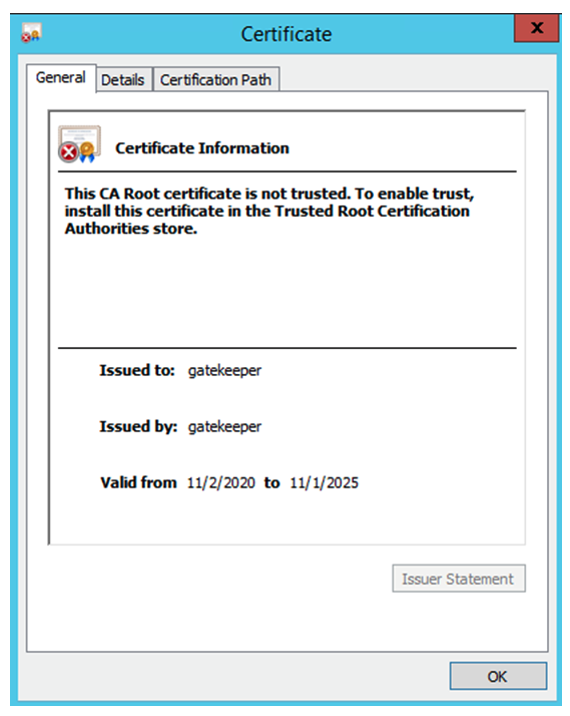
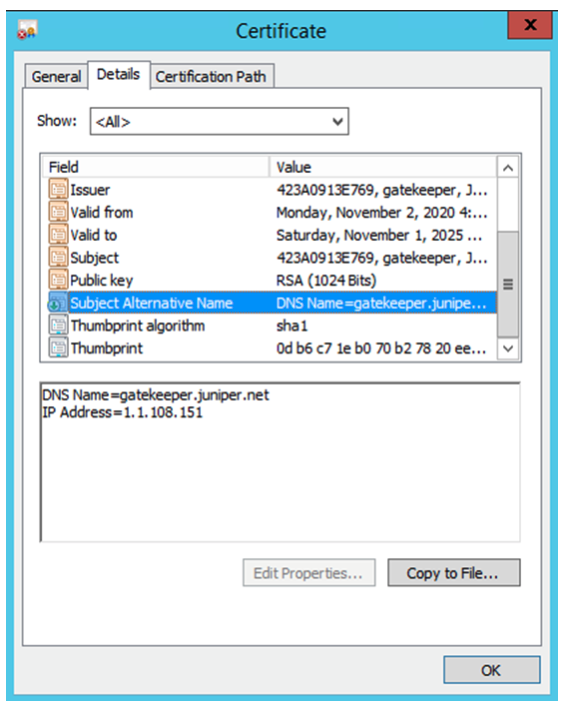
Figure 3 shows all the details of the certificate that is configured in the SRX Series Firewall.
You must check for the following from the certificate information in the browser:
-
Check whether the Subject Alternative Name matches with your generated certificate.
-
Check whether there is a warning message about the Thumbprint/Fingerprint. A warning message is displayed if you did not export the CA certificate from the SRX Series Firewall to all clients.
We recommend that you export the self-signed certificate from the SRX Series Firewall in .pem format, or the CA root certificate from the CA that signed your CSR to each client. You can do this manually or distribute it using a client rollout package for Windows and macOS. See Create Installation Packages for Juniper Secure Connect Rollout on Windows and Create Rollout Packages for Juniper Secure Connect Installation.
Table 1 lists the Juniper Secure Connect application directory location where you can place the exported certificate on different platforms.
|
Platform |
Directory Location |
|---|---|
|
Windows |
C:\ProgramData\Juniper\SecureConnect\cacerts\ |
|
macOS |
/Library/Application Support/Juniper/SecureConnect/cacerts/ |
|
Android |
/Juniper/Export |
|
iOS |
/Files/Secure Connect/ |
Based on the versions of the OS and Juniper Secure Connect application, the absolute paths for the import and export locations can change. To export the certificate, select the certificate from Device Administration > Certificate Management > Certificates and export it.

Configure Multiple Domains and Certificates
Juniper Secure Connect supports multiple connection profiles with different URLs in FQDN/RealmName format. To ensure that these connection requests do not show any certificate warning, as an administrator, you can bind multiple certificates to multiple domains or single certificate to multiple domains in the SRX Series Firewall. These URLs contain domain names used in connection profiles on your Juniper Secure Connect application.
In this configuration, you create multiple certificates with multiple domain names on the SRX Series Firewall.
Before you begin, as an administrator:
Complete the basic setup of the SRX Series Firewall.
Identify the domain names to be associated with Juniper Secure Connect. These are mapped to the Juniper Secure Connect Connection profiles which are URLs in FQDN or FQDN/RealmName format. See Table 2, for the sample domain names and certificates used in this configuration.
If you need to map multiple domain names to a single certificate, generate the certificate externally. If you have a Let’s Encrypt certificate, ensure that you generate it using Let’s Encrypt server. See ACME Protocol.
|
Domain Name |
Certificate |
|---|---|
|
srx.example.com |
internal |
| gateway.example.com |
external |
| gateway1.example.com |
letsencrypt |
| gateway2.example.com |
letsencrypt |
Configure the gateway certificates for the domain names mentioned in the URLs on your SRX Series Firewall using the configuration statements.
To configure multiple certificates and multiple domains using the CLI:
-
Log in to your SRX Series Firewall using the CLI.
-
If you need an self-signed certificate, generate a public key infrastructure (PKI) public/private key pair for a local digital certificate in the SRX Series Firewall.
user@host> request security pki generate-key-pair size 2048 type rsa certificate-id internal
user@host> request security pki generate-key-pair size 2048 type rsa certificate-id external
-
Manually generate and load self-signed certificate(s). You can also load an externally generated CA signed certificate.
user@host> request security pki local-certificate generate-self-signed certificate-id internal subject DC=example.com CN=srx domain-name srx.example.com
user@host> request security pki local-certificate generate-self-signed certificate-id external subject DC=example.com CN=gateway domain-name gateway.example.com
-
Enter the configuration mode.
-
Configure multiple domains using
virtual-domainoption and associate them with the corresponding certificate. Ensure to generate the certificate externally. If you have a Let’s Encrypt certificate, see ACME Protocol.user@host# set system services web-management https virtual-domain srx.example.com pki-local-certificate internal user@host# set system services web-management https virtual-domain gateway.example.com pki-local-certificate external
-
Configure a certificate with multiple domain-names. Ensure that you generate these certificates separately. See ACME Protocol.
user@host# set system services web-management https virtual-domain gateway1.example.com pki-local-certificate letsencrypt
user@host# set system services web-management https virtual-domain gateway2.example.com pki-local-certificate letsencrypt
-
When you complete configuring the feature on your device, enter
commitfrom configuration mode.
Your end users can now use the corresponding certificates to initiate a connection. This ensures that when the Juniper Secure Connect application initiates a connection, server-side certificate is validated and trusted if that corresponding certificate is loaded in the Juniper Secure Connect client.
Get Familiar with Juniper Secure Connect Wizard on J-Web
If you plan to use J-Web, get familiar with Juniper Secure Connect Wizard on J-Web. Juniper Secure Connect lets you create a remote access VPN tunnel between the remote user and the internal network in a few steps with an intuitive, easy to use VPN wizard in J-Web.
When you navigate to VPN > IPsec VPN and select Create VPN > Remote Access > Juniper Secure Connect, the Create Remote Access (Juniper Secure Connect) page appears as shown in Figure 5.
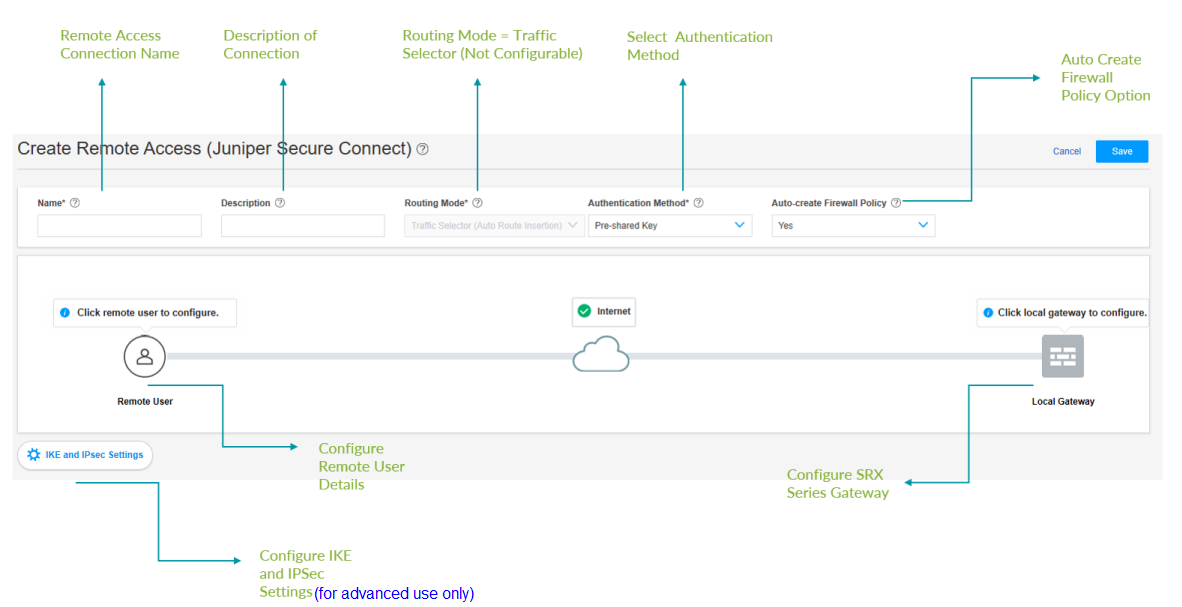
The VPN configuration wizard allows you to configure Juniper Secure Connect in just few steps as shown in Table 3.
|
Options |
What You Configure Here |
|---|---|
|
Name |
Name for the remote access connection. This name will be displayed on the Juniper Secure Connect application on remote client device when you do not select a default profile. Example: When you do not use a default profile: https://<srx-series-device-ip-address>/<remote access connection name>) When you use a default profile: https://<srx-series-device-ip-address>/). |
|
Description |
Description of remote access connection. |
|
Routing Mode |
Routing Mode is set to Traffic Selector (Auto Route Insertion) by default. You cannot change this option. |
|
Authentication Method |
Pre-shared: This authentication method is simple and easy to use, but it is less secure than the certificates. If you select pre-shared option, you can use:
|
|
Certificate-based: This authentication method using Extensible Authentication Protocol (EAP). If you select certificate-based option, you can use:
|
|
|
Auto-create Firewall Policy |
Option for auto-creating a firewall policy. |
|
Remote User |
|
|
Local Gateway |
|
|
IKE and IPSec |
|
Now that you have an understanding of the configuration options. let's get started with the configuration.
Based on the authentication method you have selected, see either of these topics:
Gateway Certificate Warning Messages
When the user initiates a connection, the application validates whether the gateway certificate is valid. In this section, you'll see different warning messages related to the gateway certificate.
If the SRX Series Firewall has a system-generated certificate enabled, it cannot establish any connection with the application.
To know more about a valid gateway certificate, we recommend that you understand different warning messages you see on the Juniper Secure Connect application.
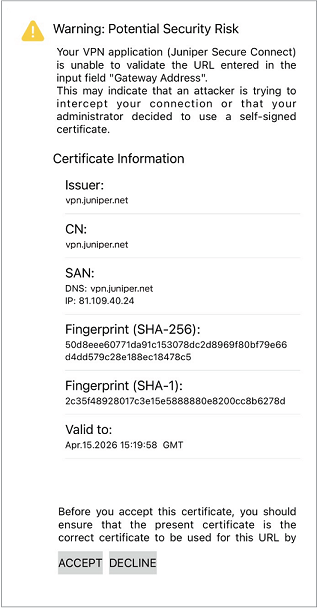
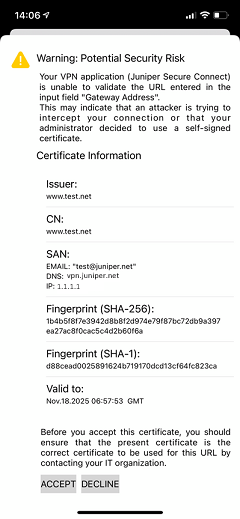
If the gateway uses a certificate where the root certificate has not been distributed to the application (Create Installation Packages for Juniper Secure Connect Rollout on Windows and Create Rollout Packages for Juniper Secure Connect Installation on macOS), you will be prompted with a warning message shown in Figure 6, Figure 7, Figure 8, and Figure 9 based on the platform where the Juniper Secure Connect application is installed.
Figure 6 is a sample warning message on Windows platform if the application does not have a root certificate.
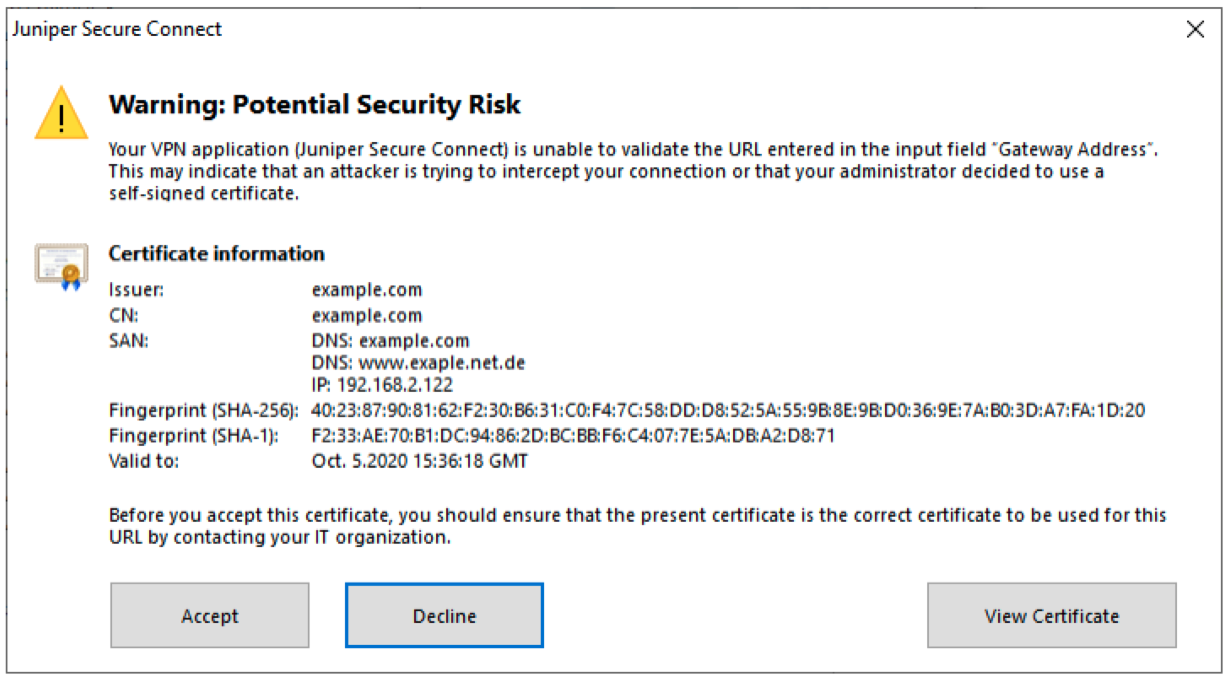
Figure 7 is a sample warning message on macOS platform if the application does not have a root certificate.

Figure 8 is a sample warning message on Android platform if the application does not have a root certificate.
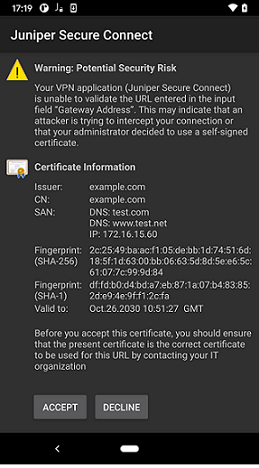
Figure 9 is a sample warning message on iOS platform if the application does not have a root certificate.
The appearance of the warning message page depends on where the Juniper Secure Connect application is installed.
Details displayed on the warning message depend on the certificate that is configured on Juniper Secure Connect. Table 4 shows the details in a sample warning message.
|
Certificate Information |
Description |
|---|---|
|
Issuer |
Name of the certificate issuer. |
|
CN |
Common name (CN) represents the subject name in the certificate. |
|
SAN |
Subject Alternative Name (SAN) represents the subject alternative name in the certificate. |
|
Fingerprint |
Represents the finger and thumbprint section in the certificate. |
As a system administrator, you must inform your users what action they need to take when a warning message is displayed. The easiest way to validate your certificate as an administrator is to click on the warning message in the browser toolbar to display the certificate details as shown in Figure 2 and Figure 3 or load the correct root certificate on the client.
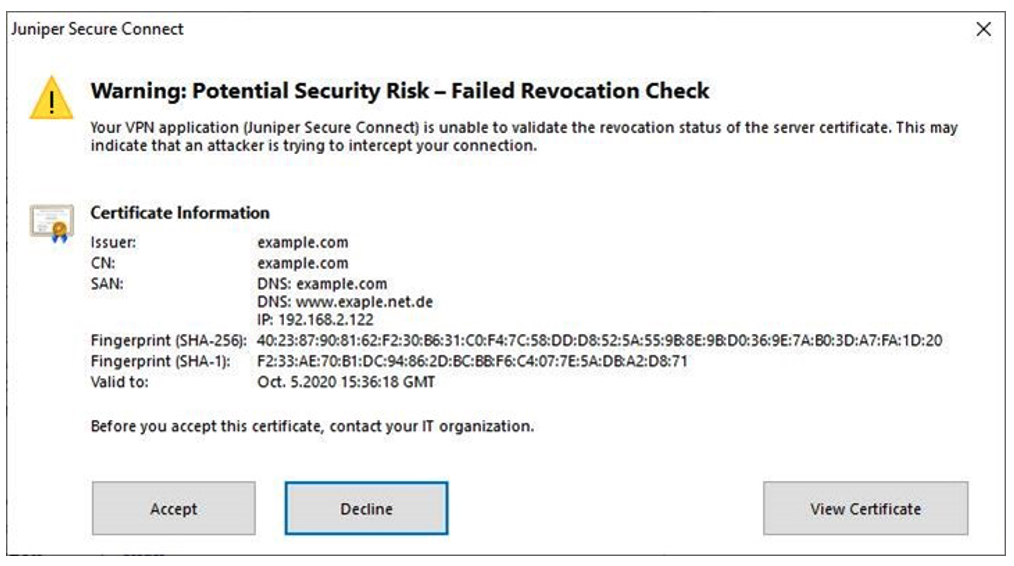
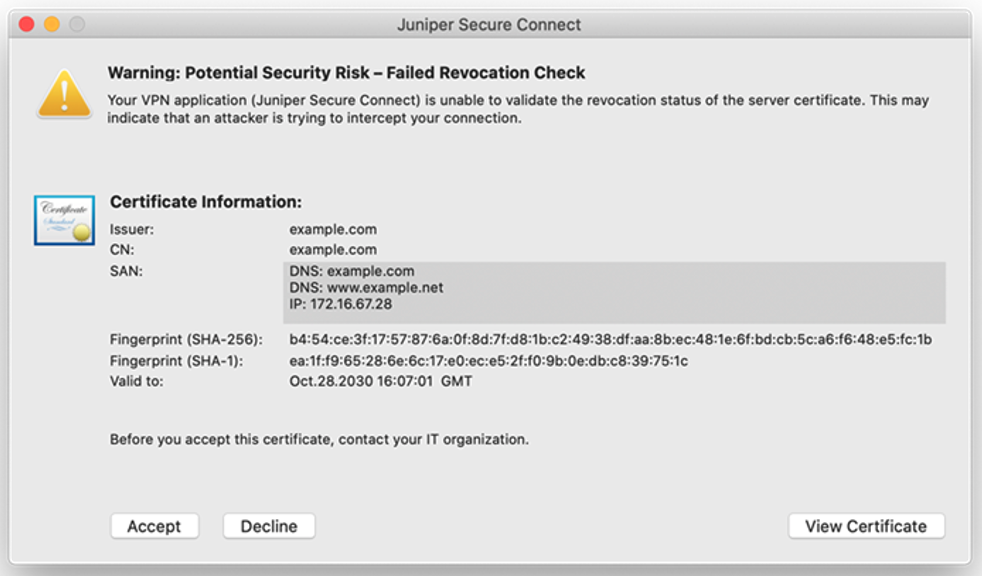
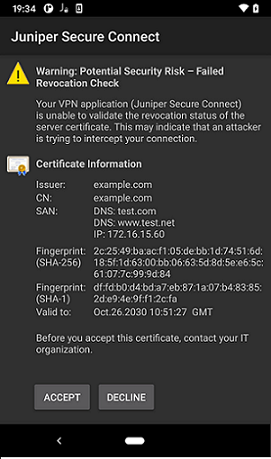
Users notice the following warning message if the application cannot reach the CRL (Certificate Revocation List) of the signed certificate loaded on the SRX Series Firewall.
When you use a signed certificate and if the Juniper Secure Connect application cannot reach the Certificate Revocation List (CRL) to validate the gateway certificate, the application prompts the users with the warning message (as shown in Figure 10, Figure 11, Figure 12, and Figure 13) each time they connect until the CRL is accessible. Juniper Networks strongly recommends you or your user to report this error message to your IT organization to solve the CRL download failure.