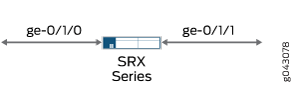
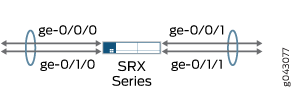
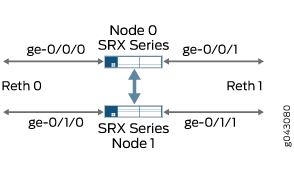
安全设备上的安全线路
了解安全设备上的安全线路
到达特定接口的流量可以通过另一个接口原封不动地转发。这种接口映射(称为 安全线路)允许将 SRX 系列部署在网络流量路径中,而无需更改路由表或重新配置相邻设备。 图 1 显示了使用安全线路的 SRX 系列的典型路径部署。
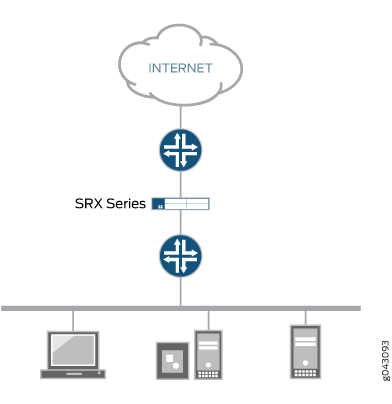
安全线路映射两个对等接口。它与透明模式和路由模式的不同之处在于,没有交换或路由查找来转发流量。只要安全策略允许流量,到达一个对等接口的数据包就会立即原封不动地从另一个对等接口转发出去。不会对数据包做出路由或交换决策。返回流量也保持不变。
在 [] 层次结构级别使用 语句edit security forwarding-options配置secure-wire安全线路映射;必须指定两个以太网逻辑接口。以太网逻辑接口必须配置有 family ethernet-switching ,并且每对接口必须属于 VLAN。接口必须绑定到安全区域,并且必须将安全策略配置为允许区域之间的流量。
此功能仅在以太网逻辑接口上可用;支持 IPv4 和 IPv6 流量。您可以为接入或中继模式配置接口。安全线路支持机箱群集冗余以太网接口。此功能不支持透明模式下不支持的安全功能,包括 NAT 和 IPsec VPN。
Secure Wire 支持第 7 层功能,如 AppSecure、SSL 代理、 内容安全和 IPS/IDP。
安全线路是 SRX 系列防火墙上提供点对点连接的第 2 层透明模式的特例。这意味着理想情况下,安全线路的两个接口必须直接连接到第 3 层实体,例如路由器或主机。安全线接口可以连接到交换机。但是,请注意,仅当安全策略允许流量时,安全线路接口才会将所有到达的流量转发到对等接口。
安全线路可以与第 3 层模式共存。虽然您可以同时配置第 2 层和第 3 层接口,但流量转发在第 2 层和第 3 层接口上独立进行。
安全线路可以与第 2 层透明模式共存。如果同一 SRX 系列防火墙上存在这两种功能,则需要在不同的 VLAN 中配置这些功能。
安全线路不支持集成路由和桥接 (IRB) 接口。
另请参阅
示例:通过接入模式安全线路接口简化 SRX 系列防火墙部署
如果要将 SRX 系列防火墙连接到其他网络设备,则可以使用安全线路来简化设备在网络中的部署。无需更改 SRX 系列防火墙上的路由或转发表,也无需重新配置相邻设备。只要安全策略或其他安全功能允许,安全线路就允许在 SRX 系列防火墙上的指定接入模式接口之间原封不动地转发流量。如果要通过接入模式接口将 SRX 系列防火墙连接到其他网络设备,请遵循此示例。
此示例说明如何为两个接入模式接口配置安全线路映射。此配置适用于未标记用户流量的场景。
要求
配置此功能之前,不需要除设备初始化之外的特殊配置。
概述
此示例配置将接口 ge-0/0/3.0 映射到接口 ge-0/0/4.0 的安全线路接入 sw。两个对等接口配置为接入模式。VLAN ID 10 是为 vlan-10 和接入模式接口配置的。
必须为 VLAN 配置特定的 VLAN ID。
配置
程序
CLI 快速配置
从 Junos OS 15.1X49-D10 版和 Junos OS 17.3R1 版开始,某些第 2 层 CLI 配置语句得到增强,一些命令也发生了更改。有关已修改的层次结构的详细信息,请参见 安全设备的增强型第 2 层 CLI 配置语句和命令更改。
下面显示的配置语句适用于 Junos OS 15.1X49-D10 或更高版本以及 Junos OS 17.3R1 版本。
要快速配置此示例,请复制以下命令,将其粘贴到文本文件中,删除所有换行符,更改详细信息,以便与网络配置匹配,将命令复制并粘贴到 [edit] 层级的 CLI 中,然后从配置模式进入 commit 。
在交换模式下,以太网交换接口不得位于安全区域。必须使用 global-mode (Protocols) 命令为安全区域中允许的以太网交换接口启用透明模式。
set vlans vlan-10 vlan-id 10
set interfaces ge-0/0/3 unit 0 family ethernet-switching interface-mode access
set interfaces ge-0/0/3 unit 0 family ethernet-switching vlan members 10
set interfaces ge-0/0/4 unit 0 family ethernet-switching interface-mode access
set interfaces ge-0/0/4 unit 0 family ethernet-switching vlan members 10
set security forwarding-options secure-wire access-sw interface [ge-0/0/3.0 ge-0/0/4.0]
set security zones security-zone trust interfaces ge-0/0/3.0
set security zones security-zone untrust interfaces ge-0/0/4.0
set security address-book book1 address mail-untrust 203.0.113.1
set security address-book book1 attach zone untrust
set security address-book book2 address mail-trust 192.168.1.1
set security address-book book2 attach zone trust
set security policies from-zone trust to-zone untrust policy permit-mail match source-address mail-trust
set security policies from-zone trust to-zone untrust policy permit-mail match destination-address mail-untrust
set security policies from-zone trust to-zone untrust policy permit-mail match application junos-mail
set security policies from-zone trust to-zone untrust policy permit-mail then permit
分步过程
下面的示例要求您在各个配置层级中进行导航。有关操作说明,请参阅 CLI 用户指南中的在配置模式下使用 CLI 编辑器。
要为接入模式接口配置安全线路映射,请执行以下操作:
配置 VLAN。
[edit vlans vlan-10]
user@host# set vlan-id 10
配置接入模式接口。
[edit interfaces ]
user@host# set ge-0/0/3 unit 0 family ethernet-switching interface-mode access
user@host# set ge-0/0/4 unit 0 family ethernet-switching interface-mode access
user@host# set ge-0/0/3 unit 0 family ethernet-switching vlan members 10
user@host# set ge-0/0/4 unit 0 family ethernet-switching vlan members 10
配置安全线路映射。
[edit security forwarding-options]
user@host# set secure-wire access-sw interface [ge-0/0/3.0 ge-0/0/4.0]
配置安全区域。
[edit security zones]
user@host# set security-zone trust interfaces ge-0/0/3.0
user@host# set security-zone untrust interfaces ge-0/0/4.0
创建通讯簿条目。将安全区域附加到通讯簿。
[edit security address-book book1]
user@host# set address mail-untrust 203.0.113.1
user@host# set attach zone untrust
[edit security address-book book1]
user@host# set address mail-trust 192.168.1.1
user@host# set attach zone trust
配置安全策略以允许邮件流量。
[edit security policies from-zone trust to-zone untrust]
user@host# set policy permit-mail match source-address mail-trust
user@host# set policy permit-mail match destination-address mail-untrust
user@host# set policy permit-mail match application junos-mail
user@host# set policy permit-mail then permit
结果
在配置模式下,输入 show vlans 、show interfaces、show security forwarding-options 和 show security zones 命令,以确认您的配置。如果输出未显示预期的配置,请重复此示例中的说明,以便进行更正。
user@host# show vlans
    vlan-10 {
        vlan-id 10;
    }
    user@host# show interfaces
    ge-0/0/3 {
        unit 0 {
            family ethernet-switching {
                interface-mode access;
                vlan {
                    members 10;
                }
            }
        }
    }
    ge-0/0/4 {
        unit 0 {
            family ethernet-switching {
                interface-mode access;
                vlan {
                    members 10;
                }
            }
        }
    }
    user@host# show security forwarding-options
    secure-wire {
        access-sw {
            interface [ ge-0/0/3.0 ge-0/0/4.0 ];
        }
    }
user@host# show security zones
    security-zone trust {
        interfaces {
            ge-0/0/3.0;
        }
    }
    security-zone untrust {
        interfaces {
            ge-0/0/4.0;
        }
    }
user@host# show security policies
from-zone trust to-zone untrust {
    policy permit-mail {
        match {
            source-address mail-trust;
            destination-address mail-untrust;
            application junos-mail;
        }
        then {
            permit;
        }
    }
}
如果完成设备配置,请从配置模式输入 commit。
验证
确认配置工作正常。
验证安全线路映射
目的
验证安全线路映射。
操作
在操作模式下,输入 show security forwarding-options secure-wire 命令。
user@host> show security forward-options secure-wire
Secure wire                       Interface       Link   Interface       Link
access-sw                         ge-0/0/3.0      down   ge-0/0/4.0      down
Total secure wires: 1
验证 VLAN
目的
验证 VLAN。
操作
在操作模式下,输入 show vlans vlan-10 命令。
user@host> show vlans vlan-10
Routing instance        VLAN name            Tag     Interfaces
default-switch          vlan-10               10          ge-0/0/3.0
                                                          ge-0/0/4.0
验证策略配置
目的
验证有关安全策略的信息。
操作
在操作模式下,输入 show security policies detail 命令。
user@host> show security policies detail
Default policy: deny-all
Pre ID default policy: permit-all
Policy: permit-mail, action-type: permit, State: enabled, Index: 4, Scope Policy: 0
  Policy Type: Configured
  Sequence number: 1
  From zone: trust, To zone: untrust
  Source vrf group:
    any
  Destination vrf group:
    any
  Source addresses:
    mail-trust(book2): 192.168.1.1/32
  Destination addresses:
    mail-untrust(book1): 203.0.113.1/32
  Application: junos-mail
    IP protocol: tcp, ALG: 0, Inactivity timeout: 1800
      Source port range: [0-0]
      Destination ports: 25
Per policy TCP Options: SYN check: No, SEQ check: No, Window scale: No示例:通过中继模式接口上的安全线路简化 SRX 系列防火墙部署
如果要将 SRX 系列防火墙连接到其他网络设备,则可以使用安全线路来简化设备在网络中的部署。无需更改 SRX 系列防火墙上的路由或转发表,也无需重新配置相邻设备。只要安全策略或其他安全功能允许,安全线路就允许在 SRX 系列防火墙上的指定中继模式接口之间原封不动地转发流量。如果要通过中继模式接口将 SRX 系列防火墙连接到其他网络设备,请遵循此示例。
要求
配置此功能之前,不需要除设备初始化之外的特殊配置。
概述
此示例配置将接口 ge-0/1/0.0 映射到接口 ge-0/1/1.0 的安全线中继 sw。两个对等接口配置为中继模式,可承载 VLAN ID 标记为 100 到 102 的用户流量。VLAN ID 列表 100-102 是为 VLAN vlan-100 和中继模式接口配置的。
必须为 VLAN 配置特定的 VLAN ID。
配置
程序
CLI 快速配置
要快速配置此示例,请复制以下命令,将其粘贴到文本文件中,删除所有换行符,更改详细信息,以便与网络配置匹配,将命令复制并粘贴到 [edit] 层级的 CLI 中,然后从配置模式进入 commit 。
set vlans vlan-100 vlan members 100-102
set interfaces ge-0/1/0 unit 0 family ethernet-switching interface-mode trunk vlan members 100-102
set interfaces ge-0/1/1 unit 0 family ethernet-switching interface-mode trunk vlan members 100-102
set security forwarding-options secure-wire trunk-sw interface [ge-0/1/0.0 ge-0/1/1.0]
set security zones security-zone trust interfaces ge-0/1/0.0
set security zones security-zone untrust interfaces ge-0/1/1.0
set security policies default-policy permit-all
分步过程
下面的示例要求您在各个配置层级中进行导航。有关操作说明,请参阅 CLI 用户指南中的在配置模式下使用 CLI 编辑器。
要为中继模式接口配置安全线路映射:
配置 VLAN。
[edit vlans vlan-100]
user@host# set vlan members 100-102
配置中继模式接口。
[edit interfaces]
user@host# set ge-0/1/0 unit 0 family ethernet-switching interface-mode trunk vlan members 100-102
user@host# set ge-0/1/1 unit 0 family ethernet-switching interface-mode trunk vlan members 100-102
配置安全线路映射。
[edit security forwarding-options]
user@host# set secure-wire trunk-sw interface [ge-0/1/0.0 ge-0/1/1.0]
配置安全区域。
[edit security zones]
user@host# set security-zone trust interfaces ge-0/1/0.0
user@host# set security-zone untrust interfaces ge-0/1/1.0
配置安全策略以允许流量。
[edit security policies]
user@host# set default-policy permit-all
结果
在配置模式下,输入 show vlans 、show interfaces、show security forwarding-options 和 show security zones 命令,以确认您的配置。如果输出未显示预期的配置,请重复此示例中的说明,以便进行更正。
user@host# show vlans
    vlan-100 {
        vlan members 100-102;
    }
    user@host# show interfaces
    ge-0/1/0 {
        unit 0 {
            family ethernet-switching {
                interface-mode trunk;
                vlan members 100-102;
            }
        }
    }
    ge-0/1/1 {
        unit 0 {
            family ethernet-switching {
                interface-mode trunk;
                vlan members 100-102;
            }
        }
    }
    user@host# show security forwarding-options
    secure-wire trunk-sw {
        interfaces [ge-0/1/0.0 ge-0/1/1.0];
    }
user@host# show security zones
    security-zone trust {
        interfaces {
            ge-0/1/0.0;
        }
    }
    security-zone untrust {
        interfaces {
            ge-0/1/1.0;
        }
    }
如果完成设备配置,请从配置模式输入 commit。
验证
确认配置工作正常。
验证安全线路映射
目的
验证安全线路映射。
操作
在操作模式下,输入 show security forwarding-options secure-wire 命令。
user@host> show security forward-options secure-wire
Secure wire                       Interface       Link   Interface       Link
trunk-sw                          ge-0/1/0.0      up     ge-0/1/1.0      up
Total secure wires: 1
验证 VLAN
目的
验证 VLAN。
操作
在操作模式下,输入 show vlans 命令。
user@host> show vlans
Routing instance        VLAN name            VLAN ID     Interfaces
default-switch          vlan-100-vlan-0100          100         ge-0/1/0.0
                                                             ge-0/1/1.0
default-switch          vlan-100-vlan-0101          101         ge-0/1/0.0
                                                             ge-0/1/1.0
default-switch          vlan-100-vlan-0102          102         ge-0/1/0.0
ge-0/1/1.0VLAN 会自动扩展,VLAN ID 列表中的每个 VLAN ID 对应一个 VLAN。
示例:通过聚合接口成员链路上的安全线路简化 SRX 系列防火墙部署
如果要将 SRX 系列防火墙连接到其他网络设备,则可以使用安全线路来简化设备在网络中的部署。无需更改 SRX 系列防火墙上的路由或转发表,也无需重新配置相邻设备。只要安全策略或其他安全功能允许,安全线路就允许在 SRX 系列防火墙上的指定聚合接口成员链路之间转发流量不变。如果要通过聚合接口成员链路将 SRX 系列防火墙连接到其他网络设备,请遵循此示例。
不支持 LACP。可以为链路束的成员链路配置安全线路映射,而不是直接映射聚合以太网接口。当 SRX 系列防火墙上的端口或接口处于中继模式时,设备不会传输 LACP PDU,并且会使 LACP 失败。您必须添加本机 VLAN 来保护线路接口,才能启动 LACP。
在 SRX210、SRX220、SRX240、SRX300、SRX320、SRX340、SRX345、SRX550 和 SRX650 设备上,当您创建具有两个或更多端口的聚合接口并将该系列设置为以太网交换时,如果捆绑包中的链路出现故障,则通过同一链路转发的流量将在两秒后重新路由。这会导致发送到链路的流量中断,直到重新路由完成。
要求
配置此功能之前,不需要除设备初始化之外的特殊配置。
概述
此示例为两个聚合以太网接口链路束配置安全线路,每个捆绑包有两个链路。使用每个聚合以太网链路束中的一个链路配置两条独立的安全线路 ae-link1 和 ae-link2。此静态映射要求两个链路束具有相同数量的链路。
对于链路束,安全线路映射的所有逻辑接口必须属于同一 VLAN。为 VLAN VLAN-10 和逻辑接口配置 VLAN ID 10。链路束的所有逻辑接口必须属于同一安全区域。
必须为 VLAN 配置特定的 VLAN ID 或 VLAN ID 列表。
配置
程序
CLI 快速配置
要快速配置此示例,请复制以下命令,将其粘贴到文本文件中,删除所有换行符,更改详细信息,以便与网络配置匹配,将命令复制并粘贴到 [edit] 层级的 CLI 中,然后从配置模式进入 commit 。
set vlans vlan-10 vlan-id 10
set interfaces ge-0/0/0 unit 0 family ethernet-switching interface-mode access vlan-id 10
set interfaces ge-0/0/1 unit 0 family ethernet-switching interface-mode access vlan-id 10
set interfaces ge-0/1/0 unit 0 family ethernet-switching interface-mode access vlan-id 10
set interfaces ge-0/1/1 unit 0 family ethernet-switching interface-mode access vlan-id 10
set security forwarding-options secure-wire ae-link1-sw interface [ge-0/1/0.0 ge-0/1/1.0]
set security forwarding-options secure-wire ae-link2-sw interface [ge-0/0/0.0 ge-0/0/1.0]
set security zones security-zone trust interfaces ge-0/0/0.0
set security zones security-zone trust interfaces ge-0/1/0.0
set security zones security-zone untrust interfaces ge-0/0/1.0
set security zones security-zone untrust interfaces ge-0/1/1.0
set security policies default-policy permit-all
分步过程
下面的示例要求您在各个配置层级中进行导航。有关操作说明,请参阅 CLI 用户指南中的在配置模式下使用 CLI 编辑器。
要为聚合接口成员链路配置安全线路映射,请执行以下操作:
配置 VLAN。
[edit vlans vlan-10]
user@host# set vlan-id10
配置接口。
[edit interfaces ]
user@host# set ge-0/0/0 unit 0 family ethernet-switching interface-mode access vlan-id 10
user@host# set ge-0/0/1 unit 0 family ethernet-switching interface-mode access vlan-id 10
user@host# set ge-0/1/0 unit 0 family ethernet-switching interface-mode access vlan-id 10
user@host# set ge-0/1/1 unit 0 family ethernet-switching interface-mode access vlan-id 10
配置安全线路映射。
[edit security forwarding-options]
user@host# set secure-wire ae-link1-sw interface [ ge-0/1/0.0 ge-0/1/1.0 ]
user@host# set secure-wire ae-link2-sw interface [ ge-0/0/0.0 ge-0/0/1.0 ]
配置安全区域。
[edit security zones]
user@host# set security-zone trust interfaces ge-0/0/0.0
user@host# set security-zone trust interfaces ge-0/1/0.0
user@host# set security-zone untrust interfaces ge-0/0/1.0
user@host# set security-zone untrust interfaces ge-0/1/1.0
配置安全策略以允许流量。
[edit security policies]
user@host# set default-policy permit-all
结果
在配置模式下,输入 show vlans 、show interfaces、show security forwarding-options 和 show security zones 命令,以确认您的配置。如果输出未显示预期的配置,请重复此示例中的说明,以便进行更正。
user@host# show vlans
    vlan-10 {
        vlan-id 10;
    }
    user@host# show interfaces
    ge-0/0/0 {
        unit 0 {
            family ethernet-switching {
                interface-mode access;
                vlan-id 10;
            }
        }
    }
    ge-0/0/1 {
        unit 0 {
            family ethernet-switching {
                interface-mode access;
                vlan-id 10;
            }
        }
    }
    ge-0/1/0 {
        unit 0 {
            family ethernet-switching {
                interface-mode access;
                vlan-id 10;
            }
        }
    }
    ge-0/1/1{
        unit 0 {
            family ethernet-switching {
                interface-mode access;
                vlan-id 10;
            }
        }
    }
    user@host# show security forwarding-options
    secure-wire ae-link1-sw {
        interfaces [ge-0/1/0.0 ge-0/1/1.0];
    }
    secure-wire ae-link2-sw {
        interfaces [ge-0/0/0.0 ge-0/0/1.0];
    }
user@host# show security zones
    security-zone trust {
        interfaces {
            ge-0/0/0.0;
            ge-0/1/0.0;
        }
    }
    security-zone untrust {
        interfaces {
            ge-0/0/1.0;
            ge-0/1/1.0;
        }
    }
如果完成设备配置,请从配置模式输入 commit。
验证
确认配置工作正常。
验证安全线路映射
目的
验证安全线路映射。
操作
在操作模式下,输入 show security forwarding-options secure-wire 命令。
user@host> show security forward-options secure-wire
Secure wire                       Interface       Link   Interface       Link
ae-link1-sw                       ge-0/1/0.0      up     ge-0/1/1.0      up
ae-link2-sw                       ge-0/0/0.0      up     ge-0/0/1.0      up
Total secure wires: 2
示例:通过冗余以太网接口上的安全线路简化机箱群集部署
如果要将 SRX 系列机箱群集连接到其他网络设备,则可以使用安全线路来简化群集在网络中的部署。无需更改群集上的路由或转发表,也无需重新配置相邻设备。只要安全策略或其他安全功能允许,安全线路就允许在 SRX 系列机箱群集上的指定冗余以太网接口之间原封不动地转发流量。如果要通过冗余以太网接口将 SRX 系列机箱群集连接到其他网络设备,请遵循此示例。
要求
准备工作:
在机箱群集中连接一对相同的 SRX 系列防火墙 。
配置机箱群集节点 ID 和群集 ID。
设置机箱群集中冗余以太网接口的数量。
配置机箱群集结构。
配置机箱群集冗余组(此示例使用冗余组 1)。
有关更多信息,请参阅 SRX 系列设备的机箱群集用户指南。
概述
机箱群集中的冗余以太网接口支持安全线路。必须在同一冗余组中配置两个冗余以太网接口。如果发生故障转移,两个冗余以太网接口必须一起进行故障转移。
不支持冗余以太网链路聚合组 (LAG) 的安全线映射。不支持 LACP。
此示例配置将入口接口 reth0.0 映射到出口接口 reth1.0 的安全线 reth-sw。每个冗余以太网接口由两个子接口组成,一个子接口位于机箱群集的每个节点上。两个冗余以太网接口配置为接入模式。VLAN ID 10 是为 VLAN VLAN-10 和冗余以太网接口配置的。
必须为 VLAN 配置特定的 VLAN ID 或 VLAN ID 列表。
配置
程序
CLI 快速配置
要快速配置此示例,请复制以下命令,将其粘贴到文本文件中,删除所有换行符,更改详细信息,以便与网络配置匹配,将命令复制并粘贴到 [edit] 层级的 CLI 中,然后从配置模式进入 commit 。
set vlans vlan-10 vlan-id 10
set interfaces ge-0/0/0 gigether-options redundant-parent reth0
set interfaces ge-0/0/1 gigether-options redundant-parent reth1
set interfaces ge-0/1/0 gigether-options redundant-parent reth0
set interfaces ge-0/1/1 gigether-options redundant-parent reth1
set interfaces reth0 unit 0 family ethernet-switching interface-mode access vlan-id 10
set interfaces reth1 unit 0 family ethernet-switching interface-mode access vlan-id 10
set interfaces reth0 redundant-ether-options redundancy-group 1
set interfaces reth1 redundant-ether-options redundancy-group 1
set security forwarding-options secure-wire reth-sw interface [reth0.0 reth1.0]
set security zones security-zone trust interfaces reth0.0
set security zones security-zone untrust interfaces reth1.0
set security policies default-policy permit-all
分步过程
下面的示例要求您在各个配置层级中进行导航。有关操作说明,请参阅 CLI 用户指南中的在配置模式下使用 CLI 编辑器。
要为机箱群集冗余以太网接口配置安全线路映射:
配置 VLAN。
[edit vlans vlan-10]
user@host# set vlan-id 10
配置冗余以太网接口。
[edit interfaces ]
user@host# set ge-0/0/0 gigether-options redundant-parent reth0
user@host# set ge-0/0/1 gigether-options redundant-parent reth1
user@host# set ge-0/1/0 gigether-options redundant-parent reth0
user@host# set ge-0/1/1 gigether-options redundant-parent reth1
user@host#set reth0 unit 0 family ethernet-switching interface-mode access vlan-id 10
user@host#set reth1 unit 0 family ethernet-switching interface-mode access vlan-id 10
user@host# set reth0 redundant-ether-options redundancy-group 1
user@host# set reth1 redundant-ether-options redundancy-group 1
配置安全线路映射。
[edit security forwarding-options]
user@host# set secure-wire reth-sw interface [reth0.0 reth1.0]
配置安全区域。
[edit security zones]
user@host# set security-zone trust interfaces reth0.0
user@host# set security-zone untrust interfaces reth1.0
配置安全策略以允许流量。
[edit security policies]
user@host# set default-policy permit-all
结果
在配置模式下,输入 show vlans 、show interfaces、show security forwarding-options 和 show security zones 命令,以确认您的配置。如果输出未显示预期的配置,请重复此示例中的说明,以便进行更正。
user@host# show vlans
    vlan-10 {
        vlan-id 10;
    }
    user@host# show interfaces
    ge-0/0/0 {
        gigether-options {
            redundant-parent reth0;
        }
    }
    ge-0/0/1 {
        gigether-options {
            redundant-parent reth1;
        }
    }
    ge-0/1/0 {
        gigether-options {
            redundant-parent reth0;
        }
    }
    ge-0/1/1 {
        gigether-options {
            redundant-parent reth1;
        }
    }
    reth0 {
        redundant-ether-options {
            redundancy-group 1;
        }
        unit 0 {
            family ethernet-switching {
                interface-mode access;
                vlan-id 10;
            }
        }
    }
    reth1 {
        redundant-ether-options {
            redundancy-group 1;
        }
        unit 0 {
            family ethernet-switching {
                interface-mode access;
                vlan-id 10;
            }
        }
    }
    user@host# show security forwarding-options
    secure-wire reth-sw {
        interfaces [reth0.0 reth1.0];
    }
user@host# show security zones
    security-zone trust {
        interfaces {
            reth0.0;
        }
    }
    security-zone untrust {
        interfaces {
            reth1.0;
        }
    }
如果完成设备配置,请从配置模式输入 commit。
验证
确认配置工作正常。
验证安全线路映射
目的
验证安全线路映射。
操作
在操作模式下,输入 show security forwarding-options secure-wire 命令。
user@host> show security forward-options secure-wire
node0:
--------------------------------------------------------------------------
Secure wire                       Interface       Link   Interface       Link
reth-sw                           reth0.0         up     reth1.0         up

Total secure wires: 1

node1:
--------------------------------------------------------------------------
Secure wire                       Interface       Link   Interface       Link
reth-sw                           reth0.0         up     reth1.0         up

Total secure wires: 1
示例:通过聚合冗余以太网接口上的安全线路简化机箱群集部署
如果要将 SRX 系列机箱群集连接到其他网络设备,则可以使用安全线路来简化群集在网络中的部署。无需更改群集上的路由或转发表,也无需重新配置相邻设备。只要安全策略或其他安全功能允许,安全线路就允许在 SRX 系列机箱群集上的指定冗余以太网接口之间原封不动地转发流量。如果要通过聚合冗余以太网接口将 SRX 系列机箱群集连接到其他网络设备,请遵循此示例。
不能为冗余以太网接口链路聚合组 (LAG) 配置安全线路。对于此示例中显示的安全线路映射,SRX 系列机箱群集上没有 LAG 配置。每个冗余以太网接口由两个子接口组成,一个子接口位于机箱群集的每个节点上。连接到 SRX 系列集群的上游或下游设备上的用户可在 LAG 中配置冗余以太网接口子链路。
要求
准备工作:
在机箱群集中连接一对相同的 SRX 系列防火墙 。
配置机箱群集节点 ID 和群集 ID。
设置机箱群集中冗余以太网接口的数量。
配置机箱群集结构。
配置机箱群集冗余组(在本例中,使用冗余组 1)。
有关更多信息,请参阅 SRX 系列设备的机箱群集用户指南。
概述
此示例为四个冗余以太网接口配置安全线路:reth0、reth1、reth2 和 reth3。每个冗余以太网接口由两个子接口组成,一个子接口位于机箱群集的每个节点上。所有四个冗余以太网接口必须位于同一个 VLAN 中 — 在本例中,VLAN 为 vlan-0。其中两个冗余以太网接口 reth0.0 和 reth2.0 分配给信任区域,而另外两个接口 reth1.0 和 reth3.0 分配给不信任区域。
此示例配置以下安全线路:
RETH-SW1 将接口 RETH0.0 映射到接口 RETH1.0
RETH-SW2 映射接口 RETH2.0 至 RETH3.0
所有冗余以太网接口均配置为接入模式。VLAN ID 10 是为 VLAN VLAN-0 和冗余以太网接口配置的。
必须为 VLAN 配置特定的 VLAN ID 或 VLAN ID 列表。
拓扑学
图 6 显示了在安全线路配置 RETH-SW1 和 RETH-SW2 中映射的冗余以太网接口子链路。每个冗余以太网接口由两个子接口组成,一个子接口位于机箱群集的每个节点上。
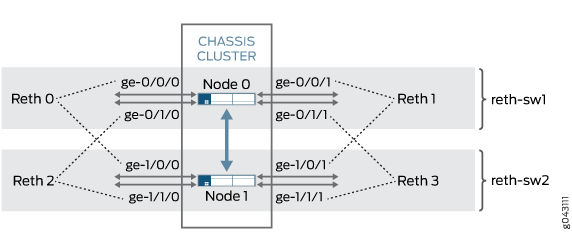
只要 LAG 不跨越机箱群集节点,连接到 SRX 系列群集的上游或下游设备上的用户就可以在 LAG 中配置冗余以太网接口子链路。例如,节点 0 上的 ge-0/0/0 和 ge-0/1/0 以及 ge-0/0/1 和 ge-0/1/1 可以在连接的设备上配置为 LAG。同样,节点 1 上的 ge-1/0/0 和 ge-1/1/0 以及 ge-1/0/1 和 ge-1/1/1 都可以配置为已连接设备上的 LAG。
配置
程序
CLI 快速配置
要快速配置此示例,请复制以下命令,将其粘贴到文本文件中,删除所有换行符,更改详细信息,以便与网络配置匹配,将命令复制并粘贴到 [edit] 层级的 CLI 中,然后从配置模式进入 commit 。
set vlans vlan-0 vlan-id 10
set interfaces ge-0/0/0 gigether-options redundant-parent reth0
set interfaces ge-0/0/1 gigether-options redundant-parent reth1
set interfaces ge-0/1/0 gigether-options redundant-parent reth2
set interfaces ge-0/1/1 gigether-options redundant-parent reth3
set interfaces ge-1/0/0 gigether-options redundant-parent reth0
set interfaces ge-1/0/1 gigether-options redundant-parent reth1
set interfaces ge-1/1/0 gigether-options redundant-parent reth2
set interfaces ge-1/1/1 gigether-options redundant-parent reth3
set interfaces reth0 unit 0 family ethernet-switching interface-mode access vlan-id 10
set interfaces reth1 unit 0 family ethernet-switching interface-mode access vlan-id 10
set interfaces reth2 unit 0 family ethernet-switching interface-mode access vlan-id 10
set interfaces reth3 unit 0 family ethernet-switching interface-mode access vlan-id 10
set interfaces reth0 redundant-ether-options redundancy-group 1
set interfaces reth1 redundant-ether-options redundancy-group 1
set interfaces reth2 redundant-ether-options redundancy-group 1
set interfaces reth3 redundant-ether-options redundancy-group 1
set security forwarding-options secure-wire reth-sw1 interface [reth0.0 reth1.0]
set security forwarding-options secure-wire reth-sw2 interface [reth2.0 reth3.0]
set security zones security-zone trust interfaces reth0.0
set security zones security-zone trust interfaces reth2.0
set security zones security-zone untrust interfaces reth1.0
set security zones security-zone untrust interfaces reth3.0
set security policies default-policy permit-all
分步过程
下面的示例要求您在各个配置层级中进行导航。有关操作说明,请参阅 CLI 用户指南中的在配置模式下使用 CLI 编辑器。
要为聚合接口成员链路配置安全线路映射,请执行以下操作:
配置 VLAN。
[edit vlans vlan-0]
user@host# set vlan-id 10
配置冗余以太网接口。
[edit interfaces ]
user@host# set ge-0/0/0 gigether-options redundant-parent reth0
user@host# set ge-0/0/1 gigether-options redundant-parent reth1
user@host# set ge-0/1/0 gigether-options redundant-parent reth2
user@host# set ge-0/1/1 gigether-options redundant-parent reth3
user@host# set ge-1/0/0 gigether-options redundant-parent reth0
user@host# set ge-1/0/1 gigether-options redundant-parent reth1
user@host# set ge-1/1/0 gigether-options redundant-parent reth2
user@host# set ge-1/1/1 gigether-options redundant-parent reth3
user@host# set reth0 unit 0 family ethernet-switching interface-mode access vlan-id 10
user@host# set reth1 unit 0 family ethernet-switching interface-mode access vlan-id 10
user@host# set reth2 unit 0 family ethernet-switching interface-mode access vlan-id 10
user@host# set reth3 unit 0 family ethernet-switching interface-mode access vlan-id 10
user@host# set reth0 redundant-ether-options redundancy-group 1
user@host# set reth1 redundant-ether-options redundancy-group 1
user@host# set reth2 redundant-ether-options redundancy-group 1
user@host# set reth3 redundant-ether-options redundancy-group 1
配置安全线路映射。
[edit security forwarding-options]
user@host# set secure-wire reth-sw1 interface [reth0.0 reth1.0]
user@host# set secure-wire reth-sw2 interface [reth2.0 reth3.0]
配置安全区域。
[edit security zones]
user@host# set security-zone trust interfaces reth0.0
user@host# set security-zone trust interfaces reth2.0
user@host# set security-zone untrust interfaces reth1.0
user@host# set security-zone untrust interfaces reth3.0
配置安全策略以允许流量。
[edit security policies]
user@host# set default-policy permit-all
结果
在配置模式下,输入 show vlans 、show interfaces、show security forwarding-options 和 show security zones 命令,以确认您的配置。如果输出未显示预期的配置,请重复此示例中的说明,以便进行更正。
user@host# show vlans
    vlan-0 {
        vlan-id 10;
    }
    user@host# show interfaces
    ge-0/0/0 {
        gigether-options {
            redundant-parent reth0;
        }
    }
    ge-0/0/1 {
        gigether-options {
            redundant-parent reth1;
        }
    }
    ge-0/1/0 {
        gigether-options {
            redundant-parent reth2;
        }
    }
    ge-0/1/1 {
        gigether-options {
            redundant-parent reth3;
        }
    }
    ge-1/0/0 {
        gigether-options {
            redundant-parent reth0;
        }
    }
    ge-1/0/1 {
        gigether-options {
            redundant-parent reth1;
        }
    }
    ge-1/1/0 {
        gigether-options {
            redundant-parent reth2;
        }
    }
    ge-1/1/1 {
        gigether-options {
            redundant-parent reth3;
        }
    }
    reth0 {
        redundant-ether-options {
            redundancy-group 1;
        }
        unit 0 {
            family ethernet-switching {
                interface-mode access;
                vlan-id 10;
            }
        }
    }
    reth1 {
        redundant-ether-options {
            redundancy-group 1;
        }
        unit 0 {
            family ethernet-switching {
                interface-mode access;
                vlan-id 10;
            }
        }
    }
    reth2 {
        redundant-ether-options {
            redundancy-group 1;
        }
        unit 0 {
            family ethernet-switching {
                interface-mode access;
                vlan-id 10;
            }
        }
    }
    reth3 {
        redundant-ether-options {
            redundancy-group 1;
        }
        unit 0 {
            family ethernet-switching {
                interface-mode access;
                vlan-id 10;
            }
        }
    }
    user@host# show security forwarding-options
    secure-wire reth-sw1 {
        interfaces [reth0.0 reth1.0];
    }
    secure-wire reth-sw2 {
        interfaces [reth2.0 reth3.0];
    }
user@host# show security zones
    security-zone trust {
        interfaces {
            reth0.0;
            reth2.0;
        }
    }
    security-zone untrust {
        interfaces {
            reth1.0;
            reth3.0;
        }
    }
如果完成设备配置,请从配置模式输入 commit。
验证
确认配置工作正常。
验证安全线路映射
目的
验证安全线路映射。
操作
在操作模式下,输入 show security forwarding-options secure-wire 命令。
user@host> show security forward-options secure-wire
node0:
--------------------------------------------------------------------------
Secure wire                       Interface       Link   Interface       Link
reth-sw1                          reth0.0         up     reth1.0         up
reth-sw2                          reth2.0         up     reth3.0         up

Total secure wires: 2

node1:
--------------------------------------------------------------------------
Secure wire                       Interface       Link   Interface       Link
reth-sw1                          reth0.0         up     reth1.0         up
reth-sw2                          reth2.0         up     reth3.0         up

Total secure wires: 2


