Related Documentation
Example: Configuring OSPF Stub and Totally Stubby Areas
This example shows how to configure an OSPF stub area and a totally stubby area to control the advertisement of external routes into an area.
Requirements
Before you begin:
- Configure the device interfaces. See the Router Interfaces or the Junos OS Interfaces Configuration Guide for Security Devices.
- Configure the router identifiers for the devices in your OSPF network. See Example: Configuring an OSPF Router Identifier.
- Control OSPF designated router election. See Example: Controlling OSPF Designated Router Election
- Configure a multiarea OSPF network. See Example: Configuring a Multiarea OSPF Network.
Overview
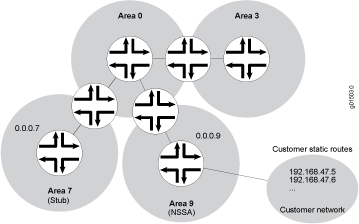
The backbone area, which is 0 in Figure 1, has a special function and is always assigned the area ID 0.0.0.0. Area IDs are unique numeric identifiers, in dotted decimal notation. Area IDs need only be unique within an autonomous system (AS). All other networks or areas (such as 3, 7, and 9) in the AS must be directly connected to the backbone area by area border routers (ABRs) that have interfaces in more than one area.
Stub areas are areas through which or into which OSPF does not flood AS external link-state advertisements (Type 5 LSAs). You might create stub areas when much of the topology database consists of AS external advertisements and you want to minimize the size of the topology databases on the internal routers in the stub area.
The following restrictions apply to stub areas:
- You cannot create a virtual link through a stub area.
- A stub area cannot contain an AS boundary router.
- You cannot configure the backbone as a stub area.
- You cannot configure an area as both a stub area and an not-so-stubby area (NSSA).
In this example, you configure each routing device in area 7 (area ID 0.0.0.7) as a stub router and some additional settings on the ABR:
- stub—Specifies that this area become a stub area and not be flooded with Type 5 LSAs. You must include the stub statement on all routing devices that are in area 7 because this area has no external connections.
- default-metric—Configures the ABR to generate a default route with a specified metric into the stub area. This default route enables packet forwarding from the stub area to external destinations. You configure this option only on the ABR. The ABR does not automatically generate a default route when attached to a stub. You must explicitly configure this option to generate a default route.
- no-summaries—(Optional) Prevents the ABR from advertising summary routes into the stub area by converting the stub area into a totally stubby area. If configured in combination with the default-metric statement, a totally stubby area only allows routes internal to the area and advertises the default route into the area. External routes and destinations to other areas are no longer summarized or allowed into a totally stubby area. Only the ABR requires this additional configuration because it is the only routing device within the totally stubby area that creates Type 3 LSAs used to receive and send traffic from outside of the area.
 | In Junos OS Release 8.5 and later, the following applies:
|
Figure 1: OSPF Network Topology with Stub Areas and NSSAs

Configuration
CLI Quick Configuration
- To quickly configure an OSPF stub area, copy the following
command and paste it into the CLI. You must configure all routing
devices that are part of the stub area.[edit] set protocols ospf area 0.0.0.7 stub
- To quickly configure the ABR to inject a default route
into the area, copy the following command and paste it into the CLI.
You apply this configuration only on the ABR.[edit] set protocols ospf area 0.0.0.7 stub default-metric 10
- (Optional) To quickly configure the ABR to restrict all
summary advertisements and allow only internal routes and default
route advertisements into the area, copy the following command and
paste it into the CLI. You apply this configuration only on the ABR.[edit] set protocols ospf area 0.0.0.7 stub no-summaries
Step-by-Step Procedure
To configure OSPF stub areas:
- On all routing devices in the area, configure an OSPF
stub area.

Note: To specify an OSPFv3 stub area, include the ospf3 statement at the [edit protocols] hierarchy level.
[edit]user@host# set protocols ospf area 0.0.0.7 stub - On the ABR, inject a default route into the area.[edit]user@host# set protocols ospf area 0.0.0.7 stub default-metric 10
- (Optional) On the ABR, restrict summary LSAs from entering
the area. This step converts the stub area into a totally stubby area.[edit]user@host# set protocols ospf area 0.0.0.7 stub no-summaries
- If you are done configuring the devices, commit the configuration.[edit]user@host# commit
Results
Confirm your configuration by entering the show protocols ospf command. If the output does not display the intended configuration, repeat the instructions in this example to correct the configuration.
Configuration on all routing devices:
Configuration on the ABR (the output also includes the optional setting):
To confirm your OSPFv3 configuration, enter the show protocols ospf3 command.
Verification
Confirm that the configuration is working properly.
Verifying the Interfaces in the Area
Purpose
Verify that the interface for OSPF has been configured for the appropriate area. Confirm that the output includes Stub as the type of OSPF area.
Action
From operational mode, enter the show ospf interface detail command for OSPFv2, and enter the show ospf3 interface detail command for OSPFv3.
Verifying the Type of OSPF Area
Purpose
Verify that the OSPF area is a stub area. Confirm that the output displays Normal Stub as the Stub type.
Action
From operational mode, enter the show ospf overview command for OSPFv2, and enter the show ospf3 overview command for OSPFv3.


