セッションスマートルーターでのIDPベースの脅威検知
侵入検出および防止(IDP)ポリシーを使用すると、ネットワーク トラフィックにさまざまな攻撃検出および防御技術を選択的に適用できます。アプリケーションポリシーでIDPを有効にすることで、Juniper Mist™ネットワークでスポークデバイスとして動作しているジュニパー®ネットワークスセッションスマート™ ルーターでIDPを有効にできます。SSRデバイスを持つIDPは、ローカルブレイクアウトトラフィックに有効です。
侵入検出とは、ネットワーク上で発生するイベントを監視し、セキュリティ ポリシーに対するインシデント、違反、または差し迫った脅威の兆候を分析するプロセスです。侵入防御とは、侵入検出を実施し、検知インシデントを阻止するプロセスのことです。詳細については、 侵入検出および防止の概要を参照してください。
IDPは計算量の多い機能です。ポリシーでIDPを有効にすると、SSR120などのエントリーレベルのSSRでパフォーマンスが低下する可能性があります。
セッションスマートルーターでのIDPベースの脅威検知については、次のビデオをご覧ください。
Hey everyone, today I want to show you how easy it is to deploy an AI-driven full-stack branch managed by the Mist Cloud. That is a whole branch network with access points, switches, and routers, all being managed by a single pane of glass, with artificial intelligence to alert you to any issues and easily find the root cause of those issues. In this demo, I will show you how Juniper Network's AI-driven full-stack branch simplifies all operational stages. Day zero design, day one deployment, and day two troubleshooting and maintenance. And also, I will show you how quickly this can be done.
All right, let's jump into it. Day zero design. When we talk about day zero operations, we are talking about all the planning and design that you can do prior to deploying any of the systems. These are the tasks that should be performed to make sure that the actual deployment day goes as smoothly as possible. The tasks you want to perform here are designing your network and staging your configuration. Using the Mist Cloud, you have one interface you can log into to configure all of the access points, switches, and routers in your whole network. You can use configuration templates with site-specific variables, so you only have to create a limited number of configurations for large deployments. I have seen deployments with 10,000 sites that only have six or so different designs. So, what do they do? They create six templates and apply the appropriate templates to the correct sites as they are onboarding. I have also dealt with deployments that have a couple variations between sites. Say, for example, they use different IP address schemes at each site. This is not a problem either because all we have to do is input a variable or placeholder like this, and then when we create the site, we say, for this variable, put in this value. With this technology, we can easily deploy 1,000 sites in minutes.
Once you have your network designed and you have staged your configuration, it is time to prepare for deployment day. Day one deployment. Day one stands for the first day of use for our new devices. This is the most exciting day in my opinion. You have a shiny new device and you just can't wait to pull it out of the box and use it. Unfortunately, a lot of times, this day can be ruined by the actual deployment and installation. Well, that does not have to be the case with Juniper Networks. With the AI-driven full-stack branch, you can easily deploy your network using QR codes or claim codes. First, if you didn't do it as part of your day zero tasks, create a site in the Mist cloud and assign the appropriate templates to that site. Then, just look at the back of your device for a QR code and scan it with an app or grab the claim code and add it to your inventory for that site. If you have a white box switcher router, then just copy a few lines of configuration to get that device speaking to the Mist cloud. Once your device connects up to the Mist cloud, it will see what site it is deployed to and grab the appropriate configuration. Another huge benefit of the configuration templates is that if you need to make any changes to your configuration, all you have to do is make the change in the template and the change will get pushed down to all of the appropriate devices. You no longer need to log into each individual device. With these powerful tools at your disposal, you can have a full site up in minutes. This is what we call true zero-touch provisioning.
Day two, maintenance and troubleshooting. Once you have your site deployed, then it just comes down to your normal day-to-day operations. This is what we call our day two operations. In the Mist ecosystem, we like to break our telemetry down to SLEs or service level experiences. These SLEs give you insight into the health of your network, devices, links and applications. They alert you to any issues impacting the user experience and provide insights into the root cause. The SLEs are impressive and very powerful, giving you experience insights across the network. But even more powerful is your AI virtual network assistant, Marvis. Marvis Actions proactively alert you to high priority issues impacting your network. This Marvis actions page is a great page to start your day off with, a cup of coffee view, so you can know where you need to spend your attention and solve issues before your customers even know. You can also chat with Marvis to ask questions about your network. Say, for example, you're getting complaints about an application not working. You can ask Marvis if the problem is something on your network, with your ISP or on the application itself. This saves hours of investigating to prove where the problem is and reduces your MTTI or mean time to innocence. Security is also managed by Mist and Marvis. Using the IDP and enhanced web filtering features in your SessionSmart routers, you leverage the Juniper IDP signature database, providing state-of-the-art protection against the most up-to-date vulnerabilities. The database contains definitions of attack objects and application signatures defined in the form of an IDP policy rule set that is updated regularly.By automatically downloading the latest definitions and application signatures, the SSR is able to provide cutting-edge security solutions for your network. When discovered, you can either have your router alert you to the vulnerability or block the traffic, giving you the network protection that you need without the need to purchase additional hardware.
Lastly, with all of this data and all of these cool tools, how can you share this information with interested parties and extend Mist into your business intelligence? This can be done with Premium Analytics. Premium Analytics is another tool that you can use to share with any decision maker, help them get the relevant information they need. Whether it's a CIO looking at further network investment, a branch manager looking at user experience, or a facilities management executive looking at real estate optimization and occupancy management. Premium Analytics provides long-term insights into your network with intuitive graphs and charts. So that was a very brief dive into what the Juniper Network AI-driven full-stack SD branch has to offer. To summarize, the AI-driven full-stack SD branch simplifies every stage of operations, design, deployment, maintenance, and troubleshooting, allowing for the best user experience for your network architects, engineers, operations folks, and end users. There is a lot more that you can do with the Mist Cloud and Mist AI than we have time to show you here. If you'd like to try this out for yourself, sign up for a demo or POC. Thank you for watching.
Juniper Mist クラウドは、次の IDP プロファイルをサポートしています。
-
[標準(Standard)]:標準プロファイルはデフォルト プロファイルであり、ジュニパーネットワークスが推奨する IDP シグネチャとルールのセットを表します。各攻撃タイプと重大度には、ジュニパーが定義した設定不可能なアクションがあり、IDPエンジンが攻撃を検出したときに適用します。可能なアクションは次のとおりです。
-
クライアントとサーバーのTCP接続を閉じます。
-
現在のパケットと後続のすべてのパケットをドロップします
-
アラートのみを送信します (追加のアクションはありません)。
-
-
アラート—アラートプロファイルは、重大度の低い攻撃にのみ適しています。IDPエンジンがネットワーク上で悪意のあるトラフィックを検出すると、システムはアラートを生成しますが、攻撃を防ぐための追加の対策は講じません。IDP の署名とルールは、標準プロファイルと同じです。
-
Strict—Strict プロファイルには、標準プロファイルと同様の IDP 署名とルールのセットが含まれます。ただし、システムが攻撃を検出すると、このプロファイルはネットワーク上で検出された悪意のあるトラフィックやその他の攻撃をアクティブにブロックします。
アプリケーション ポリシーに IDP プロファイルを適用できます。各プロファイルにはトラフィックアクションが関連付けられており、これらのアクションは、サービスまたはアプリケーションポリシーにルールセットを適用する方法を定義します。IDP プロファイルのアクションは事前設定されており、ユーザーが設定することはできません。
IDP ベースの脅威検出を設定するには:
-
Juniper Mist クラウド ポータルで、[組織> WAN Edge テンプレート(Organization WAN Edge Templates)] をクリックし、スポーク デバイスのテンプレートを選択します。
-
[WAN Edge テンプレート (WAN Edge Templates)] ページで、[ アプリケーション ポリシー (Applications Policies )] ペインまで下にスクロールします。ペインには、既存のアプリケーション ポリシーの一覧が表示されます。
-
[IDP 列] で、IDP プロファイルを選択します。たとえば、Internet-via-Hub-CBO ポリシーの場合は、IDP プロファイルの [アラート] を選択します。
図 1: IDP プロファイル (アラート) を構成する
を構成する
- 「 保存」をクリックします。
選択した IDP プロファイルは、すべてのスポーク デバイスに適用されます。
ポリシー・アクションがPERMITに設定されていることを確認します。そうしないと、IDP 設定が DENY ステートメントを上書きする可能性があります。
トラフィックがローカルLANまたはWANインターフェイス(LBOの場合)に誘導されないすべてのスポークデバイスでは、ハブデバイスにIDPサービスを追加する必要があります。この例では、オーバーレイVPNにトラフィックを誘導するため、リモートサイト(ハブ)にも変更を知らせる必要があります。
次のスニペットでは、IDP を有効にした後のスポーク デバイスでの転送パスの変更を確認できます。LANインターフェイス側では変更はありませんが、WAN側では、ANY-idp*という新しい自動サービスとSPOKE-LAN1-idp*というテナントが作成されます。また、システム内には2つのセッションがあります。もう一方の側、つまり、ハブデバイスは一致するテナント名「SPOKE-LAN1-idp*」を想定し、アプリケーション ポリシーで以前に使用されていた「SPOKE-LAN1」を使用しなくなります。
次の例は、デバイス上でローカルにアクセスできるセッションスマートルーターのプログラム可能なコマンドラインインターフェイス(PCLI)からのものです。
show service

============================================== ==================== ====================================================== ================= =========================== ======= ========== ============== ==============
Service Prefixes Transport Tenant Allowed Service-Policy State Sessions Tx Bandwidth Rx Bandwidth
============================================== ==================== ====================================================== ================= =========================== ======= ========== ============== ==============
ANY 0.0.0.0/0 - SPOKE-LAN1 ANY-sp
.
.
ANY-idp* 0.0.0.0/0 - SPOKE-LAN1-idp* ANY-sp Up 0 0 bps 0 bps
.
.

show sessions

====================================== ===== =============================== ================= ======================= ======================= ====== ======= ================= ========== ================= =========== =============== ========== =================== ========= =================
Session Id Dir Service Tenant Dev Name Intf Name VLAN Proto Src IP Src Port Dest IP Dest Port NAT IP NAT Port Payload Encrypted Timeout Uptime
====================================== ===== =============================== ================= ======================= ======================= ====== ======= ================= ========== ================= =========== =============== ========== =================== ========= =================
3e3bc1d9-3e6f-455b-87f8-902d459eec5e fwd ANY SPOKE-LAN1 ge-0-3 ge-0-3_1099 1099 ICMP 10.99.99.99 10 9.9.9.9 10 0.0.0.0 0 True 4 0 days 0:59:25
3e3bc1d9-3e6f-455b-87f8-902d459eec5e rev ANY SPOKE-LAN1 idp-in idp-in 0 ICMP 9.9.9.9 10 10.99.99.99 10 0.0.0.0 0 True 0 0 days 0:59:25
2d1251ac-1e3a-42b7-8d5b-83403be09677 fwd ANY-idp* SPOKE-LAN1-idp* idp-out idp-out 0 ICMP 10.99.99.99 10 9.9.9.9 10 0.0.0.0 0 True 4 0 days 0:59:25
2d1251ac-1e3a-42b7-8d5b-83403be09677 rev ANY-idp* SPOKE-LAN1-idp* ge-0-0 ge-0-0 0 UDP 192.168.129.191 16405 192.168.173.114 16414 0.0.0.0 0 True 0 0 days 0:59:25
この例でハブ デバイス側で一致するテナント名を設定するには、次の手順を使用します。
-
クラウド・ポータルJuniper Mist、「 組織 > ハブ・プロファイル 」をクリックし、プロファイルを選択します。たとえば、 hub1 という名前のプロファイルを選択します。
-
[Application Policies] セクションまで下にスクロールし、[IDP プロファイル] を [Spokes-to-Hub-LAN] と [Spokes-Traffic-CBO-on-Hub] に設定します。
図 2: ハブ デバイス側 での IDP プロファイルの設定
-
変更を保存します。
この手順では、両側のテナント名を同期し、ハブとスポーク間の通信を有効にします。
スポーク デバイスで初めて IDP 機能を有効にする場合は、メンテナンス ウィンドウで計画することをお勧めします。IDPエンジンの起動とLANからWANへのパスへの組み込み(つまり、サービスチェイニング)には数分かかる場合があり、進行中の通信が中断される可能性もあります。
サンプル攻撃を開始することで、IDP ベースのセキュリティ スキャナーの効果をテストできます。セキュリティ侵入テストに利用できるさまざまなオプションを備えた Kali Linux の Nikto などのツールを使用できます。
サンドボックスまたはラボ環境で仮想マシン(VM)デスクトップ(desktop1)を使用し、Nikto などの Web サーバー用のシンプルなセキュリティ スキャナーをインストールします。Niktoは、オープンソースのWebサーバーおよびWebアプリケーションスキャナーです。たとえば、Nikto は、ラボのローカルにあるハード化されていない Apache Tomcat Web サーバー (またはそれに相当するもの) に対して実行できます。このテストでは、IDP インスペクションのためにプレーンまたは暗号化されていない HTTP リクエストを送信できます。
次の例は、ツールをインストールし、HTTP サーバーの存在を確認してから、攻撃を開始するプロセスを示しています。
virsh console desktop1
apt-get update
apt-get install -y nikto
# Using your individual Lab-Access-IP we test if the labinternal
# Apache Tomcat Server of the Apache guacamole container is avail
wget http://172.16.77.155:8080
–2022-09-16 15:47:32– http://172.16.77.155:8080/
Connecting to 172.16.77.155:8080… connected.
HTTP request sent, awaiting response… 200
Length: unspecified [text/html]
Saving to: ‘index.html’

index.html [ <=> ] 10.92K –.-KB/s in 0s

2022-09-16 15:47:32 (85.3 MB/s) – ‘index.html’ saved [11184]

# Now start our security scanner for the first time
nikto -h http://172.16.77.155:8080
– Nikto v2.1.5
—————————————————————————
+ Target IP: 172.16.77.155
+ Target Hostname: 172.16.77.155
+ Target Port: 8080
+ Start Time: 2022-09-16 15:48:22 (GMT0)
—————————————————————————
+ Server: No banner retrieved
+ The anti-clickjacking X-Frame-Options header is not present.
+ No CGI Directories found (use ‘-C all’ to force check all possible dirs)
+ Server leaks inodes via ETags, header found with file /favicon.ico, fields: 0xW/21630 0x1556961512000
+ OSVDB-39272: favicon.ico file identifies this server as: Apache Tomcat
+ Allowed HTTP Methods: GET, HEAD, POST, PUT, DELETE, OPTIONS
+ OSVDB-397: HTTP method (‘Allow’ Header): ‘PUT’ method could allow clients to save files on the web server.
+ OSVDB-5646: HTTP method (‘Allow’ Header): ‘DELETE’ may allow clients to remove files on the web server.
+ /examples/servlets/index.html: Apache Tomcat default JSP pages present.
+ Cookie JSESSIONID created without the httponly flag
+ OSVDB-3720: /examples/jsp/snp/snoop.jsp: Displays information about page retrievals, including other users.
+ OSVDB-3233: /manager/manager-howto.html: Tomcat documentation found.
+ /manager/html: Default Tomcat Manager interface found
+ 6544 items checked: 1 error(s) and 10 item(s) reported on remote host
+ End Time: 2022-09-16 15:50:03 (GMT0) (101 seconds)
—————————————————————————
+ 1 host(s) tested
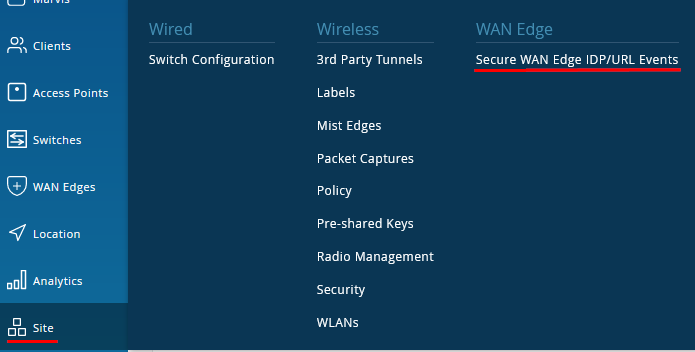
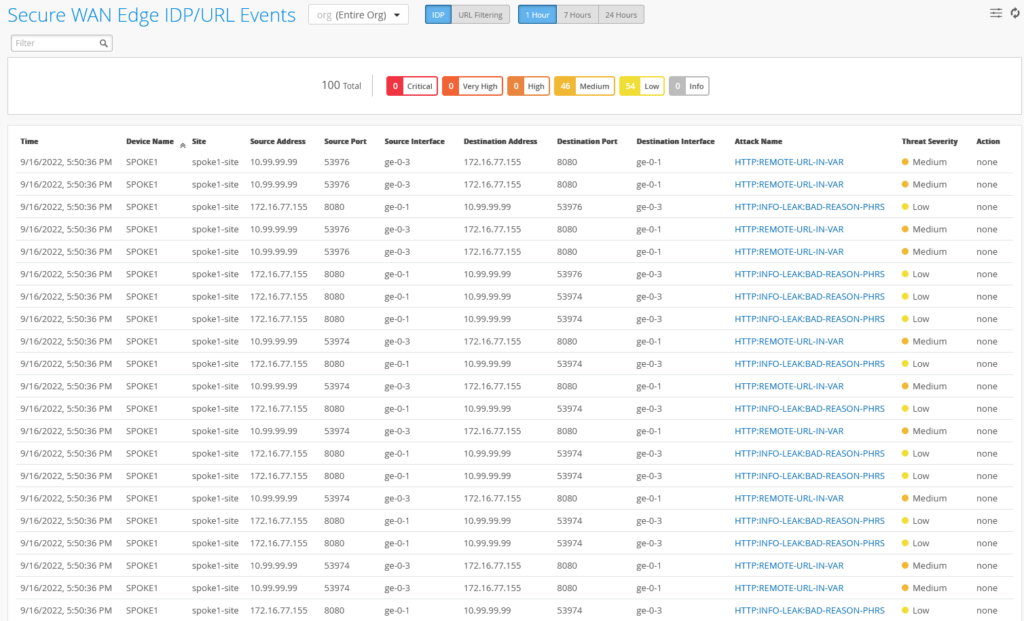
生成されたイベントを表示するには、[ サイト > セキュアWANエッジIDP/URLイベント(Site Secure WAN Edge IDP/URL Events)] に移動します。

図4 は、セッションスマートルーター用に生成されたIDPイベントを示しています。
 に対して生成される IDP イベント
前の例では、IDP プロファイルの種類 Alerts を使用して、イベントにパッシブ ログを使用しました。次に、IDP プロファイル タイプ Strict を使用して、イベントを停止または軽減します。Strict プロファイルを使用すると、IDP エンジンは検出された攻撃に対して TCP 接続を閉じます。
サンプルに示されているのと同じプロセスに従うことができます。ただし、今回はスポーク デバイス テンプレートを変更し、IDP プロファイルを Alert から Strict に変更します ( 図 5 参照)。

セキュリティ スキャナーを実行します。スキャナーはより多くのエラーを検出し、イベントが少ないため、実行に時間がかかることに気付くでしょう。
nikto -h http://172.16.77.155:8080
– Nikto v2.1.5
—————————————————————————
+ Target IP: 172.16.77.155
+ Target Hostname: 172.16.77.155
+ Target Port: 8080
+ Start Time: 2022-09-16 16:01:51 (GMT0)
—————————————————————————
+ Server: No banner retrieved
+ The anti-clickjacking X-Frame-Options header is not present.
+ No CGI Directories found (use ‘-C all’ to force check all possible dirs)
+ Server leaks inodes via ETags, header found with file /favicon.ico, fields: 0xW/21630 0x1556961512000
+ OSVDB-39272: favicon.ico file identifies this server as: Apache Tomcat
+ Allowed HTTP Methods: GET, HEAD, POST, PUT, DELETE, OPTIONS
+ OSVDB-397: HTTP method (‘Allow’ Header): ‘PUT’ method could allow clients to save files on the web server.
+ OSVDB-5646: HTTP method (‘Allow’ Header): ‘DELETE’ may allow clients to remove files on the web server.
+ /examples/servlets/index.html: Apache Tomcat default JSP pages present.
+ 6544 items checked: 5657 error(s) and 6 item(s) reported on remote host
+ End Time: 2022-09-16 16:05:27 (GMT0) (216 seconds)
—————————————————————————
+ 1 host(s) tested
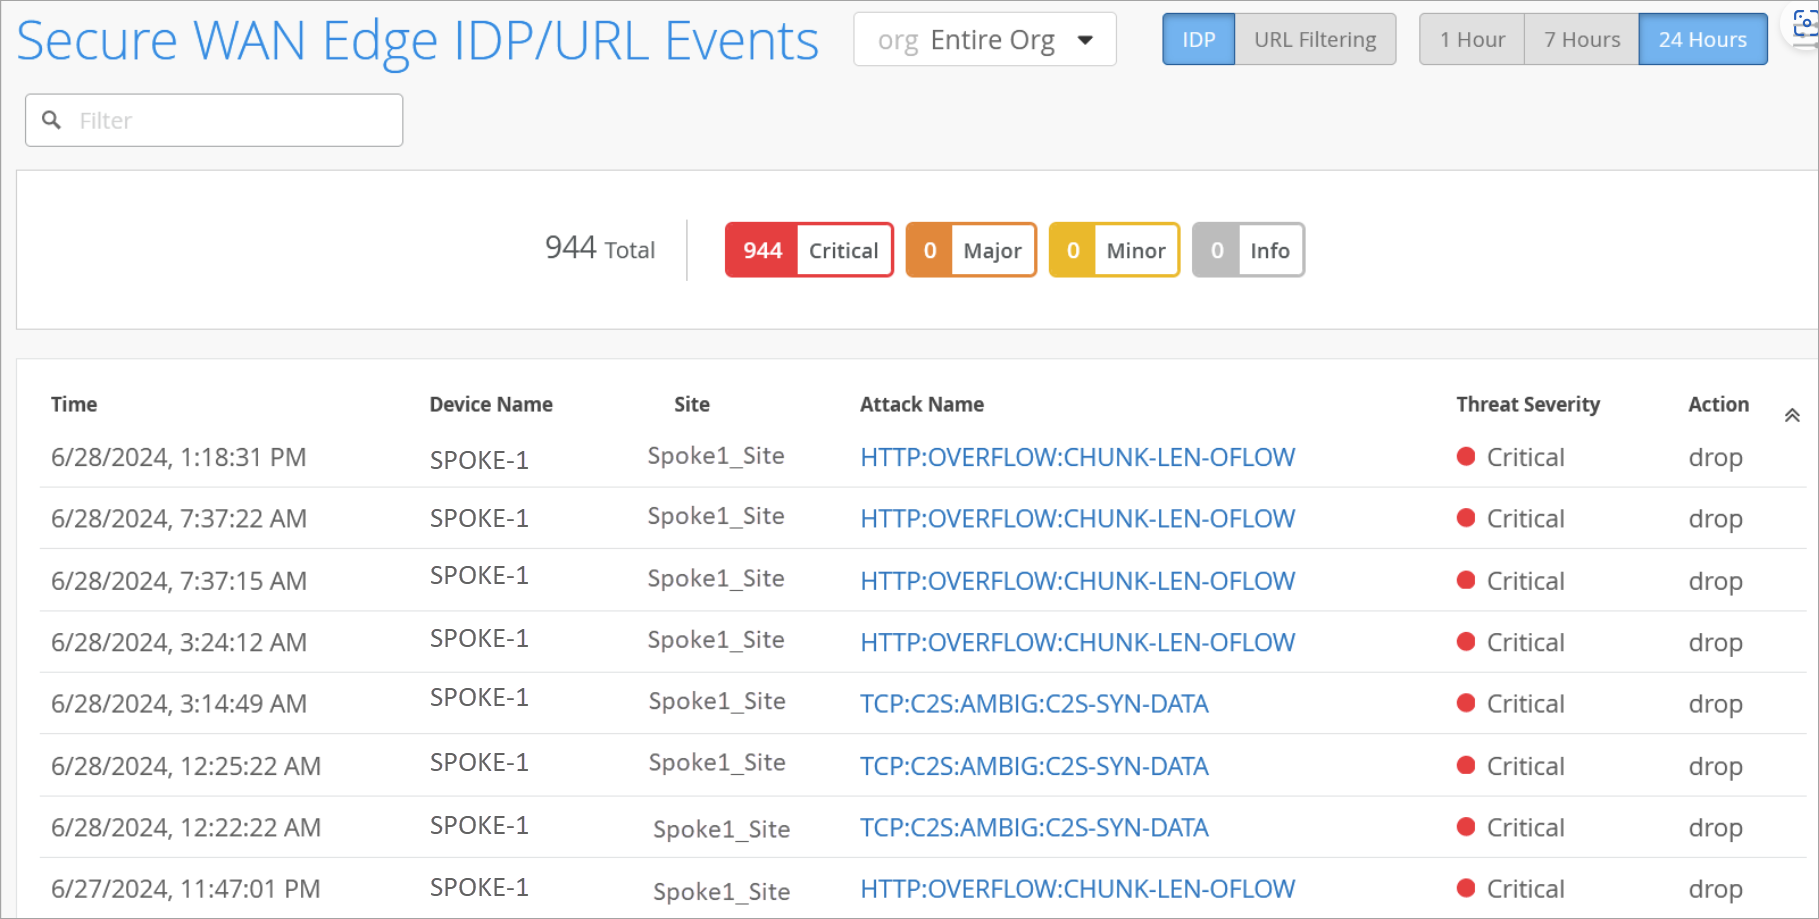
図 6 は、一部のイベントでは、アクションがセッションを閉じて脅威を軽減することであることを示しています ([ アクション ] フィールドの下)。
 に対して生成される IDP イベント
侵入検出および防止(IDP)バイパスプロファイル
IDP バイパスは、侵入防御システム(IPS)ルールと連携して機能し、不要なアラームが生成されるのを防ぎます。IDPプロファイルは、特定の宛先または攻撃タイプをIDPルールの一致から除外する場合に設定します。これにより、IDP が不要なアラームを生成するのを防ぎます。
IDP プロファイルには複数のバイパス プロファイルがあり、それぞれに複数のバイパス ルールがあります。
IDP バイパス プロファイルを作成するには:
Juniper Mistクラウドポータルで、 組織>WAN>アプリケーションポリシー>IDPバイパスプロファイルを選択します。
このページには、IDP バイパス プロファイルのリストが表示されます(使用可能な場合)
- 「 バイパス・プロファイルの追加 」をクリックして、プロファイルを作成します。
- [バイパス プロファイルの作成(Create Bypass Profile)] ウィンドウで、次の操作を行います。
- [名前を追加] をクリックします。英数字、アンダースコア、またはダッシュを使用し、63 文字を超えることはできません。
- 基本プロファイルを選択します。サポートされている基本プロファイルは次のとおりです。
- 標準
- 厳しい
- クリティカルのみ – SRX
IDP バイパス プロファイルを作成するには、ベース IDP プロファイルが必要です。
- 「 次へ」をクリックします。ポータルでルール ページが開き、IDP バイパス プロファイルのルールを定義できます。
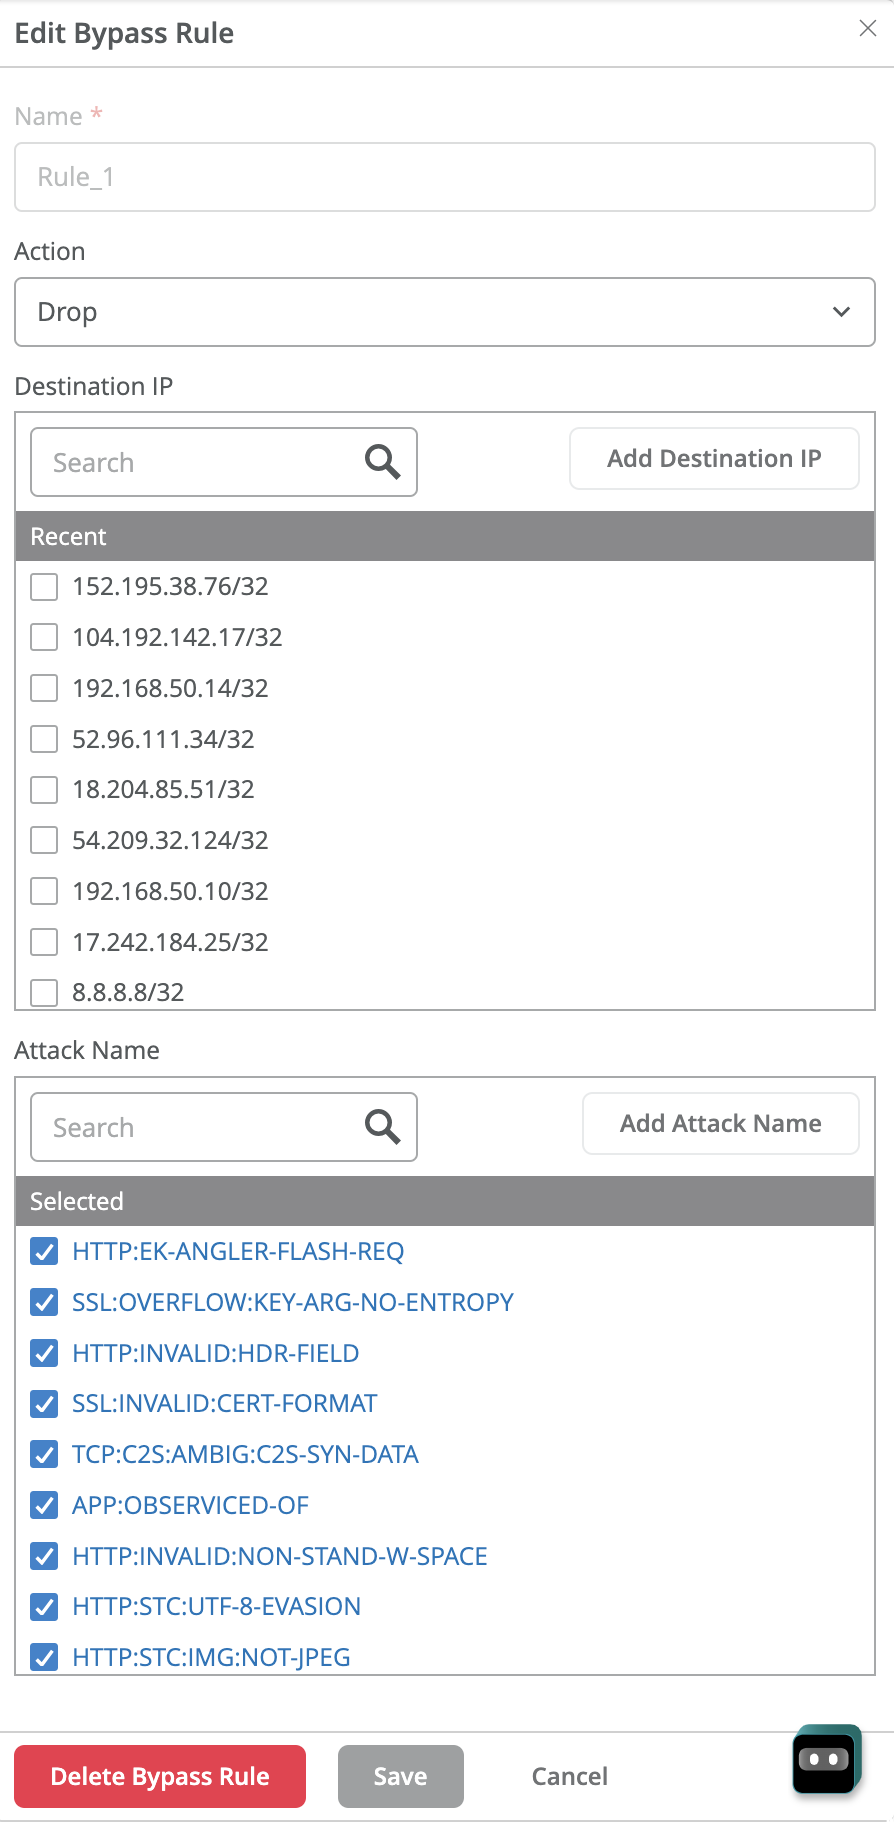
図 7: IDP バイパス プロファイル ルール

- アクション – 関連するトラフィックアクションを選択します。使用可能なオプションは、[ 変更]、[ ドロップ]、または [閉じる] です。
- 宛先 IP – 除外するトラフィックの送信先の IP アドレス。入力済みリストから 1 つ以上のIP アドレスを選択するか、[ 宛先 IPの追加(Add )] をクリックしてIP アドレスを入力できます。
- 攻撃名 – 表示されたリストから、指定された宛先アドレスに対して IDP が除外する攻撃を選択します。または、[ Add 攻撃名] をクリックして攻撃を開始することもできます。入力する攻撃は、ジュニパーネットワークス IPS シグネチャでサポートされているタイプである必要があります。
- 「 保存」をクリックします。
作成したルールが [IDP バイパス プロファイル(IDP Bypass Profile)] ペインに表示されます。次に、次の手順を使用して、任意の IDP プロファイルの適用と同様に、アプリケーション ポリシーに IDP バイパス プロファイルを適用する必要があります。
- Juniper Mist クラウド ポータルで、[組織> WAN Edge テンプレート(Organization WAN Edge Templates)] をクリックし、スポーク デバイスのテンプレートを選択します。
- [IDP] 列で、IDP プロファイルを選択します。たとえば、前の手順で作成した IDP バイパス プロファイルを選択します。
図 8: アプリケーション ポリシー
 での IDP バイパス プロファイルの適用
- アプリケーション ポリシーで他のオプションを設定したら、[ 保存(Save )] をクリックします。「 セッションスマートルーターでのアプリケーションポリシーの設定」を参照してください。
生成されたイベントを表示するには、[ サイト > セキュア WAN Edge IDP/URL イベント (Site Secure WAN Edge IDP/URL Events)] に移動します。
