예: IoT 디바이스 검색 및 정책 시행 구성
이 예제에서는 IoT 디바이스 검색 및 보안 정책 적용을 위해 보안 디바이스를 구성합니다.
개요
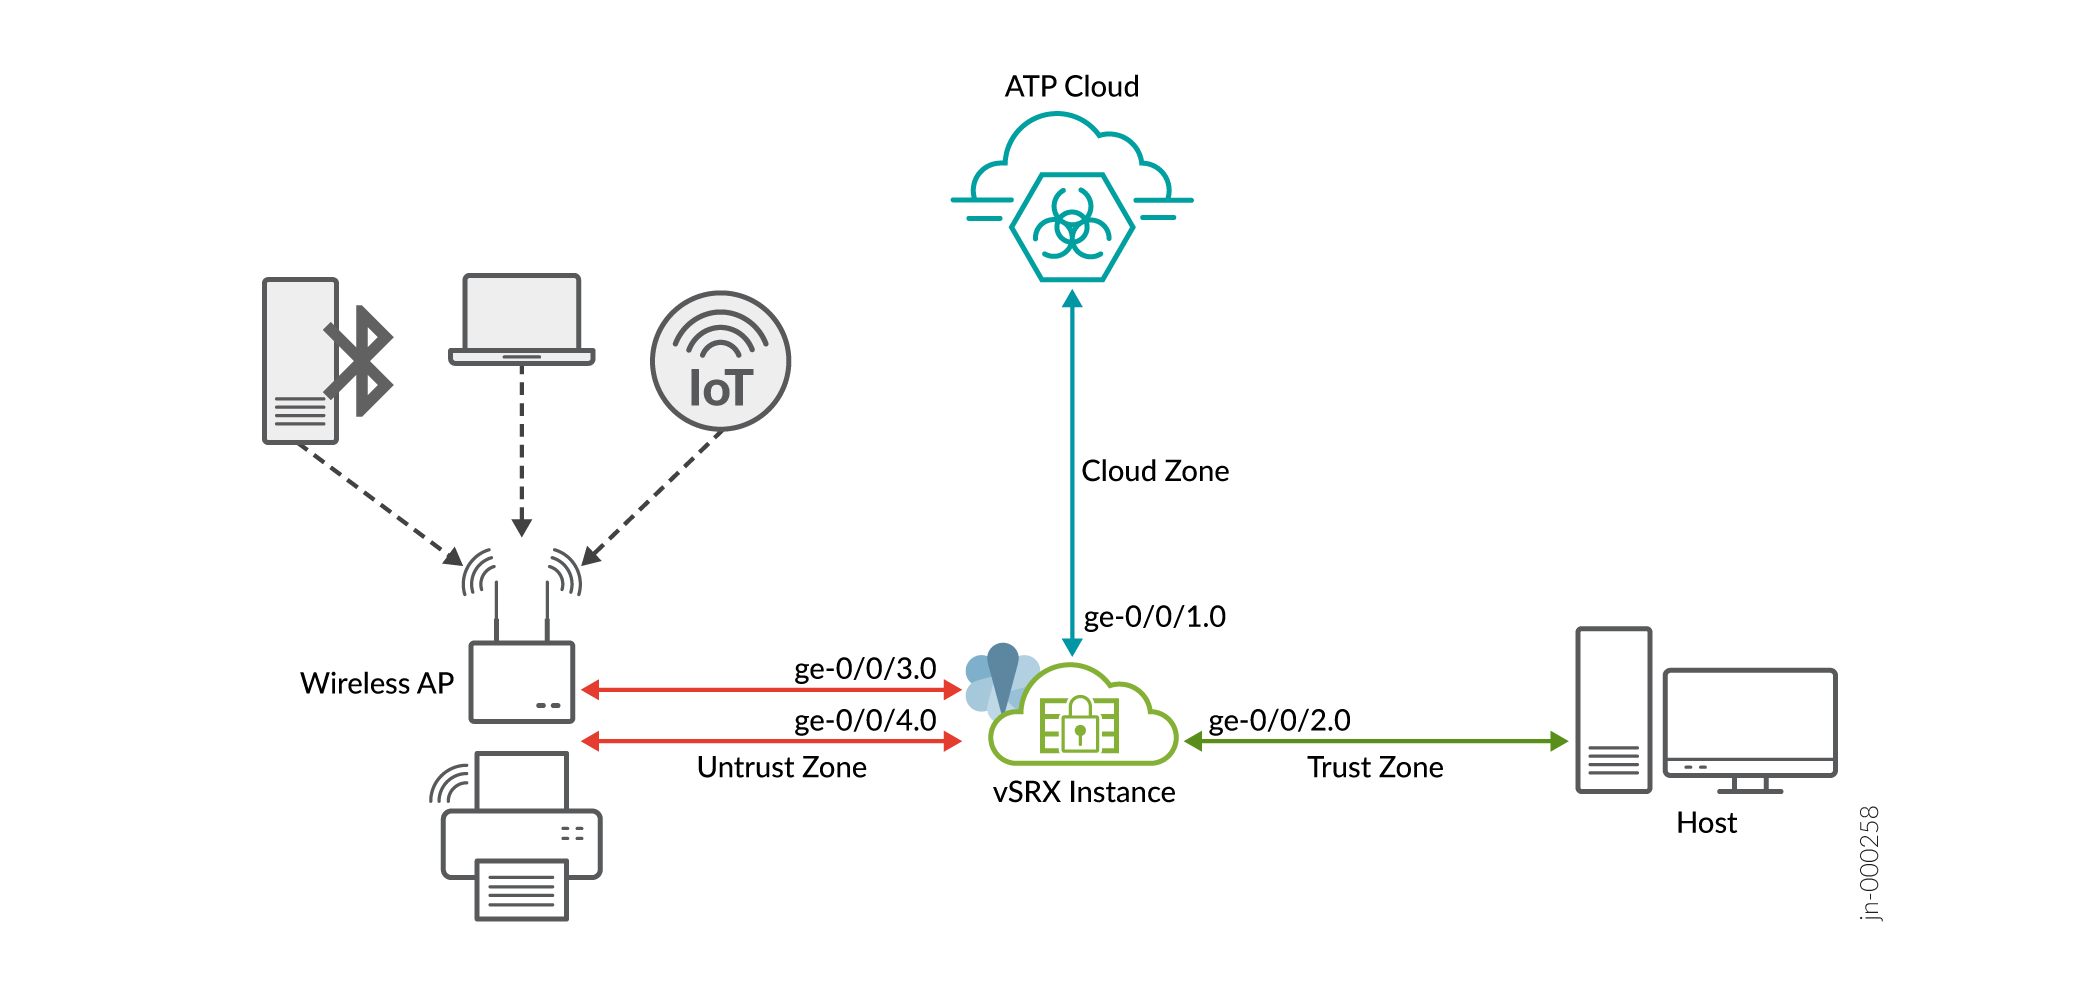
네트워크에서 IoT 디바이스 검색을 시작하려면 주니퍼 ATP 클라우드에 연결된 보안 디바이스만 있으면 됩니다. 그림 1 은 이 예에서 사용되는 토폴로지입니다.

토폴로지에서 볼 수 있듯이 네트워크에는 무선 액세스 포인트(AP)를 통해 SRX 시리즈 방화벽에 연결된 일부 IoT 디바이스가 포함됩니다. 보안 디바이스는 주니퍼 클라우드 ATP 서버 및 호스트 디바이스에 연결됩니다.
보안 디바이스는 IoT 디바이스 메타데이터를 수집하고 관련 정보를 주니퍼 ATP 클라우드로 스트리밍합니다. IoT 메타데이터 스트리밍을 사용하도록 설정하려면 보안 메타데이터 스트리밍 정책을 만들고 이러한 정책을 보안 정책에 연결해야 합니다. 주니퍼 클라우드 서버가 IoT 디바이스를 분류하기에 충분한 세부 정보를 확보하면 IoT 디바이스 트래픽 스트리밍이 자동으로 일시 정지됩니다.
주니퍼 ATP 클라우드는 IoT 디바이스를 검색하고 분류합니다. 검색된 IoT 디바이스의 인벤토리를 사용하여 동적 주소 그룹의 형태로 위협 피드를 만듭니다. 보안 디바이스가 동적 주소 그룹을 다운로드하면 동적 주소 그룹을 사용하여 IoT 트래픽에 대한 보안 정책을 생성하고 시행할 수 있습니다.
표 1 과 표 2 는 이 예에서 사용되는 매개 변수의 세부 정보를 제공합니다.
| 연결된 영역 | 인터페이스 | |
|---|---|---|
| 트러스트 | ge-0/0/2.0 | 클라이언트 디바이스 |
| 불신(untrust) | ge-0/0/4.0 및 ge-0/0/3.0 | IoT 트래픽을 관리하기 위한 액세스 포인트 |
| 구름 | ge-0/0/1.0 | 인터넷(주니퍼 ATP 클라우드 연결용) |
| 정책 | 유형 | 애플리케이션 |
|---|---|---|
| P1 | 보안 정책 | 트러스트 영역에서 언트러스트(untrust) 영역으로 트래픽을 허용합니다 |
| P2 | 보안 정책 | 언트러스트(untrust) 영역에서 트러스트 영역으로 트래픽을 허용합니다 |
| P3 | 보안 정책 | 신뢰 영역에서 클라우드 영역으로 트래픽을 허용합니다 |
| p1 | 메타데이터 스트리밍 정책 | 신뢰할 수 없는 영역을 트러스트 영역 트래픽 메타데이터로 스트리밍합니다 |
| p2 | 메타데이터 스트리밍 정책 | 트러스트 영역을 clod 영역 트래픽 메타데이터로 스트리밍합니다 |
| Unwanted_Applications | 글로벌 보안 정책 | 글로벌 컨텍스트의 위협 피드 및 보안 정책을 기반으로 IoT 트래픽을 방지합니다 |
요구 사항
- SRX 시리즈 방화벽 또는 NFX 시리즈 디바이스
- IoT 보안은 프리미엄 ATP 기능이며 자격을 얻으려면 프리미엄 라이선스(프리미엄 1 또는 프리미엄 2)가 필요합니다. 자세한 내용은 ATP 클라우드용 소프트웨어 라이선스를 확인하십시오.
- Junos OS 릴리스 22.1R1 이상
- 주니퍼 ATP(Advanced Threat Prevention) 클라우드 계정. 주니퍼 ATP(Advanced Threat Prevention) 클라우드 계정 등록을 참조하십시오.
주니퍼는 Junos OS 릴리스 22.1R1과 함께 vSRX 가상 방화벽 인스턴스를 사용하여 구성을 확인 및 테스트했습니다.
구성
SRX 시리즈 방화벽을 주니퍼 ATP 클라우드와 연동하도록 준비하십시오
주니퍼 ATP 클라우드 웹 포털과 통신하려면 SRX 시리즈 방화벽을 구성해야 합니다. SRX 시리즈 방화벽이 인터넷에 연결되어 있는지 확인하십시오. SRX 시리즈 방화벽을 인터넷으로 설정하려면 다음 초기 구성을 완료해야 합니다.
- 인터페이스를 구성합니다. 이 예시에서는 SRX 시리즈 방화벽에서 인터넷 연결 인터페이스로 인터페이스 ge-0/0/1.0을 사용하고 있습니다.
[edit]
user@host# set interfaces ge-0/0/1 unit 0 family inet address 10.50.50.1/24
- 인터페이스를 보안 영역에 추가합니다.
[edit]
user@host# set security zones security-zone cloud interfaces ge-0/0/1.0 host-inbound-traffic system-services all
user@host# set security zones security-zone cloud interfaces ge-0/0/1.0 host-inbound-traffic protocols all
- DNS를 구성합니다.
[edit]
user@host# set groups global system name-server 172.16.1.1
- NTP를 구성합니다.
[edit]
user@host# set groups global system processes ntp enable
user@host# set groups global system ntp boot-server 192.168.1.20
user@host# set groups global system ntp server 192.168.1.20
SRX 시리즈가 ge-0/0/1.0 인터페이스를 통해 인터넷에 연결되면 다음 단계를 진행합니다.
- 필요한 라이선스 및 애플리케이션 서명 패키지 확인
- 주니퍼 ATP 클라우드로 보안 디바이스 등록
- IoT 트래픽 스트리밍 설정 구성
- SRX 시리즈 방화벽 구성
- ATP 클라우드에서 검색된 IoT 디바이스 보기
- 위협 피드 생성
- 적응형 위협 프로파일링 피드를 사용하여 보안 정책 생성
- 결과
필요한 라이선스 및 애플리케이션 서명 패키지 확인
- 적절한 주니퍼 ATP 클라우드 라이선스가 있는지 확인합니다.
show system license명령을 사용하여 라이센스 상태를 확인합니다. 출력은 다음 샘플과 같이 SRX 디바이스 유형(SRX 또는 vSRX) 및 JUNOS 버전을 기반으로 레거시 ATP 클라우드 브랜딩(SkyATP)을 표시할 수 있습니다.user@host> show system license License identifier: JUNOS123456 License version: 4 Software Serial Number: 1234567890 Customer ID: JuniperTest Features: Sky ATP - Sky ATP: Cloud Based Advanced Threat Prevention on SRX firewalls date-based, 2016-07-19 17:00:00 PDT - 2016-07-30 17:00:00 PDTroot@host> show system license License identifier: JUNOS123456 License version: 4 Software Serial Number: 1234567890 Customer ID: JuniperTest Features: ATP Cloud - Cloud Based Advanced Threat Prevention on SRX firewalls date-based, 2016-07-19 17:00:00 PDT - 2016-07-30 17:00:00 PDT메모:show system license인타이틀먼트가 클라우드에서 관리되는 경우 SRX 시리즈 방화벽의 명령이 ATP 클라우드 라이선스를 표시하지 않을 수 있습니다. 이는 SRX 시리즈 디바이스에 ATP 클라우드용 라이선스 키를 설치하지 않아도 되기 때문입니다. 대신, SRX 시리즈 일련 번호와 인증 코드를 사용하여 라이선스 키를 생성할 때 인타이틀먼트가 클라우드 서버로 자동 전송됩니다. vSRX 가상 방화벽의 경우 설치된 라이선스가 필요합니다. - 장치의 보안 장치에 최신 애플리케이션 서명 팩이 있는지 확인합니다.
- 애플리케이션 식별 라이센스가 디바이스에 설치되어 있는지 확인합니다.
user@host> show system license
License usage:
Licenses Licenses Licenses Expiry
Feature name used installed needed
logical-system 4 1 3 permanent
License identifier: JUNOSXXXXXX
License version: 2
Valid for device: AA4XXXX005
Features:
appid-sig - APPID Signatur
- 최신 버전의 응용 프로그램 서명 팩을 다운로드합니다.
user@host> request services application-identification download
- 다운로드 상태를 확인합니다.
user@host> request services application-identification download status
Downloading application package 3475 succeeded.
- 응용 프로그램 ID 서명 팩을 설치합니다.
user@host> request services application-identification install
- 설치된 응용 프로그램 서명 팩 버전을 확인합니다.
user@host> show services application-identification version
  Application package version: 3418
  Release date: Tue Sep 14 14:40:55 2021 UTC
- 애플리케이션 식별 라이센스가 디바이스에 설치되어 있는지 확인합니다.
주니퍼 ATP 클라우드로 보안 디바이스 등록
주니퍼 ATP 클라우드에 보안 디바이스를 등록하는 것부터 시작하겠습니다. 디바이스를 이미 등록한 경우 이 단계를 건너뛰고 IoT 트래픽 스트리밍 설정 구성으로 바로 이동할 수 있습니다. 그렇지 않은 경우 장치 등록에 다음 방법 중 하나를 사용합니다.
방법 1: CLI를 사용하여 보안 디바이스 등록
- SRX 시리즈 방화벽에서 다음 명령을 실행하여 등록 프로세스를 시작합니다.
user@host> request services advanced-anti-malware enroll
Please select geographical region from the list:
1. North America
2. European Region
3. Canada
4. Asia Pacific
Your choice: 1
- 기존 영역을 선택하거나 새 영역을 만듭니다.
Enroll SRX to:
1. A new SkyATP security realm (you will be required to create it first)
2. An existing SkyATP security realm
옵션 1을 선택하여 영역을 만듭니다. 다음 단계를 사용합니다.
-
You are going to create a new Sky ATP realm, please provide the required information:
-
Please enter a realm name (This should be a name that is meaningful to your organization. A realm name can only contain alphanumeric characters and the dash symbol. Once a realm is created, it cannot be changed):

Real name: example-company-a
-
Please enter your company name:
Company name: Example Company A
-
Please enter your e-mail address. This will be your username for your Sky ATP account:
Email: me@example-company-a.com
-
Please setup a password for your new Sky ATP account (It must be at least 8 characters long and include both uppercase and lowercase letters, at least one number, at least one special character):
Password: **********
Verify: **********
-
Please review the information you have provided:
Region: North America
New Realm: example-company-a
Company name: Example Company A
Email: me@example-company-a.com
-
Create a new realm with the above information? [yes,no]
yes
Device enrolled successfully!
또한 기존 영역을 사용하여 SRX 시리즈를 주니퍼 ATP 클라우드에 등록할 수도 있습니다.
-
show services advanced-anti-malwarestatus CLI 명령을 사용하여 SRX 시리즈 방화벽이 클라우드 서버에 연결되어 있는지 확인합니다.root@idpreg-iot-v2# run show services advanced-anti-malware dynamic-filter status Feb 09 18:36:46 Dynamic Filter Server Connection Status: Server Hostname: srxapi.us-west-2.sky.junipersecurity.net Server Port: 443 Proxy Hostname: None Proxy Port: None Control Plane Connection Status: Connected Last Successful Connect: 2022-02-09 18:36:07 PST Pkts Sent: 2 Pkts Received: 6
방법 2: 주니퍼 ATP 클라우드 웹 포털에 보안 디바이스 등록
Junos OS 작업(op) 스크립트를 사용하여 주니퍼 ATP(Advanced Threat Prevention) 클라우드 서비스에 연결하도록 SRX 시리즈 방화벽을 구성할 수 있습니다.
- 주니퍼 ATP 클라우드 웹 포털의 장치 페이지에서 등록 버튼을 클릭합니다.
- 명령을 클립보드에 복사하고 확인을 클릭합니다.
- 운영 모드에서 SRX 시리즈 방화벽의 Junos OS CLI에 명령을 붙여넣습니다.
show services advanced-anti-malwarestatus 명령을 사용하여 SRX 시리즈 방화벽에서 클라우드 서버로 연결되는지 확인합니다. 다음 샘플의 서버 호스트 이름은 예제일 뿐입니다.user@host> show services advanced-anti-malware statusServer connection status: Server hostname: srxapi.us-west-2.sky.junipersecurity.net Server realm: qatest Server port: 443 Proxy hostname: None Proxy port: None Control Plane: Connection time: 2022-02-15 21:31:03 PST Connection status: Connected Service Plane: fpc0 Connection active number: 18 Connection retry statistics: 48샘플에서 연결 상태는 클라우드 서버가 보안 장치에 연결되어 있음을 나타냅니다.
- 주니퍼 ATP 클라우드 포털에서 등록된 디바이스를 볼 수도 있습니다. Devices > All Devices(모든 장치 ) 페이지로 이동합니다. 이 페이지에는 등록된 모든 디바이스가 나열됩니다.

IoT 트래픽 스트리밍 설정 구성
이 절차에서는 메타데이터 스트리밍 정책을 만들고 보안 디바이스에서 보안 서비스를 사용하도록 설정합니다.
- 클라우드 연결 구성을 완료합니다.
[edit]
user@host# set services security-intelligence url https://cloudfeeds.sky.junipersecurity.net/api/manifest.xml
user@host# set services security-intelligence authentication tls-profile aamw-ssl
-
보안 메타데이터 스트리밍 정책을 만듭니다.
[edit]
user@host# set services security-metadata-streaming policy p1 dynamic-filter
user@host# set services security-metadata-streaming policy p2 dynamic-filter
나중에 이러한 보안 메타데이터 스트리밍 정책을 보안 정책에 연결하여 세션에 대한 IoT 트래픽 스트리밍을 사용하도록 설정합니다.
- 애플리케이션 추적, 애플리케이션 식별, PKI와 같은 보안 서비스를 지원합니다.
[edit]
user@host# set services application-identification
user@host# set security pki
user@host# set security application-tracking
SRX 시리즈 방화벽 구성
이 절차를 사용하여 인터페이스, 영역, 정책을 구성하고, 보안 디바이스에서 IoT 패킷 필터링 및 스트리밍 서비스를 활성화합니다.
-
인터페이스를 구성합니다.
[edit]
user@host# set interfaces ge-0/0/2 mtu 9092
user@host# set interfaces ge-0/0/2 unit 0 family inet address 10.60.60.1/24
user@host# set interfaces ge-0/0/3 mtu 9092
user@host# set interfaces ge-0/0/3 unit 0 family inet address 10.70.70.1/24
user@host# set interfaces ge-0/0/4 mtu 9092
user@host# set interfaces ge-0/0/4 unit 0 family inet address 10.80.80.1/24
-
보안 영역을 구성하고 구성된 각 영역에 대해 애플리케이션 트래픽을 사용하도록 설정합니다.
[edit]
user@host# set security zones security-zone trust interfaces ge-0/0/2.0 host-inbound-traffic system-services all
user@host# set security zones security-zone trust interfaces ge-0/0/2.0 host-inbound-traffic protocols all
user@host# set security zones security-zone trust application-tracking
user@host# set security zones security-zone untrust interfaces ge-0/0/4.0 host-inbound-traffic system-services all
user@host# set security zones security-zone untrust interfaces ge-0/0/4.0 host-inbound-traffic protocols all
user@host# set security zones security-zone untrust interfaces ge-0/0/3.0 host-inbound-traffic system-services all
user@host# set security zones security-zone untrust interfaces ge-0/0/3.0 host-inbound-traffic protocols all
user@host# set security zones security-zone untrust application-tracking
user@host# set security zones security-zone cloud application-tracking
토폴로지에서 볼 수 있듯이, 언트러스트(untrust) 영역은 네트워크의 IOT 디바이스로부터 전송 및 호스트 바운드 트래픽을 수신합니다. 클라이언트 디바이스는 트러스트 존에 있고 주니퍼 ATP 클라우드는 클라우드 존에 있습니다.
-
보안 정책 P1을 구성합니다.
[edit]
user@host# set security policies from-zone trust to-zone untrust policy P1 match source-address any
user@host# set security policies from-zone trust to-zone untrust policy P1 match destination-address any
user@host# set security policies from-zone trust to-zone untrust policy P1 match application any
user@host# set security policies from-zone trust to-zone untrust policy P1 then permit
이 구성은 트러스트 영역에서 언트러스트(untrust) 영역으로 트래픽을 허용합니다.
-
보안 정책 P2를 구성합니다.
[edit]
user@host# set security policies from-zone untrust to-zone trust policy P2 match source-address any
user@host# set security policies from-zone untrust to-zone trust policy P2 match destination-address any
user@host# set security policies from-zone untrust to-zone trust policy P2 match application any
user@host# set security policies from-zone untrust to-zone trust policy P2 then permit
user@host# set security policies from-zone untrust to-zone trust application-services security-metadata-streaming-policy p1
구성은 언트러스트(untrust) 영역에서 트러스트 영역으로 트래픽을 허용하고 보안 메타데이터 스트리밍 정책 p1을 적용하여 세션에 대한 IoT 트래픽 스트리밍을 활성화합니다.
-
보안 정책 P3을 구성합니다.
[edit]
user@host# set security policies from-zone trust to-zone cloud policy P3 match source-address any
user@host# set security policies from-zone trust to-zone cloud policy P3 match destination-address any
user@host# set security policies from-zone trust to-zone cloud policy P3 match application any
user@host# set security policies from-zone trust to-zone cloud policy P3 then permit
user@host# set security policies from-zone trust to-zone cloud application-services security-metadata-streaming-policy p2
이 구성은 신뢰 영역에서 클라우드 영역으로의 트래픽을 허용하고 보안 메타데이터 스트리밍 정책 p2를 적용하여 세션에 대한 IoT 트래픽 스트리밍을 사용하도록 설정합니다.
- 구성을 커밋합니다.
[edit]
user@host# commit
주니퍼 ATP 클라우드 포털에서 검색된 모든 IoT 디바이스를 확인할 수 있습니다.
ATP 클라우드에서 검색된 IoT 디바이스 보기
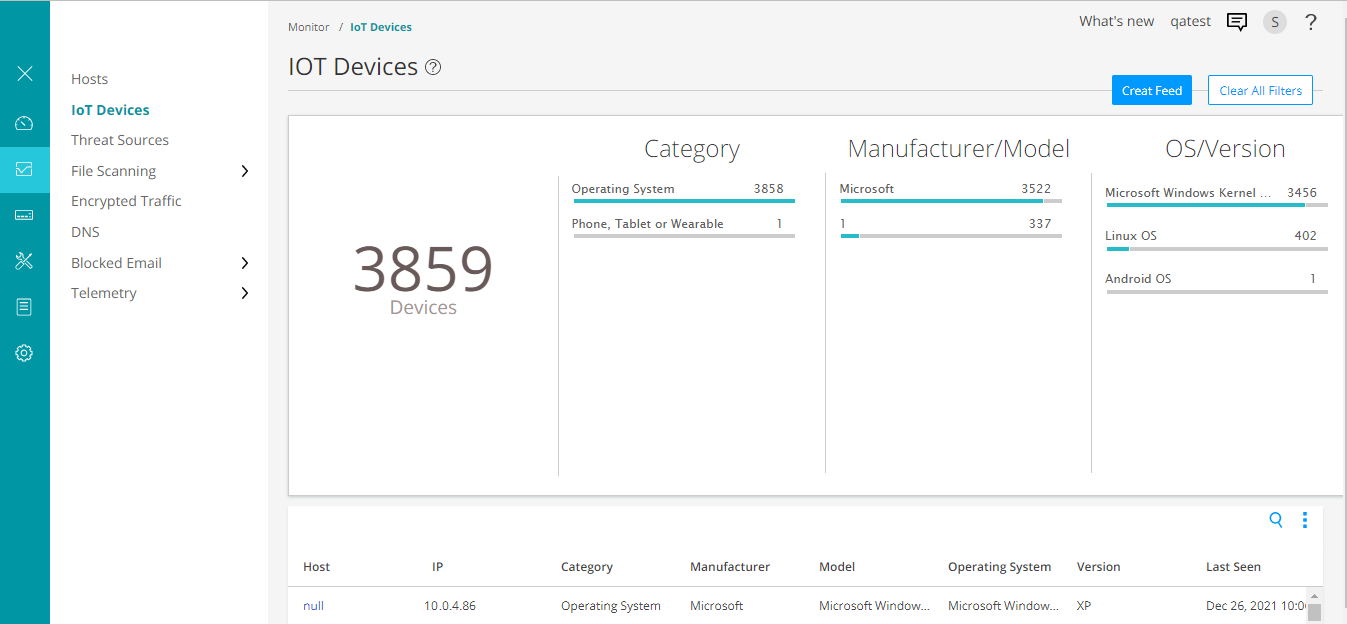
주니퍼 ATP 클라우드 포털에서 검색된 IoT 디바이스를 보려면 Minotor > IoT 디바이스 페이지로 이동하십시오.

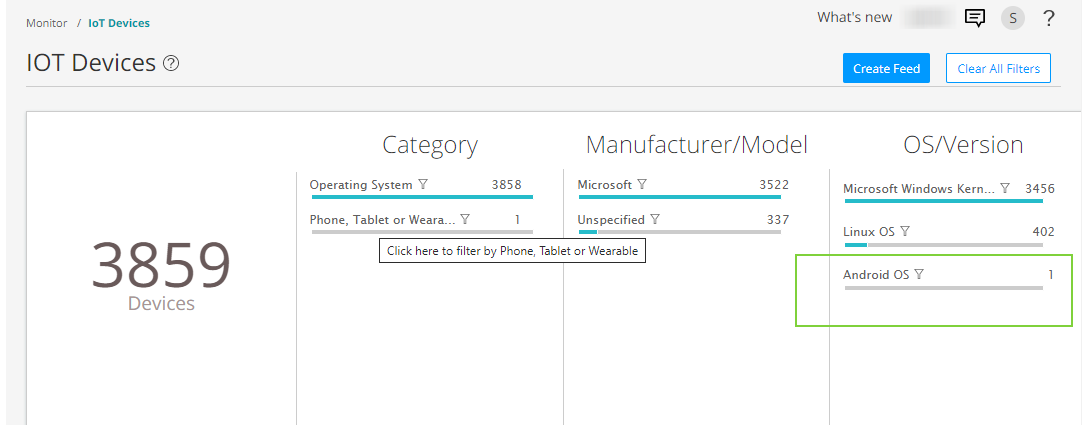
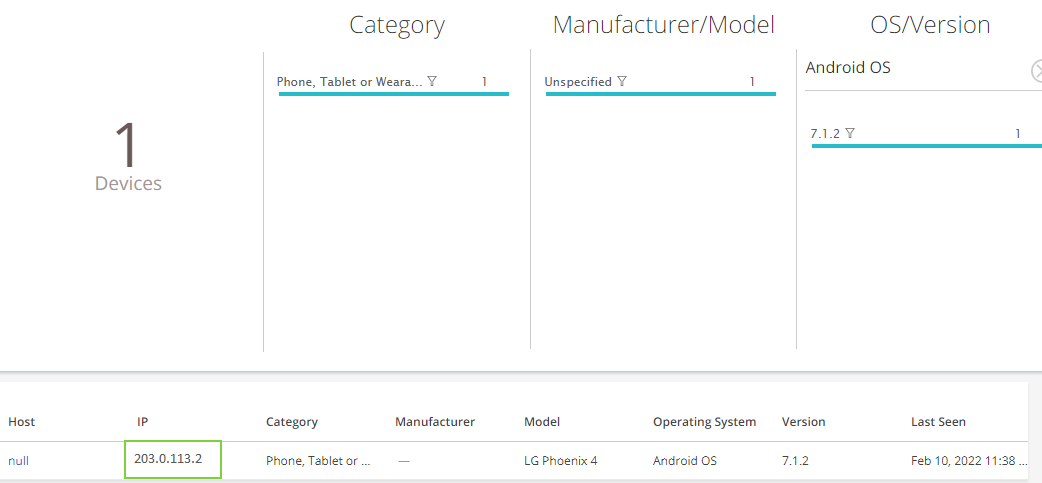
장치 범주, 제조업체, 운영 체제 유형에 따라 IoT 장치를 클릭하고 필터링할 수 있습니다.


이 페이지에는 IP 주소, 유형, 제조업체, 모델 등과 같은 세부 정보와 함께 IoT 디바이스가 나열됩니다. 이러한 세부 정보를 사용하여 위협 피드를 모니터링하고 생성하여 보안 정책을 시행할 수 있습니다.
위협 피드 생성
주니퍼 ATP 클라우드가 IoT 디바이스를 식별하면 위협 피드를 생성할 수 있습니다. 보안 디바이스가 동적 주소 그룹의 형태로 위협 피드를 다운로드하면 보안 정책 피드를 사용하여 이러한 IoT 디바이스의 인바운드 및 아웃바운드 트래픽에 대한 시행 조치를 취할 수 있습니다.
- Minotor > IoT 장치 페이지로 이동하여 피드 생성 옵션을 클릭합니다.

-
더하기 기호(+)를 클릭합니다. 새 피드 추가 페이지가 나타납니다.
이 예에서는 TTL(Time-to-Live)이 7일인 피드 이름 android_phone_user 사용합니다.
다음 필드에 대한 구성을 완료합니다.
-
피드 이름:
위협 피드의 고유한 이름을 입력합니다. 피드 이름은 영숫자로 시작해야 하며 문자, 숫자 및 밑줄을 포함할 수 있습니다. 공백은 허용되지 않습니다. 길이는 8-63자입니다.
-
형: 피드의 콘텐츠 유형을 IP로 선택합니다.
-
데이터 출처: 피드를 IOT로 만들기 위한 데이터 원본을 선택합니다.
-
살 시간: 필요한 피드 항목이 활성화되는 기간(일)을 입력합니다. 피드 항목이 TTL(Time to Live) 값을 넘으면 피드 항목이 자동으로 제거됩니다. 사용 가능한 범위는 1-365일입니다.
-
- 확인을 클릭하여 변경 사항을 저장합니다.
- Configure > Adaptive Threat Profiling(적응형 위협 프로파일링 구성)으로 이동합니다. 이 페이지에는 생성된 모든 위협 피드가 표시됩니다. 페이지에 나열된 위협 피드 android_phone_user 볼 수 있습니다.

위협 피드를 클릭하면 위협 피드에 포함된 IP 주소가 표시됩니다.

- 보안 디바이스가 피드를 다운로드했는지 확인합니다. 다운로드는 정기적으로 자동으로 수행되지만 몇 분 정도 걸릴 수 있습니다.
user@host> show services security-intelligence sec-profiling-feed status
Category name            :SecProfiling
  Feed name              :Android_Phone_User
    Feed type            :IP
    Last post time       :N/A
    Last post status code:N/A
    Last post status     :N/A
  Feed name              :IT_feed
    Feed type            :IP
    Last post time       :N/A
    Last post status code:N/A
    Last post status     :N/A
  Feed name              :High_Risk_Users
    Feed type            :IP
    Last post time       :N/A
    Last post status code:N/A
    Last post status     :N/A
다음 명령을 사용하여 위협 피드를 수동으로 다운로드할 수 있습니다.
request services security-intelligence download status ||match android_phone_user
다운로드한 위협 피드로 보안 정책 생성을 진행해 보겠습니다.
적응형 위협 프로파일링 피드를 사용하여 보안 정책 생성
보안 디바이스가 위협 피드를 다운로드하면 보안 정책에서 이를 동적 주소 그룹으로 참조할 수 있습니다. 동적 주소는 특정 도메인에 속하는 IoT 디바이스의 IP 주소 그룹입니다.
이 예제에서는 Android 휴대폰의 트래픽을 감지하고 트래픽을 차단하는 정책을 만듭니다.
- 보안 정책 일치 기준을 정의합니다.
[edit]
user@host# set security policies global policy Block_Android_Traffic match source-address android_phone_user
user@host# set security policies global policy Block_Android_Traffic match destination-address any
user@host# set security policies global policy Block_Android_Traffic match application any
- 보안 정책 작업을 정의합니다.
[edit]
user@host# set security policies global policy Block_Android_Traffic then deny
이 예에서 구성을 커밋하면 보안 디바이스가 특정 도메인에 속하는 IoT 디바이스에 대한 HTTP 트래픽을 차단합니다.
자세한 내용은 능동형 위협 프로파일링 구성을 참조하십시오.
결과
구성 모드에서 명령을 입력하여 구성을 show security 확인합니다. 출력이 의도된 구성을 표시하지 않으면, 이 예의 구성 지침을 반복하여 수정합니다.
               [edit]


               user@host# show security policies
from-zone trust to-zone untrust {
    policy P1 {
        match {
            source-address any;
            destination-address any;
            application any;
        }
        then {
            permit;
        }
    }
}
from-zone untrust to-zone trust {
    policy P2 {
        match {
            source-address any;
            destination-address any;
            application any;
        }
        then {
            permit;
        }
    }
    application-services {
        security-metadata-streaming-policy p1;
    }
}
from-zone trust to-zone cloud {
    policy P3 {
        match {
            source-address any;
            destination-address any;
            application any;
        }
        then {
            permit;
        }
    }
    application-services {
        security-metadata-streaming-policy p2;
    }
}
user@host# show security policies global
policy Block_Android_Traffic {
    match {
        source-address android_phone_user;
        destination-address any;
        application any;
    }
    then {
        deny;
    }
}
보안 존을 확인합니다.
               [edit]


               user@host# show security zones
security-zone trust {
    interfaces {
        ge-0/0/2.0 {
            host-inbound-traffic {
                system-services {
                    all;
                }
                protocols {
                    all;
                }
            }
        }
    }
    application-tracking;
}
security-zone untrust {
    interfaces {
        ge-0/0/4.0 {
            host-inbound-traffic {
                system-services {
                    all;
                }
                protocols {
                    all;
                }
            }
        }
        ge-0/0/3.0 {
            host-inbound-traffic {
                system-services {
                    all;
                }
                protocols {
                    all;
                }
            }
        }
    }
    application-tracking;
}
security-zone cloud {
    interfaces {
        ge-0/0/0.1 {
            host-inbound-traffic {
                system-services {
                    all;
                }
                protocols {
                    all;
                }
            }
        }
    }
    application-tracking;
}
서비스 표시
               [edit]


               user@host# show services
advanced-anti-malware {
    dynamic-filter {
        traceoptions {
            file dyn-filterd-log size 1g world-readable;
            level all;
            flag all;
        }
    }
    connection {
        url https://srxapi.us-west-2.sky.junipersecurity.net;
        authentication {
            tls-profile aamw-ssl;
        }
    }
}
ssl {
    initiation {
        profile aamw-ssl {
            trusted-ca [ aamw-secintel-ca aamw-cloud-ca ];
            client-certificate aamw-srx-cert;
            actions {
                crl {
                    disable;
                }
            }
        }
    }
}
security-metadata-streaming {
    policy p1 {
        dynamic-filter;
    }
    policy p2 {
        dynamic-filter;
    }
}
security-intelligence {
    url https://cloudfeeds.sky.junipersecurity.net/api/manifest.xml;
    authentication {
        tls-profile aamw-ssl;
    }
}
디바이스에서 기능 구성을 마쳤으면 구성 모드에서 commit을 입력합니다.
확인
피드 요약 및 상태 확인
목적: 보안 디바이스가 동적 주소 그룹의 형태로 IP 주소 피드를 수신하고 있는지 확인합니다.
행동: 다음 명령을 실행합니다.
               user@host> show services advanced-anti-malware dynamic-filter status
Dynamic Filter Server Connection Status:
  Server Hostname: srxapi.us-west-2.sky.junipersecurity.net
  Server Port: 443
  Proxy Hostname: None
  Proxy Port: None
  Control Plane
    Connection Status: Connected
    Last Successful Connect: 2022-02-12 09:51:50 PST
    Pkts Sent: 3
    Pkts Received: 42
의미 출력에는 주니퍼 ATP 클라우드 서버의 연결 상태 및 기타 세부 정보가 표시됩니다.
