- play_arrow Overview
- play_arrow Introduction
-
- play_arrow Devices
- play_arrow Device Management
- play_arrow Systems of Record
- play_arrow Device Discovery Profiles
- play_arrow Modeling Devices
- Rapid Deployment Overview
- Zero Touch Deployment Using Autoinstallation and Junos Space Network Management Platform on ACX Series and SRX Series Devices
- Model Devices Overview
- Creating a Connection Profile
- Creating a Modeled Instance
- Activating a Modeled or Cloned Device in Junos Space Network Management Platform
- Downloading a Configlet
- Viewing and Copying Configlet Data
- Activating Devices by Using Configlets
- Viewing a Modeled Instance
- Adding More Devices to an Existing Modeled Instance
- Viewing the Status of Modeled Devices
- Deleting Modeled Instances
- Viewing a Connection Profile
- Cloning a Connection Profile
- Modifying a Connection Profile
- Deleting Connection Profiles
- play_arrow Device Authentication in Junos Space
- play_arrow Viewing Device Inventory
- play_arrow Exporting Device Inventory
- play_arrow Configuring Juniper Networks Devices
- Modifying the Configuration on the Device
- Reviewing and Deploying the Device Configuration
- Junos OS Releases Supported in Junos Space Network Management Platform
- Configuration Guides Overview
- Saving the Configuration Created using the Configuration Guides
- Previewing the Configuration Created using the Configuration Guides
- Deploying the Configuration Created using the Configuration Guides
- Viewing and Assigning Shared Objects
- Applying a CLI Configlet to Devices
- Applying a CLI Configlet to a Physical Inventory Element
- Applying a CLI Configlet to a Physical Interface
- Applying a CLI Configlet to a Logical Interface
- Executing a Script on the Devices
- Executing a Script on a Physical Inventory Component
- Executing a Script on a Logical Interface
- Executing a Script on the Physical Interfaces
- play_arrow Device Adapter
- play_arrow Device Configuration Management
- play_arrow Adding and Managing Non Juniper Networks Devices
- play_arrow Accessing Devices
- Launching a Device’s Web User Interface
- Looking Glass Overview
- Executing Commands by Using Looking Glass
- Exporting Looking Glass Results in Junos Space Network Management Platform
- Secure Console Overview
- Connecting to a Device by Using Secure Console
- Configuring SRX Series Firewall Clusters in Junos Space using Secure Console
- play_arrow Logical Systems (LSYS)
- play_arrow Tenant System (TSYS)
- play_arrow Device Partitions
- play_arrow Custom Labels
- play_arrow Verifying Template, Image Deployment, Script Execution, and Staged Images on Devices
- play_arrow Device Maintenance
- Viewing Device Statistics
- Viewing Devices and Logical Systems with QuickView
- Resynchronizing Managed Devices with the Network
- Putting a Device in RMA State and Reactivating Its Replacement
- Modifying the Target IP Address of a Device
- Modifying the Serial Number of a Device
- Rebooting Devices
- Deleting Staged Images on a Device
- Cloning a Device in Junos Space Network Management Platform
- Deleting Devices
-
- play_arrow Device Templates
- play_arrow Overview
- play_arrow Template Definitions
- Creating a Template Definition
- Finding Configuration Options in a Template Definition
- Working with Rules in a Template Definition
- Specifying Device-Specific Values in Template Definitions
- Managing CSV Files for a Template Definition
- Publishing a Template Definition
- Viewing a Template Definition
- Modifying a Template Definition
- Cloning a Template Definition
- Importing a Template Definition
- Exporting a Template Definition
- Unpublishing a Template Definition
- Deleting a Template Definition
- play_arrow Configuring Devices using Device Templates
- play_arrow Configuring Devices using Quick Templates
- play_arrow Device Template Administration
- Viewing Template Details
- Viewing the Device-Template Association (Device Templates)
- Viewing Template Definition Statistics
- Viewing Device Template Statistics
- Comparing Templates or Template Versions
- Comparing a Device Template Configuration with a Device Configuration
- Cloning a Template in Junos Space Network Management Platform
- Exporting and Importing a Quick Template in Junos Space Network Management Platform
- Deleting Device Templates from Junos Space Network Management Platform
-
- play_arrow CLI Configlets
- play_arrow Overview
- play_arrow CLI Configlets
- Creating a CLI Configlet
- Modifying a CLI Configlet
- Viewing CLI Configlet Statistics
- Viewing a CLI Configlet
- Exporting CLI Configlets
- CLI Configlet Examples
- Deleting CLI configlets
- Cloning a CLI Configlet
- Importing CLI Configlets
- Applying a CLI Configlet to Devices
- Comparing CLI Configet Versions
- Marking and Unmarking CLI Configlets as Favorite
- play_arrow Configuration Views
- Configuration Views Overview
- Configuration View Variables
- Configuration View Workflow
- XML Extensions
- Creating a Configuration View
- Viewing a Configuration View
- Modifying a Configuration View
- Deleting Configuration Views
- Exporting and Importing Configuration Views
- Viewing Configuration Views Statistics
- Default Configuration Views Examples
- play_arrow XPath and Regular Expressions
- play_arrow Configuration Filters
-
- play_arrow Images and Scripts
- play_arrow Overview
- play_arrow Managing Device Images
- Device Images Overview
- Importing Device Images to Junos Space
- Viewing Device Images
- Modifying Device Image Details
- Staging Device Images
- Staging Satellite Software Packages on Aggregation Devices
- Verifying the Checksum
- Viewing and Deleting MD5 Validation Results
- Deploying Device Images
- Deploying Satellite Software Packages on Aggregation and Satellite Devices
- Viewing Device Image Deployment Results
- Viewing Device Association of Images
- Undeploying JAM Packages from Devices
- Removing Device Images from Devices
- Deleting Device Images
- play_arrow Managing Scripts
- Scripts Overview
- Promoting Scripts Overview
- Importing Scripts to Junos Space
- Viewing Script Details
- Modifying Scripts
- Modifying Script Types
- Comparing Script Versions
- Staging Scripts on Devices
- Verifying the Checksum of Scripts on Devices
- Viewing Verification Results
- Enabling Scripts on Devices
- Executing Scripts on Devices
- Executing Scripts on Devices Locally with JUISE
- Viewing Execution Results
- Exporting Scripts in .tar Format
- Viewing Device Association of Scripts
- Marking and Unmarking Scripts as Favorite
- Disabling Scripts on Devices
- Removing Scripts from Devices
- Deleting Scripts
- Script Annotations
- Script Example
- play_arrow Managing Operations
- play_arrow Managing Script Bundles
- Script Bundles Overview
- Creating a Script Bundle
- Viewing Script Bundles
- Modifying a Script Bundle
- Staging Script Bundles on Devices
- Enabling Scripts in Script Bundles on Devices
- Executing Script Bundles on Devices
- Disabling Scripts in Script Bundles on Devices
- Viewing Device Associations of Scripts in Script Bundles
- Deleting Script Bundles
-
- play_arrow Reports
- play_arrow Reports Overview
- play_arrow Report Definitions
- play_arrow Reports
-
- play_arrow Network Monitoring
- play_arrow Overview
- play_arrow Integration of OpenNMS with Junos Space Network Management Platform
- play_arrow Managing Nodes
- play_arrow Network Monitoring Administration
-
- play_arrow Configuration Files
- play_arrow Overview
- play_arrow Managing Configuration Files
-
- play_arrow Jobs
- play_arrow Overview
- play_arrow Managing Jobs
- Viewing Statistics for Jobs
- Viewing Your Jobs
- Viewing Jobs
- Viewing Objects on Which a Job is Executed
- Viewing Job Recurrence
- Rescheduling and Modifying the Recurrence Settings of Jobs
- Retrying a Job on Failed Devices
- Reassigning Jobs
- Canceling Jobs
- Clearing Your Jobs
- Archiving and Purging Jobs
- Common Error Messages in Device-Related Operations
-
- play_arrow Role-Based Access Control
- play_arrow Overview
- play_arrow Roles
- Roles Overview
- Predefined Roles Overview
- Creating a User-Defined Role
- Managing Roles
- Modifying User-Defined Roles
- Deleting User-Defined Roles
- Cloning Predefined and User-Defined Roles
- Exporting User-Defined Roles from Junos Space Network Management Platform
- Importing Roles to Junos Space Network Management Platform
- play_arrow User Accounts
- Configuring Users to Manage Objects in Junos Space Overview
- Creating Users in Junos Space Network Management Platform
- Modifying a User
- Deleting Users
- Disabling and Enabling Users
- Unlocking Users
- Viewing Users
- Exporting User Accounts from Junos Space Network Management Platform
- Changing Your Password on Junos Space
- Clearing User Local Passwords
- Viewing User Statistics
- play_arrow User Groups
- play_arrow Domains
- play_arrow Remote Profiles
- play_arrow API Access Profiles
- play_arrow User Sessions
-
- play_arrow Audit Logs
- play_arrow Troubleshooting
- play_arrow Knowledge Base
-
Dedicated Database Nodes in the Junos Space Fabric Overview
Junos Space Network Management Platform enables the load balancer, application logic, and database functions on the first node of the fabric by default. For improved performance of Junos Space Platform and Junos Space applications, you can add two additional Junos Space nodes to run as dedicated database nodes. You can add any two Junos Space nodes as the primary and secondary database nodes. Database high availability (HA) is enabled by default.
Before you add database nodes to the fabric, you must configure a Junos Space Virtual Appliance as a Junos Space node to be added to an existing fabric, by using the Junos Space CLI. You can then use the Junos Space Platform UI to add the node as a dedicated database node to the fabric.
When you add database nodes to the Junos Space fabric, the MySQL database is moved to the primary and secondary database nodes and disabled on the Junos Space active and standby nodes, improving the performance of the Junos Space active node.
Junos Space accesses the database through a database VIP address, which is assigned to the primary database node. You specify the database VIP address when you add the database nodes to the fabric. After you add the database nodes to the Junos Space fabric, Junos Space Platform automatically reconfigures the Junos Space server to use the new database VIP address to access the database
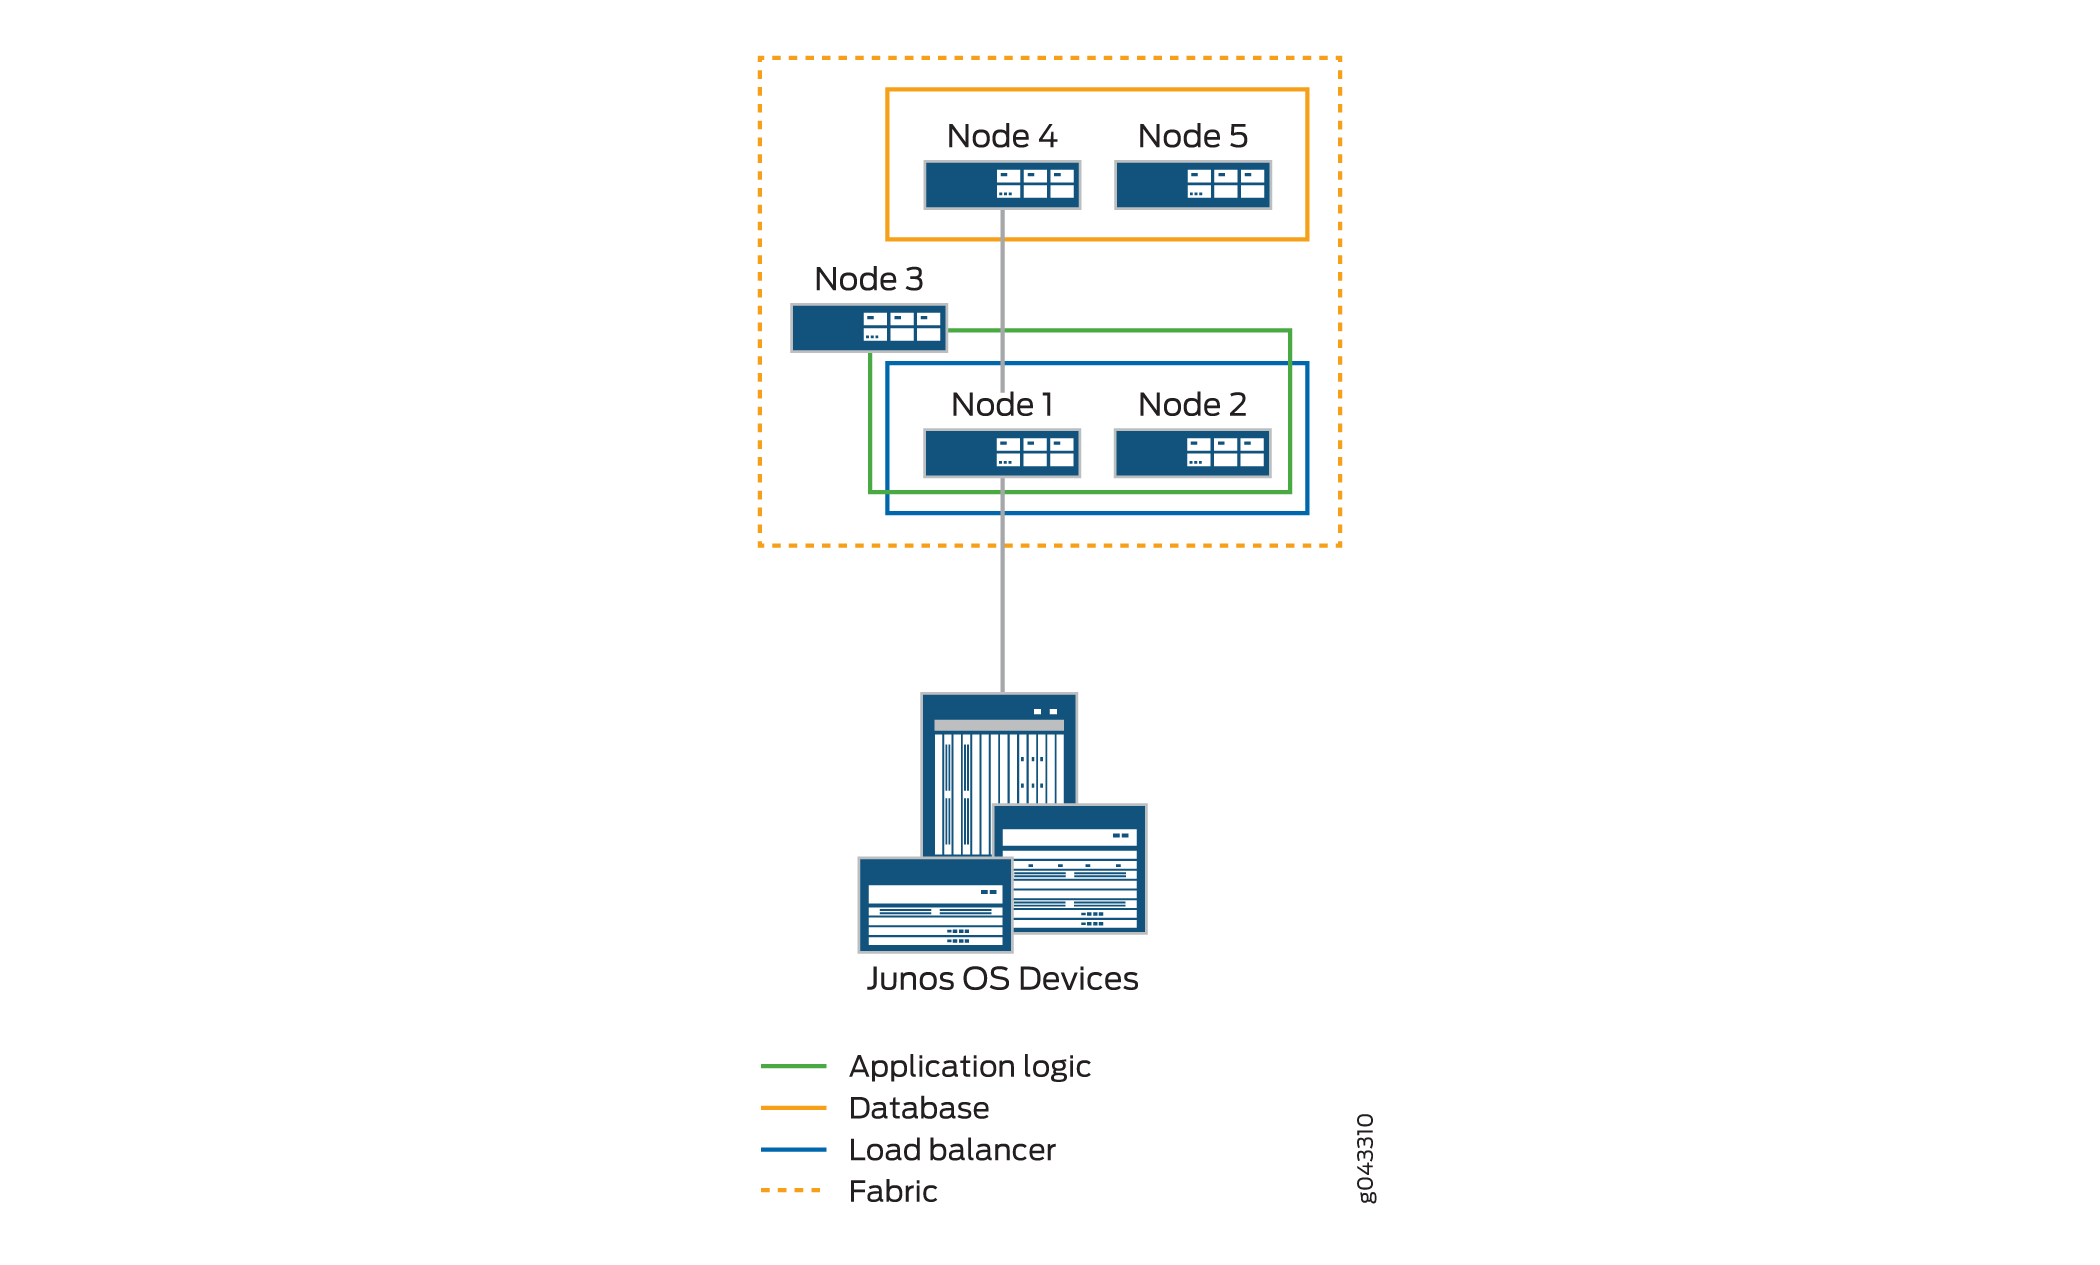
Figure 1 shows database nodes in a fabric comprising five nodes.

In case the primary database node goes down or is deleted, the database VIP address is transferred to the secondary node, which becomes the new primary database node, and any other non-load-balancer node in the fabric can be designated the new secondary database node. If the secondary database node goes down or is deleted, the primary database node retains the database VIP address and you can designate any other non-load-balancer node as the new secondary database node. If there is no other non-load-balancer node in the fabric or you choose not to configure a new secondary database node, database high availability is lost.
When you add database nodes to the fabric, node functions are assigned based on the number and type of nodes that already exist in the fabric.
Adding database nodes to a fabric with one node—By default, the load-balancer, database server, and application logic node functions are enabled on the first node of the fabric. When you add database nodes to a one-node fabric, you must add the second and third nodes together as dedicated database nodes. The database server functions are moved to the dedicated database nodes from the first node, and the first node no longer provides the database server functions.
When you have one node of the fabric functioning as the active load-balancer server, and two nodes functioning as the primary and secondary database nodes, the fourth node that you add to the fabric automatically assumes the functions of the standby load-balancer server. All subsequent nodes can have only the application logic.
Adding database nodes to a fabric with two nodes—When you have two nodes in a fabric, the first node functions as the active load-balancer server and active database server, and the second node functions as the standby load-balancer server and standby database server. You can add the third and fourth nodes as database nodes. The database server functions are moved to the primary and secondary database nodes and disabled on the first and second nodes.
In this case, after you add the two nodes as database nodes, all additional nodes that you add can have only the application logic.
Adding database nodes to a fabric with more than two nodes—When you have more than two nodes in a fabric, the first node functions as the active load-balancer server and active database server, and the second node functions as the standby load-balancer server and standby database server. The rest of the nodes can have only the application logic. You can add two other nodes as database nodes. The database server functions are moved to the primary and secondary database nodes and disabled on the first and second nodes.
While adding database nodes, you must consider the following points:
To add a node as a database node, the node must have enough disk space for the MySQL database, and an additional 100 GB of free disk space.
In the first instance of adding database nodes to the Junos Space fabric, you must configure both the primary and secondary database nodes. You cannot add a primary database node alone. Database high availability is enabled by default.
If you have already added the primary and secondary database nodes, you cannot add another database node.
When you configure the primary and secondary database nodes, you must ensure that both the nodes have similar configuration. That is, if one node is a Junos Space Virtual Appliance, then the other node must also be a Junos Space Virtual Appliance with the same configuration for CPU, memory, disk space and so on.
Junos Space Platform does not permit you to delete both the primary and secondary database nodes at the same time. You can delete either the primary database node or the secondary database node, but not both nodes.
After the MySQL database is moved to the dedicated database nodes, you cannot move it back to the Junos Space active and standby nodes.