DNS ALG
The Domain Name System (DNS) Application Layer Gateway (ALG) service handles data associated with locating and translating domain names into IP addresses. The ALG typically runs on port 53. The ALG monitors DNS query and reply packets and supports only UDP traffic.
Use Feature Explorer to confirm platform and release support for specific features.
Review thePlatform-Specific DNS ALG Behavior section for notes related to your platform.
DNS ALG Overview
The DNS Application Layer Gateway (ALG) service provides an application-level gateway for use with DNS clients. The DNS ALG service allows a client to access multiple DNS servers in different networks and provides routing to and from those servers. It also supports flexible address translation of the DNS query and response packets. These functions allow the DNS client to query many different domains from a single DNS server instance on the client side of the network.
The DNS server listens through UDP port 53 for incoming queries from DNS resolvers. A resolver communicates with DNS servers by sending DNS queries and handling DNS responses.
The default port for DNS ALG is port 53.
The DNS ALG performs the following functions:
Monitors DNS query and reply packets and closes the session when the DNS reply is received
Performs DNS doctoring
Performs the IPv4 and IPv6 address transformations
The Domain Name System (DNS) was originally designed to support queries of a static configured database and the data was expected to change.
Dynamic DNS (DDNS) support is now available in addition to the DNS standard. The main difference between DNS and DDNS is in the message format of the header section and the update message.
DDNS messages are processed differently when compared to DNS messages. Message parsing is rewritten for DDNS. DDNS does NAT and NAT-PT in the query part of the message and DNS does NAT and NAT-PT in the response part of the message.
See Also
Example: Configuring the DNS ALG
This example shows how to configure the DNS ALG to pass through DNS traffic with a static NAT pool on Juniper Networks devices.
Requirements
Before you begin:
-
Configure static NAT pool for all IP address.
-
Understand the concepts behind ALG for DNS. See DNS ALG Overview.
Overview
In this example, the ALG for DNS is configured to monitor and allow DNS traffic to be exchanged between the clients and the server located on opposite sides of a Juniper Networks device.
This example shows how to configure a static NAT pool and rule set, and associate the DNS ALG to a policy.

Configuration
Configuring a NAT Static Pool and Rule Set
CLI Quick Configuration
To quickly configure this section of the example,
copy the following commands, paste them into a text file, remove any
line breaks, change any details necessary to match your network configuration,
copy and paste the commands into the CLI at the [edit] hierarchy
level, and then enter commit from configuration mode.
set security nat static rule-set rs1 from zone untrust
set security nat static rule-set rs1 rule r1 match destination-address 203.0.113.100
set security nat static rule-set rs1 rule r1 then static-nat prefix 192.0.2.100
set security policies from-zone untrust to-zone trust policy u2t match source-address any
set security policies from-zone untrust to-zone trust policy u2t match destination-address any
set security policies from-zone untrust to-zone trust policy u2t match application junos-dns-udp
set security policies from-zone untrust to-zone trust policy u2t then permit
Step-by-Step Procedure
The following example requires you to navigate various levels in the configuration hierarchy. For instructions on how to do that, see Using the CLI Editor in Configuration Mode in the CLI User Guide.
To configure a static NAT pool:
-
Create a NAT static rule set.
[edit]
user@host# set security nat static rule-set rs1 from zone untrust
user@host# set security nat static rule-set rs1 rule r1 match destination-address 203.0.113.100
user@host# set security nat static rule-set rs1 rule r1 then static-nat prefix 192.0.2.100
-
Associate the DNS application using a policy.
[edit]
user@host# set security policies from-zone untrust to-zone trust policy u2t match source-address any
user@host# set security policies from-zone untrust to-zone trust policy u2t match destination-address any
user@host# set security policies from-zone untrust to-zone trust policy u2t match application junos-dns-udp
user@host# set security policies from-zone untrust to-zone trust policy u2t then permit
Results
From configuration mode, confirm your configuration
by entering the show security nat command. If the output
does not display the intended configuration, repeat the configuration
instructions in this example to correct it.
user@host# show security nat
static  {
    rule-set rs1 {
        from zone untrust;
        rule r1 {
            match {
                destination-address 203.0.113.100;
            }
            then {
                static-nat {
                    prefix  {
                        192.0.2.100;
                    }
                }
            }
        }
        }
}[edit]
user@host# show security policies
from-zone untrust to-zone trust {
policy u2t {
match {
source-address any;
destination-address any;
application [ junos-dns-udp];
}
then {
permit;
}
}
}
default-policy {
permit-all;
}If you are done configuring the device, enter commit from configuration mode.
Configuring and Printing the DNS Trace
Purpose
Print the DNS trace file.
Action
From configuration mode, enter the following command.
set security alg traceoptions file alglog
set security  alg traceoptions file size 1g
set security alg traceoptions level verbose
set security alg dns traceoptions flag all
Verification
To confirm that the configuration is working properly, perform these tasks:
Verifying DNS ALG
Purpose
Verify that DNS ALG is enabled.
Action
From operational mode, enter the show security
alg status command.
user@host> show security alg status
ALG Status :
  DNS      : Enabled
  FTP      : Enabled
  H323     : Disabled
  MGCP     : Disabled
  MSRPC    : Enabled
  PPTP     : Enabled
  RSH      : Disabled
  RTSP     : Disabled
  SCCP     : Disabled
  SIP      : Disabled
  SQL      : Disabled
  SUNRPC   : Enabled
  TALK     : Enabled
  TFTP     : Enabled
  IKE-ESP  : Disabled
Meaning
The output shows the DNS ALG is enabled.
Verifying DNS ALG Security Flow Session
Purpose
Verify ALG security flow session is enabled.
Action
From operational mode, enter the show security
flow session application dns extensive command.
user@host> show security flow session application dns extensive
Session ID: 24088, Status: Normal
Flags: 0x40/0x0/0x2/0x2000103
Policy name: unt2tru/6
Source NAT pool: Null, Application: junos-dns-udp/16
Dynamic application: junos:UNKNOWN,
Encryption:  Unknown
Application traffic control rule-set: INVALID, Rule: INVALID
Maximum timeout: 60, Current timeout: 56
Session State: Valid
Start time: 658866, Duration: 10
   In: 192.0.2.0/38926 --> 198.51.100.0/53;udp,
  Conn Tag: 0x0, Interface: ge-0/0/3.0,
    Session token: 0xa, Flag: 0x621
    Route: 0x110010, Gateway: 192.0.2.0, Tunnel: 0
    Port sequence: 0, FIN sequence: 0,
    FIN state: 0,
    Pkts: 2, Bytes: 116
   Out: 198.51.100.0/53 --> 192.0.2.0/38926;udp,
  Conn Tag: 0x0, Interface: ge-0/0/2.0,
    Session token: 0x9, Flag: 0x620
    Route: 0x100010, Gateway: 198.51.100.0, Tunnel: 0
    Port sequence: 0, FIN sequence: 0,
Meaning
The output shows there is an active flow utilizing the DNS ALG.
Understanding DNS and DDNS Doctoring
Junos OS supports Domain Name System (DNS) for ALGs. The DNS ALG monitors DNS query and reply
packets and closes the session if the DNS flag indicates that the packet is a reply message.
To configure the DNS ALG, use the edit security alg dns statement at the
[edit security alg] hierarchy level.
DNS provides name-to-address mapping within a routing class, whereas Network Address Translation (NAT) attempts to provide transparent routing between hosts in disparate address realms of the same routing class. As a result, NAT can cause some DNS problems the DNG ALG must handle through a process called DNS doctoring.
The same doctoring feature applies to the dynamic domain name system (DDNS). For DDNS in NAT mode, you also can do the IP translation in the DDNS update.
To resolve the problems introduced by NAT, DNS and DDNS ALG functionality has been extended to support static NAT, allowing the problems to be resolved through DNS doctoring.
The restoring and doctoring process is performed in two parts:
-
Packet sanity check

For the DNS packet, the DNS ALG check fields are questions, answers, authority, and additional information. The DNS ALG drops the packet if the number of questions is more than 1, the domain name is more than 255 bytes, or the label length is more than 63 bytes.

For the DDNS packet, the DNS ALG check fields are zone, prerequisite, update, and additional data. The DNS ALG drops the packet if the number of zones is more than 1, the domain name is more than 255 bytes, or the label length is more than 63 bytes.
For both DNS and DDNS, the DNS ALG drops the packet that does not comply with the standards.
-
NAT
Figure 2 shows how DNS translates a private address to a public address.
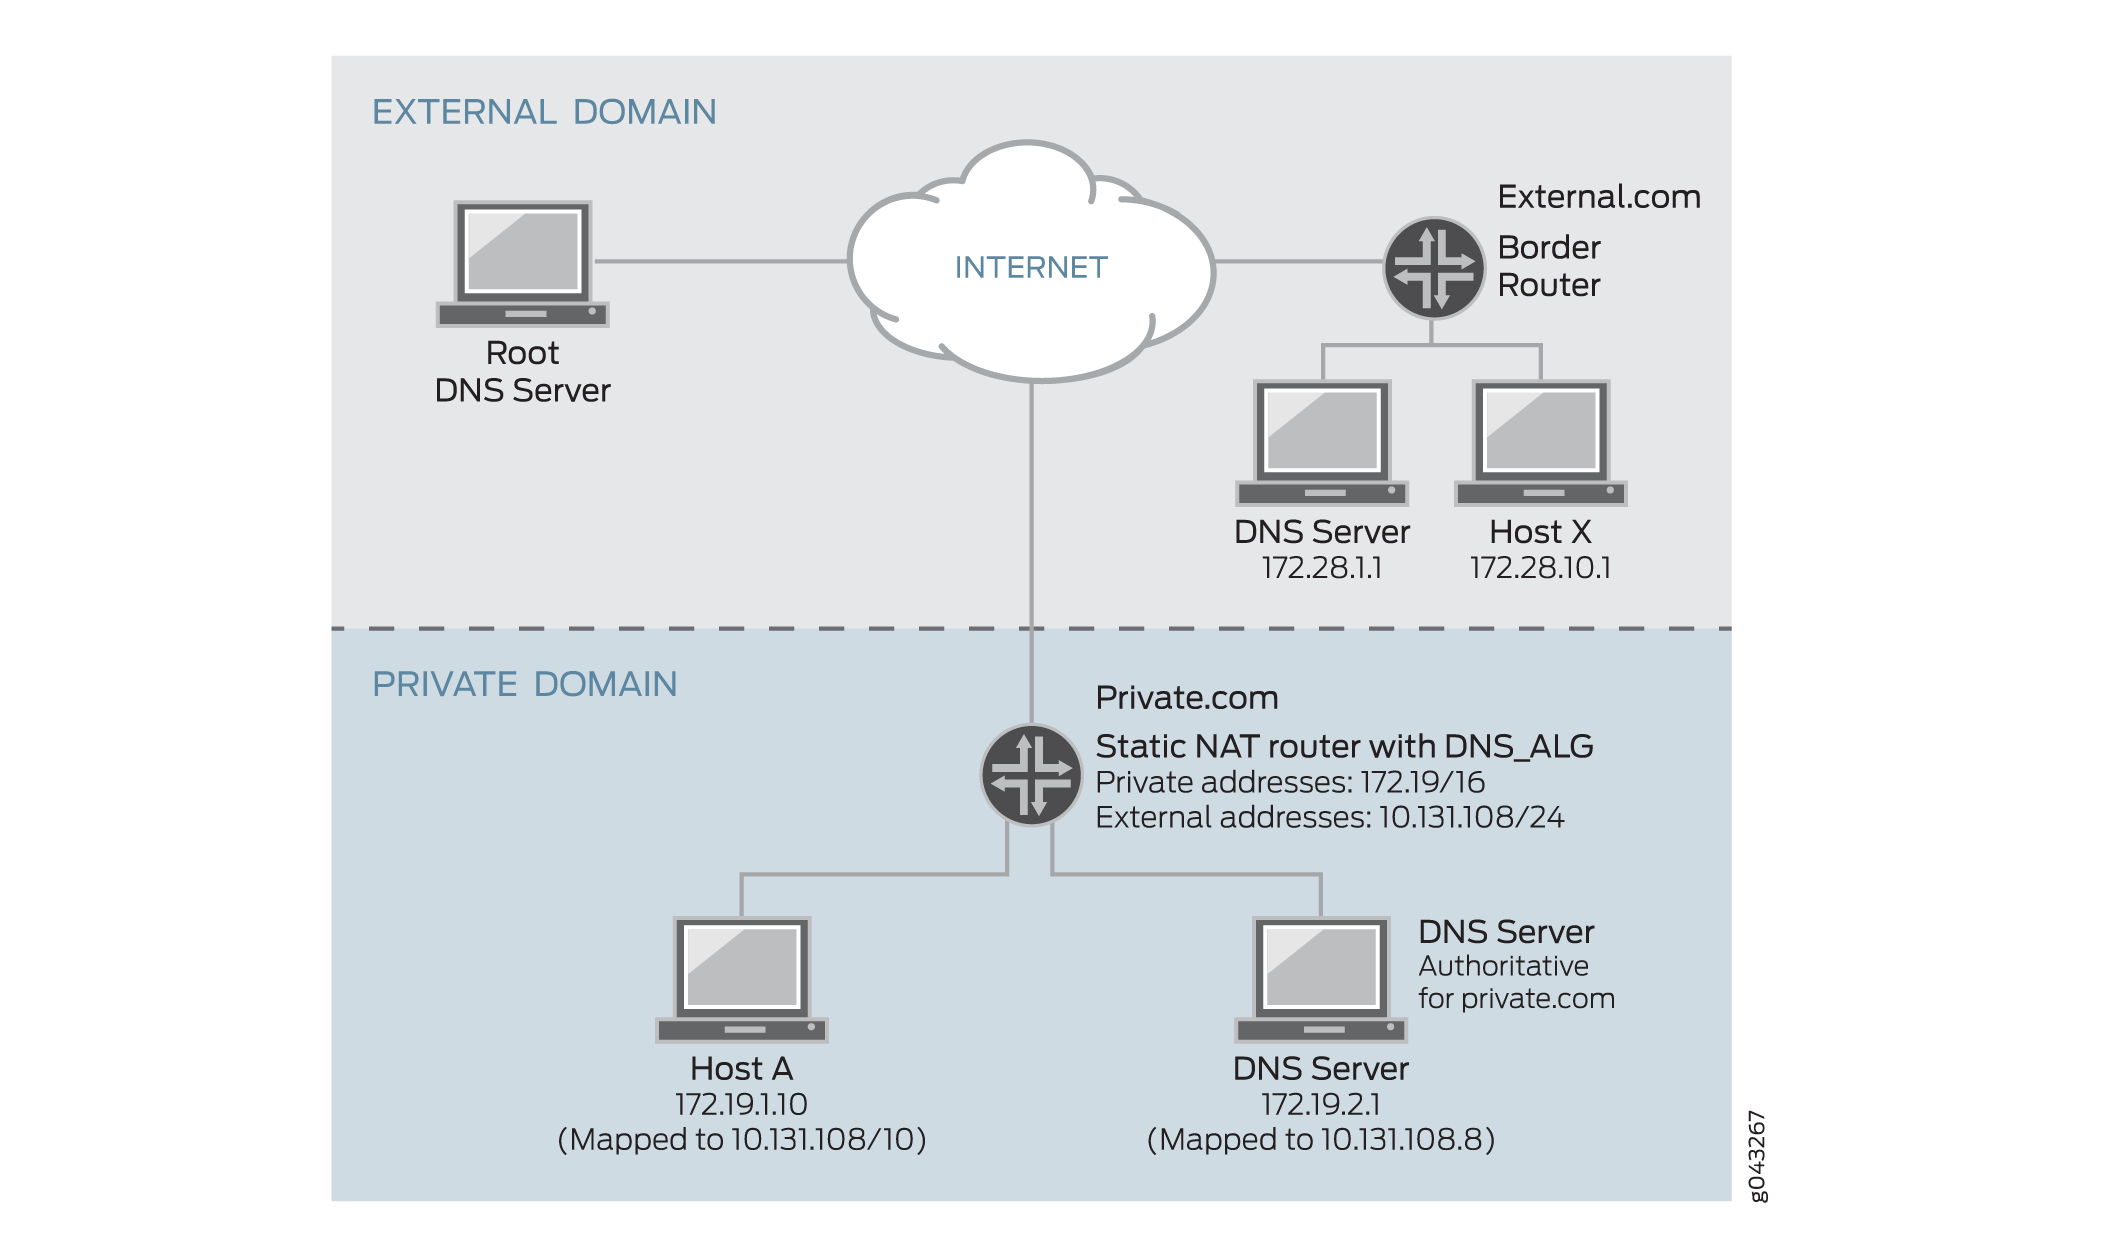
When host X in external.com wants to resolve host A’s address through DNS and if the DNS ALG does not support NAT, it takes a private address such as 172.19.1.10, which is invalid to host X. The private address is translated to public address 10,131.108.10 through the DNS ALG.
Figure 3 shows how DNS translates a public address to a private address.
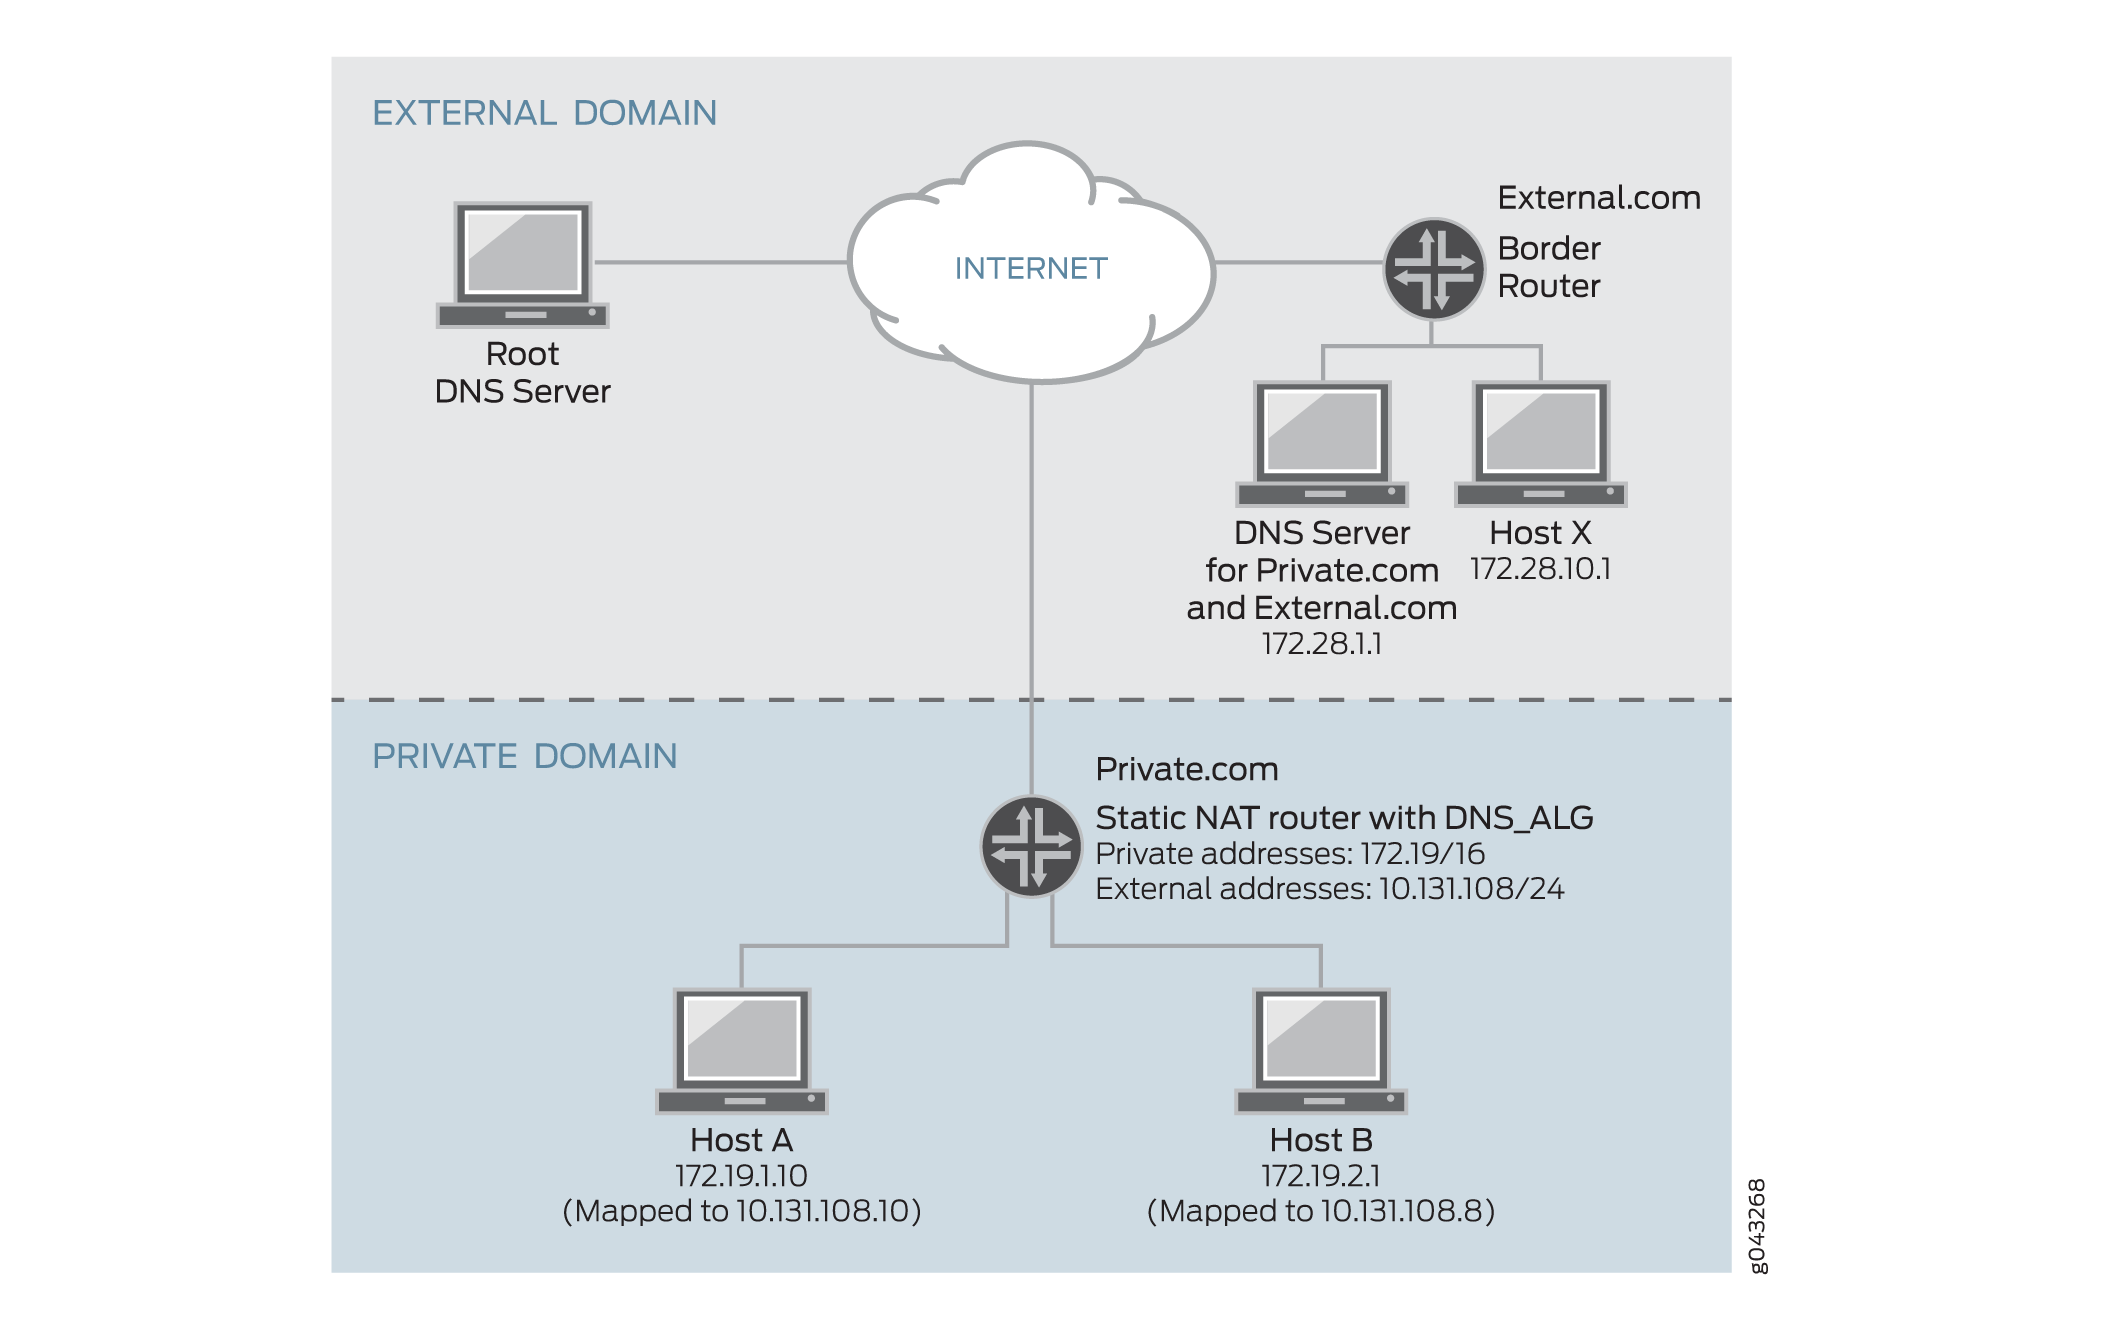
When host A in private.com wants to resolve host B's address through DNS and if the DNS ALG does not support NAT, it takes a public address from the DNS server in external.com, such as 10.131.108.8. If Host A sends traffic to host B with public address 10.131.108.8, which is invalid to host B in the private domain. Hence, the public address in the DNS query A-record is translated to private address 172.19.2.1 through the DNS ALG.
The DNS ALG can translate the first 32 A-records in a single DNS reply. A-records after the first 32 records are not handled. Also note that the DNS ALG supports IPv4 and IPv6 addresses and does not support VPN tunnels.
Disabling DNS and DDNS Doctoring
The DNS ALG must be enabled on the devices to perform DNS and DDNS doctoring. With the DNS ALG enabled on the device, the DNS and DDNS doctoring feature is enabled by default. You can disable DNS and DDNS doctoring with the CLI.
To disable DNS and DDNS doctoring:
-
Disable all the doctoring features by specifying the
noneconfiguration option.This command disables all the doctoring features.
user@host#
set security alg dns doctoring none -
Disable the NAT feature and retain the sanity-check feature by specifying the
sanity-checkconfiguration option.This option disables the NAT feature and retains the sanity-check feature.
user@host#
set security alg dns doctoring sanity-check -
If you are finished configuring the device, commit the configuration.
-
To verify the configuration, use the vty command show usp algs dns stats.
Platform-Specific DNS ALG Behavior
Use Feature Explorer to confirm platform and release support for specific features.
Use the following table to review platform-specific behaviors for your platform:
|
Platform |
Difference |
|---|---|
|
SRX Series |
|