ON THIS PAGE
Policy-Based GTP
The GPRS tunneling protocol (GTP) policies contain rules that permit, deny, or tunnel traffic. The device performs GTP policy filtering by checking every GTP packet against policies that regulate GTP traffic and by then forwarding, dropping, or tunneling the packet based on these policies.
Understanding Policy-Based GTP
By default, the public land mobile network (PLMN) that the Juniper Networks device protects is in the Trust zone. The device protects the PLMN in the Trust zone against other PLMNs in other zones. You can place all the PLMNs against which you are protecting your PLMN in the Untrust zone, or you can create user-defined zones for each PLMN. A PLMN can occupy one security zone or multiple security zones.
You must create policies to enable traffic to flow between zones and PLMNs. Policies contain rules that permit, deny, or tunnel traffic. The device performs GPRS tunneling protocol (GTP) policy filtering by checking every GTP packet against policies that regulate GTP traffic and by then forwarding, dropping, or tunneling the packet based on these policies.
By selecting the GTP service in a policy, you enable the device to permit, deny, or tunnel GTP traffic. However, this does not enable the device to inspect GTP traffic. For the device to inspect GTP traffic, you must apply a GTP configuration, also referred to as a GTP inspection object, to a policy.
You can apply only one GTP inspection object per policy, but you can apply a GTP inspection object to multiple policies. Using policies, you can permit or deny the establishment of GTP tunnels from certain peers such as a Serving GPRS Support Node (SGSN).
Use Feature Explorer to confirm platform and release support for specific features. Additional platforms may be supported.
See the Additional Platform Information section for more information.
Example: Enabling GTP Inspection in Policies
This example shows how to enable GTP inspection in policies.
Requirements
Before you begin, the device must be restarted after GTP is enabled. By default, GTP is disabled on the device.
Overview
In this example, you configure interfaces as ge-0/0/1 and ge-0/0/2, the addresses are 2.0.0.254/8 and 3.0.0.254/8. You then configure the security zone and specify address as 2.0.0.5/32 and 3.0.0.6/32. You enable the GTP service in the security policies to allow bidirectional traffic between two networks within the same PLMN.
Configuration
Procedure
CLI Quick Configuration
To quickly configure this section of the example,
copy the following commands, paste them into a text file, remove any
line breaks, change any details necessary to match your network configuration,
copy and paste the commands into the CLI at the [edit] hierarchy
level, and then enter commit from configuration
mode.
set security gprs gtp profile gtp1
set interfaces ge-0/0/1 unit 0 family inet address 2.0.0.254/8
set interfaces ge-0/0/2 unit 0 family inet address 3.0.0.254/8
set security zones security-zone sgsn interfaces ge-0/0/1.0 host-inbound-traffic system-services all
set security zones security-zone sgsn host-inbound-traffic protocols all
set security zones security-zone ggsn interfaces ge-0/0/2.0 host-inbound-traffic system-services all
set security zones security-zone ggsn host-inbound-traffic protocols all
set security address-book global address local-sgsn 2.0.0.5/32
set security address-book global address remote-ggsn 3.0.0.6/32
set security policies from-zone sgsn to-zone ggsn policy sgsn_to_ggsn match source-address local-sgsn destination-address remote-ggsn application junos-gprs-gtp
set security policies from-zone sgsn to-zone ggsn policy sgsn_to_ggsn then permit application-services gprs-gtp-profile gtp1
set security policies from-zone ggsn to-zone sgsn policy ggsn_to_sgsn match source-address remote-ggsn destination-address local-sgsn application junos-gprs-gtp
set security policies from-zone ggsn to-zone sgsn policy ggsn_to_sgsn then permit application-services gprs-gtp-profile gtp1
Step-by-Step Procedure
To configure GTP inspection in policies:
Create the GTP inspection object.
[edit]
user@host# set security gprs gtp profile gtp1
Configure interfaces.
[edit interfaces]
user@host# set ge-0/0/1 unit 0 family inet address 2.0.0.254/8
user@host# set ge-0/0/2 unit 0 family inet address 3.0.0.254/8
Configure security zones.
[edit security zones]
user@host# set security-zone sgsn interfaces ge-0/0/1.0
user@host# set security-zone sgsn host-inbound-traffic system-services all
user@host# set security-zone sgsn host-inbound-traffic protocols all
user@host# set security-zone ggsn interfaces ge-0/0/2.0
user@host# set security-zone ggsn host-inbound-traffic system-services all
user@host# set security-zone ggsn host-inbound-traffic protocols all
Specify addresses.
[edit security address-book global]
user@host# set address local-sgsn 2.0.0.5/32
user@host# set address remote-ggsn 3.0.0.6/32
Enable the GTP service in the security policies.
[edit security policies]
user@host# set from-zone sgsn to-zone ggsn policy sgsn_to_ggsn match source-address local-sgsn destination-address remote-ggsn application junos-gprs-gtp
user@host# set from-zone sgsn to-zone ggsn policy sgsn_to_ggsn then permit application-services gprs-gtp-profile gtp1
user@host# set from-zone ggsn to-zone sgsn policy ggsn_to_sgsn match source-address remote-ggsn destination-address local-sgsn application junos-gprs-gtp
user@host# set from-zone ggsn to-zone sgsn policy ggsn_to_sgsn then permit application-services gprs-gtp-profile gtp1
Results
From configuration mode, confirm your configuration
by entering the show security command. If the output does
not display the intended configuration, repeat the configuration instructions
in this example to correct it.
For brevity, this show output includes only the configuration
that is relevant to this example. Any other configuration on the system
has been replaced with ellipses (...).
[edit]

user@host# show security
...
gprs {
gtp {
profile gtp1;
  }
}
zones {
security-zone Trust {
host-inbound-traffic {
system-services {
all;
}
protocols {
all;
  }
}
interfaces {
ge-0/0/1.0;
  }
}
...

host-inbound-traffic {
system-services {
all;
}
protocols {
all;
  }
}
interfaces {
ge-0/0/1.0;
  }
}
host-inbound-traffic {
system-services {
all;
}
protocols {
all;
  }
}
interfaces {
ge-0/0/2.0;
   }
}
}
address-book {
global {
address local-sgsn 2.0.0.5/32;
address remote-ggsn 3.0.0.6/32;
   }
}
policies {
from-zone sgsn to-zone ggsn {
policy sgsn_to_ggsn {
match {
source-address local-sgsn;
destination-address remote-ggsn;
application junos-gprs-gtp;
}
then {
permit {
application-services {
gprs-gtp-profile gtp1;
   }
   }
  }
  }
}
from-zone ggsn to-zone sgsn {
policy ggsn_to_sgsn {
match {
source-address remote-ggsn;
destination-address local-sgsn;
application junos-gprs-gtp;
}
}
then {
permit {
application-services {
gprs-gtp-profile gtp1;
     }
     }
  }
  }
default-policy {
permit-all;
}
}
...
If you are done configuring the device, enter commit from configuration mode.
Understanding GTP Inspection Objects
For the device to perform the inspection of GPRS
tunneling protocol (GTP) traffic, you must create a GTP inspection
object and then apply it to a policy. Use the following command to
create a GTP inspection object named la-ny: set security
gprs gtp profile la-ny. GTP inspection objects provide more
flexibility in that they allow you to configure multiple policies
that enforce different GTP configurations. You can configure the device
to control GTP traffic differently based on source and destination
zones and addresses, action, and so on.
To configure GTP features, you must enter the context
of a GTP configuration. To save your settings in the CLI, you must
first exit the GTP configuration, then enter the commit command.
Example: Creating a GTP Inspection Object
This example shows how to create a GTP inspection object.
Requirements
No special configuration beyond device initialization is required before configuring this feature.
Overview
In this example, you create a GTP inspection object named LA-NY. You preserve most of the default values, and enable the sequence number validation feature.
Configuration
Procedure
Step-by-Step Procedure
To configure a GTP inspection object:
Create a GTP inspection object.
[edit]
user@host# set security gprs gtp profile la-ny
If you are done configuring the device, commit the configuration.
[edit]
user@host# commit
Understanding GTPv2
The GPRS tunneling protocol (GTP) establishes a GTP tunnel between a Serving GPRS Support Node (SGSN) and a Gateway GPRS Support Node (GGSN) for individual Mobile Stations (MS). GTP version 2 (GTPv2) is supported from Junos OS Release 11.4.
GTPv2 is part of Long Term Evolution (LTE), a fourth generation (4G) wireless broadband technology developed by Third-Generation Partnership Project (3GPP). 3GPP is the standard body for developing GPRS standards. LTE is designed to increase the capacity and speed of mobile telephone networks. GTPv2 is a protocol designed for LTE networks. An LTE network comprises network elements, LTE interfaces, and protocols.
GTPv0 and GTPv1 are implemented using SGSNs and GGSNs. However, in GTPv2, the traditional SGSNs and GGSNs are replaced by three logical nodes—a serving gateway (SGW), a packet data network gateway (PGW), and a mobility management entity (MME).
Figure 1 shows the following LTE interfaces deployed in the public land mobile network (PLMN).
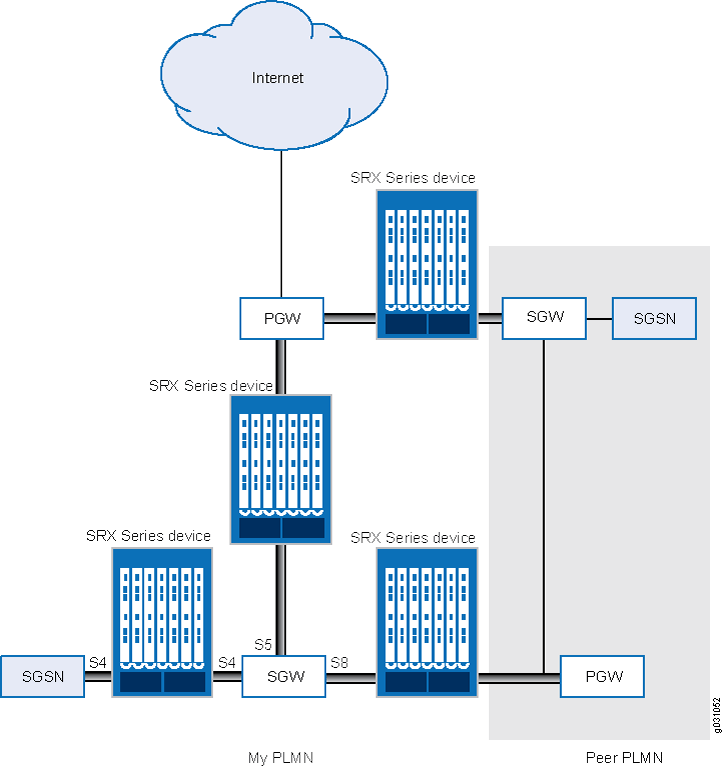
-
S5—This interface connects an SGW and a PGW. It provides user plane tunneling and tunnel management capability between the SGW and the PGW. It is also used for SGW relocation that happens because of user equipment mobility or SGW connection to a non-collocated PGW. The S5 interface is equivalent to the Gn interface in a Third Generation (3G) mobile network.
-
S8—This interface connects an SGW in a visited PLMN (VPLM) and a PGW in a home PLMN (HPLMN). S8 is the inter-PLMN variant of S5. The S8 interface is equivalent to the Gp interface in a 3G mobile network.
-
S4—This interface connects an S4 SGSN and an SGW. It provides related control and mobility support between GPRS core network and 3GPP Anchor function. It also provides user plane tunneling if direct tunneling is not established. The S4 interface does not have any equivalent interface in the 3G mobile network, because it provides interoperability between 3G and 4G networks.
Understanding Policy-Based GTPv2
GPRS tunneling protocol version 2 (GTPv2) implements a policy mechanism that checks every GTPv2 packet against security policies that regulate GTPv2 traffic. Based on the security policy, the packet is then forwarded, dropped, or tunneled.
A GTPv2 security policy allows you to forward, deny, or tunnel GTPv2 traffic. However, the security policy does not enable GTPv2 traffic inspection on the device. To enable traffic inspection, you must apply a GTPv2 inspection object to a security policy. A GTPv2 inspection object is a set of configuration parameters for processing GTPv2 traffic.
You can apply only one GTPv2 inspection object per security policy. However, you can apply an inspection object to multiple security policies.
By default, a GTPv2 inspection object is not applied to a security policy. You need to explicitly apply an inspection object to a security policy.
Using GTPv2 security policies, you can permit or deny GTPv2 tunnel establishment from certain peers, such as a serving gateway (SGW). You can configure GTPv2 security policies that specify multiple source and destination addresses, address groups, or an entire zone.
Example: Enabling GTPv2 Inspection in Policies
This example shows how to enable GTPv2 inspection in policies.
Requirements
Before you begin, the device must be restarted after GTPv2 is enabled. By default, GTPv2 is disabled on the device.
Overview
In this example, you configure interfaces as ge-0/0/1 and ge-0/0/2, and assign them the interface addresses 4.0.0.254/8 and 5.0.0.254/8, respectively. You then configure the security zones and specify the global addresses as 4.0.0.5/32 and 5.0.0.6/32, respectively. You enable GTPv2 inspection in security policies to allow bidirectional traffic between two networks within the same public land mobile network (PLMN).
Configuration
Procedure
CLI Quick Configuration
To quickly configure this example, copy the
following commands, paste them into a text file, remove any line breaks,
change any details necessary to match your network configuration,
copy and paste the commands into the CLI at the [edit] hierarchy
level, and then enter commit from configuration
mode.
 set security gprs gtp profile gtp2
set interfaces ge-0/0/1 unit 0 family inet address 4.0.0.254/8
set interfaces ge-0/0/2 unit 0 family inet address 5.0.0.254/8
set security zones security-zone sgw1 interfaces ge-0/0/1.0 host-inbound-traffic system-services all
set security zones security-zone sgw1 host-inbound-traffic protocols all
set security zones security-zone pgw1 interfaces ge-0/0/2.0 host-inbound-traffic system-services all
set security zones security-zone pgw1 host-inbound-traffic protocols all
set security address-book global address local-sgw1 4.0.0.5/32
set security address-book global address remote-pgw1 5.0.0.6/32
set security policies from-zone sgw1 to-zone pgw1 policy sgw1_to_pgw1 match source-address local-sgw1 destination-address remote-pgw1 application junos-gprs-gtp
set security policies from-zone sgw1 to-zone pgw1 policy sgw1_to_pgw1 then permit application-services gprs-gtp-profile gtp2
set security policies from-zone pgw1 to-zone sgw1 policy pgw1_to_sgw1 match source-address remote-pgw1 destination-address local-sgw1 application junos-gprs-gtp
set security policies from-zone pgw1 to-zone sgw1 policy pgw1_to_sgw1 then permit application-services gprs-gtp-profile gtp2
Step-by-Step Procedure
To configure GTPv2 inspection in policies:
Create the GTPv2 inspection object.
[edit]
user@host# set security gprs gtp profile gtp2
Configure the interfaces.
[edit interfaces]
user@host# set ge-0/0/1 unit 0 family inet address 4.0.0.254/8
user@host# set ge-0/0/2 unit 0 family inet address 5.0.0.254/8
Configure the security zones.
[edit security zones]
user@host# set security-zone sgw1 interfaces ge-0/0/1.0
user@host# set security-zone sgw1 host-inbound-traffic system-services all
user@host# set security-zone sgw1 host-inbound-traffic protocols all
user@host# set security-zone pgw1 interfaces ge-0/0/2.0
user@host# set security-zone pgw1 host-inbound-traffic system-services all
user@host# set security-zone pgw1 host-inbound-traffic protocols all
Specify the addresses.
[edit security address-book global]
user@host# set address local-sgw1 4.0.0.5/32
user@host# set address remote-pgw1 5.0.0.6/32
Enable GTPv2 inspection in the security policies.
[edit security policies]
user@host# set from-zone sgw1 to-zone pgw1 policy sgw1_to_pgw1 match source-address local-sgw1 destination-address remote-pgw1 application junos-gprs-gtp
user@host# set from-zone sgw1 to-zone pgw1 policy sgw1_to_pgw1 then permit application-services gprs-gtp-profile gtp2
user@host# set from-zone pgw1 to-zone sgw1 policy pgw1_to_sgw1 match source-address remote-pgw1 destination-address local-sgw1 application junos-gprs-gtp
user@host# set from-zone pgw1 to-zone sgw1 policy pgw1_to_sgw1 then permit application-services gprs-gtp-profile gtp2
Results
From configuration mode, confirm your configuration
by entering the show security policies command. If the
output does not display the intended configuration, repeat the configuration
instructions in this example to correct it.
[edit]
user@host# show security policies
from-zone sgw1 to-zone pgw1 {
    policy sgw1_to_pgw1 {
    match {
    source-address local-sgw1;
        destination-address remote-pgw1;
        application junos-gprs-gtp;
        }
        then {
            permit {
            application-services {
            gprs-gtp-profile gtp2;
        }
        }
    }
    }
}
from-zone pgw1 to-zone sgw1 {
    policy pgw1_to_sgw1 {
    match {
    source-address remote-pgw1;
        destination-address local-sgw1;
        application junos-gprs-gtp;
    }
        then {
            permit {
            application-services {
            gprs-gtp-profile gtp2;
        }
    }
    }
    }
}
default-policy {
    permit-all;
}
If you are done configuring the device, enter commit from configuration mode.
Understanding GTP Path Restart
Restarting a GPRS tunneling protocol (GTP) path terminates all GTP tunnels between two devices. Each GTP gateway is associated with a restart number. You can obtain a restart number from the Recovery information element (IE) of a GTP message.
You can detect a restart by comparing the locally stored restart number with the newly obtained one. The locally stored restart number is a nonzero value and does not match with the new restart number.
You can use the set security gprs gtp profile name restart-path (echo | create | all) configuration statement to restart a GTP path.
After you configure this command, the device detects the changed
restart number obtained from the Recovery IE in the messages. You
can use the echo option to obtain a new restart number
from echo messages, the create option to obtain a restart
number from create-session messages, or the all option
to obtain a new restart number from all types of GTP messages.
Example: Restarting a GTPv2 Path
This example shows how to restart a GTPv2 path.
Requirements
No special configuration beyond device initialization is required before configuring this feature.
Overview
For brevity, this example uses GTPv2.
In this example, you restart the GTPv2 path for the GTPv2 inspection object named gtp2. You obtain a new restart number from the Recovery information element (IE) in an echo message.
Configuration
Procedure
Step-by-Step Procedure
To restart the GTPv2 path:
Specify the GTPv2 profile.
[edit]
user@host# set security gprs gtp profile gtp2
Restart the path.
[edit]
user@host# set security gprs gtp profile gtp2 restart-path echo
If you are done configuring the device, commit the configuration.
[edit]
user@host# commit
Understanding GTPv2 Tunnel Cleanup
A GPRS tunneling protocol version 2 (GTPv2) tunnel enables transmission of GTPv2 traffic between GPRS support nodes (GSNs).
While transmitting traffic, GTPv2 tunnels might hang for a number of reasons. For example, delete-pdp-request messages might get lost in the network, or a GSN might not shut down properly. In such a case, you can remove hanging GTPv2 tunnels either automatically or manually.
To remove a hanging GTPv2 tunnel automatically, you need to set a GTPv2 tunnel timeout value on the device. The device automatically identifies and removes a tunnel that is idle for the period specified by the timeout value. The default GTPv2 tunnel timeout value is 36 hours.
You can use the set security gprs gtp profile name timeout configuration statement to configure this value on the device. The timeout range is 1 through
1000 hours.
To remove a hanging GTPv2 tunnel manually, you need to use the clear security gprs gtp tunnel operational mode
command.
Example: Setting the Timeout Value for GTPv2 Tunnels
This example shows how to set the timeout value for GTPv2 tunnels.
Requirements
No special configuration beyond device initialization is required before configuring this feature.
Overview
In this example, you set the tunnel timeout value to 40 hours for the GTPv2 inspection object named gtp2.
Configuration
Procedure
Step-by-Step Procedure
To configure the GTPv2 tunnel timeout value:
Specify the GTPv2 profile.
[edit]
user@host# set security gprs gtp profile gtp2
Specify the timeout value.
[edit]
user@host# set security gprs gtp profile gtp2 timeout 40
If you are done configuring the device, commit the configuration.
[edit]
user@host# commit
Understanding GTPv2 Traffic Logging
You can use the console or syslog to view GPRS tunneling protocol version 2 (GTPv2) traffic logs. You can configure the device to log GTPv2 packets based on their status. GTPv2 packet status can be any of the following:
Forwarded—GTPv2 packet was forwarded because it was valid.
State-invalid—GTPv2 packet was dropped because it failed stateful inspection or a sanity check. In case of a sanity check failure, the packet is marked as sanity.
Prohibited—GTPv2 packet was dropped because it failed message length, message type, or International Mobile Subscriber Identity (IMSI) prefix checks.
Rate-limited—GTPv2 packet was dropped because it exceeded the maximum rate limit of the destination GPRS support node (GSN).
By default, GTPv2 logging is disabled on the device. You can
use the set security gprs gtp profile name log configuration statement to enable GTPv2 logging on the device.
Example: Enabling GTPv2 Traffic Logging
This example shows how to enable GTPv2 traffic logging on a device.
Requirements
No special configuration beyond device initialization is required before configuring this feature.
Overview
In this example, you enable GTPv2 traffic logging for forwarded GTPv2 packets.
Configuration
Procedure
Step-by-Step Procedure
To enable GTPv2 traffic logging for forwarded GTPv2 packets:
Specify the GTPv2 profile.
[edit]
user@host# set security gprs gtp profile gtp2
Enable logging for GTPv2 forwarded packets.
[edit]
user@host# set security gprs gtp profile gtp2 log forwarded basic
If you are done configuring the device, commit the configuration.
[edit]
user@host# commit
Verification
To verify the configuration is working properly,
enter the show security gprs command.
Additional Platform Information
Use Feature Explorer to confirm platform and release support for specific features. Additional platforms may be supported.
To accommodate IoT (Internet of Things) and roaming firewall use cases, the GTP tunnel scale per SPU is increased for the following SRX5000 (SRX5400, SRX5600, SRX5800), and SRX4600 devices:
|
Platform |
SRX5000 SPC2 |
SRX5000 SPC3 |
SRX4600 |
|
Pre 19.4 Tunnel Scale per SPU |
600K |
1.2M |
400K |
|
Pre 19.4 Tunnel Scale per SPC |
600K * 4 |
1.2M * 2 |
400k |
|
19.4 onwards Tunnel Scale per SPU |
3M |
12M |
4M |
|
19.4 onwards Tunnel Scale per SPC |
3M * 4 |
12M * 2 |
4M |
Starting in Junos OS Release 20.1R1, to enable IoT (Internet of Things) and roaming firewall use cases, the GTP tunnel scale is increased for the following SRX Series Firewalls:
|
Platform |
SRX1500 |
SRX4100 |
SRX4200 |
|
Pre 20.1 Tunnel Scale per system |
204800 |
409600 |
819200 |
|
20.1 onwards Tunnel Scale per system |
1024000 |
4096000 |
4096000 |
For vSRX Virtual Firewall instances, the number of tunnels supported depends on the available system memory.
|
Platform |
Memory |
Tunnel Number |
|
vSRX Virtual Firewall |
4G/6G |
40K |
|
8G/10G/12G/14G |
200K |
|
|
16G/20G/24G/28G |
400K |
|
|
32G/40G/48G |
800K |
|
|
56G/64G |
1600K (1.6M) |
You can configure policies that specify “Any” as the source or destination zone (thereby including all hosts in the zone), and you can configure policies that specify multiple source and destination addresses.
In policies, you can enable traffic logging.