Other MC-LAG Configurations
Configuring Active-Active Bridging and VRRP over IRB in Multichassis Link Aggregation on MX Series Routers
The following sections describe the configuration of active-active bridging and VRRP over IRB in a multichassis link aggregation (MC-LAG) :
- Configuring MC-LAG
- Configuring the Interchassis Link-Protection Link
- Configuring Multiple Chassis
- Configuring the Service ID
- Configuring IGMP Snooping for Active-Active MC-LAG
Configuring MC-LAG
An MC-LAG is composed of logical link aggregation groups (LAGs) and is configured under the [edit interfaces aeX] hierarchy, as follows:
[edit]
interfaces {
    ae0 {
        encapsulation ethernet-bridge;
        multi-chassis-protection {
            peer 10.10.10.10 {
                interface ge-0/0/0;
                }
            }
        aggregated-ether-options {
            mc-ae {
                mode active-active; # see note below
            }
        }
    }
}
The mode active-active statement is valid only if encapsulation is an ethernet-bridge or extended-vlan-bridge.
Use the mode statement to specify if an MC-LAG is active-standby or active-active. If the ICCP connection is UP and ICL comes UP, the router configured as standby brings up the multichassis aggregated Ethernet interfaces shared with the peer.
Using multi-chassis-protection at the physical interface level is a way to reduce the configuration at the logical interface level.
If there are n+1 logical interfaces under ae0, from ae0.0 through ae0.n, there are n+1 logical interfaces under ge-0/0/0 as well, from ge-0/0/0.0 through ge-0/0/0.n, each ge-0/0/0 logical interface is a protection link for the ae0 logical interface.
A bridge domain cannot have multichassis aggregated Ethernet logical interfaces that belong to different redundancy groups.
Configuring the Interchassis Link-Protection Link
The interchassis link-protection link (ICL-PL) provides redundancy when a link failure (for example, an MC-LAG trunk failure) occurs on one of the active links. The ICL-PL is an aggregated Ethernet interface. You can configure only one ICL-PL between the two peers, although you can configure multiple MC-LAGs between them.
The ICL-PL assumes that interface ge-0/0/0.0 is used to protect interface ae0.0 of MC-LAG-1:
[edit]
interfaces {
    ae0 {
        ....
        unit 0 {
            multi-chassis-protection {
                peer 10.10.10.10 {
                    interface ge-0/0/0.0;
                }
                ....
            }
            ...
        }
    }
}
The protection interface can be an Ethernet type interface such as ge or xe, or an aggregated Ethernet (ae) interface.
Configuring Multiple Chassis
A top-level hierarchy is used to specify a multichassis-related configuration, as follows:
[edit]
multi-chassis {
    multi-chassis-protection {
        peer 10.10.10.10 {
            interface ge-0/0/0;
        }
    }
}
This example specifies interface ge-0/0/0 as the multichassis protection interface for all the multichassis aggregated Ethernet interfaces which are also part of the peer. This can be overridden by specifying protection at the physical interface level and the logical interface level.
Configuring the Service ID
You must configure the same unique network-wide configuration for a service in the set of PE routers providing the service. You can configure the service IDs under the level of the hierarchies shown in the following examples:
Global Configuration (Default Logical System)
switch-options {
    service-id 10;
}
bridge-domains {
    bd0 {
        service-id 2;
    }
}
routing-instances {
    r1 {
        switch-options {
            service-id 10;
        }
        bridge-domains {
            bd0 {
                service-id 2;
            }
        }
    }
}
Logical Systems
ls1 {
    switch-options {
        service-id 10;
    }
    routing-instances {
        r1 {
            switch-options {
                service-id 10;
            }
        }
    }
}
Using a service name per bridge domain is not supported.
The bridge-level service ID is required to link related bridge domains across peers, and should be configured with the same value. The service-id values share the name space across all bridging and routing instances, and across peers. Thus, duplicate values for service IDs are not permitted across these entities.
The service ID at the bridge domain level is mandatory for type non-single VLAN bridge domains. The service ID is optional for bridge domains with a VLAN identifier (VID) defined. If no service ID is defined in the latter case, it is picked up from the service ID configuration for that routing instance.
When this default routing instance (or any other routing instance) which contains a bridge domain containing a multichassis aggregated Ethernet interface is configured, you must configure a global-level switch-options service-id number , irrespective of whether the contained bridge domains have specific service IDs configured.
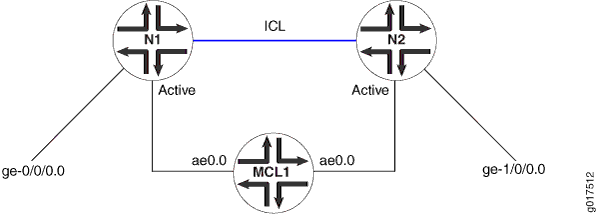
In the sample illustration shown in Figure 1, network routing instances N1 and N2, both for the same service ID, are configured with same service ID in both N1 and N2. Use of a name string instead of a number is not supported.
The following configuration restrictions apply:
-
The service ID must be configured when the multichassis aggregated Ethernet interface is configured and a multichassis aggregated Ethernet logical interface is part of a bridge domain. This requirement is enforced.
-
A single bridge domain cannot correspond to two redundancy group IDs.
In Figure 2, it is possible to configure a bridge domain consisting of logical interfaces from two multichassis aggregated Ethernet interfaces and map them to a separate redundancy group ID, which is not supported. A service must be mapped one-to-one with the redundancy group providing the service. This requirement is enforced.
Figure 2: Bridge Domain with Logical Interfaces from Two Multichassis Aggregated Ethernet Interfaces
To display the multichassis aggregated Ethernet configuration, use the show interfaces mc-ae command. For more information, see the CLI Explorer.
Configuring IGMP Snooping for Active-Active MC-LAG
For the multicast solution to work, the following must be configured:
-
The multichassis protection link must be configured as a router-facing interface.
[edit bridge-domain bd-name]
protocols {
    igmp-snooping {
        interface ge-0/0/0.0 {
            multicast-router-interface;
        }
    }
}
In this example, ge-0/0/0.0 is an ICL interface.
-
The
multichassis-lag-replicate-statestatement options must be configured under themulticast-snooping-optionsstatement for that bridge domain.
Snooping with active-active MC-LAG is only supported in non-proxy mode.
Configuring IGMP Snooping in MC-LAG Active-Active Mode
You can use the bridge-domain statement's service-id option to specify the multichassis aggregated Ethernet
configuration on MX240 routers, MX480 routers, MX960 routers and QFX
Series switches.
The
service-idstatement is mandatory for non-single VLAN type bridge domains (none, all, or vlan-id-tags:dual).The statement is optional for bridge domains with a VID defined.
The bridge-level
service-idis required to link related bridge domains across peers, and should be configured with the same value.The
service-idvalues share the name space across all bridging and routing instances, and across peers. Thus, duplicateservice-idvalues are not permitted across these entities.A change of bridge service-id is considered catastrophic, and the bridge domain is changed.
This procedure allows you to enable or disable the replication feature.
To configure IGMP snooping in MC-LAG active-active mode :
Configuring Manual and Automatic Link Switchover for MC-LAG Interfaces on MX Series Routers
In a multichassis link aggregation (MC-LAG) topology with active-standby mode, a link switchover happens only if the active node goes down. You can override this default behavior by configuring an MC-LAG interface in active-standby mode to automatically revert to a preferred node. With this configuration, you can trigger a link switchover to a preferred node even when the active node is available. For example, consider two nodes, PE1 and PE2. PE1 is configured in active mode making it a preferred node, and PE2 is configured in active-standby mode. In case of any failure at PE1, PE2 becomes the active node. However, as soon as PE1 is available again, an automatic link switchover is triggered and the control is switched back to PE1 even though PE2 is active.
You can configure the link switchover in two modes: revertive
and nonrevertive. In revertive mode, the link switchover is triggered
automatically by using the request interface mc-ae switchover operational mode command. In nonrevertive mode, the link switchover
must be triggered manually by the user. You can also configure a revert
time that triggers an automatic or manual switchover when the specified
timer expires.
If two MC-LAG devices configured in an active-standby setup using Inter-Chassis Control Protocol (ICCP) and nonrevertive switchcover mode is configured on the aggregated Ethernet interfaces of both the MC-LAGs and when both mc-ae interfaces are linked together with a Layer 2 circuit local-switching configuration, we recommend that you perform switchover by entering the
request interface
mc-ae switchover (immediate mcae-id mcae-id | mcae-id mcae-id)
operational mode command on only one of the aggregated Ethernet interfaces of an MC-LAG device. This command can be issued only on MC-LAG devices that are configured as active nodes (by using thestatus-control activestatement at the[edit interfaces aeX aggregated-ether-options mc-ae]hierarchy level).In nonrevertive switchover mode, when an MC-LAG interface transitions to the standby state because of an MC-LAG member link failure and another MC-LAG interface moves to the active state, the MC-LAG in standby state remains in that state until the MC-LAG in active state encounters a failure and returns to the active state.
If you perform a switchover on both the aggregated Ethernet interfaces in the MC-LAG, because of Layer 2 circuit local-switching configuration, a switchover on one aggregated Ethernet interface triggers a switchover on the other aggregated Ethernet interface. In such a scenario, both the aggregated Ethernet interfaces move to the standby state and then transition back to the active state. Therefore, you must not perform switchover on both the aggregated Ethernet interfaces in an MC-LAG at the same time.
Layer 2 circuit configuration and VPLS functionalities are not supported if you configure an MC-LAG interface to be in revertive switchover mode. You can configure the revertive or nonrevertive switchover capability only if two MC-LAG devices are configured in an active-standby setup (one device set as an active node by using the
status-control standbystatement and the other device set as a standby node by using thestatus-control activestatement at the[edit interfaces aeX aggregated-ether-options mc-ae]hierarchy level. You can perform a switchover by entering therequest interface mc-ae switchover (immediate mcae-id mcae-id | mcae-id mcae-id)operational mode command only on MC-LAG devices configured as active nodes.
To configure the link switchover mechanism on an MC-LAG interface:
You can use the show interfaces mc-ae revertive-info command to view the switchover configuration information.
Forcing MC-LAG Links or Interfaces with Limited LACP Capability to Be Up
In an MC-LAG network, an MC-LAG client link without Link Access Control Protocol (LACP) configuration remains down and cannot be accessed by the MC-LAG switches.
To ensure that the client device with limited LACP capability
is up and accessible on the MC-LAG network, configure one of the aggregated
Ethernet links or interfaces on a MC-LAG switch to be up by using
the force-up statement at the appropriate hierarchy level
on your device:
[edit interfaces interface-name aggregated-ether-options lacp]
You can configure the force-up feature on the MC-LAG switches in either active mode or standby mode. However, in order to prevent duplicate traffic and packet drops, you configure the force-up feature only on one aggregated Ethernet link of the MC-LAG switches. If multiple aggregated Ethernet links are up on the MC-LAG switches with force-up feature configured, then the device selects the link based on the LACP port ID and port priority. The port with the lowest priority is given preference. In case of two ports with the same priority, the one with the lowest port ID is given preference.
The force-up option is not supported on QFX10002 switches.
On the QFX5100 switch, you can configure the force-up feature in Link Aggregation Control Protocol (LACP) on the MC-LAG switches starting with Junos OS Release 14.1X53-D10.
If LACP comes up partially in the MC-LAG network—that is, it comes up on one of the MC-LAG switches and does not comes up on other MC-LAG switches—the force-up feature is disabled.
Increasing ARP and Network Discovery Protocol Entries for Enhanced MC-LAG and Layer 3 VXLAN Topologies
- Understanding the Need for an Increase in ARP and Network Discovery Protocol (NDP) Entries
- Increasing ARP and Network Discovery Protocol Entries for Enhanced MC-LAG Using IPv4 Transport
- Increasing ARP and Network Discovery Protocol Entries for Enhanced MC-LAG Using IPv6 Transport
- Increasing ARP for EVPN-VXLAN Gateway for Border-Leaf in Edge Routed Bridge (ERB) or Spine in Centrally Routed Bridge (CRB) for IPv4 Tenant Traffic
- Increasing ARP and Network Discovery Protocol Entries for EVPN-VXLAN gateway for Border-Leaf in Edge Routed Bridge (ERB) or Spine in Centrally Routed Bridge (CRB) for IPv6 Tenant Traffic
Understanding the Need for an Increase in ARP and Network Discovery Protocol (NDP) Entries
The number of ARP and NDP entries has increased to 256,000 to improve enhanced MC-LAG and Layer 3 VXLAN scenarios.
Here are some enhanced MC-LAG and Layer 3 VXLAN scenarios in which an increase in ARP and NDP entries is needed:
Enhanced MC-LAG topology with a large number of MC-AE interfaces that contain a large number of members per chassis.
Non-collapsed spine-leaf topology, in which the leaf devices operate as Layer 2 gateways and handle traffic within the VXLAN, and the spine devices operate as Layer 3 gateways and handle traffic between the VXLANs using IRB interfaces.
In this scenario, the increase in ARP and NDP entries is needed at the spine level.
Leaf devices that operate as both Layer 2 and Layer 3 gateways.
In this scenario, the transit spine devices provide Layer 3 routing functioning only, and the increased number of ARP and NDP entries in needed only at the leaf level.
Increasing ARP and Network Discovery Protocol Entries for Enhanced MC-LAG Using IPv4 Transport
To increase the number of ARP and NDP entries using IPv4 transport, follow these steps. We recommend that you use the values provided in this procedure for optimal performance:
Increasing ARP and Network Discovery Protocol Entries for Enhanced MC-LAG Using IPv6 Transport
To increase the number of ARP and Network Discovery Protocol entries using IPv6 transport. We recommend that you use the values provided in this procedure for optimal performance:
Increasing ARP for EVPN-VXLAN Gateway for Border-Leaf in Edge Routed Bridge (ERB) or Spine in Centrally Routed Bridge (CRB) for IPv4 Tenant Traffic
To increase the number of ARP entries using IPv4 tenant traffic, follow these steps. We recommend that you use the values provided in this procedure for optimal performance:
Increasing ARP and Network Discovery Protocol Entries for EVPN-VXLAN gateway for Border-Leaf in Edge Routed Bridge (ERB) or Spine in Centrally Routed Bridge (CRB) for IPv6 Tenant Traffic
To increase the number of ARP and Network Discovery Protocol entries using IPv4 and IPv6 tenant traffic, follow these steps. We recommend that you use the values provided in this procedure for optimal performance:
Synchronizing and Committing Configurations
To propagate, synchronize, and commit configuration changes from one device (Junos Fusion Provider Edge, Junos Fusion Enterprise, EX Series switches, and MX Series routers) to another, perform following tasks:
- Configure Devices for Configuration Synchronization
- Create a Global Configuration Group
- Create a Local Configuration Group
- Create a Remote Configuration Group
- Create Apply Groups for the Local, Remote, and Global Configurations
- Synchronizing and Committing Configurations
- Troubleshooting Remote Device Connections
Configure Devices for Configuration Synchronization
Configure the hostnames or IP addresses for the devices that will be synchronizing their configurations as well as the usernames and authentication details for the users administering configuration synchronization. Additionally, enable a NETCONF connection so that the devices can synchronize their configurations. Secure Copy Protocol (SCP) copies the configurations securely between the devices.
For example, if you have a local device named Switch A and want to synchronize a configuration with remote devices named Switch B, Switch C, and Switch D, you need to configure the details for Switch B, Switch C, and Switch D on Switch A.
To specify the configuration details:
Create a Global Configuration Group
Create a global configuration group the local and remote devices.
To create a global configuration group:
The output for the configuration is as follows:
groups {
global {
when {
peers [ Switch A Switch B Switch C Switch D ];
}
interfaces {
ge-0/0/0 {
unit 0 {
family inet {
address 10.1.1.1/8;
}
}
}
ge-0/0/1 {
ether-options {
802.3ad ae0;
}
}
ge-0/0/2 {
ether-options {
802.3ad ae1;
}
}
ae0 {
aggregated-ether-options {
lacp {
active;
}
}
unit 0 {
family ethernet-switching {
interface-mode trunk;
vlan {
members v1;
}
}
}
}
ae1 {
aggregated-ether-options {
lacp {
active;
system-id 00:01:02:03:04:05;
admin-key 3;
}
mc-ae {
mc-ae-id 1;
redundancy-group 1;
mode active-active;
}
}
unit 0 {
family ethernet-switching {
interface-mode access;
vlan {
members v1;
}
}
}
}
}
switch-options {
service-id 1;
}
vlans {
v1 {
vlan-id 100;
l3-interface irb.100;
}
}
}
}
Create a Local Configuration Group
Create a local configuration group for the local device.
To create a local configuration group:
The output for the configuration is as follows:
groups {
local {
when {
peers Switch A;
}
interfaces {
ae1 {
aggregated-ether-options {
mc-ae {
chassis-id 0;
status-control active;
events {
iccp-peer-down {
prefer-status-control-active;
}
}
}
}
}
irb {
unit 100 {
family inet {
address 10.10.10.3/8 {
arp 10.10.10.2 l2-interface ae0.0 mac 00:00:5E:00:53:00;
}
}
}
}
}
multi-chassis {
multi-chassis-protection 10.1.1.1 {
interface ae0;
}
}
}
}
Create a Remote Configuration Group
Create a remote configuration group for remote devices.
To create a remote configuration group:
The output for the configuration is as follows:
groups {
remote {
when {
peers Switch B Switch C Switch D
}
interfaces {
    ae1 {
        aggregated-ether-options {
            mc-ae {
                chassis-id 1;
                status-control standby;
                events {
                    iccp-peer-down {
                        prefer-status-control-active;
                    }
                }
            }
        }
    }
    irb {
        unit 100 {
            family inet {
                address 10.10.10.3/8 {
                    arp 10.10.10.2 l2-interface ae0.0 mac 00:00:5E:00:53:00;
                }
            }
        }
    }
}
    multi-chassis {
        multi-chassis-protection 10.1.1.1 {
            interface ae0;
        }
    }
}
}
Create Apply Groups for the Local, Remote, and Global Configurations
Create apply groups so changes in the configuration are inherited by local, remote, and global configuration groups. List the configuration groups in order of inheritance, where the configuration data in the first configuration group takes priority over the data in subsequent configuration groups.
When you apply the configuration groups and issue the commit
peers-synchronize command, changes are committed on both the
local and remote devices. If there is an error on any of the devices,
an error message is issued, and the commit is terminated.
To apply the configuration groups:
[edit] user@switch# set apply-groups [<name of global configuration group> <name of local configuration group> <name of remote configuration group>]
For example:
[edit] user@switch# set apply-groups [ global local remote ]
The output for the configuration is as follows:
apply-groups [ global local remote ];Synchronizing and Committing Configurations
The commit at <"string"> command is not
supported when performing configuration synchronization.
You can enable the peers-synchronize statement on
the local (or requesting) device to copy and load its configuration
to the remote (or responding) device by default. You can alternatively
issue the commit peers-synchronize command.
Configure the
commitcommand on the local (or requesting) to automatically perform apeers-synchronizeaction between devices.[edit] user@switch# set system commit peers-synchronize
The output for the configuration is as follows:
system { commit { peers-synchronize; } }Issue the
commit peers-synchronizecommand on the local (or requesting) device.[edit] user@switch# commit peers-synchronize
Troubleshooting Remote Device Connections
Problem
Description
When you issue the commit command, the system
issues the following error message:
root@Switch A# commit
error: netconf: could not read hello error: did not receive hello packet from server error: Setting up sessions for peer: 'Switch B' failed warning: Cannot connect to remote peers, ignoring it
The error message shows that there is a NETCONF connection issue between the local device and remote device.
Resolution
Resolution
Verify that the SSH connection to the remote device (Switch B) is working.
root@Switch A# ssh root@Switch B
@@@@@@@@@@@@@@@@@@@@@@@@@@@@@@@@@@@@@@@@@@@@@@@@@@@@@@@@@@@ @    WARNING: REMOTE HOST IDENTIFICATION HAS CHANGED!     @ @@@@@@@@@@@@@@@@@@@@@@@@@@@@@@@@@@@@@@@@@@@@@@@@@@@@@@@@@@@ IT IS POSSIBLE THAT SOMEONE IS DOING SOMETHING NASTY! Someone could be eavesdropping on you right now (man-in-the-middle attack)! It is also possible that a host key has just been changed. The fingerprint for the ECDSA key sent by the remote host is 21:e8:5a:58:bb:29:8b:96:a4:eb:cc:8a:32:95:53:c0. Please contact your system administrator. Add correct host key in /root/.ssh/known_hosts to get rid of this message. Offending ECDSA key in /root/.ssh/known_hosts:1 ECDSA host key for Switch A has changed and you have requested strict checking. Host key verification failed.
The error message shows that the SSH connection is not working.
Delete the key entry in the /root/.ssh/known_hosts:1 directory and try to connect to Switch B again.
root@Switch A# ssh root@Switch B
The authenticity of host 'Switch B (10.92.76.235)' can't be established. ECDSA key fingerprint is 21:e8:5a:58:bb:29:8b:96:a4:eb:cc:8a:32:95:53:c0. Are you sure you want to continue connecting (yes/no)? yes Warning: Permanently added 'Switch A,10.92.76.235' (ECDSA) to the list of known hosts. Password: Last login: Wed Apr 13 15:29:58 2016 from 192.168.61.129 - JUNOS 15.1I20160412_0929_dc-builder Kernel 64-bit FLEX JNPR-10.1-20160217.114153_fbsd-builder_stable_10 At least one package installed on this device has limited support. Run 'file show /etc/notices/unsupported.txt' for details.
Connection to Switch B was successful.
Log out of Switch B.
root@Switch B# exit
logout Connection to Switch B closed.
Verify that NETCONF over SSH is working.
root@Switch A# ssh root@Switch B -s netconf
logout Connection to st-72q-01 closed.Password:<hello xmlns="urn:ietf:params:xml:ns:netconf:base:1.0"><capabilities><capability>urn:ietf:params:netconf:base:1.0</capability><capability>urn:ietf:params:netconf:capability:candidate:1.0</capability>The log message shows that the NETCONF over SSH was successful.
If the error message showed that NETCONF over SSH was not successful, enable NETCONF over SSH by issuing the
set system services netconf sshcommand.Create configuration groups to synchronize if you have not done so already.
You can issue the
show | comparecommand to see if any configuration groups have been created.root@Switch A# show | compare
Issue the
commitcommand.root@Switch A# commit
[edit chassis] configuration check succeeds commit complete {master:0}[edit]The log message shows that the commit was successful.