Remote Loopback for Link Fault Management
Use this topic to understand what happens when you set a remote interfaces in loopback mode and how to enable remote loopback. You can also learn how to enable nonstop routing for LFM.
Set a Remote Interface into Loopback Mode
You can configure the software to set the remote DTE into loopback mode on the following interfaces:
IQ2 and IQ2-E Gigabit Ethernet interfaces
Ethernet interfaces on the MX Series routers or EX Series switches
Junos OS can place a remote DTE into loopback mode (if remote-loopback mode is supported by the remote DTE). When you place a remote DTE into loopback mode, the interface receives the remote-loopback request and puts the interface into remote-loopback mode. When the interface is in remote-loopback mode, all frames except OAM PDUs are looped back without any changes made to the frames. OAM PDUs continue to be sent to the management plane and processed.
To configure remote loopback, include the remote-loopback statement at the [edit protocol oam ethernet link-fault-management
interface interface-name] hierarchy level:
[edit protocol oam ethernet link-fault-management interface interface-name] remote-loopback;
To take the remote DTE out of loopback mode, remove the remote-loopback statement from the configuration.
See Also
Enable Remote Loopback Support on the Local Interface
You can allow a remote DTE to set a local interface into remote loopback mode on IQ2 and IQ2-E Gigabit Ethernet interfaces and all Ethernet interfaces on the MX Series routers and EX Series switches. When a remote-loopback request is sent by a remote DTE, the Junos OS places the local interface into loopback mode. When an interface is in loopback mode, all frames except OAM PDUs are looped back without any changes to the frames. OAM PDUs continue to be sent to the management plane and processed. By default, the remote loopback feature is not enabled.
To enable remote loopback, include the allow-remote-loopback statement at the [edit protocol oam ethernet link-fault-management
interface interface-name negotiation-options] hierarchy level:
[edit protocol oam ethernet link-fault-management interface interface-name negotiation-options] allow-remote-loopback;
Activation of OAM remote loopback may result in data frame loss.
See Also
Enable Nonstop Routing for Ethernet Link Fault Management on Backup Routers
Starting in Junos OS Release 17.3R1, the Ethernet link fault management daemon (lfmd) runs on the backup Routing Engine as well when graceful Routing Engine switchover (GRES) is configured. When the lfmd daemon runs on the backup Routing Engine as well, the link fault management states are kept in sync and so minimal effort is required by the lfmd daemon post switch over.
To enable Nonstop routing for Ethernet LFM on backup routers:
See Also
Example: Configure Ethernet LFM with Loopback Support
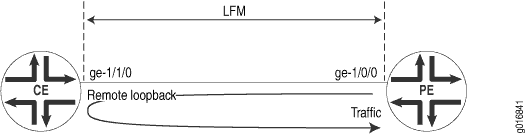
In this example, LFM is configured between provider edge (PE) router and the customer edge (CE) router. The PE router can put the CE router in remote loopback mode. This allows the PE to have all the traffic sent to the CE router looped back for diagnostics purposes, as shown in Figure 1.
To configure LFM between a PE router and a CE router:
-
Configure LFM loopback on the PE router:
[edit] interfaces ge-1/0/0 { unit 0 { family inet { address 11.11.11.1/24; } } } protocols { oam { ethernet { link-fault-management { interface ge-1/0/0 { pdu-interval 1000; pdu-threshold 5; remote-loopback; } } } } } -
Configure LFM loopback on the CE router:
[edit] interfaces ge-1/1/0 { unit 0 { family inet { address 11.11.11.2/24; } } } protocols { oam { ethernet { link-fault-management { interface ge-1/1/0 { pdu-interval 1000; pdu-threshold 5; negotiation-options { allow-remote-loopback; } } } } } }Note:If the
negotiation options allow-remote-loopbackstatement on the CE router is deleted before removing the CE router from remote loopback mode, traffic flow between the PE router and CE router is affected. Hence, delete theremote-loopbackstatement on the PE router before deleting thenegotiation-options allow-remote-loopbackstatement on the CE router.
See Also
Change History Table
Feature support is determined by the platform and release you are using. Use Feature Explorer to determine if a feature is supported on your platform.