Integrate Microsoft Entra ID as an Identity Provider
Follow these steps to understand Entra ID options, add Mist as a new registration in Entra ID, and add your Identity Provider to your Juniper Mist organization.
Microsoft Azure Active Directory (Azure AD), now known as Microsoft Entra ID, is an identity and access management solution. With Juniper Mist Access Assurance, you can integrate an authentication service into Entra ID by using OAuth to perform:
- User authentication with Extensible Authentication Protocol–Tunneled TLS
(EAP-TTLS)
- Performs delegated authentication, that is, checks username and password by using OAuth.
- Retrieves user group membership information to support authentication policies that are based on this user identity.
- Gets the status—active or suspended—of an user account.
- User Authorization with Extensible Authentication Protocol–Transport Layer
Security (EAP-TLS) and EAP-TTLS
- Retrieves user group membership information to support authentication policies that are based on this user identity.
- Gets the status—active or suspended—of an user account
-
EAP-TTLS with Password Authentication Protocol (PAP)
- Performs delegated authentication, that is, checks username and password by using OAuth or Resource Owner Password Credentials (ROPC).
- Retrieves user group membership information to support authentication policies that are based on this user identity.
- Gets the status—active or suspended—of an user account
Configuration in Entra ID Portal
To integrate Entra ID with Juniper Mist Access Assurance, you need the Client ID, Client Secret, and Tenant ID, which are values that the Entra ID portal generates.
The screenshots from third-party applications are correct at the time of publishing. We have no way to know when or if the screenshots will be accurate at any future time. Please refer to the third-party website for guidance about changes to these screens or the workflows involved.
Configuration on Juniper Mist Dashboard
-
From the left menu of the Juniper Mist portal, select
Organization> Access >
Identity Providers.
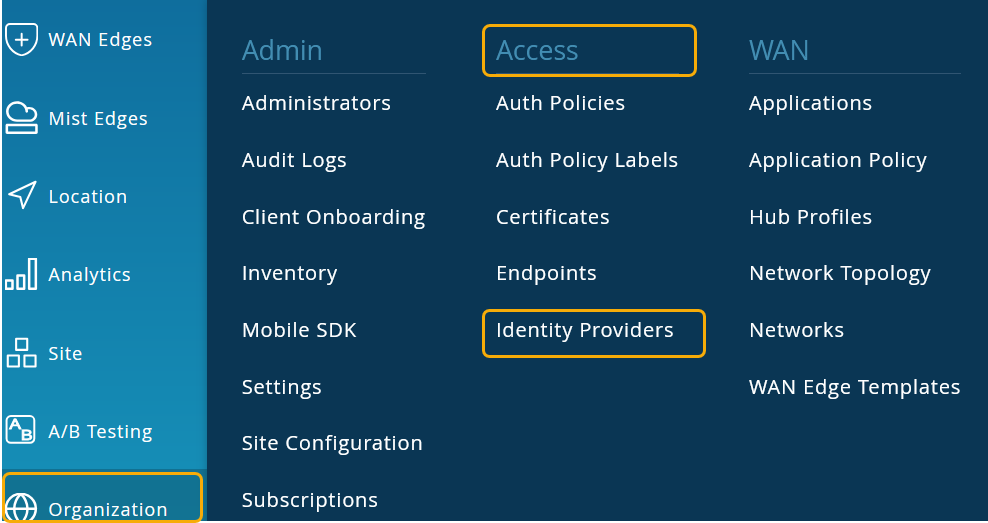
The Identity Providers page displays any configured identity providers.
Figure 1: Identity Providers Page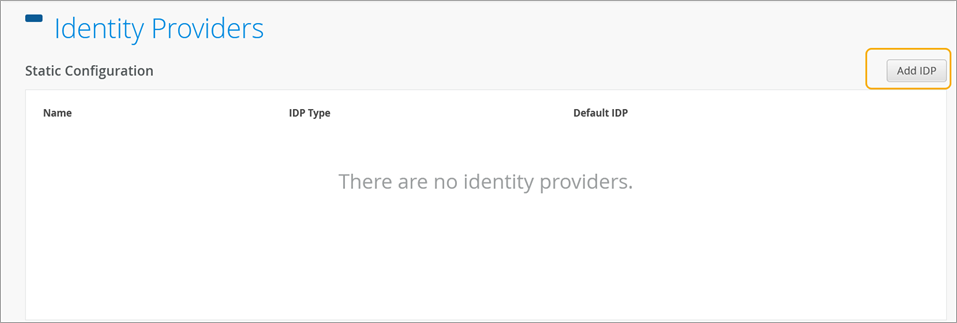
-
On the New Identity Provider page, enter the
required information as shown below.
Figure 2: Add Azure AD as Identity Provider
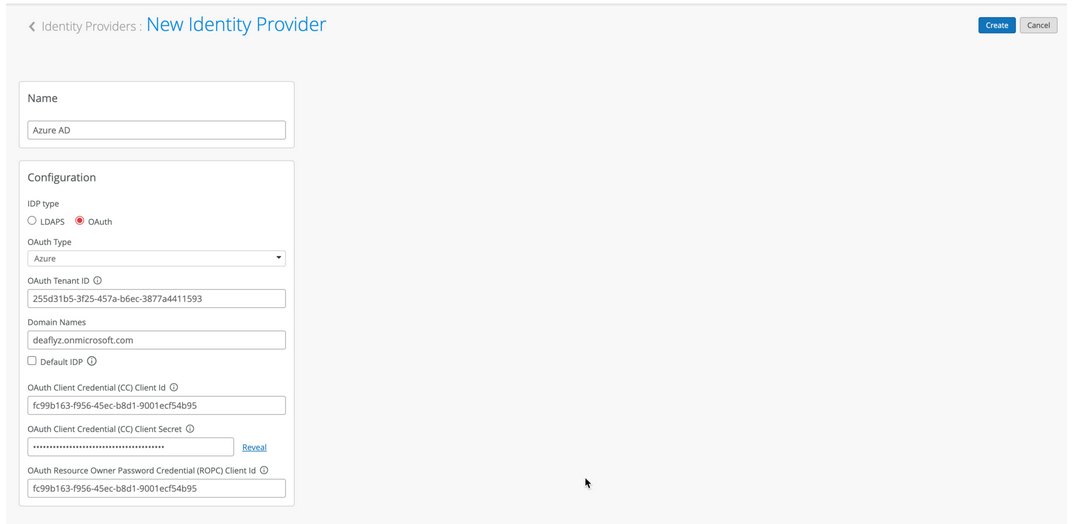
- Name—Enter an IdP name (For this example: Azure AD).
- IDP Type—Select OAuth.
- OAuth Type—Select Azure from the drop-down list.
- OAuth Tenant ID—Enter the directory (tenant) ID that you copied from the Azure AD application.
- Domain Names—Enter the domain name, that is, the user's username (For example: username@domain.com). The domain name field examines incoming authentication requests, identifying the respective username and associated domain. A connector uses the domain name that you set up to identify the Azure tenant the connector needs to communicate with.
Default IDP—Check this option to get machine group memberships.
- OAuth Client Credential (CC) Client id—Enter the application (client) ID of the registered application in Microsoft Entra admin center.
- OAuth Client Credential (CC) Client secret—Enter the application secret that you created earlier on the Azure portal.
- OAuth Resource Owner Password Credential (ROPC) Client id—Enter the application (client) ID of the registered Azure AD application.
On the Juniper Mist portal, go to Monitoring > Insights > Client Events.
When Juniper Mist Access Assurance authenticates a user by using EAP-TLS with Azure AD, you can see the NAC IDP Group Lookup Success event as shown below:
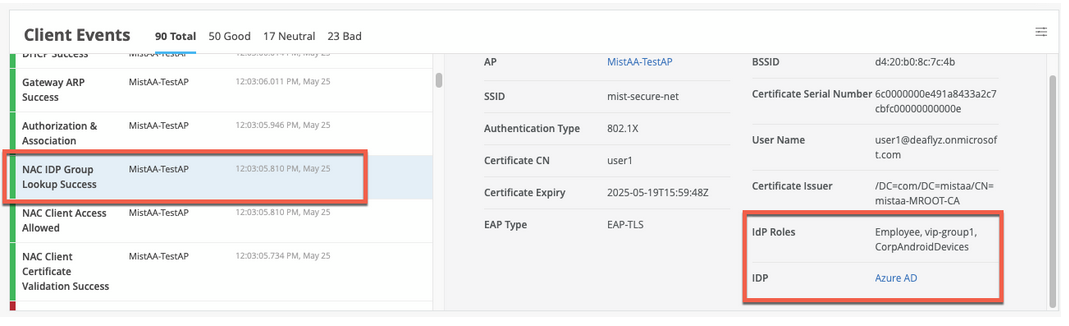
For EAP-TTLS authentication, you see the NAC IDP Authentication Success event. This event indicates that Azure AD has validated the user credentials. For this authentication, you also see the NAC IDP Group Lookup Success event that fetches user group memberships.

EAP-TTLS Authentication with Azure AD and ROPC
EAP-TTLS leverages Resource Owner Password Credentials (ROPC) OAuth flow with Azure AD to authenticate users and retrieve user group information. You must consider several factors when you use a legacy authentication such as ROPC flow, which verifies only user name and password and skips multi-factor authentication (MFA).
- You must configure the client devices with the correct wireless profile, either by using mobile device management (MDM) or a Group Policy Object (GPO). If you provide only user name and password at the login prompt, legacy authentication fails to work for some operating systems.
- The username that a user enters must be in the User Principal Name (UPN) format (username@domain).
- You must configure clients to trust the server certificate.
- Users must log in at least once to the Azure portal before attempting access using ROPC authentication. This step is important to test user accounts.
- The Azure portal must store user passwords either in full cloud accounts, or in a local AD where password synchronization is enabled with Azure AD Connect. Federated Authentication users are not supported.
- You must disable MFA for users who select ROPC authentication. One way to
achieve MFA bypass for EAP-TTLS is to mark Mist Access Assurance Source IP
addresses as trusted locations using following procedure:
- In the Microsoft Entra portal, go to Protection > Conditional Access > Named locations and select New location.
- In the New location (IP ranges), enter the details.Figure 5: Bypass MFA for Sign in from a Trusted IP Address Range
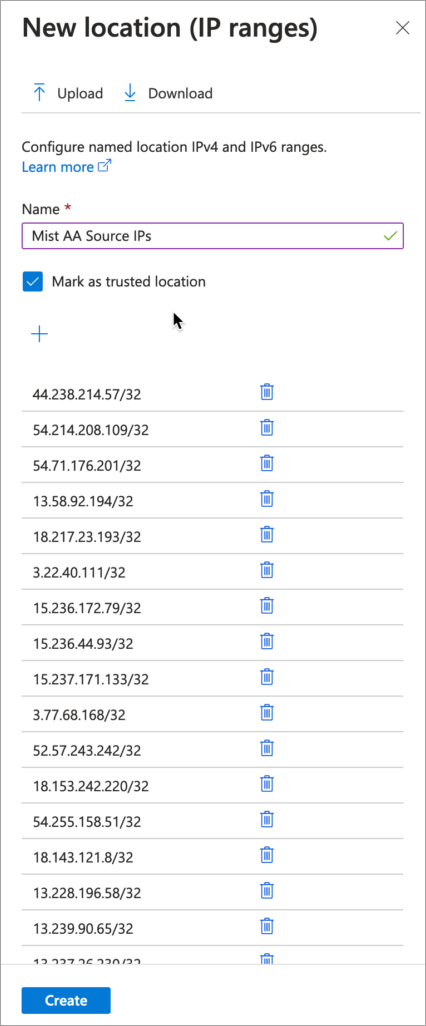
- Enter a name for the location.
- Select Mark as trusted location.
- Enter the IP range for Juniper Mist Access Assurance IP addresses.
- Click Create.
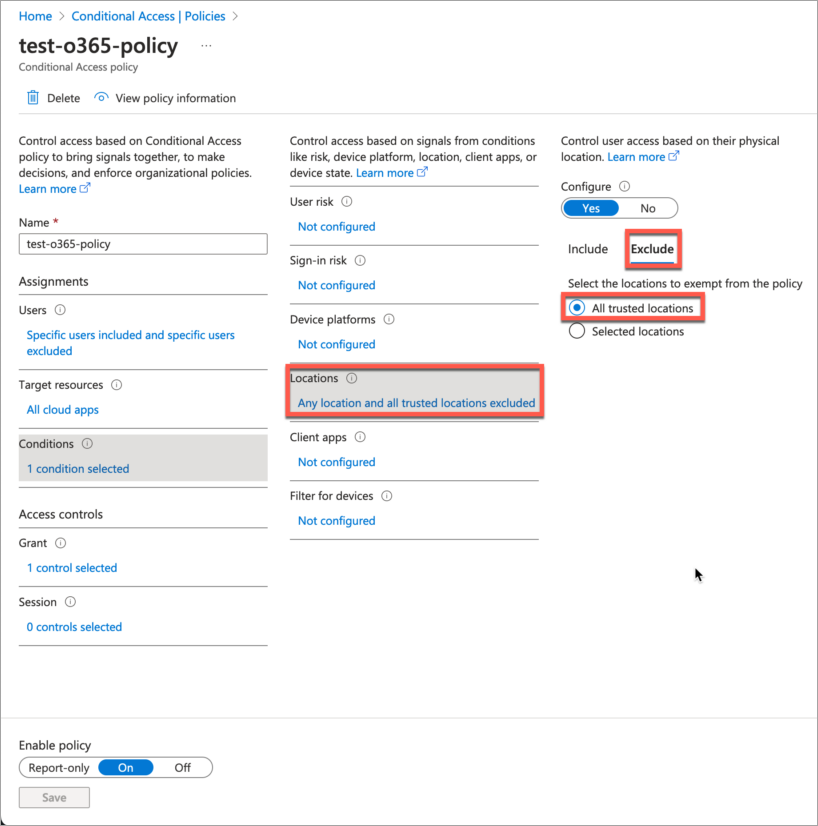
- In the Conditional Access MFA policy, refer the trusted IP sources as
exclusion criteria.Figure 6: Exclude Named Location from Access Policy