Integrate Okta as an Identity Provider
Follow these steps to complete pre-requisites, configure your credential apps in Okta, and add your Identity Provider to your Juniper Mist organization.
You can use Okta Workforce Identity Cloud through the Juniper Mist dashboard to authenticate end users attempting to access the network. Juniper Mist Access Assurance uses Okta as an identity provider (IdP) to perform various authentication tasks.:
- For credential-based (EAP-TTLS) authentication, Okta:
- Performs delegated authentication, that is, checks username and password by using OAuth.
- Retrieves user group membership information to support authentication policies based on this user identity.
- Gets the status—active or suspended—of an user account
- For certificate-based (EAP-TLS or EAP-TTLS ) authorization, Okta:
- Retrieves user group membership information to support authentication policies based on this user identity
- Gets the status—active or suspended—of an user account
Prerequisites
-
Create a subscription for Okta and get your tenant ID. During subscription creation, you specify a tenant that is used to create a URL to access the Okta dashboard. You can find your tenant ID at the top- right corner of the Okta dashboard. The tenant ID must not include okta.com.
Note:Your Okta login URL has the following format:
https://{your-okta-account-id}-admin.okta.com/admin/getting-started.Replace
{your-okta-account-id}with your Okta tenant ID. - You must have super user permission on the Juniper Mist portal.
OKTA Resource Owner Password Credential App Integration
The screenshots from third-party applications are correct at the time of publishing. We have no way to know when or if the screenshots will be accurate at any future time. Please refer to the third-party website for guidance about changes to these screens or the workflows involved.
Okta Client Credential App Integration
-
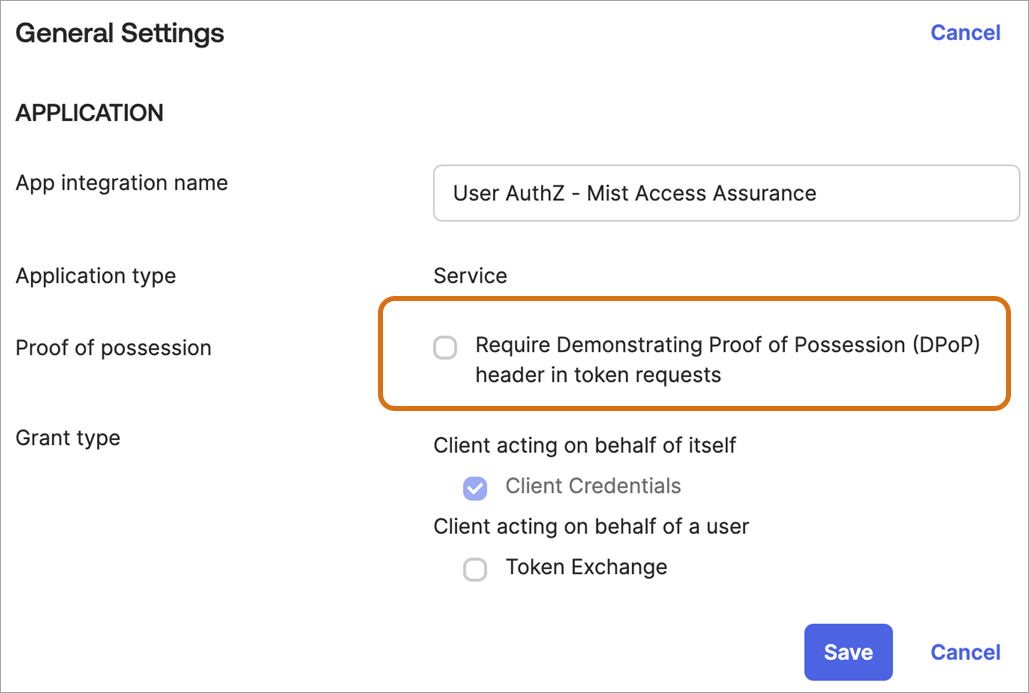
Scroll
down until you see General Settings section. Cick
Edit and uncheck the Require
Demonstrating Proof of Possession (DPoP) header in token
requestsoption.
Configuration on Juniper Mist Dashboard
-
On the New Identity Provider page, enter the
following information:
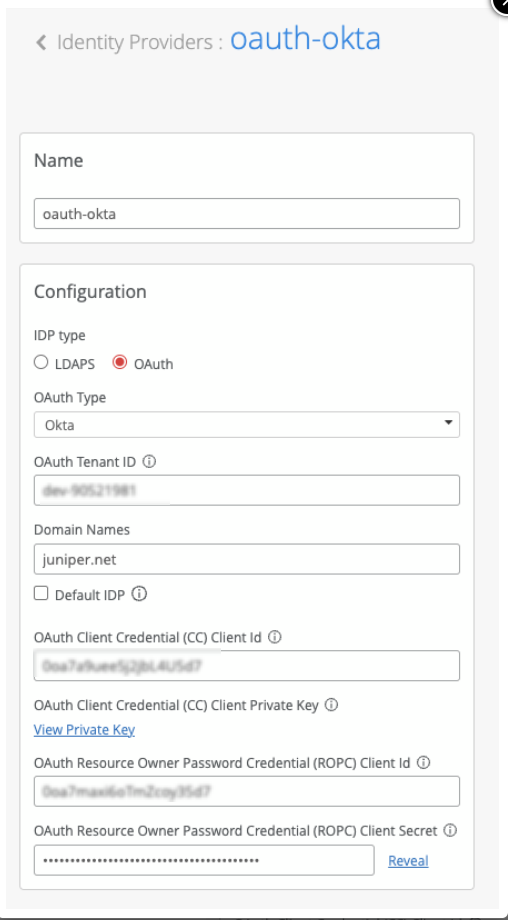
- Name—Enter an IdP name.
- IDP Type—Select an IdP type as OAuth.
Table 1: Settings for Identity Provider Type OAuth Parameters
Description
OAuth Type
Select Okta OAuth Tenant ID
Enter OAuth tenant ID. Use the ID you received during Okta application configuration.
Domain Names
Enter your Okta users domain name. Example: abc.com
Default IDP
Set the selected identity provider as default if user domain name is not specified.
OAuth Client Credential (CC) Client Id
Use the ID you received during Okta application configuration.
Okta Client Credential App IntegrationOAuth Client Credential (CC) Client Private Key Enter the private key generated during Okta application configuration. See Okta Client Credential App Integration OAuth Resource Owner Password Credential (ROPC) Client Id
Enter the secret ID you received and stored during Okta application configuration.
See OKTA Resource Owner Password Credential App Integration.OAuth Resource Owner Password Credential (ROPC) Client Secret Provide client secret value you received and stored during Okta application configuration.
See OKTA Resource Owner Password Credential App Integration
In Juniper Mist portal, go to Monitoring > Insights > Client Events.
When a user authenticates using EAP-TLS with Okta, you can see the event called NAC IDP Group Lookup Success as shown below:
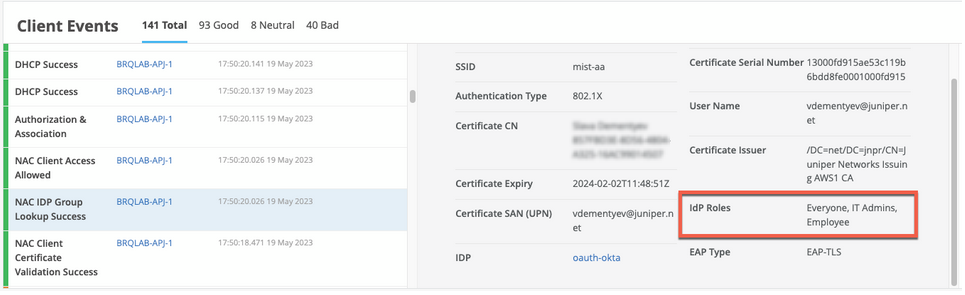
In case of EAP-TTLS authentication, you can see the NAC IDP Authentication Success event. This event indicates that Azure AD has validated user credentials. You can also see the NAC IDP Group Lookup Success event that fetches user group memberships.
