QoS Configuration
Understand Quality of Service (Qos) concepts and codes, and follow these steps to enable QoS in a port profile.
QoS configuration is part of the switch configuration workflow described in Configure Switches Using Templates. This topic provides more detailed information focused solely on QoS concept and configuration steps.
Quality of Service (QoS) is a traffic-control mechanism that helps you prioritize latency-sensitive traffic (such as voice) over other traffic in a congested network. Juniper Mist enables QoS on a per interface basis. The QoS implementation generally involves the following aspects:
-
Classifying traffic.
-
Defining traffic-to-queue mappings (forwarding classes).
-
Defining scheduler and re-write rules for each queue. These rules govern the prioritization, bandwidth control, and congestion management of the traffic on each interface.
-
Applying QoS components to the interfaces.
In Juniper Mist, QoS utilizes the Behavior Aggregate (BA) classification, where the DiffServ code point (DSCP) or class of service (CoS) values in the incoming traffic govern the classification. The BA classifier maps a CoS value in the packet header to a forwarding class and loss priority.
Enabling QoS on an interface adds DSCP markings to that port based on the class and rewrite rules. The QoS mechanism maps the incoming packets with a DSCP marking to one of the seven forwarding classes listed in the following table:
| Code Point/Loss Priority | Forwarding Class | Transmit Queue | Buffer Size(%) | Transmit Rate(%) | Priority |
|---|---|---|---|---|---|
| be | default-app | 0 | Remainder | Remainder | Low |
| af41/Low af42/High af43/High cs4/Low | video | 1 | 8 | 8 | Low |
| af31/Low af32/High af33/High cs3/Low | bizapp-af3 | 2 | 10 | 10 | Low |
| af21/Low af22/High af23/High | bizapp-af2 | 3 | 10 | 10 | Low |
| af11/Low af12/High af13/High | net-tools | 4 | 3 | 3 | Low |
| cs5/Low ef/Low | voice | 7 | 10 | 10 | Strict-high |
| nc1/Low nc2/Low | net-control | 5 | 3 | 3 | Low |
As shown in the above table, the packet classification assigns an incoming packet to an output queue based on the packet’s forwarding class. In case of traffic congestion on the link, Juniper Mist prioritizes the latency-sensitive traffic (for example, voice traffic) over other traffic (provided that the incoming traffic is marked appropriately). Juniper Mist also configures re-write rules automatically to retain markings as the packets exit the switch.
Enable QoS on a Switch Port
Enabling QoS helps you prioritize latency-sensitive traffic (such as voice) over other traffic in a congested network. You can configure QoS on a switch port from the Port Profile tile on the switch details page or switch template.
Ensure that you enable QoS on both downstream and upstream port profiles, to obtain optimum results.
To enable QoS on a switch port:
To configure QoS at the organization level, click Organization > Switch Templates > template name. Or, if you want to configure QoS at the switch level, click Switches > switch name.
From the Port Profile tile, select the port profile you want to update. Or if you want to create a new port profile, click Add Profile.
In the configuration, remember to select the QoS check box.
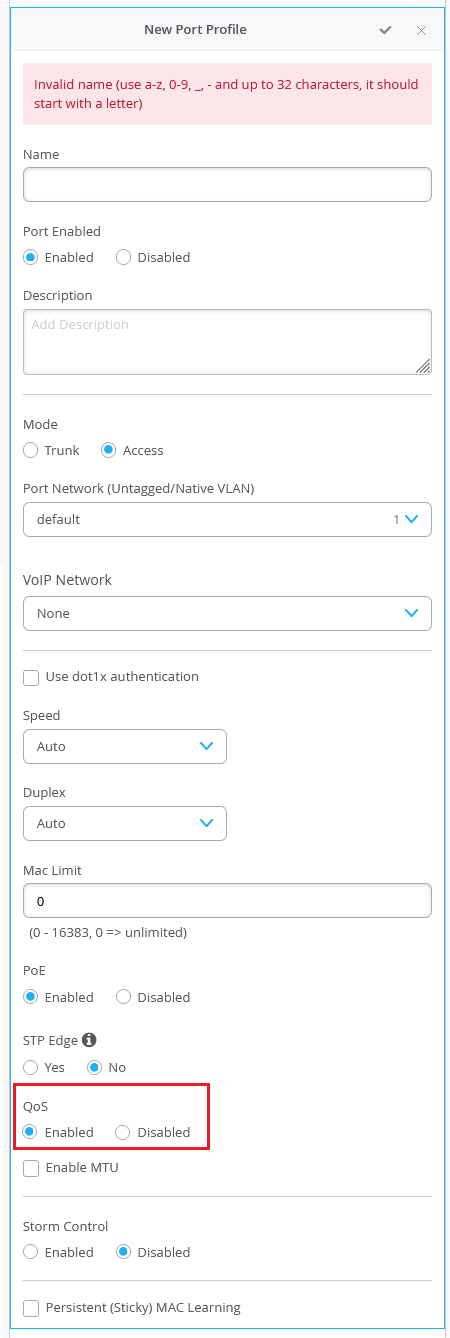
Save the configuration by clicking the tick mark on the upper right of the port profile configuration window.
After configuring QoS in the port profile, assign the profile to the switch port on which you want to configure QoS. You can do that from the Port Config tab in the Select Switches section of a switch configuration template (See Create a Switch Configuration Template) or from the Port Configuration section on the Switch Details page (Switch Details).
Override QoS
You also have the option to override the QoS configuration on the WLAN settings page (Site > WLANs > WLAN name). To override the QoS configuration, select the Override QoS check box and choose a wireless access class (see WLAN Options). The downstream traffic (AP > client) gets marked with the override access class value specified. The override configuration doesn't support upstream traffic (client > AP).
For further details on QoS on Juniper EX Switches, please see Example: Configuring CoS on EX Series Switches. If required, any additional QoS configuration updates can be done via CLIs in the Additional CLI Commands section in the switch details page.
Verify QoS Settings (API)
The following example has “enable_qos”: true set for the port profiles
qos-test and uplink. This indicates that the port
profile has QoS enabled.
"port_usages": {
        "qos-test": {
            "name": "qos-test",
            "mode": "access",
            "disabled": false,
            "port_network": "vl10",
            "voip_network": null,
            "stp_edge": false,
            "all_networks": false,
            "networks": [],
            "port_auth": null,
            "speed": "auto",
            "duplex": "auto",
            "mac_limit": 0,
            "poe_disabled": false,
            "enable_qos": true
        },
        "uplink": {
            "mode": "trunk",
            "all_networks": true,
            "stp_edge": false,
            "port_network": "vlan3",
            "voip_network": null,
            "name": "uplink",
            "disabled": false,
            "networks": [],
            "port_auth": null,
            "speed": "auto",
            "duplex": "auto",
            "mac_limit": 0,
            "poe_disabled": false,
            "enable_qos": true
        }
    },
Verify QoS Configuration Through the CLI
The following is a sample QoS configuration on a switch:
set groups mist-qos-default class-of-service classifiers dscp dscp-classifier-default forwarding-class bizapp-af2 loss-priority high code-points af22
set groups mist-qos-default class-of-service classifiers dscp dscp-classifier-default forwarding-class bizapp-af2 loss-priority high code-points af23
set groups mist-qos-default class-of-service classifiers dscp dscp-classifier-default forwarding-class bizapp-af2 loss-priority low code-points af21
set groups mist-qos-default class-of-service classifiers dscp dscp-classifier-default forwarding-class bizapp-af3 loss-priority high code-points af32
set groups mist-qos-default class-of-service classifiers dscp dscp-classifier-default forwarding-class bizapp-af3 loss-priority high code-points af33
set groups mist-qos-default class-of-service classifiers dscp dscp-classifier-default forwarding-class bizapp-af3 loss-priority low code-points af31
set groups mist-qos-default class-of-service classifiers dscp dscp-classifier-default forwarding-class bizapp-af3 loss-priority low code-points cs3
set groups mist-qos-default class-of-service classifiers dscp dscp-classifier-default forwarding-class default-app loss-priority low code-points be
set groups mist-qos-default class-of-service classifiers dscp dscp-classifier-default forwarding-class net-control loss-priority low code-points nc1
set groups mist-qos-default class-of-service classifiers dscp dscp-classifier-default forwarding-class net-control loss-priority low code-points nc2
set groups mist-qos-default class-of-service classifiers dscp dscp-classifier-default forwarding-class net-tools loss-priority high code-points af12
set groups mist-qos-default class-of-service classifiers dscp dscp-classifier-default forwarding-class net-tools loss-priority high code-points af13
set groups mist-qos-default class-of-service classifiers dscp dscp-classifier-default forwarding-class net-tools loss-priority low code-points af11
set groups mist-qos-default class-of-service classifiers dscp dscp-classifier-default forwarding-class video loss-priority high code-points af42
set groups mist-qos-default class-of-service classifiers dscp dscp-classifier-default forwarding-class video loss-priority high code-points af43
set groups mist-qos-default class-of-service classifiers dscp dscp-classifier-default forwarding-class video loss-priority low code-points af41
set groups mist-qos-default class-of-service classifiers dscp dscp-classifier-default forwarding-class video loss-priority low code-points cs4
set groups mist-qos-default class-of-service classifiers dscp dscp-classifier-default forwarding-class voice loss-priority low code-points cs5
set groups mist-qos-default class-of-service classifiers dscp dscp-classifier-default forwarding-class voice loss-priority low code-points ef
set groups mist-qos-default class-of-service classifiers dscp dscp-classifier-default import default
set groups mist-qos-default class-of-service forwarding-classes queue 0 default-app
set groups mist-qos-default class-of-service forwarding-classes queue 1 video
set groups mist-qos-default class-of-service forwarding-classes queue 2 bizapp-af3
set groups mist-qos-default class-of-service forwarding-classes queue 3 bizapp-af2
set groups mist-qos-default class-of-service forwarding-classes queue 4 net-tools
set groups mist-qos-default class-of-service forwarding-classes queue 5 voice
set groups mist-qos-default class-of-service forwarding-classes queue 7 net-control
set groups mist-qos-default class-of-service interfaces ge-0/0/0 scheduler-map sched-maps-default
set groups mist-qos-default class-of-service interfaces ge-0/0/0 unit 0 classifiers dscp dscp-classifier-default
set groups mist-qos-default class-of-service interfaces ge-0/0/0 unit 0 rewrite-rules dscp dscp-rewriter-default
set groups mist-qos-default class-of-service interfaces ge-0/0/9 scheduler-map sched-maps-default
set groups mist-qos-default class-of-service interfaces ge-0/0/9 unit 0 classifiers dscp dscp-classifier-default
set groups mist-qos-default class-of-service interfaces ge-0/0/9 unit 0 rewrite-rules dscp dscp-rewriter-default
set groups mist-qos-default class-of-service rewrite-rules dscp dscp-rewrite-default import default
set groups mist-qos-default class-of-service rewrite-rules dscp dscp-rewriter-default forwarding-class bizapp-af2 loss-priority low code-point af21
set groups mist-qos-default class-of-service rewrite-rules dscp dscp-rewriter-default forwarding-class bizapp-af3 loss-priority low code-point af31
set groups mist-qos-default class-of-service rewrite-rules dscp dscp-rewriter-default forwarding-class default-app loss-priority low code-point be
set groups mist-qos-default class-of-service rewrite-rules dscp dscp-rewriter-default forwarding-class net-control loss-priority low code-point nc1
set groups mist-qos-default class-of-service rewrite-rules dscp dscp-rewriter-default forwarding-class net-tools loss-priority low code-point af11
set groups mist-qos-default class-of-service rewrite-rules dscp dscp-rewriter-default forwarding-class video loss-priority low code-point af41
set groups mist-qos-default class-of-service rewrite-rules dscp dscp-rewriter-default forwarding-class voice loss-priority low code-point ef
set groups mist-qos-default class-of-service scheduler-maps sched-maps-default forwarding-class bizapp-af2 scheduler bizapp-af2-scheduler
set groups mist-qos-default class-of-service scheduler-maps sched-maps-default forwarding-class bizapp-af3 scheduler bizapp-af3-scheduler
set groups mist-qos-default class-of-service scheduler-maps sched-maps-default forwarding-class default-app scheduler default-scheduler
set groups mist-qos-default class-of-service scheduler-maps sched-maps-default forwarding-class net-control scheduler net-control-scheduler
set groups mist-qos-default class-of-service scheduler-maps sched-maps-default forwarding-class net-tools scheduler net-tools-scheduler
set groups mist-qos-default class-of-service scheduler-maps sched-maps-default forwarding-class video scheduler video-scheduler
set groups mist-qos-default class-of-service scheduler-maps sched-maps-default forwarding-class voice scheduler voice-scheduler
set groups mist-qos-default class-of-service schedulers bizapp-af2-scheduler buffer-size percent 10
set groups mist-qos-default class-of-service schedulers bizapp-af2-scheduler priority low
set groups mist-qos-default class-of-service schedulers bizapp-af2-scheduler transmit-rate percent 10
set groups mist-qos-default class-of-service schedulers bizapp-af3-scheduler buffer-size percent 10
set groups mist-qos-default class-of-service schedulers bizapp-af3-scheduler priority low
set groups mist-qos-default class-of-service schedulers bizapp-af3-scheduler transmit-rate percent 10
set groups mist-qos-default class-of-service schedulers default-scheduler buffer-size remainder
set groups mist-qos-default class-of-service schedulers default-scheduler priority low
set groups mist-qos-default class-of-service schedulers default-scheduler transmit-rate remainder
set groups mist-qos-default class-of-service schedulers net-control-scheduler buffer-size percent 3
set groups mist-qos-default class-of-service schedulers net-control-scheduler priority low
set groups mist-qos-default class-of-service schedulers net-control-scheduler transmit-rate percent 3
set groups mist-qos-default class-of-service schedulers net-tools-scheduler buffer-size percent 3
set groups mist-qos-default class-of-service schedulers net-tools-scheduler priority low
set groups mist-qos-default class-of-service schedulers net-tools-scheduler transmit-rate percent 3
set groups mist-qos-default class-of-service schedulers video-scheduler buffer-size percent 8
set groups mist-qos-default class-of-service schedulers video-scheduler priority low
set groups mist-qos-default class-of-service schedulers video-scheduler transmit-rate percent 8
set groups mist-qos-default class-of-service schedulers voice-scheduler buffer-size percent 10
set groups mist-qos-default class-of-service schedulers voice-scheduler priority strict-high
set groups mist-qos-default class-of-service schedulers voice-scheduler shaping-rate percent 10
To verify the traffic-matching QoS policies and their corresponding queue counters:
-
Review the current interface statistics and CoS information by running the following command:
root@ex2300-home> show interfaces ge-0/0/0 extensive ...... Queue counters: Queued packets Transmitted packets Dropped packets 0 0 0 0 1 0 0 0 2 0 0 0 3 0 0 0 4 0 0 0 5 0 0 0 7 0 0 0 Queue number: Mapped forwarding classes 0 default-app 1 video 2 bizapp-af3 3 bizapp-af2 4 net-tools 5 voice 7 net-control ...... CoS information: Direction : Output CoS transmit queue Bandwidth Buffer Priority Limit % bps % usec 0 default-app r r r 0 low none 1 video 8 80000000 8 0 low none 2 bizapp-af3 10 100000000 10 0 low none 3 bizapp-af2 10 100000000 10 0 low none 4 net-tools 3 30000000 3 0 low none 5 voice r r 10 0 strict-high none 7 net-control 3 30000000 3 0 low none Interface transmit statistics: Disabled -
Generate some video and voice traffic. The device marks the traffic with DSCP values (queue 1 for video traffic and queue 5 for voice traffic).
ping 8.8.8.8 -I eth0 -Q 184
PING 8.8.8.8 (8.8.8.8) from 10.0.0.2 eth0: 56(84) bytes of data.

53 packets transmitted, 53 received, 0% packet loss, time 140ms
rtt min/avg/max/mdev = 2.421/2.811/5.064/0.428 ms
ping 8.8.8.8 -I eth0 -Q 136
PING 8.8.8.8 (8.8.8.8) from 10.0.0.2 eth0: 56(84) bytes of data.

62 packets transmitted, 62 received, 0% packet loss, time 157ms
rtt min/avg/max/mdev = 2.396/3.103/6.578/0.609 ms
-
Run the
show interfaces ge-0/0/0 extensivecommand again. You can view the packet counts displayed under Queued Packets and Transmitted Packets.root@ex2300-home> show interfaces ge-0/0/0 extensive ....... Egress queues: 8 supported, 7 in use Queue counters: Queued packets Transmitted packets Dropped packets 0 9821 9821 0 1 62 62 0 2 0 0 0 3 7185 7185 0 4 0 0 0 5 53 53 0 7 0 0 0 Queue number: Mapped forwarding classes 0 default-app 1 video 2 bizapp-af3 3 bizapp-af2 4 net-tools 5 voice 7 net-control ....... CoS information: Direction : Output CoS transmit queue Bandwidth Buffer Priority Limit % bps % usec 0 default-app r r r 0 low none 1 video 8 80000000 8 0 low none 2 bizapp-af3 10 100000000 10 0 low none 3 bizapp-af2 10 100000000 10 0 low none 4 net-tools 3 30000000 3 0 low none 5 voice r r 10 0 strict-high none 7 net-control 3 30000000 3 0 low none Interface transmit statistics: Disabled