User Management
In the NorthStar Controller application, a user has access to both the NorthStar Controller web UI and the NorthStar Planner. Users and user groups that are created in either Controller or Planner are carried over into the other. Because the available group permissions are different in the Controller versus the Planner, you can adjust them in either application.
User Groups and Permissions
When you first launch NorthStar, the pre-configured user groups available depend on whether you are installing for the first time or upgrading from an earlier release.
If you are installing the NorthStar Controller application for the first time (fresh install), one user group is automatically created–Administrators. The Administrators user group, by default, has full permissions in the work order management system–to create, approve or reject, and activate work orders. See Work Order Management for more information about the Work Order management system.
In a fresh install, the only user pre-added to this group is the Admin. The Admin is a special user who can access all features and functionality within NorthStar, including those related to system settings, license management, authentication method control, and user management. Being assigned to the Administrators user group does not make a user an Admin. But the Admin is assigned to the Administrators user group.
If you are upgrading from a NorthStar release older than Release 4.1.0, two user groups are automatically created–Administrators and Viewers.
IMPORTANT: All existing full-access users from the older release are pre-added to the Administrators user group during the upgrade process. All view-only users from the older release are pre-added to the Viewers user group. We recommend that the Admin immediately access the User Management system (Administration > Users) to create additional user groups, assign them appropriate permissions for handling work orders, and assign each existing user to the appropriate user group based on those permissions. The Admin is the only user who can access the User Management system.
User and User Group Management (Admin Only)
User permissions are determined by the user group to which the user is assigned. Only the Admin has access to the User Management system where groups are created, permissions are assigned to groups, and users are created. Every user must be assigned to a group. Access the User Management system by navigating to the Administration > Users page. The User Management window is displayed as shown in Figure 1.

There is a relationship between the permissions users have and the functions in the Administration menu that they can access, as follows:
All users (including users with Activate Work Orders, Approve Work Orders, or even no permissions at all) can access:
System Health
Device Profile
Task Scheduler
Logs
Users with Create Work Orders or Auto-Approve Work Orders can additionally access:
Analytics
Transport Controller
Additional functionality only the Admin can access:
Authentication
License
Subscribers
System Settings
Users
There is a relationship between user permissions and functions available in the Applications menu, as follows:
Users with Create or Auto-Approve permission have access to the following functions:
Bandwidth Calendar
Nework Events
Path Optimization
Reports
There is also a relationship between user permissions and functions available in the Network Management > Provisioning menu, as follows:
Users with Create or Auto-Approve permission have access to the following functions:
Provision LSP
Provision Diverse LSP
Provision Multiple LSPs
Configure LSP Delegation
Device Configuration
Path Optimization
Note:Add, Modify, and Delete buttons are available in the Network Information table.
Users with any other permission(s) have access only to the following functions:
Device Configuration (limited view-only)
Bandwidth Calendar
Network Events
Reports
Note:Add, Modify, and Delete buttons are not available in the Network Information table for these users.
- Creating a User Group and Assigning Permissions
- Creating, Modifying, and Deleting Users
- Modifying and Deleting User Groups
Creating a User Group and Assigning Permissions
To create a new user group:
Click Manage User Groups in the upper right corner of the User Management window. The Manage User Groups window appears as shown in Figure 2.
Figure 2: Manage User Groups Window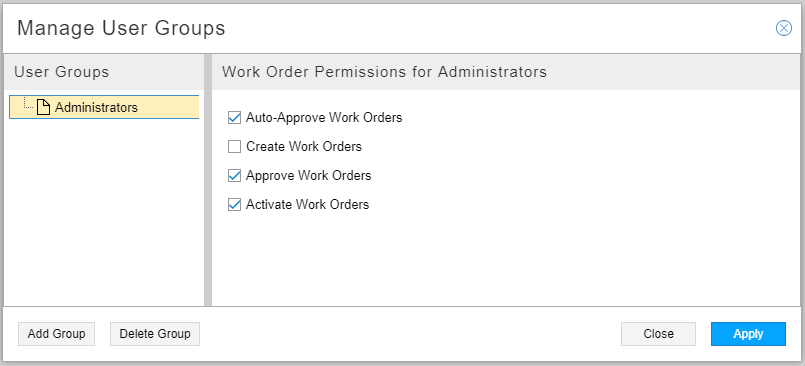
Click Add Group in the lower left corner. You are prompted to enter the name of the new group. Click OK. The new group is added to the list of groups in the Manage User Groups window.
Select the new group in the list. On the right side of the window, click in the check boxes for the permissions you want to assign to this group. A group can have any combination of the available permissions selected, except that the first two (Auto-Approve Work Orders and Create Work Orders) are mutually exclusive because Auto-Approve permission includes Create permission. By default, none of the permissions are checked as shown in Figure 3.
Figure 3: Selecting Permissions for a New Group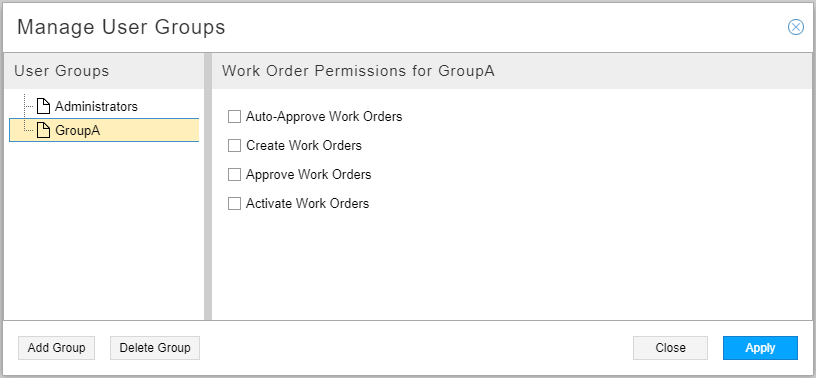
See Work Order Management for more information about the available permissions and how the work order management system functions.
Click Apply to complete the addition.
Creating, Modifying, and Deleting Users
Once the groups are created, you can create new users and assign each to a group. When you create a new user, you must assign them a username, a password, and a group. To create a new user:
Click Add in the User Management window. The Add User window is displayed as shown in Figure 4.
Figure 4: Add User Window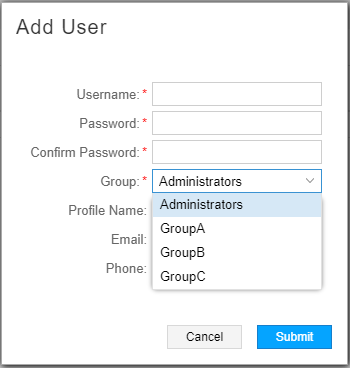
Complete the Username, Password (this is the initial password that the user can later change), and Confirm Password fields. Click the down arrow beside the Group field to select a group for this user from the list of existing groups. Profile Name, Email, and Phone are optional fields.
Click Submit to complete the addition.
To modify an existing user, either select the username from the User Management window and click Modify, or just double click the username. Both actions display the Modify User window where you can modify the values you previously assigned.
To delete an existing user, select the username in the User Management window and click Delete.
There is no warning that you are about to delete the user, so be sure of your intention before you click Delete.
Modifying and Deleting User Groups
To modify the permissions assigned to a user group, click Manage User Groups in the upper right corner of the User Management window to display the Manage User Groups window. Select the group to be modified in the left side of the window and revise the permissions in the right side of the window.
When you change the permissions of a group, all the members of that group are affected.
Before you can delete a group, you must delete the users assigned to it, or reassign users in that group to another group. To delete an empty group, select the group name in the Manage User Groups window and click Delete.
There is no warning that you are about to delete the group, so be sure of your intention before you click Delete.
Active Users
The Active Users window shows who is currently logged in to the system, when they logged in, how long they have been logged in, their user group, and whether they are logged in to the web UI or the NorthStar Planner. This window is available to all users, but is a particularly good user management tool for the Admin.
Access the Active Users window from the hamburger icon (horizontal bars) in the upper right corner of the web UI.
Figure 5 shows the Active Users window.
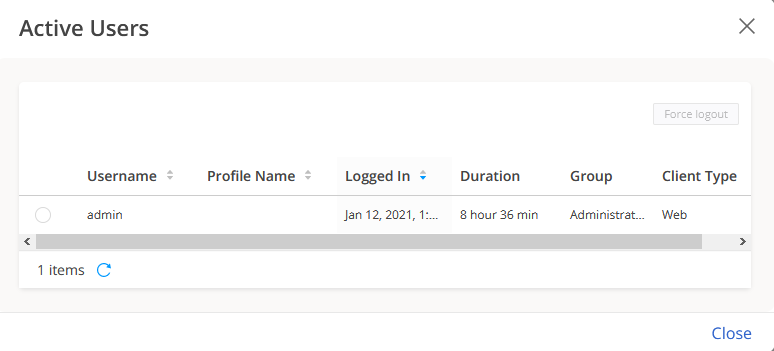
The Force Log Out button is available only to the Admin, for the purpose of selectively disconnecting NorthStar Controller (as opposed to Planner) user sessions. To disconnect a user session, select the user name to disconnect and click Force Log Out.
User Account Settings
The Account Settings window is available to all users for purposes of updating their own information. Click the user icon in the upper right corner of the web UI to view the User Options drop-down menu, which includes Account Settings and Log Out.
Figure 6 shows the user options menu.
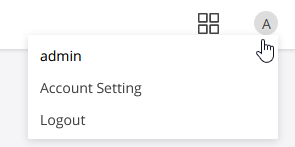
Select Account Setting to display the Account Settings window shown in Figure 7.
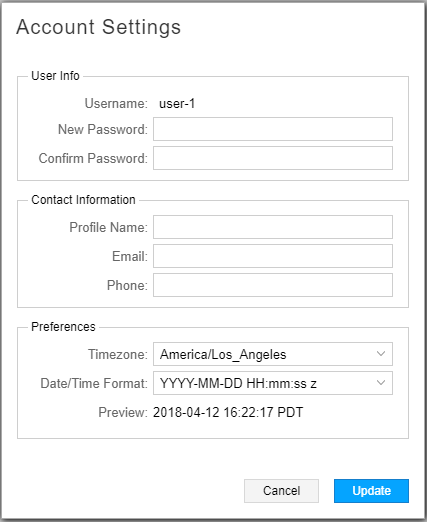
The Account Settings window allows you to change your password, create or change a profile name (like a nickname) for yourself, enter your contact information (e-mail address and telephone number), and set up date/time and time zone preferences for your web UI display.
Time zone/format preferences are saved in the database and persist across sessions for each user, including both NorthStar Controller and NorthStar Planner. Also, all displays of time/date conform to the configured preferences, with only the following exceptions (because these functions fetch files from the server):
Reports
Logs
You cannot change your username. Click Update to save your changes, or Cancel to discard them.
