Work Order Management
Work order management provides authorization and tracking for two kinds of change requests:
Requests related to the provisioning of LSPs
Configuration change requests to be pushed to network routers using the Device Configuration tool (Network Management > Provisioning > Device Configuration)
Change requests (additions, deletions, and modifications) are captured as work orders and must be approved and activated (provisioned) before they can take effect and be seen in the network information table and in the topology (in the case of LSPs), or in the router configurations (in the case of device configuration updates). Users can perform the various functions within the work order management system based on their assigned user group.
The life cycle of a work order is typically:
Created/submitted
Approved or rejected
Activated (if approved) - this step actually provisions the LSP(s) or pushes the requested configuration change to the router(s)
Closed
All users can monitor the status of work orders using the Work Orders window accessible from the top menu bar in the web UI.
Work orders are stored in the Cassandra database, each with a number of attributes such as:
Work order ID and state
Identification of the submitter, approver, activator, and closer
Comments added at any stage of the work order life cycle
Provisioning status
Error messages, if any
Details of the action requested
List of affected network elements and the pending actions on them
The Cassandra database is queried to populate the Work Orders window. Changes in the Work Orders window are immediately saved back to the Cassandra database and broadcast to all users in real time, so everyone has the most current information.
Permissions In the Work Order Management System
What any individual user can do within the work order management system is based on their user group. Each user group has permissions associated with it, allowing users in that group to perform various tasks. At this time, the defined permissions are:
Create Work Orders
User can access the web UI window appropriate for the desired request, such as Provision LSP, Modify LSP, Provision Multiple LSPs, Device Configuration, and so on. Once the user clicks Submit (or Provision), a work order is created.
Approve (or Reject) Work Orders
User can approve or reject work orders created by anyone, including those he himself created (if he also has Create Work Orders permission).
Auto-Approve Work Orders
User can create work orders which are automatically approved and activated. Create and Auto-Approve are mutually exclusive because Auto-Approve includes Create. Auto-Approve permission does not enable a user to approve work orders submitted by other users. Auto-Approve permission also applies to the REST API, making automated northbound integration possible with third-party systems or scripts.
Note:When activation is executed as a separate step, the user is offered the opportunity to schedule the provision for a future date/time, and in the case of device configuration, to launch a device collection task. But when a user with Auto-Approve permission creates and submits a work order, the approval and activation are immediate, bypassing the scheduling/device collection step.
Activate Work Orders
User can activate (provision) approved work orders created by anyone.
A user with none of these permissions can view the status of work orders, but cannot alter them in any way.
See User Management for information about creating user groups and assigning permissions to them.
Creating and Submitting a Work Order
A user with Create or Auto-Approve permission can access the web UI window appropriate for the desired request, such as Provision LSP, Modify LSP, Provision Multiple LSPs, Device Configuration, and so on. Complete the fields in the window, and click Submit (for LSPs) or Provision (for device configuration). This creates a work order and submits it into the work order management system.
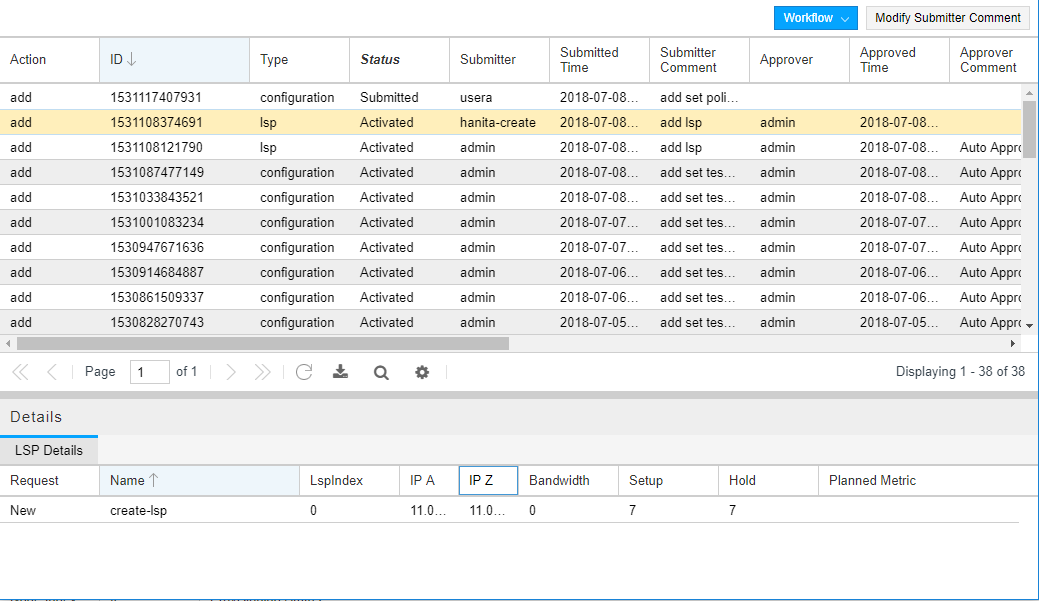
The new work order appears in the Work Orders window, accessible from the top Menu Bar in the web UI. The Status column lists the work order as Submitted. The Submitter Comment column is populated automatically. To modify the comment, click Modify Submitter Comment in the upper right corner, enter your new comment, and click OK. For LSP provisioning work orders, the automatically-generated Submitter Comment reflects the action (such as add or modify). For device configuration work orders, the automatically-generated Submitter Comment reflects the action (such as add) and the configuration template (configlet) name.
Figure 1 shows the Work Orders window with work orders listed in the top portion. The bottom portion of the window (Details) shows detailed information for the highlighted work order, an LSP provisioning work order in this example.

Figure 2 and Figure 3 show the Details section for an example device configuration work order. There are two tabs: Details Status and Configuration. The Configuration tab lists the CLI being pushed to the device(s).


The Details part of the window for a Modify work order shows both the old and new values.
Approving and Activating a Work Order
Work orders submitted by users with Auto-Approve permission are automatically approved and activated when they are submitted, and their status is updated to Activated in the Work Orders window. All other submitted work orders must be approved by a user with Approve permission.
To approve a work order, highlight the row in the Work Orders window and click Workflow in the upper right corner of the window. Select Approve or Reject from the drop-down window. Optionally, add a comment when prompted. The status for the work order is updated accordingly.
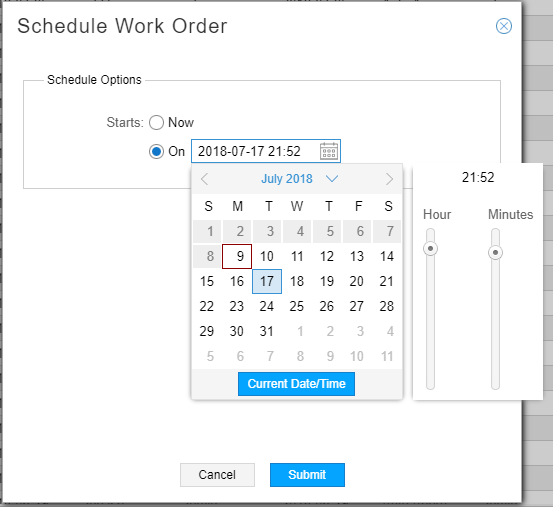
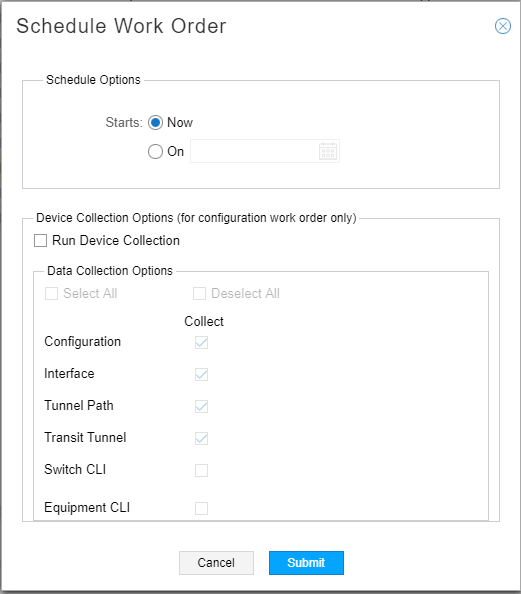
A user with Activate permission must then activate the approved work order for it to actually take effect. To activate a work order, highlight the row in the Work Orders window and click Workflow in the upper right corner. Select Activate from the drop-down menu to display the Schedule Work Order window. The Schedule Work Order window is different, depending on whether the work order is related to LSP provisioning or to device configuration.
The Schedule Work Order window is not presented when work orders are auto-approved. Such work orders are approved and activated immediately upon submission.
Figure 4 shows the Schedule Work Order window for an LSP provisioning work order. The calendar is displayed when you click the calendar icon.

Figure 5 shows the Schedule Work Order window for a device configuration work order. In addition to being able to schedule the work order to take effect at a future day and time, you can also opt to run device collection immediately afterwards, to update the NorthStar topology.

You can opt to provision the work order immediately or at a future date and time. Optionally, you can add a comment when prompted. Once activated, NorthStar attempts to provision the LSP (for LSP work orders), and the LSP appears in the network information table (Tunnel tab) and in the topology. When device configuration work orders are activated, the configuration statements are pushed to the network devices according to the instructions in the work order. Verify the provisioning is successful. The Work Orders window includes a column for Provisioning Status.
Best Practices
The following best practices help to keep the Work Orders window current and meaningful over time:
Submitters: close your work orders when they are no longer needed.
Work orders are considered open until they are manually closed; only open work orders are displayed in the Work Orders window. We recommend that you keep this display as streamlined as possible by closing activated or rejected work orders when they are no longer needed, thereby removing them from the Work Orders window. Close a work order by highlighting the row in the work orders table and clicking Workflow in the upper right corner of the window. Select Close.
Note:Only the user who submitted a work order can close it. Not even the Admin can close a work order submitted by another user. A work order can be closed by the user who submitted it as long as the status is Submitted, Rejected, or Activated.
Approvers and Activators: Monitor the Work Orders window regularly and advance work orders promptly to keep them moving through the work order management system.
All Users: Consider adding meaningful comments.
The submitter, approver, and activator comments are retained and displayed as part of the work order record to help clarify what is happening with the work order at each step in the process. The submitter comment is populated automatically and can be changed. The approver and activator comments are completely optional, but potentially valuable.
