Deployment of Microsoft Azure Hardware Security Module on vSRX Virtual Firewall 3.0
Microsoft Azure Key Vault Hardware Security Module Integration Overview
Microsoft Azure Key Vault hardware security module (HSM) is a cloud service that works as a secure secrets store. You can securely store keys, passwords, certificates, and other secrets. This service from cloud vendors helps us to securely generate, store and manage Crypto keys. vSRX Virtual Firewall applications use these Crypto keys to protect data at rest, such as private keys, passwords and other sensitive data. Azure Key Vault HSM can also be used as a Key Management solution. Azure Key Vault makes it easy to create and control the encryption keys used to encrypt your data. When you provide the master encryption password then that password is used to encrypt the sensitive data and save encrypted data (AES256) on disk. The master encryption password is also protected using RSA key-pair generated and stored in HSM.
vSRX Virtual Firewall (mgd process) generates hash of configuration. This hash (and other sensitive data) is protected using master encryption password as key for AES-GCM 256 encryption.
The master password is used to protect secrets such as the RADIUS password, IKE preshared keys, and other shared secrets in the Junos OS management process (mgd) configuration. The master password is protected using the master encryption password. The master password itself is not saved as part of the configuration. The password quality is evaluated for strength, and the device gives feedback if weak passwords are used.
Sensitive data such as PKI private keys and configuration that are stored in plain text on vSRX Virtual Firewall 3.0 instances can now be protected using HSM service.
When you enable Microsoft Azure Key Vault HSM on vSRX Virtual Firewall, vSRX Virtual Firewall creates, an RSA key pair of 2048 size and uses it to encrypt, a PKI private key file located in /var/db/certs/common/key-pairs, configuration hash and a master password, which is saved in: /config/unrd-master-password.txt.
Existing keypairs prior to enabling HSM will not be encrypted and are deleted.
By enabling the HSM, the software layer leverages the use of the underlying HSM service that protects sensitive information such as private keys, system master passwords, and so on, by storing the information using 256-bit AES encryption (instead of storing in cleartext format). The device also generates a new SHA256 hash of the configuration each time the administrator commits the configuration. This hash is verified each time the system boots up. If the configuration has been tampered with, the verification fails and the device will not continue to boot. Both the encrypted data and the hash of the configuration are protected by the HSM module using the master encryption password.
Hash validation is performed during any commit operation by performing a validation check of the configuration file against the saved hash from previous commits. In a chassis cluster system, hash is independently generated on the backup system as part of the commit process.
Hash is saved only for the current configuration and not for any rollback configurations. Hash is not generated during reboot or shutdown of the device.
vSRX Virtual Firewall uses HSM to encrypt the following secrets:
SHA256 hash of the configuration
Device master password
All key pairs on the device
Keys created by each vSRX Virtual Firewall 3.0 instance will be tagged and/or named using the UUID of each VM. You can log in to the cloud portal, access the keys, and verify their properties or the operations requested.
Configure Microsoft Azure Key Vault HSM on vSRX Virtual Firewall 3.0
Key vault on Azure stack provides cloud HSM service for all Azure applications. All applications need to be registered in Azure active directory to use services such as Key Vault.
vSRX3.0 is integrated with Microsoft Azure Cloud HSM when running on Azure. You can login to cloud portal, access the keys, and verify their properties or operations requested for.
For each public cloud vendor, there are unique steps to be performed to integrate vSRX Virtual Firewall with cloud HSM. This section provides the steps needed to integrate vSRX Virtual Firewall 3.0 with Microsoft Azure Key Vault HSM.
You will need the following listed items to integrate vSRX Virtual Firewall with Microsoft Azure Key Vault HSM:
vSRX Virtual Firewall 3.0 instance
Microsoft Azure Key vault
Setup key vault authentication for vSRX Virtual Firewall
Microsoft Azure-specific configurations for integrating HSM
Microsoft Azure Key Vault is a cloud-hosted management service that allows users to encrypt keys and small secrets by using keys that are protected by hardware security modules (HSMs).
This procedure provides the general steps to integrate Microsoft Azure Key Vault HSM with vSRX Virtual Firewall 3.0.
- Create Key vault. From the dashboard, select + Create
a resource, Security + Identity, and then Key
Vault as shown in Figure 1.Figure 1: Create Key Vault
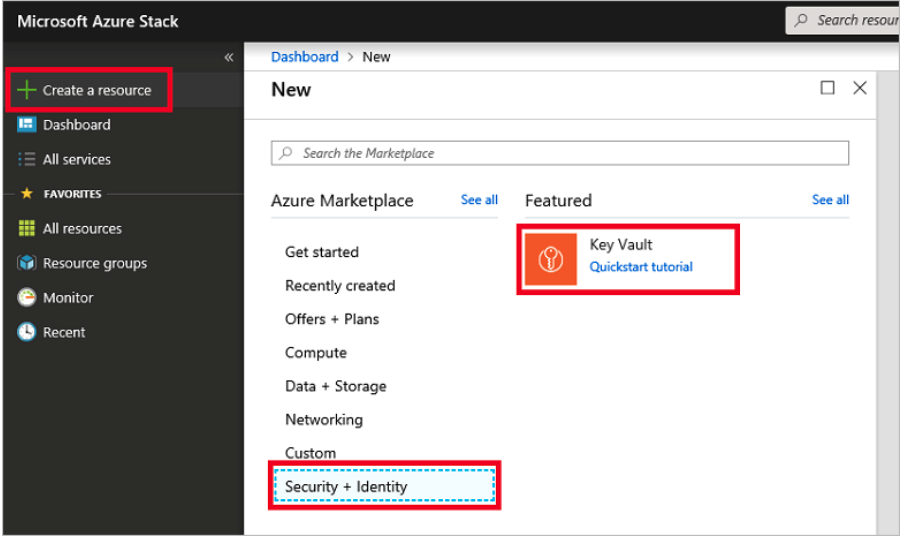
You need to create “premium” key vault to access cryptographic key features needed by vSRX Virtual Firewall 3.0. After you create a key vault, for more information on how to create and manage keys and secrets within the vault, see Manage Key Vault in Azure Stack using the portal.
-
Enable managed identity for vSRX Virtual Firewall 3.0.
System assigned managed identity helps vSRX Virtual Firewall authenticate to other services (example Key vault) without saving credentials in the code by registering your application to Azure Active directory. Enabling this identity will generate unique object ID, which can be used to refer it across other vSRX Virtual Firewall instances.
To enable managed identity for vSRX Virtual Firewall on Microsoft Azure, you need to configure managed identities for Microsoft Azure resources on a VM using the Azure portal as shown in Figure 2 and Figure 3.
For more information, see Configure managed identities for Azure resources on a VM using the Azure portal
Figure 2: Enable System Assigned Managed Identity During Creation of a VM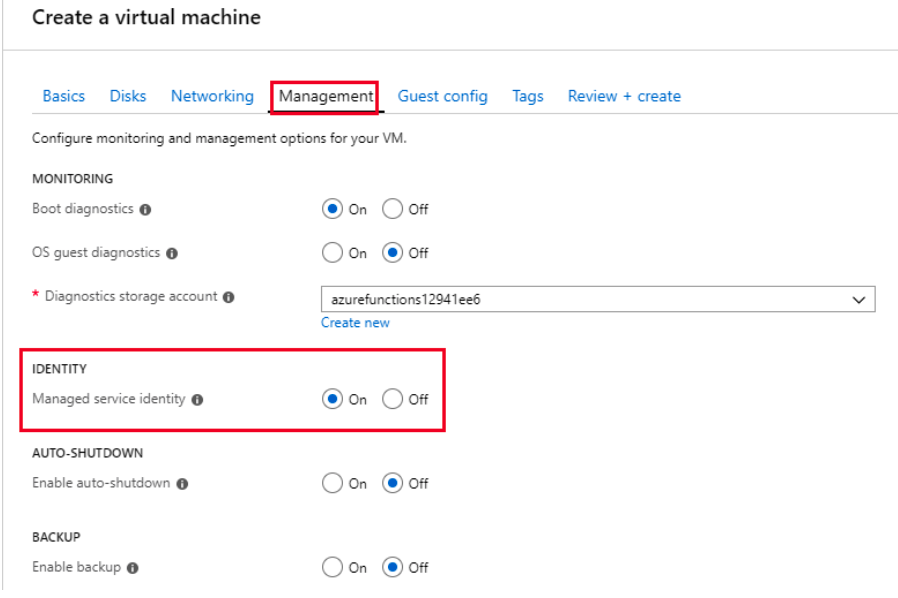 Figure 3: Enable System Assigned Managed Identity on an Existing VM
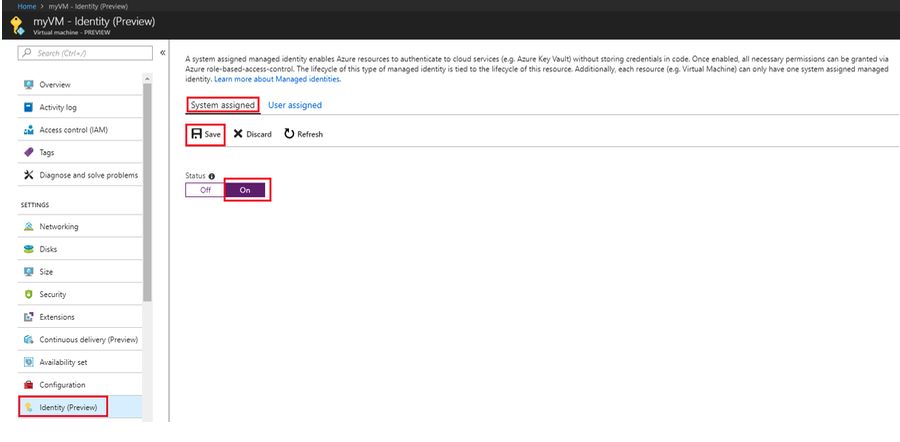
Change the Master Encryption Password
If you want to change the master encryption password then you
can run the request security hsm master-encryption-password set
plain-text-password command from operational mode:
It is recommended that no configuration changes are made while you are changing the master encryption password.
The system checks if the master encryption password is already configured. If master encryption password is configured, then you are prompted to enter the current master encryption password.
The entered master encryption password is validated against the current master encryption password to make sure these master encryption passwords match. If the validation succeeds, you will be prompted to enter the new master encryption password as plain text. You will be asked to enter the key twice to validate the password.
The system then proceeds to re-encrypt the sensitive data with the new master encryption password. You must wait for this process of re-encryption to complete before attempting to change the master encryption password again.
If the encrypted master encryption password file is lost or corrupted, the system will not be able to decrypt the sensitive data. The system can only be recovered by re-importing the sensitive data in clear text, and re-encrypting them.
Verify the Status of the HSM
Purpose
To check connectivity with HSM.
Action
You can use the show security hsm status command
to verify the status of the HSM. The following information is displayed:
If HSM is enabled and reachable or disabled
Is Master Binding Key (RSA Key pair) created in HSM
Is Master Encryption Key configured - master encryption password status (set or not set)
Cloud vendor Information
request security hsm master-encryption-password
Syntax
request security
hsm master-encryption-password set plain-text-password
Release Information
Command introduced in Junos OS Release 19.4R1.
Description
Use this command to set or replace the password (in plain text).
Options
| plain-text-password | Set or replace the password (in plain text). |
Required Privilege Level
maintenance
Output Fields
When you enter this command, you are provided feedback on the status of your request.
Sample Output
request security hsm master-encryption-password set
plain-text-password
user@host> request security hsm master-encryption-password set plain-text-password
   Enter new master encryption password:
   Repeat new master encryption password:
   Binding password with HSM
   Master encryption password is bound to HSM
   Encoding master password ..
   Successfully encoded master password
   Deleting all previous local certificates, keypairs and certificate requests
show security hsm status
- Syntax
- Release Information
- Description
- Options
- Required Privilege Level
- Output Fields
- Sample Output
- Sample Output
Syntax
show security HSM status
Release Information
Command introduced in Junos OS Release 19.4R1.
Description
Display the current
status of the Hardware Security Module (HSM). You can use this show security hsm status command to check the status of HSM,
master binding key, master encryption password, and cloud vendor details.
Options
This command has no options.
Required Privilege Level
security
Output Fields
Table 1 lists
the output fields for the show security hsm status command.
Field Name |
Field Description |
|---|---|
|
Specifies whether HSM is enabled or disabled. |
|
Displays the HSM’s Master Binding Key status whether it is created or not created in HSM. HSM generates cryptographic keys and encrypts them so that those can only be decrypted by the HSM. This process is know as binding. Each HSM has a master binding key, which is also know as storage root key. |
|
Displays Master Encryption configuration status whether it is set or not set. The encrypted data and the hash of the configuration is protected by vSRX Virtual Firewall using Microsoft Key Vault (HSM) service. |
|
Displays the details specific to the cloud vendor. |
Sample Output
show security hsm status (HSM status command output when vSRX Virtual Firewall initially boots up but this feature is not enabled)
user@host> show security hsm status
HSM Status:
  Accessible: no
  Master Binding Key: not-created
  Master Encryption Key: not-configured
  Azure Key Vault: unknown
Sample Output
show security hsm status (HSM status command output after successful integration with key vault)
user@host> show security hsm status
HSM Status:
  Accessible: yes
  Master Binding Key: created
  Master Encryption Key: configured
  Azure Key Vault: vsrx3-hsm-kv
See Also
Understanding VPN Functionality with Microsoft Azure Key Vault HSM Service
With the integration of Microsoft Azure Key Vault HSM Service on vSRX3.0, you can now use the HSM service to create, store, and perform the required VPN keypair operations. Keypair creation is now enabled in HSM service.A PKI based VPN tunnel can now be established using the keypairs generated using the HSM. Once the master encryption key is configured, you can configure the VPN functionality using HSM service. You can generate only RSA keypairs of length 2048 and 4096 bits. Operations such as private key signing during CSR creation in PKID, private key signing during verification of the certificate received from the CA server in PKID, and private key signing during IKE negotiations at IKED is off-loaded from vSRX Virtual Firewall and is now performed by the HSM service.
Keypair generation using HSM service is only for pkid and iked processes. Also, existing keypairs in the filesystem before HSM service is enabled are not encrypted and those keypairs are deleted.
Deployment Scenario
This section provides a deployment scenario where vSRX Virtual Firewall 3.0 instance is launched as a gateway in a virtual network connecting to a data center using a pure IPsec connection.
Figure 4 shows the deployment scenario.
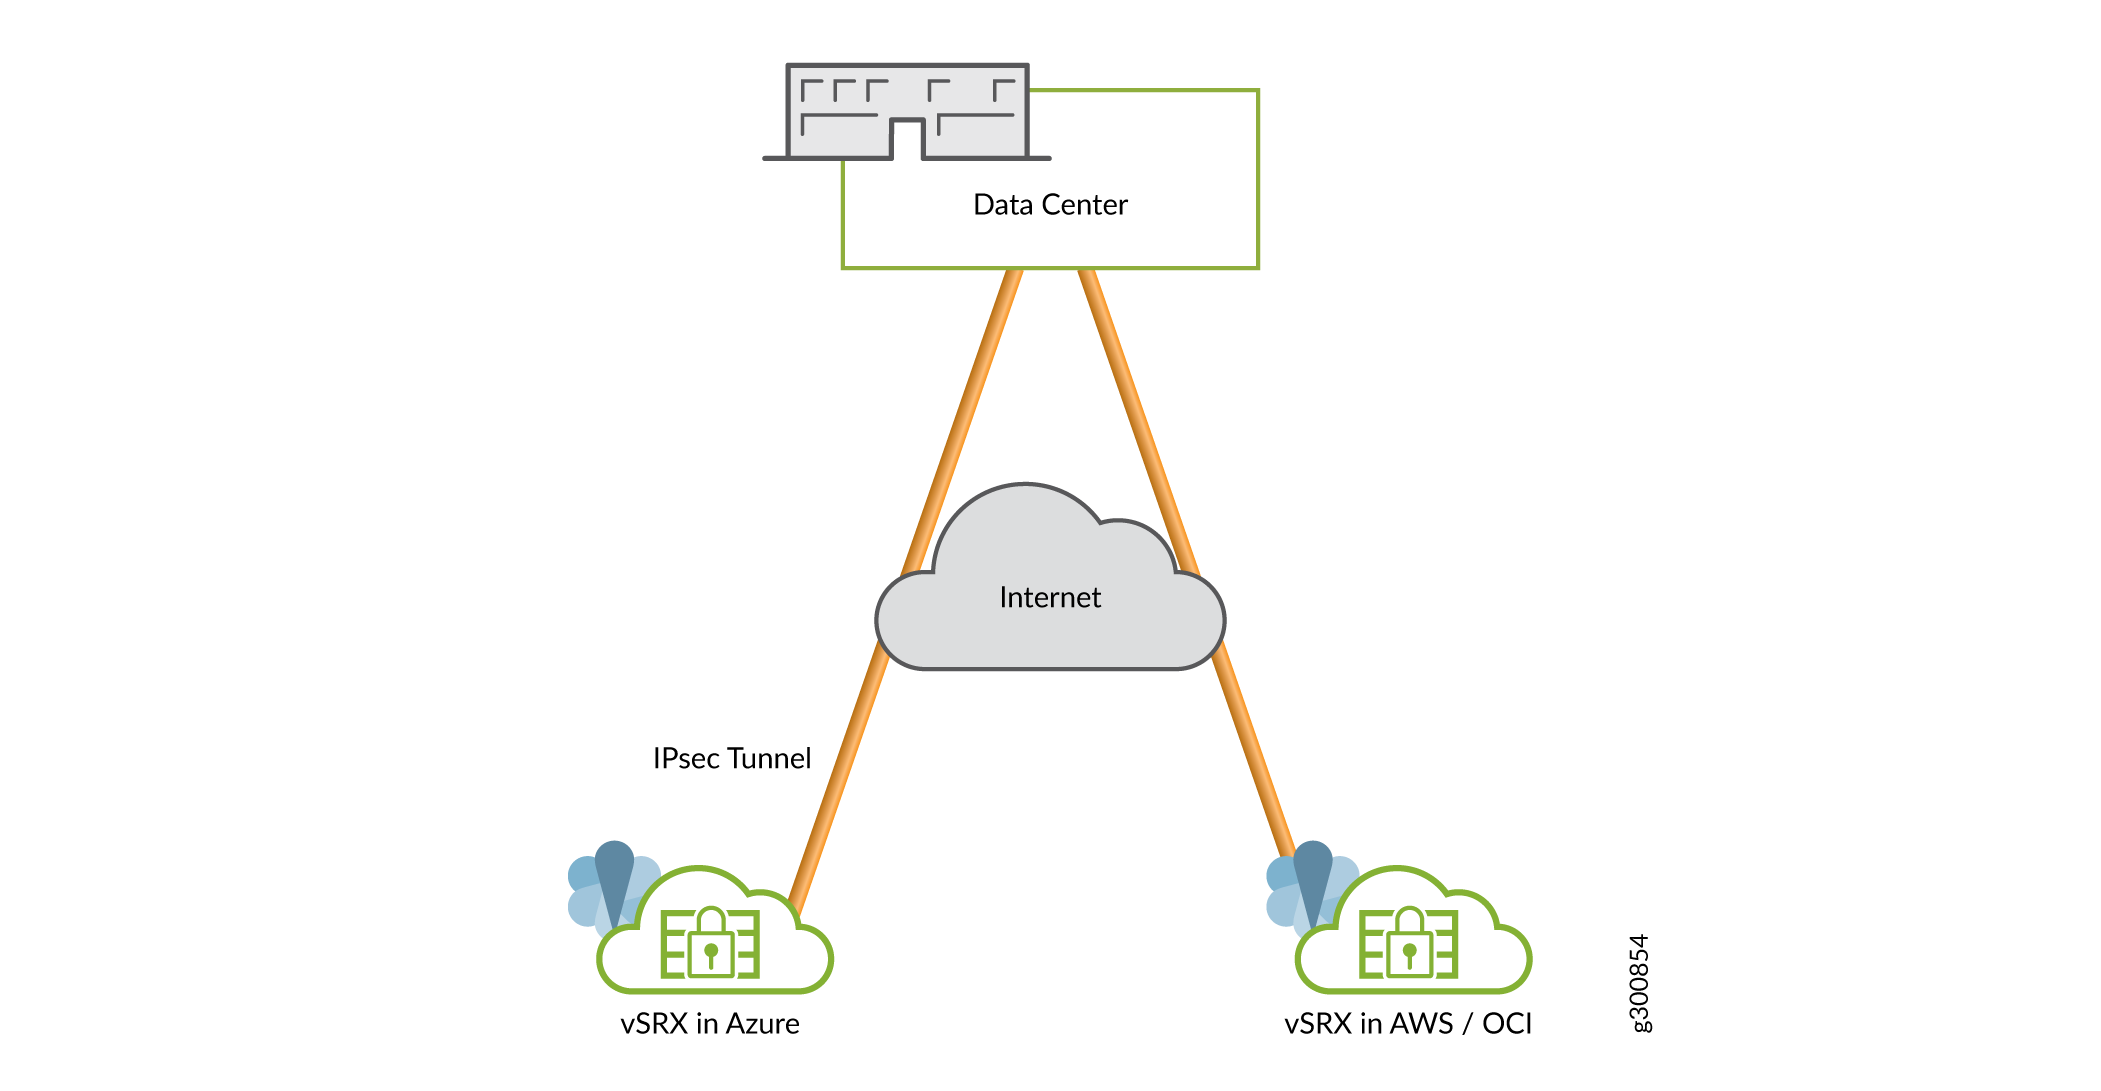
You can generate key pairs using Microsoft Azure cloud HSM service for pkid process and use these keypairs for getting a local certificate from the CA server. Use the keypair present in the cloud HSM service for private key signing during IKE negotiations.
The VPN functionality performed within the Microsoft Azure cloud using HSM service is as shown in Figure 5.
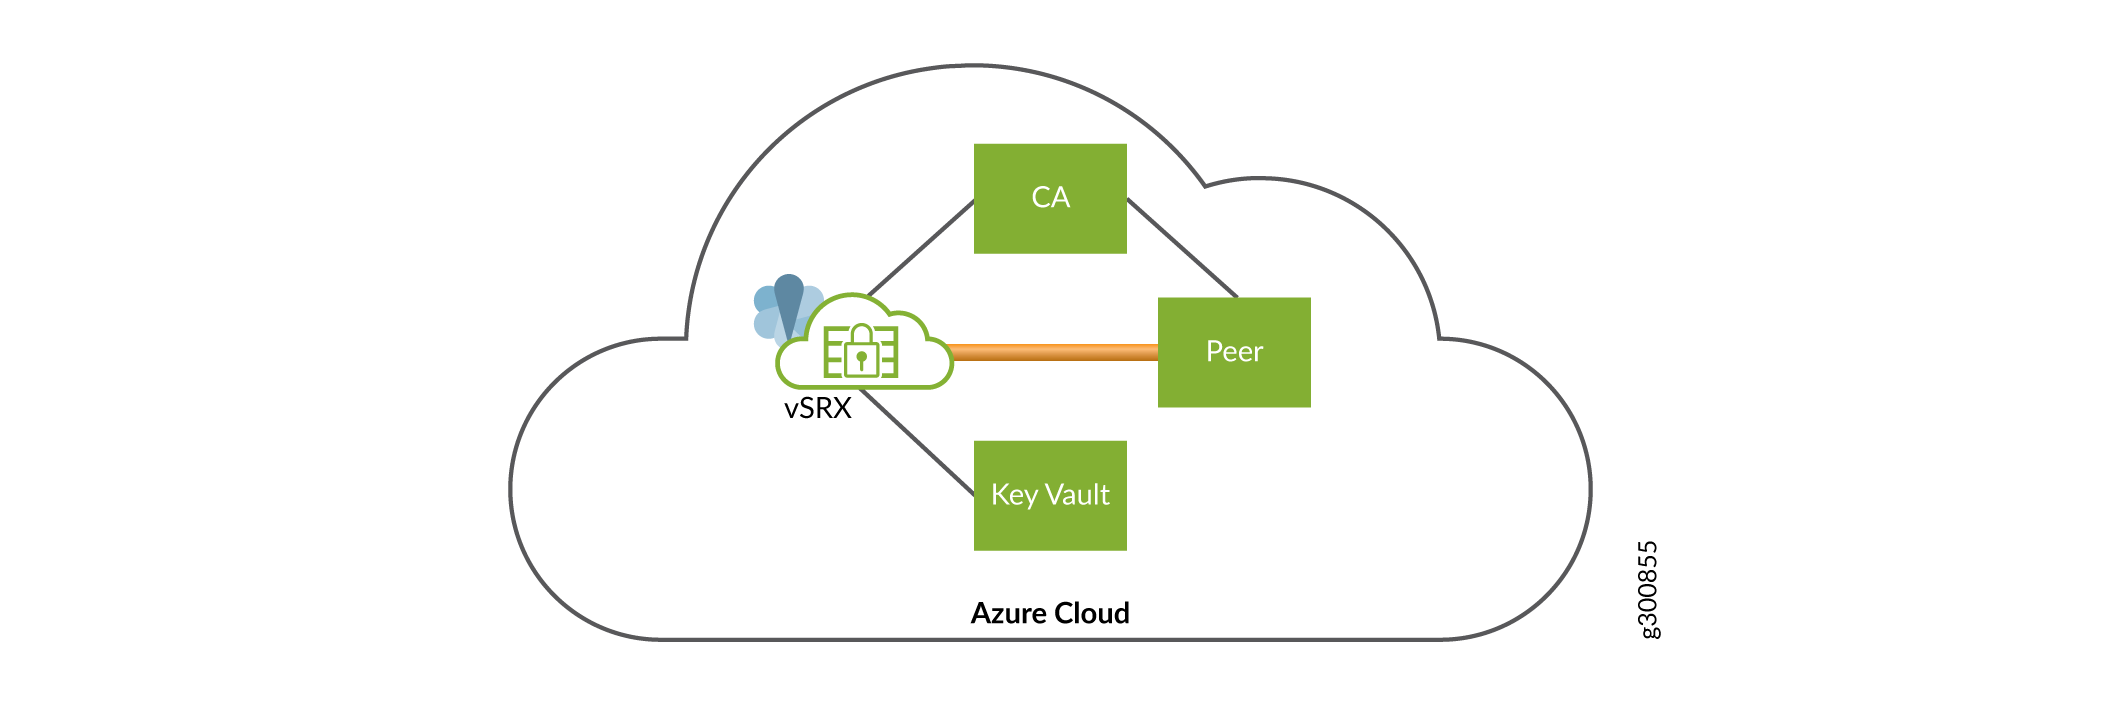
The components involved here are:
vSRX Virtual Firewall 3.0 launched in the Microsoft Azure cloud.
Peer—Second vSRX Virtual Firewall 3.0 instance launched in the Azure cloud. A tunnel is established between the frist vSRX Virtual Firewall 3.0 and and the Peer.
Key Vault—The HSM service launched in the Azure cloud. You can interact between the vSRX Virtual Firewall 3.0 and the HSM. and the peer can create and store keypairs locally.
Certificate Authority Server—Any CA server that can be accessed by the vSRX Virtual Firewall instances. The CA server is launched on the Azure Cloud.
This procedure provides steps on how to allow access from vSRX Virtual Firewall to the HSM by authenticating the vSRX Virtual Firewall with the cloud HSM service.
Initialize a session with the HSM service—Each process that needs to interact with the HSM has to initialize a separate session of its own. For the VPN functionality you must establish 2 sessions with the HSM service for each device involved. One session is established with pkid process and another session with iked process. These sessions with the HSM service are established only once during the init process of the daemon. If a daemon is restarted, a new session is established with the HSM service. When a session is successfully established with the HSM service, a valid session context is returned. Sessions will be established with the HSM service only if Master Encryption Key (MEK) is enabled. Each session will be a secure TLS connection between the vSRX Virtual Firewall and the cloud HSM.
Handling Keypairs at the HSM—To create and store keypairs at the HSM use the
request security pki generate-key-pair certificate-id certificate-id-name <size> <type>command.Note:The term certificate-id is just an identifier associated with the keypair that has been generated. There is no connection to a certificate creation yet. If no type and size are mentioned, then the default values of type as RSA and and size of 2048 is considered.
Redirection to the HSM—With HSM enabled, the same CLI command will be redirected to the HSM. A new keypair with the given parameters is created at the HSM. Keys created by each vSRX Virtual Firewall will be tagged using the UUID of each VM. You can login to cloud portal, access the keys and verify their properties/operations that you want. The UUID of each key is of the following format:<key-name>_<unique vm-instance id>. You need to provide the key name at the time of key creation. The VM instance is the factor that will make the key id unique in the HSM service. Thus, it is required that the vm-instance id must be unique for each VM which is up and running. This is ensured by Microsoft Azure. The HSM redirection will be a timed call, wherein if no response is received within x seconds, then an error message
call
                                to HSM failed
is displayed.Retrieval of Public Key Information—After the creation of the keypair at the HSM, we retrieve the public key components of the keypair. The HSM returns the modulus and the exponent. These components are converted into EVP_PKEY structure using OpenSSL API’s. The public key structure is then stored as a new entry in the hash of keys. In this way, the public key components can be retrieved from the hash when required. Currently, the HSM does not detect duplicate keypairs, instead when error key id is received again, the HSM will overwrite the pre-existing keypair. To avoid this overwrite of keypairs, the public key is saved in the hash at the time of key creation itself. This way, a duplicate keypair creation is stopped at the device level itself, without making a call to the HSM.
You will receive an error
error: Failed to generate
key pair at HSM. Found a key with the same name at HSM. Use a different
certificate id next time. Refer to PKID logs for more details
when you try to use the same name to create a new keypair, even if you have deleted the previous keypair.Deletion of Keypairs—HSM does not support an API to delete keypairs created at the HSM. The delete keypair command issued at the CLI will result in the public key component being deleted from the disk and the key hash. The keypair will not be deleted from the HSM. To delete the keypair from the HSM, you need to access the HSM and manually delete the keypair. If Azure key vault has soft delete feature enabled, you will also need to eliminate the keypair from the keypair before you can re-use the keypair name.
Note:Exporting keys from the file is not supported. When you use the
request security pki local-certificate exportandrequest security pki key-pair exportcommands to export keys, you will receive an error messageExport of keypairs/certificate is not supported when HSM is enabled.Private Key Signing—The private key is now present at the HSM. So, all operations requiring the private key have been offloaded to the HSM. The operations involve:
Private key signing operation are used during:
Creating the Certificate Signing Request (CSR)
Verification of the local certificate received from the CA
RSA signing during IKE negotiations
SHA-1 Inter-operability. The Azure key vault supports private key signing for only SHA-256 digests.
CLI Behavior With and Without HSM
CLI |
Non-HSM |
HSM |
|
Creates a keypair locally |
Creates a keypair at the HSM |
|
Creates a CSR locally |
Contacts the HSM for private key signing while creating the CSR. Digest has to be SHA-256 |
|
Creates a CSR locally. Sends the CSR to the CA server and receives a certificate |
Contacts the HSM for private key signing while creating the CSR. Sends the CSR to the CA server and receives a certificate. Digest has to be SHA-256 |
|
Exported local certificate to other device |
Not possible as key pair not present locally |
|
Exported locally present key pair to other device |
Not possible as key pair not present locally |
|
Generates self signed certificate |
Contacts HSM for signing and then generates self signed certificate |
|
Shows local certificate present on device |
Shows keypair is generated locally or at cloud HSM |
request security pki local-certificate enroll scep
- Syntax
- Release Information
- Description
- Options
- Required Privilege Level
- Output Fields
- Sample Output
- Sample Output
Syntax
request security pki local-certificate enroll scep
    ca-profile  ca-profile name
    certificate-id certificate-id-name
    challenge-password challenge-password
    digest (sha-1 | sha-256)
    domain-name domain-name
    email email-address
    ip-address ip-address
    ipv6-address ipv6-address
    logical-system (logical-system-name | all)
    scep-digest-algorithm (md5 | sha-1)
    scep-encryption-algorithm (des | des3)
    subject subject-distinguished-name
Release Information
Command introduced in Junos OS Release
9.1. Serial number (SN) option added to the subject string output
field in Junos OS Release 12.1X45. scep keyword and ipv6-address option added in Junos OS Release 15.1X49-D40.
Starting in Junos OS Release 20.1R1 on vSRX Virtual Firewall 3.0, you can safeguard
the private keys used by PKID and IKED using Microsoft Azure Key Vault
hardware security module (HSM) service. You can establish a PKI based
VPN tunnel using the keypairs generated at the HSM. The hub certificate-id option under certificate-id is not available for configuration after
generating HSM key-pair.
Starting in Junos
OS Release 20.4R1 on vSRX Virtual Firewall 3.0, you can safeguard the private keys
used by PKID and IKED using AWS Key Management Service (KMS). You
can establish a PKI based VPN tunnel using the keypairs generated
by the KMS. The hub certificate-id option under certificate-id
is not available for configuration after generating PKI key-pair.
Starting in Junos OS Release 22.4R2, logical-system is introduced in
the statement for PKI SCEP certificate enrollment.
Description
Enroll and install a local digital certificate online by using Simple Certificate Enrollment Protocol (SCEP).
If you enter the request security pki local-certificate
enroll command without specifying the scep or cmpv2 keyword, SCEP is the default method for enrolling a local
certificate.
Options
| ca-profile ca-profile-name | CA profile name. |
| certificate-id certificate-id-name | Name of the local digital certificate and the public/private key pair. |
| challenge-password password | Password set by the administrator and normally obtained from the SCEP enrollment webpage of the CA. The password is maximum 256 characters in length. You can enforce the limit to the required characters. |
| digest (sha-1 | sha-256) | Hash algorithm used for signing RSA certificates, either SHA-1 or SHA-256. SHA-1 is the default. |
| domain-name domain-name | Fully qualified domain name (FQDN). The FQDN provides the identity of the certificate owner for Internet Key Exchange (IKE) negotiations and provides an alternative to the subject name. |
| email email-address | E-mail address of the certificate holder. |
| ip-address ip-address | IP address of the router. |
| ipv6-address ipv6-address | IPv6 address of the router for the alternate subject. |
| logical-system (logical-system-name | all) |
Name of the logical system or all. This is optional. |
| scep-digest-algorithm (md5 | sha-1) | Hash algorithm digest, either MD5 or SHA-1; SHA-1 is the default. |
| scep-encryption-algorithm (des | des3) | Encryption algorithm, either DES or DES3; DES3 is the default. |
| subject subject-distinguished-name | Distinguished Name (DN) format that contains the domain component, common name, department, serial number, company name, state, and country in the following format: DC, CN, OU, O, SN, L, ST, C.
|
Required Privilege Level
maintenance and security
Output Fields
When you enter this command, you are provided feedback on the status of your request.
Sample Output
command-name
user@host> request security pki local-certificate enroll scep certificate-id r3-entrust-scep ca-profile entrust domain-name router3.example.net subject "CN=router3,OU=Engineering,O=example,C=US" challenge-password 123
Certificate enrollment has started. To view the status of your enrollment, check the public key infrastructure log (pkid) log file at /var/log/pkid. Please save the challenge-password for revoking this certificate in future. Note that this password is not stored on the router.
Sample Output
Sample output for vSRX Virtual Firewall 3.0
user@host> request security pki generate-key-pair certificate-id example
Generated key pair example, key size 2048 bits
user@host> request security pki local-certificate enroll certificate-id ?
Possible completions:
<certificate-id> Certificate identifier
example
user@host> request security pki generate-key-pair certificate-id Hub
error: Failed to generate key pair at HSM. Found a key with the same name at HSM. Use a different certificate id next time. Refer to PKID logs for more details