Maintaining the SRX5600 Line Cards and Modules
Maintaining Interface Cards and SPCs on the SRX5600 Firewall
Purpose
For optimum firewall performance, verify the condition of the Services Processing Cards (SPCs) and interface cards (IOCs, Flex IOCs and MPCs). The firewall can have up to 6 SPCs and interface cards mounted horizontally in the card cage at the front of the chassis. To maintain SPCs and interface cards, perform the following procedures regularly.
Action
On a regular basis:
Check the LEDs on the craft interface corresponding to the slot for each SPC and interface card. The green LED labeled OK lights steadily when a card is functioning normally.
Check the OK/FAIL LED on the faceplate of each SPC and interface card. If the card detects a failure, it sends an alarm message to the Routing Engine.
Issue the CLI
show chassis fpccommand to check the status of installed cards. As shown in the sample output, the value Online in the column labeled State indicates that the card is functioning normally:user@host> show chassis fpc Temp CPU Utilization (%) Memory Utilization (%) Slot State (C) Total Interrupt DRAM (MB) Heap Buffer 0 Online 41 9 0 1024 15 57 1 Online 43 5 0 1024 16 57 2 Online 43 11 0 1024 16 57 3 Empty 4 Empty 5 Online 42 6 0 1024 16 57For more detailed output, add the
detailoption. The following example does not specify a slot number, which is optional:user@host> show chassis fpc detail Slot 0 information: State Online Temperature 41 degrees C / 105 degrees F Total CPU DRAM 1024 MB Total RLDRAM 256 MB Total DDR DRAM 4096 MB Start time: 2007-07-10 12:28:33 PDT Uptime: 1 hour, 33 minutes, 52 seconds Slot 1 information: State Online Temperature 43 degrees C / 109 degrees F Total CPU DRAM 1024 MB Total RLDRAM 256 MB Total DDR DRAM 4096 MB Start time: 2007-07-10 12:28:38 PDT Uptime: 1 hour, 33 minutes, 47 seconds Slot 2 information: State Online Temperature 43 degrees C / 109 degrees F Total CPU DRAM 1024 MB Total RLDRAM 256 MB Total DDR DRAM 4096 MB Start time: 2007-07-10 12:28:40 PDT Uptime: 1 hour, 33 minutes, 45 seconds Slot 5 information: State Online Temperature 42 degrees C / 107 degrees F Total CPU DRAM 1024 MB Total RLDRAM 256 MB Total DDR DRAM 4096 MB Start time: 2007-07-10 12:28:42 PDT Uptime: 1 hour, 33 minutes, 43 seconds
Issue the CLI
show chassis fpc pic-statuscommand. The slots are numbered 0 through 5, bottom to top:user@host> show chassis fpc pic-status Slot 0 Online SRX5k DPC 40x 1GE PIC 0 Online 10x 1GE RichQ PIC 1 Online 10x 1GE RichQ PIC 2 Online 10x 1GE RichQ PIC 3 Online 10x 1GE RichQ Slot 1 Online SRX5k DPC 40x 1GE PIC 0 Online 10x 1GE RichQ PIC 1 Online 10x 1GE RichQ PIC 2 Online 10x 1GE RichQ PIC 3 Online 10x 1GE RichQ Slot 2 Online SRX5k DPC 40x 1GE PIC 0 Online 10x 1GE RichQ PIC 1 Online 10x 1GE RichQ PIC 2 Online 10x 1GE RichQ PIC 3 Online 10x 1GE RichQ Slot 3 Online SRX5k SPC PIC 0 Offline PIC 1 Offline Slot 4 Online SRX5k SPC PIC 0 Offline PIC 1 Offline
For further description of the output from the command, see Junos OS System Basics and Services Command Reference at www.juniper.net/documentation/.
Holding an SRX5600 Firewall Card
When carrying a card, you can hold it either vertically or horizontally.
A card weighs up to 18.3 lb (8.3 kg). Be prepared to accept the full weight of the card as you lift it.
To hold a card vertically:
- Orient the card so that the faceplate faces you. To verify orientation, confirm that the text on the card is right-side up and the EMI strip is on the right-hand side.
- Place one hand around the card faceplate about a quarter of the way down from the top edge. To avoid deforming the EMI shielding strip, do not press hard on it.
- Place your other hand at the bottom edge of the card.
If the card is horizontal before you grasp it, place your left hand around the faceplate and your right hand along the bottom edge.
To hold a card horizontally:
Orient the card so that the faceplate faces you.
Grasp the top edge with your left hand and the bottom edge with your right hand.
You can rest the faceplate of the card against your body as you carry it.
As you carry the card, do not bump it against anything. Card components are fragile.
Never hold or grasp the card anywhere except those places that this topic indicates are appropriate. In particular, never grasp the connector edge, especially at the power connector in the corner where the connector and bottom edges meet (see Figure 1).
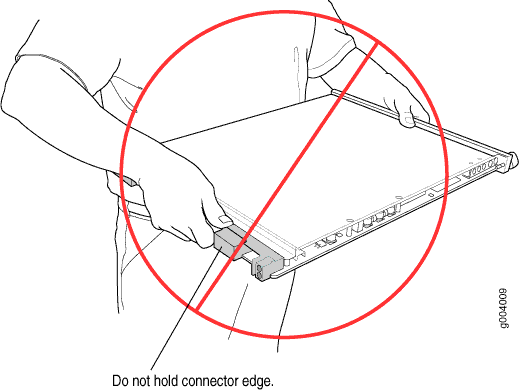
Never carry the card by the faceplate with only one hand.
Do not rest any edge of a card directly against a hard surface (see Figure 2).
Do not stack cards.
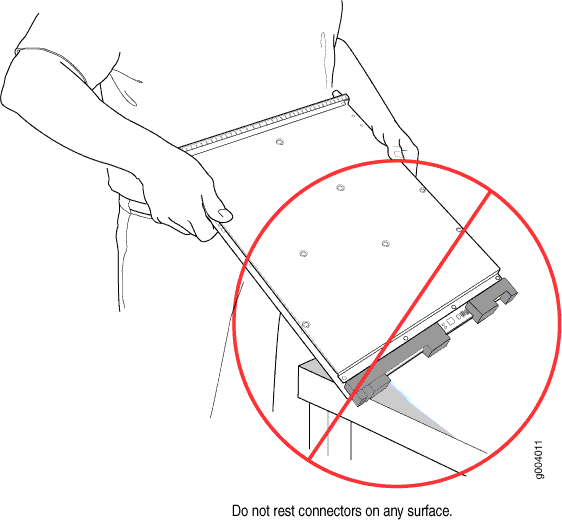
If you must rest the card temporarily on an edge while changing its orientation between vertical and horizontal, use your hand as a cushion between the edge and the surface.
Storing an SRX5600 Firewall Card
You must store a card as follows:
In the firewall chassis
In the container in which a spare card is shipped
Horizontally and sheet metal side down
When you store a card on a horizontal surface or in the shipping container, always place it inside an antistatic bag. Because the card is heavy, and because antistatic bags are fragile, inserting the card into the bag is easier with two people. To do this, one person holds the card in the horizontal position with the faceplate facing the body, and the other person slides the opening of the bag over the card connector edge.
If you must insert the card into a bag by yourself, first lay the card horizontally on a flat, stable surface, sheet metal side down. Orient the card with the faceplate facing you. Carefully insert the card connector edge into the opening of the bag, and pull the bag toward you to cover the card.
Never stack a card under or on top of any other component.
Replacing SRX5600 Firewall IOCs
To replace an IOC, perform the following procedures:
Removing an SRX5600 Firewall IOC
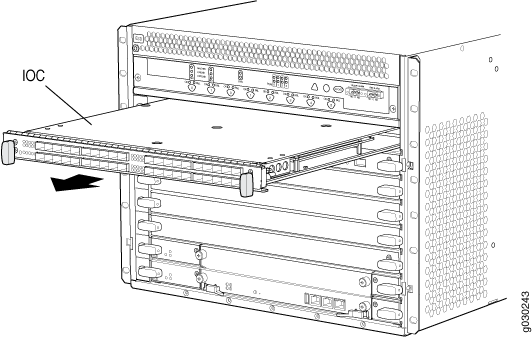
An IOC weighs up to 13.1 lb (5.9 kg). Be prepared to accept its full weight.
To remove an IOC (see Figure 3):
Installing an SRX5600 Firewall IOC
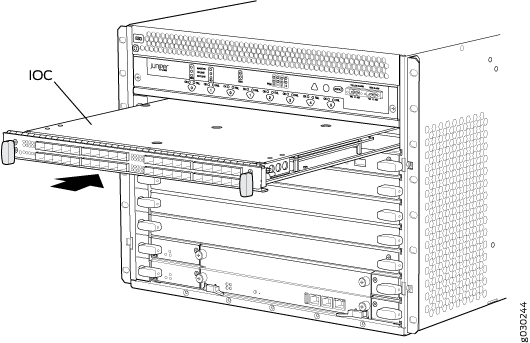
An IOC weighs up to 14.5 lb (6.6 kg). Be prepared to accept its full weight.
To install an IOC (see Figure 4):
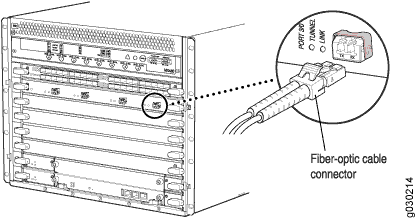
Replacing SRX5600 Firewall Flex IOCs
To replace a Flex IOC, perform the following procedures:
Removing an SRX5600 Firewall Flex IOC
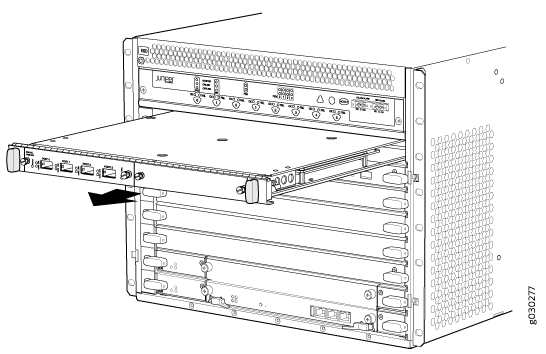
A Flex IOC weighs up to 13.1 lb (5.9 kg). Be prepared to accept the full weight of the card as you remove it.
To remove a Flex IOC (see Figure 6):
Installing an SRX5600 Firewall Flex IOC
Your firewall must be running Junos OS Release 9.5R1 or later in order to recognize Flex IOCs and port modules.
To install a Flex IOC (see Figure 7):
Replacing SRX5600 Firewall SPCs
To replace an SPC, perform the following procedures:
Removing an SRX5600 Firewall SPC
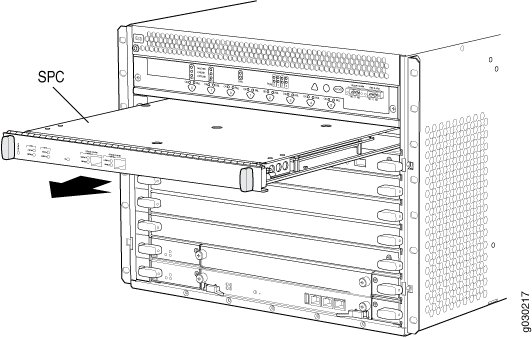
An SPC weighs up to 18.3 lb (8.3 kg). Be prepared to accept its full weight.
To remove an SPC (see Figure 8):
Installing an SRX5600 Firewall SPC
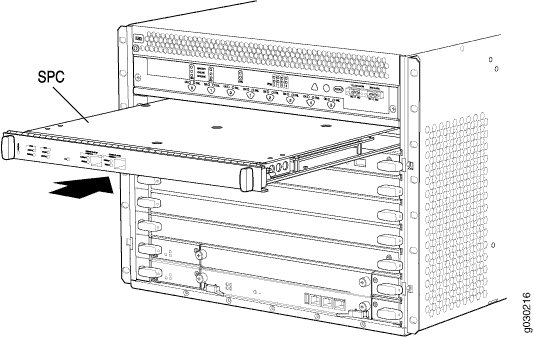
If your firewall is part of an operating chassis cluster, you might be able to install additional SPCs in the clustered devices without shutting down both of the devices at the same time. This eliminates the network downtime you would otherwise incur while adding SPCs. For more information, see Replacing SPCs in an Operating SRX5400, SRX5600, or SRX5800 Firewalls Chassis Cluster.
To install an SPC (see Figure 9):
Replacing SPCs in an Operating SRX5400, SRX5600, or SRX5800 Firewalls Chassis Cluster
If your Firewall is part of an operating chassis cluster, you can replace the first-generation SRX5K-SPC-2-10-40 SPCs with the second generation SRX5K-SPC-4-15-320 SPCs or the first and second generation SPCs with the next generation SRX5K-SPC3s by incurring a minimum downtime on your network.
SRX5K-SPC-2-10-40 SPC is not supported on SRX5400 Firewall.
To replace SPCs in a firewall that is part of a chassis cluster, it must meet the following conditions:
-
Each firewall must have at least one SPC installed. The installation may warrant additional SPCs if the number of sessions encountered is greater than the session limit of one SPC.
-
If the chassis cluster is operating in active-active mode, you must transition it to active-passive mode before using this procedure. You transition the cluster to active-passive mode by making one node primary for all redundancy groups.
-
To replace first-generation SRX5K-SPC-2-10-40 SPCs, both of the firewalls in the cluster must be running Junos OS Release 11.4R2S1, 12.1R2, or later.
-
To replace second-generation SRX5K-SPC-4-15-320 SPCs, both of the firewalls in the cluster must be running Junos OS Release 12.1X44-D10, or later.
-
To replace next-generation SRX5K-SPC3 SPCs, both of the firewalls in the cluster must be running Junos OS Release 18.2R1-S1, or later.
-
You must install SPCs of the same type and in the same slots in both of the firewalls in the cluster. Both firewalls in the cluster must have the same physical configuration of SPCs.
-
If you are replacing an existing SRX5K-SPC-2-10-40 SPC with an SRX5K-SPC-4-15-320 SPC, you must install the new SPC in the lowest-numbered slot. For example, if the chassis already has SPCs installed in slots 2 and 3, then you must replace the SPC in slot 2 first. This ensures that the central point (CP) functionality is performed by an SRX5K-SPC-4-15-320 SPC.
-
If you are adding SRX5K-SPC3 SPCs for the first time to the chassis which has a mix of other SPCs, you must install the first SRX5K-SPC3 in the lowest-numbered slot first and the other SPX5K-SPC3s can be installed in any available slot. For example, if the chassis already has two SRX5K-SPC-4-15-320 SPCs installed in slots 2 and 3, you must install SRX5K-SPC3 SPCs in slots 0 or 1. You will need to make sure that an SRX5K-SPC3 SPC is installed in the slot providing central point (CP) functionality so that the CP functionality is performed by an SRX5K-SPC3 SPC.
Note:Your firewall cannot have a mix of SRX5K-SPC-2-10-40 SPCs and SRX5K-SPC3 SPCs, but starting with Junos OS release 18.2R2 and then 18.4R1 but not 18.3R1 you can have a mix of SRX5K-SPC-4-15-320 SPCs and SRX5K-SPC3 SPCs.
If you are adding SRX5K-SPC3s to the chassis which has only SRX5K-SPC3s, the new SRX5K-SPC3 can be installed in any available slot.
-
If you are adding the SRX5K-SPC-4-15-320 SPCs or the SRX5K-SPC3 SPCs to a firewall, the firewall must already be equipped with high-capacity power supplies and fan trays, and the high-capacity air filters. See Upgrading an SRX5600 Firewall from Standard-Capacity to High-Capacity Power Supplies or Upgrading an SRX5600 Firewall from Standard-Capacity to High-Capacity Power Supplies for more information.
If your installation does not meet these criteria, use the procedure in Installing an SRX5400 Firewall SPC, or Installing an SRX5600 Firewall SPC, or Installing an SRX5800 Firewall SPC to install SPCs in your firewall.
During this installation procedure, you must shut down both devices, one at a time. When one device is shut down, the other device operates without a backup. If that device fails for any reason, you incur network downtime until you restart at least one of the devices.
To replace SPCs in an Firewall cluster:
In-Service Hardware Upgrade for SRX5K-SPC3 in a Chassis Cluster
If your device is part of a chassis cluster and does not have a mix of SPCs but has only SRX5K-SPC3 SPCs, you can only install additional SRX5K-SPC3 (SPC3) using the In-Service Hardware Upgrade (ISHU) procedure and avoid network downtime.
This ISHU procedure will not replace any existing Services Processing Cards (SPC), it will guide you to install an additional SPC3 card in a chassis cluster.
We strongly recommend that you perform the ISHU during a maintenance window, or during the lowest possible traffic as the secondary node is not available at this time.
To install SPC3s in a firewall that is part of a chassis cluster using the ISHU procedure, the following conditions have to be met:
-
Each firewall must have at least one SPC3 installed.
-
Starting in Junos OS Release 19.4R1, ISHU for SRX5K-SPC3 is supported on all SRX5000 line of devices chassis cluster:
-
If the chassis has only one SPC3, you can only install one more SPC3 by using the ISHU procedure.
-
If the chassis already has two SPC3 cards, you cannot install any more SPC3 cards by using the ISHU procedure.
-
If the chassis already has three or more SPC3 cards, you can install additional SPC3 cards by using the ISHU procedure.
-
-
Installing SPC3s to the chassis cluster must not change the central point (CP) functionality mode from Combo CP mode to Full CP mode.
When there are two or less than two SPC3s in the chassis, the CP mode is Combo CP mode. More than two SPC3s in the chassis, the CP mode is Full CP mode.
-
If the chassis cluster is operating in active-active mode, you must transition it to active-passive mode before using this procedure. You transition the cluster to active-passive mode by making one node primary for all redundancy groups.
-
When you are adding a new SPC3 to the chassis, it must be installed in the higher numbered slot than the first installed SPC3 in the chassis.
-
The firewall must already be equipped with high-capacity power supplies and fan trays, and the high-capacity air filters. See Upgrading an SRX5600 Firewall from Standard-Capacity to High-Capacity Power Supplies or Upgrading an SRX5600 Firewall from Standard-Capacity to High-Capacity Power Supplies for more information.
During this installation procedure, you must shut down both devices, one at a time. During the period when one device is shut down, the other device operates without a backup. If that other device fails for any reason, you incur network downtime until you restart at least one of the devices.
To add SPC3s in an Firewall cluster without incurring downtime:
- Use the console port on the Routing Engine to establish a CLI session with one of the devices in the cluster.
- Use the show chassis cluster status command to determine which firewall is currently primary, and which firewall is secondary, within the cluster.
- If the device with which you established the CLI session in Step 2 is not the secondary node in the cluster, use the console port on the device that is the secondary node to establish a CLI session.
-
In the CLI session of the secondary firewall:
- Use the show chassis fpc pic-status command to check the status of all the cards on both the nodes.
- Use the request vmhost power-off command to shut down the firewall if it has the Routing Engine SRX5K-RE3-128G installed else use the request system power-off command.
- Wait for the secondary firewall to shut down completely and than remove the power cables from the chassis.
- Install the new SPC3 or SPC3s in the powered-off firewall using the procedure in Installing an SRX5400 Firewall SPC, or Installing an SRX5600 Firewall SPC, or Installing an SRX5800 Firewall SPC.
- Insert the power cables to the chassis and power on the secondary firewall and wait for it to finish starting.
- Reestablish the CLI session with the secondary node device.
- Use the show chassis fpc pic-status command to make sure that all of the cards in the secondary node chassis are back online.
- Use the show chassis cluster status command to make sure that the priority for all redundancy groups is greater than zero.
- Use the console port on the device that is the primary node to establish a CLI session.
-
In the CLI session of the primary node:
- Use the request chassis cluster failover command to fail over each redundancy group that has an ID number greater than zero.
- Use the request vmhost power-off command to shut down the firewall if it has the Routing Engine SRX5K-RE3-128G installed, else use the request system power-off command. This action causes redundancy group 0 to fail over onto the other firewall, making it the active node in the cluster.
- Repeat Step 6 to install SPC3s in the powered-off firewall.
- Power on the firewall and wait for it to finish starting.
- Use the show chassis fpc pic-status command on each node to confirm that all cards are online and both firewalls are operating correctly.
- Use the show chassis cluster status command to make sure that the priority for all redundancy groups is greater than zero.
Maintaining MICs and Port Modules on the SRX5600 Firewall
Purpose
For optimum firewall performance, verify the condition of the MICs installed in MPCs, and port modules installed in Flex IOCs.
Action
On a regular basis:
Check the LEDs on MIC and port modules faceplates. The meaning of the LED states differs for various port modules. If the Flex IOC that houses the port modules detects a port modules failure, the Flex IOC generates an alarm message to be sent to the Routing Engine.
Issue the CLI
show chassis fpc pic-statuscommand. The port module and MIC slots in an FPC are numbered from 0 through 1, bottom to top:user@host> show chassis fpc pic-status Slot 0 Online SRX5k SPC PIC 0 Online SPU Cp-Flow PIC 1 Online SPU Flow Slot 3 Online SRX5k DPC 4X 10GE PIC 0 Online 1x 10GE(LAN/WAN) RichQ PIC 1 Online 1x 10GE(LAN/WAN) RichQ PIC 2 Online 1x 10GE(LAN/WAN) RichQ PIC 3 Online 1x 10GE(LAN/WAN) RichQ Slot 5 Online SRX5k FIOC PIC 0 Online 16x 1GE TX PIC 1 Online 4x 10GE XFP
For further description of the output from the command, see Junos OS System Basics and Services Command Reference at www.juniper.net/documentation/.
Replacing SRX5600 Firewall MICs
To replace an MIC, perform the following procedures:
Removing an SRX5600 Firewall MIC
The MICs are located in the MPCs installed in the front of the firewall. A MIC weighs less than 2 lb (0.9 kg).
To remove a MIC:
Installing an SRX5600 Firewall MIC
To install a MIC:
Replacing SRX5600 Firewall Port Modules
To replace a port module, perform the following procedures:
Removing an SRX5600 Firewall Port Module
Port modules are installed in Flex IOCs in the firewall card cage. A port module weighs up to 1.6 lb (0.7 kg). Be prepared to accept its full weight when you remove or install a port module.
To remove a port module (see Figure 13):
Installing an SRX5600 Firewall Port Module
To install a port module into a Flex IOC (see Figure 14):
You can also verify that the port module is functioning correctly
by issuing the show chassis fpc and show chassis fpc
pic-status commands.
Replacing SRX5600 Firewall MPCs
To replace an MPC, perform the following procedures:
Removing an SRX5600 Firewall MPC
When you remove an MPC, the firewall continues to function, although the MIC interfaces installed on the MPC being removed no longer function.
An MPC installs horizontally in the front of the firewall. A fully configured MPC can weigh up to 18.35 lb (8.3 kg). Be prepared to accept its full weight.
To remove an MPC:
Installing an SRX5600 Firewall MPC
An MPC installs horizontally in the front of the firewall. A fully configured MPC can weigh up to 18.35 lb (8.3 kg). Be prepared to accept its full weight.
To install an MPC:


