Configuring VPN on a Device Running Junos OS
This section describes sample configurations of an IPsec VPN on a Junos OS device using the following IKE authentication methods:
Configuring an IPsec VPN with a Preshared Key for IKE Authentication
Configuring an IPsec VPN with an RSA Signature for IKE Authentication
Configuring an IPsec VPN with an ECDSA Signature for IKE Authentication
Figure 1 illustrates the VPN topology used in all the examples described in this section. Here, H0 and H1 are the host PCs, R0 and R2 are the two endpoints of the IPsec VPN tunnel, and R1 is a router to route traffic between the two different networks.
The router R1 can be a Linux-based router, a Juniper Networks device, or any other vendor router.
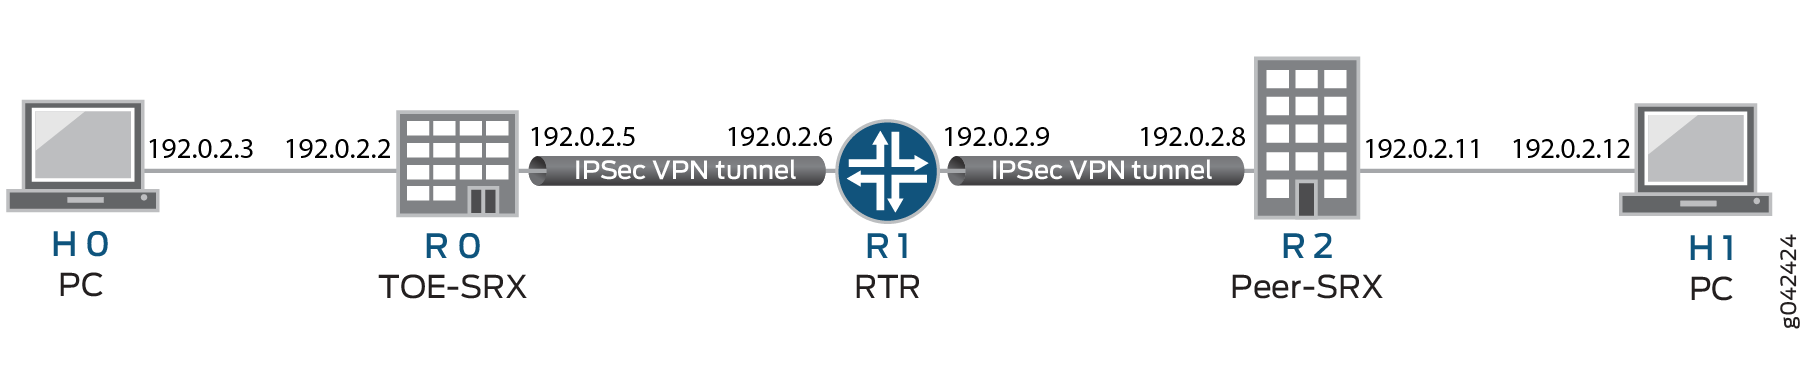
Table 1 provides a complete list of the supported IKE protocols, tunnel modes, Phase 1 negotiation mode, authentication method or algorithm, encryption algorithm, DH groups supported for the IKE authentication and encryption (Phase1, IKE Proposal), and for IPsec authentication and encryption (Phase2, IPsec Proposal). The listed protocols, modes, and algorithms are supported and required for 22.2R2 Common Criteria.
IKE Protocol |
Tunnel Mode |
Phase1 Negotiation Mode |
Phase 1 Proposal (P1, IKE) |
|||
|---|---|---|---|---|---|---|
Authentication Method |
Authentication Algorithm |
DH Group |
Encryption Algorithm |
|||
IKEv1 |
Main |
Route |
pre-shared-keys |
sha-256 |
group14 |
|
IKEv2 |
rsa-signatures-2048 |
sha-384 |
group19 |
aes-128-cbc |
||
ecdsa-signatures-256 |
group20 |
aes-128-gcm |
||||
ecdsa-signatures-384 |
group24 |
aes-192-cbc |
||||
aes-256-cbc |
||||||
aes-256-gcm |
||||||
IKE Protocol |
Tunnel Mode |
Phase1 Negotiation Mode |
Phase 2 Proposal (P2, IPsec) |
|||
|---|---|---|---|---|---|---|
Authentication Algorithm |
DH Group (PFS) |
Encryption Method |
Encryption Algorithm |
|||
IKEv1 |
Main |
Route |
hmac-sha1-96 |
group14 |
ESP |
|
IKEv2 |
hmac-sha-256-128 |
group19 |
aes-128-cbc |
|||
group20 |
aes-128-gcm |
|||||
group24 |
aes-192-cbc |
|||||
aes-192-gcm |
||||||
aes-256-cbc |
||||||
aes-256-gcm |
||||||
The following sections provide sample configurations of
IKEv1 IPsec VPN examples for selected algorithms. Authentication algorithms
can be replaced in the configurations to accomplish the user’s
desired configurations. Use set security ike gateway <gw-name>
version v2-only command for IKEv2 IPsec VPN.
Configuring an IPsec VPN with an RSA Signature for IKE Authentication
The following section provides an example to configure Junos OS devices for IPsec VPN using RSA Signature as IKE Authentication method, whereas, the algorithms used in IKE/IPsec authentication/encryption is as shown in the following table. In this section, you configure devices running Junos OS for IPsec VPN using an RSA signature as the IKE authentication method. The algorithms used in IKE or IPsec authentication or encryption is shown in Table 2 .
The TOE checks the validity of X.509 certificates each time a certificate is presented for IPsec authentication. To validate certificates, the TOE extracts the subject, issuer, subject's public key, signature, basic Constraints and validity period fields. If any fields are not present, the validation fails. The issuer is looked up in the PKI database. If the issuer is not present, or if the issuer certificate does not have the CA:true flag in the basicConstraints section, the validation fails. The TOE verifies the validity of the signature. If the signature is not valid, the validation fails. It then confirms that the current date and time is within the valid time period specified in the certificate if the TOE has been configured to perform a revocation check using CRL (as specified in RFC 5280 Section 6.3). If the CRL fails to download, the certificate is considered to have failed validation, unless the option to skip CRL checking on download failure has been enabled.
|
IKE Protocol |
Tunnel Mode |
Phase1 Negotiation Mode |
Phase 1 Proposal (P1, IKE) |
|||
|---|---|---|---|---|---|---|
|
Authentication Method |
Authentication Algorithm |
DH Group |
Encryption Algorithm |
|||
|
IKEv1 |
Main |
Route |
rsa-signatures-2048 |
sha-256 |
group19 |
aes-128-cbc |
|
IKE Protocol |
Tunnel Mode |
Phase1 Negotiation Mode |
Phase 2 Proposal (P2, IPsec) |
|||
|---|---|---|---|---|---|---|
|
Authentication Algorithm |
DH Group (PFS) |
Encryption Method |
Encryption Algorithm |
|||
|
IKEv1 |
Main |
Route |
hmac-sha-256-128 |
group19 |
ESP |
aes-128-cbc |
Configuring IPsec VPN with RSA Signature as IKE Authentication on the Initiator or Responder
To configure the IPsec VPN with RSA signature IKE authentication on the initiator:
-
Configure the PKI. See Example: Configuring PKI.
-
Generate the RSA key pair. See Example: Generating a Public-Private Key Pair.
-
Generate and load the CA certificate. See Example: Loading CA and Local Certificates Manually.
-
Load the CRL. See Example: Manually Loading a CRL onto the Device .
-
Generate and load a local certificate. See Example: Loading CA and Local Certificates Manually.
-
Configure the IKE proposal.
[edit security ike] user@host# set proposal ike-proposal1 authentication-method rsa-signatures user@host# set proposal ike-proposal1 dh-group group19 user@host# set proposal ike-proposal1 authentication-algorithm sha-256 user@host# set proposal ike-proposal1 encryption-algorithm aes-128-cbc
Note:You can use the disable option to disable the revocation check or select the crl option toconfigure the CRL attributes. Using the
set security pki ca-profile <profilename>revocation-check crl disableon-download-failure command disable the on-downloadfailure option to allow the sessions matching the CA profile, when CRL download failed for a CA profile. The sessions will be allowed only if no old CRL is present in the same CA profile."Here, ike-proposal1 is the name given by the authorized administrator. -
Configure the IKE policy.
[edit security ike] user@host# set policy ike-policy1 mode main user@host# set policy ike-policy1 proposals ike-proposal1 user@host# set policy ike-policy1 certificate local-certificate cert1
Note:Here,
ike-policy1IKE policy name given by the authorized administrator. -
Configure the IPsec proposal.
[edit security ipsec] user@host# set proposal ipsec-proposal1 protocol esp user@host# set proposal ipsec-proposal1 authentication-algorithm hmac-sha-256-128 user@host# set proposal ipsec-proposal1 encryption-algorithm aes-128-cbc
Note:Here,
ipsec-proposal1is the name given by the authorized administrator. -
Configure the IPsec policy.
[edit security ipsec] user@host# set policy ipsec-policy1 perfect-forward-secrecy keys group19 user@host# set policy ipsec-policy1 proposals ipsec-proposal1
Note:Here,
ipsec-policy1is the name given by the authorized administrator. -
Configure the IKE.
[edit security ike] user@host# set gateway gw1 ike-policy ike-policy1 user@host# set gateway gw1 address 192.0.2.8 user@host# set gateway gw1 local-identity inet 192.0.2.5 user@host# set gateway gw1 external-interface fe-0/0/1
Note:Here,
192.0.2.8is the peer VPN endpoint IP,192.0.2.5is the local VPN endpoint IP, andfe-0/0/1is the local outbound interface as VPN endpoint. The following configuration is also needed for IKEv2.[edit security ike] user@host# set gateway gw1 version v2-only
-
Configure VPN.
[edit security ipsec] user@host# set vpn vpn1 ike gateway gw1 user@host# set vpn vpn1 ike ipsec-policy ipsec-policy1 user@host# set vpn vpn1 bind-interface st0.0
Note:Here,
vpn1is the VPN tunnel name given by the authorized administrator.[edit] user@host# set routing-options static route 192.0.2.10/24 qualified-next-hop st0.0 preference 1
-
Configure the outbound flow policies.
[edit security policies] user@host# set from-zone trustZone to-zone untrustZone policy policy1 match source-address trustLan user@host# set from-zone trustZone to-zone untrustZone policy policy1 match destination-address untrustLan user@host# set from-zone trustZone to-zone untrustZone policy policy1 match application any user@host# set from-zone trustZone to-zone untrustZone policy policy1 then permit user@host# set from-zone trustZone to-zone untrustZone policy policy1 then log session-init user@host# set from-zone trustZone to-zone untrustZone policy policy1 then log session-close
Note:Here,
trustZoneanduntrustZoneare preconfigured security zone andtrustLananduntrustLanare preconfigured network addresses. -
Configure the inbound flow policies.
[edit security policies] user@host# set from-zone untrustZone to-zone trustZone policy policy1 match source-address untrustLan user@host# set from-zone untrustZone to-zone trustZone policy policy1 match destination-address trustLan user@host# set from-zone untrustZone to-zone trustZone policy policy1 match application any user@host# set from-zone untrustZone to-zone trustZone policy policy1 then permit user@host# set from-zone untrustZone to-zone trustZone policy policy1 then log session-init user@host# set from-zone untrustZone to-zone trustZone policy policy1 then log session-close
Note:Here,
trustZoneanduntrustZoneare preconfigured security zones andtrustLananduntrustLanare preconfigured network addresses. -
Commit the configuration.
[edit] user@host# commit
A web server (Example Apache 2) can be used to host the CRL files on the CRL server which the device can then retrieve via HTTP.
Configuring an IPsec VPN with an ECDSA Signature for IKE Authentication
In this section, you configure devices running Junos OS for IPsec VPN using an ECDSA signature as the IKE authentication method. The algorithms used in IKE or IPsec authentication or encryption are shown in Table 2 .
|
IKE Protocol |
Tunnel Mode |
Phase1 Negotiation Mode |
Phase 1 Proposal (P1, IKE) |
|||
|---|---|---|---|---|---|---|
|
Authentication Method |
Authentication Algorithm |
DH Group |
Encryption Algorithm |
|||
|
IKEv1 |
Main |
Route |
ecdsa-signatures-256 |
sha-384 |
group14 |
aes-256-cbc |
|
IKE Protocol |
Tunnel Mode |
Phase1 Negotiation Mode |
Phase 2 Proposal (P2, IPsec) |
|||
|---|---|---|---|---|---|---|
|
Authentication Algorithm |
DH Group (PFS) |
Encryption Method |
Encryption Algorithm |
|||
|
IKEv1 |
Main |
Route |
No Algorithm |
group14 |
ESP |
aes-256-gcm |
- Configuring IPsec VPN with ECDSA signature IKE authentication on the Initiator
- Configuring IPsec VPN with ECDSA signature IKE authentication on the Responder
- Configuring the Lifetime for an IKE SA
- Configuring the Lifetime for an IPsec SA
- Configuring Remote IKE IDs
Configuring IPsec VPN with ECDSA signature IKE authentication on the Initiator
To configure the IPsec VPN with ECDSA signature IKE authentication on the initiator:
-
Configure the PKI. See, Example: Configuring PKI.
-
Generate the ECDSA key pair. See Example: Generating a Public-Private Key Pair.
-
Generate and load CA certificate. See Example: Loading CA and Local Certificates Manually.
-
Load CRL. See Example: Manually Loading a CRL onto the Device .
-
Generate and load a local certificate. See Example: Loading CA and Local Certificates Manually.
-
Configure the IKE proposal.
[edit security ike] user@host# set proposal ike-proposal1 authentication-method ecdsa-signatures-256 user@host# set proposal ike-proposal1 dh-group group14 user@host# set proposal ike-proposal1 authentication-algorithm sha-384 user@host# set proposal ike-proposal1 encryption-algorithm aes-256-cbc
Note:Here,
ike-proposal1is the IKE proposal name given by the authorized administrator. -
Configure the IKE policy.
[edit security ike] user@host# set policy ike-policy1 mode main user@host# set policy ike-policy1 proposals ike-proposal1 user@host# set policy ike-policy1 certificate local-certificate cert1
-
Configure the IPsec proposal.
[edit security ipsec] user@host# set proposal ipsec-proposal1 protocol esp user@host# set proposal ipsec-proposal1 encryption-algorithm aes-256-gcm
Note:Here,
ipsec-proposal1is the IPsec proposal name given by the authorized administrator. -
Configure the IPsec policy.
[edit security ipsec] user@host# set policy ipsec-policy1 perfect-forward-secrecy keys group14 user@host# set policy ipsec-policy1 proposals ipsec-proposal1
Note:Here,
ipsec-policy1is the IPsec policy name andipsec-proposal1is the IPsec proposal name given by the authorized administrator. -
Configure IKE.
[edit security ike]
user@host# set gateway gw1 ike-policy ike-policy1
user@host# set gateway gw1 address 192.0.2.8
user@host# set gateway gw1 local-identity inet 192.0.2.5
user@host# set gateway gw1 external-interface ge-0/0/2
Note:Here,
gw1is an IKE gateway name,192.0.2.8is the peer VPN endpoint IP,192.0.2.5is the local VPN endpoint IP, andge-0/0/2is a local outbound interface as the VPN endpoint. The following configuration is also needed for IKEv2.[edit security ike] user@host# set gateway gw1 version v2-only
-
Configure the VPN.
[edit]
user@host# set security ipsec vpn vpn1 ike gateway gw1
user@host# set security ipsec vpn vpn1 ike ipsec-policy ipsec-policy1
user@host# set security ipsec vpn vpn1 bind-interface st0.0
user@host# set routing-options static route 192.0.2.10/24 qualified-next-hop st0.0 preference 1
Note:Here,
vpn1is the VPN tunnel name given by the authorized administrator. -
Configure the outbound flow policies.
[edit security policies] user@host# set from-zone trustZone to-zone untrustZone policy policy1 match source-address trustLan user@host# set from-zone trustZone to-zone untrustZone policy policy1 match destination-address untrustLan user@host# set from-zone trustZone to-zone untrustZone policy policy1 match application any user@host# set from-zone trustZone to-zone untrustZone policy policy1 then permit user@host# set from-zone trustZone to-zone untrustZone policy policy1 then log session-init user@host# set from-zone trustZone to-zone untrustZone policy policy1 then log session-close
Note:Here,
trustZoneanduntrustZoneare preconfigured security zones andtrustLananduntrustLanare preconfigured network addresses. -
Configure the inbound flow policies.
[edit security policies]
user@host# set from-zone untrustZone to-zone trustZone policy policy1 match source-address untrustLan
user@host# set from-zone untrustZone to-zone trustZone policy policy1 match destination-address trustLan
user@host# set from-zone untrustZone to-zone trustZone policy policy1 match application any
user@host# set from-zone untrustZone to-zone trustZone policy policy1 then permit
user@host# set from-zone untrustZone to-zone trustZone policy policy1 then log session-init
user@host# set from-zone untrustZone to-zone trustZone policy policy1 then log session-close
Note:Here,
trustZoneanduntrustZoneare preconfigured security zones andtrustLananduntrustLanare preconfigured network addresses. -
Commit your configuration.
user@host# commit
Configuring IPsec VPN with ECDSA signature IKE authentication on the Responder
To configure IPsec VPN with ECDSA signature IKE authentication on the responder:
-
Configure the PKI. See, Example: Configuring PKI.
-
Generate the ECDSA key pair. See Example: Generating a Public-Private Key Pair.
-
Generate and load CA certificate. See Example: Loading CA and Local Certificates Manually.
-
Load the CRL. See Example: Manually Loading a CRL onto the Device .
-
Configure the IKE proposal.
[edit security ike] user@host# set proposal ike-proposal1 authentication-method ecdsa-signatures-256 user@host# set proposal ike-proposal1 dh-group group14 user@host# set proposal ike-proposal1 authentication-algorithm sha-384 user@host# set proposal ike-proposal1 encryption-algorithm aes-256-cbc
Note:Here,
ike-proposal1is the IKE proposal name given by the authorized administrator. -
Configure the IKE policy.
[edit security ike] user@host# set policy ike-policy1 mode main user@host# set policy ike-policy1 proposals ike-proposal1 user@host# set policy ike-policy1 certificate local-certificate cert1
-
Configure the IPsec proposal.
[edit security ipsec] user@host# set proposal ipsec-proposal1 protocol esp user@host# set proposal ipsec-proposal1 encryption-algorithm aes-256-gcm
Note:Here,
ipsec-proposal1is the IPsec proposal name given by the authorized administrator. -
Configure the IPsec policy.
[edit security ipsec]
user@host# set policy ipsec-policy1 perfect-forward-secrecy keys group14
user@host# set policy ipsec-policy1 proposals ipsec-proposal1
Note:Here,
ipsec-policy1is the IPsec policy name andipsec-proposal1is the IPsec proposal name given by the authorized administrator. -
Configure the IKE.
[edit security ike] user@host# set gateway gw1 ike-policy ike-policy1 user@host# set gateway gw1 address 192.0.2.5 user@host# set gateway gw1 local-identity inet 192.0.2.8 user@host# set gateway gw1 external-interface ge-0/0/1
Note:Here,
gw1is an IKE gateway name,192.0.2.5is the peer VPN endpoint IP,192.0.2.8is the local VPN endpoint IP, andge-0/0/1is a local outbound interface as the VPN endpoint. The following configuration is also needed for IKEv2.[edit security ike] user@host# set gateway gw1 version v2-only
-
Configure the VPN.
[edit] user@host# set security ipsec vpn vpn1 ike gateway gw1 user@host# set security ipsec vpn vpn1 ike ipsec-policy ipsec-policy1 user@host# set security ipsec vpn vpn1 bind-interface st0.0 user@host# set routing-options static route 192.0.2.1/24 qualified-next-hop st0.0 preference 1
Note:Here,
vpn1is the VPN tunnel name given by the authorized administrator. -
Configure the outbound flow policies.
[edit security policies] user@host# set from-zone trustZone to-zone untrustZone policy policy1 match source-address trustLan user@host# set from-zone trustZone to-zone untrustZone policy policy1 match destination-address untrustLan user@host# set from-zone trustZone to-zone untrustZone policy policy1 match application any user@host# set from-zone trustZone to-zone untrustZone policy policy1 then permit user@host# set from-zone trustZone to-zone untrustZone policy policy1 then log session-init user@host# set from-zone trustZone to-zone untrustZone policy policy1 then log session-close
Note:Here,
trustZoneanduntrustZoneare preconfigured security zones andtrustLananduntrustLanare preconfigured network addresses. -
Configure the inbound flow policies.
[edit security policies]
user@host# set from-zone untrustZone to-zone trustZone policy policy1 match source-address untrustLan
user@host# set from-zone untrustZone to-zone trustZone policy policy1 match destination-address trustLan
user@host# set from-zone untrustZone to-zone trustZone policy policy1 match application any
user@host# set from-zone untrustZone to-zone trustZone policy policy1 then permit
user@host# set from-zone untrustZone to-zone trustZone policy policy1 then log session-init
user@host# set from-zone untrustZone to-zone trustZone policy policy1 then log session-close
Note:Here,
trustZoneanduntrustZoneare preconfigured security zones andtrustLananduntrustLanare preconfigured network addresses. -
Commit your configuration.
user@host# commit
Configuring the Lifetime for an IKE SA
The IKE lifetime sets the lifetime of an IKE SA. When the IKE SA expires, it is replaced by a new SA (and SPI) or is terminated. The default value IKE lifetime is 3600 seconds.
To configure the IKE lifetime, include the lifetime-seconds statement and specify the
number of seconds (180 through 86,400) at the [edit security ike proposal
ike-proposal-name] hierarchy level:
[edit security ike proposal ike-proposal-name] lifetime-seconds seconds;
Configuring the Lifetime for an IPsec SA
The IPsec lifetime option sets the lifetime of an IPsec SA. When the IPsec SA expires, it is replaced by a new SA (and SPI) or is terminated. A new SA has new authentication and encryption keys, and SPI; however, the algorithms may remain the same if the proposal is not changed. If lifetime is not configured and a lifetime is not sent by a responder, the lifetime is 28,800 seconds.
To configure the IPsec lifetime, include the lifetime-seconds statement and specify the
number of seconds (180 through 28,800) at the [edit security ipsec proposal
ipsec-proposal-name] hierarchy level:
[edit security ipsec proposal ike-proposal-name] lifetime-seconds seconds;
To configure the IPsec lifetime by number of bytes, include the lifetime-kilobytes and Specify the lifetime (in kilobytes) of an IPsec security association (SA). If this statement is not configured, the number of kilobytes used for the SA lifetime is unlimited.
Range: 64 through 4,294,967,294 kilobytes at the [edit security ipsec proposal
ipsec-proposal-name] hierarchy level:
[edit security ipsec proposal ipsec-proposal-name] lifetime-kilobytes kilobytes;
Configuring Remote IKE IDs
By default, the IKE ID received from the peer is validated with the IP address configured for the IKE gateway. In certain network setups, the IKE ID received from the peer (the IKE ID can be an IPv4 or IPv6 address, email id, fully qualified domain name (FQDN), or a distinguished name) does not match the IKE gateway configured on the device. This can lead to a Phase 1 validation failure.
To configure the IKE ID perform the following steps:
Configure the remote-identity statement at the set security ike gateway gateway-name hierarchy
level to match the IKE ID that is received from the peer. The IKE ID values can be an IPv4 address or an IPv6 address, email id, FQDN, or a distinguished name.-
On the peer device, ensure that the IKE ID is the same as the remote-identity configured on the device. If the peer device is a Junos OS device, configure the local-identity statement at the set security ike gateway gateway-name hierarchy level. The IKE ID values can be an IPv4 address or an IPv6 address, email id, FQDN, or a distinguished name.