Adding, Editing, and Deleting sFlow Collector Nodes in Contrail Command
Contrail Networking Release 2011 supports adding, removing, and reconfiguring collector nodes (also known as sFlow nodes) after the system is up and running. Prior to this release, collector nodes could only be added during provisioning.
The provisioning workflow for the collector nodes is:
When there are not any existing collector nodes in the deployment, you need to specify the provisioning type (out-of-band or in-band) and the corresponding configuration parameters.
After specifying the provisioning type, you create server nodes if none are available or select from the listed server nodes.
Next assign the selected server nodes as new collector nodes.
The Add Collector Nodes wizard guides you through the steps, which vary depending on the availability of collector nodes and server nodes. See the following procedures for the add collector nodes workflows.
Add Collector Node - No Existing Collector Nodes, No Available Server
An available server node is one that's not currently assigned as a Contrail Insights sFlow node.
To add an out-of-band collector node when there are not any existing collector nodes and no available server nodes:
Select Infrastructure > Cluster.
The Cluster Overview page displays.
Click the Collector Nodes tab.
The Collector Nodes page displays without any collector nodes listed.
Click the link Add Collector Node or navigate to Add > Collector Node.
The page opens with Step 1 - Provisioning Type.
Select the Collector Node provisioning type to identify how the Insights Flows node is managed.
Out of Band: Contrail Insights Flows nodes are managed from an out-of-band management network by default. See Table 1.
In-Band: Select the in-band option if you want to manage Contrail Insights from an in-band network interface. See Table 2.
Table 1: Provisioning Type: Out of Band Configuration Information Field
Description
Virtual IP Address
Enter the virtual IP address on the Insights Flows node that connects the node to the management network. The address is entered as a four-octet IP address with no mask; for example, 10.1.1.20.
Show Advanced (Check box)
Retention Period
Time duration in seconds that you want to keep the collected data. For example, 7200.
Max Retention Bytes
Maximum size of the data to be collected. Default is 0 which indicates unlimited size.
Table 2: Provisioning Type: In-Band Configuration Information Field
Description
In-Band Collector Configuration
CIDR
Enter the underlay telemetry infrastructure subnet. The in-band interface on the Contrail Insights Flows node is assigned an IP address from this subnet.
VLAN ID
Enter the VLAN ID used for the telemetry network.
Management Virtual IP Address
Enter an unused IP address which will be used as the management IP Address. Contrail Command uses this IP address to connect to the Contrail Insights Flows node.
Show Advanced (Check box)
Retention Period
Time duration in seconds that you want to keep the collected data. For example, 7200.
Max Retention Bytes
Maximum size of the data to be collected. Default is 0 which indicates unlimited size.
AppFormix Flows Configuration Parameters
Key
Enter a key value for a key value pair on the Contrail Insights Flows server. Key value pairs might need to be entered to use Contrail Insights and Contrail Insights Flows on the same server. See How to Install Contrail Command and Provision Your Contrail Cluster. In all other scenarios, key value pairs should only be used by expert users or by users in specialized circumstances.
Value
Enter a value for a key value pair on the Contrail Insights Flows server. Key value pairs might need to be entered to use Contrail Insights and Contrail Insights Flows on the same server. See How to Install Contrail Command and Provision Your Contrail Cluster. In all other scenarios, key value pairs should only be used by expert users or by users in specialized circumstances.
Click Next.
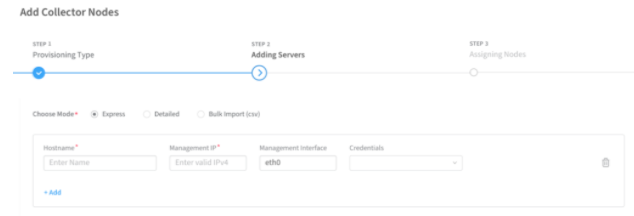
Without a server available, you are directed to Step 2 - Adding Servers.
Figure 1: Collector Nodes: Adding ServersComplete the required fields. See Table 3.
Table 3: Collector Nodes: Adding Servers Configuration Information Field
Description
Management Virtual IP address
Server IP address (for example, 1.1.1.1).
Choose Mode
Options include: Express, Detailed, or Bulk Import (CSV). We recommend using the Detailed or Bulk Import (CSV) modes in most environments to ensure all server field data is entered and to avoid performing manual configuration tasks later in the procedure.
Express—includes a limited number of required fields to enter for each server or VM.
Detailed—provides all fields to enter for each server or VM.
Bulk Import (CSV)—Import the physical server or VM fields from a CSV file.
Hostname
Name of the physical server or VM.
Management IP
Management IP address of the physical server or VM.
Management Interface
Name of the management-network facing interface on the physical server or VM.
Credentials
Select any credentials that appear in the drop-down list.
Disk Partition(s)
(Optional) Specify the disk partitions that you want to use. This field is often left blank.
Name
(Network interfaces)—the name of a network-facing interface on the physical server or VM.
IP Address
(Network interfaces)—the IP address of the network-facing interface on the physical server or VM.
Click Next after completing all fields to add the server or VM.
The page continues to Step 3 Assigning Nodes.
You can see the added server in the Available Servers box. Listed are the servers that can be provisioned as Contrail Insights nodes. Contrail Insights provides end-to-end visibility into your cloud environment to improve the operations of your network. A Contrail Insights node is needed to run Contrail Insights.
Click the > icon next to a server to assign it as a Contrail Insights node. The server is moved into the Assigned Contrail Insights Nodes table.
Click Provision.
The cluster provisioning begins and the page displays provisioning progress. When the provisioning is completed, you are directed to log in to Contrail Command.
Continue to Connect Collector Nodes to Fabric.
Add Collector Node - No Existing Collector Nodes, Available Server
To add an out of band collector node, when there is an available server node but there are no collector nodes:
Select Infrastructure > Cluster.
The Cluster Overview page displays.
Click the Collector Nodes tab.
The Collector Nodes page displays without any collector nodes listed.
Click Add > Collector Node.
The page opens with Step 1 - Provisioning Type.
Select the Collector Node provisioning type to identify how the Insights Flows node is managed.
Out of Band: Contrail Insights Flows nodes are managed from an out-of-band management network by default. See Table 4.
In-Band: Select the in-band option if you want to manage Contrail Insights from an in-band network interface. See Table 5.
Table 4: Provisioning Type: Out of Band Configuration Information Field
Description
Virtual IP Address
Enter the virtual IP address on the Insights Flows node that connects the node to the management network. The address is entered as a four-octet IP address with no mask; for example, 10.1.1.20.
Show Advanced (Check box)
Retention Period
Time duration in seconds that you want to keep the collected data. For example, 7200.
Max Retention Bytes
Maximum size of the data to be collected. Default is 0 which indicates unlimited size.
Table 5: Provisioning Type: In-Band Configuration Information Field
Description
In-Band Collector Configuration
CIDR
Enter the underlay telemetry infrastructure subnet. The in-band interface on the Contrail Insights Flows node is assigned an IP address from this subnet.
VLAN ID
Enter the VLAN ID used for the telemetry network.
Management Virtual IP Address
Enter an unused IP address which will be used as the management IP Address. Contrail Command uses this IP address to connect to the Contrail Insights Flows node.
Show Advanced (Check box)
Retention Period
Time duration in seconds that you want to keep the collected data. For example, 7200.
Max Retention Bytes
Maximum size of the data to be collected. Default is 0 which indicates unlimited size.
AppFormix Flows Configuration Parameters
Key
Enter a key value for a key value pair on the Contrail Insights Flows server. Key value pairs might need to be entered to use Contrail Insights and Contrail Insights Flows on the same server. See How to Install Contrail Command and Provision Your Contrail Cluster. In all other scenarios, key value pairs should only be used by expert users or by users in specialized circumstances.
Value
Enter a value for a key value pair on the Contrail Insights Flows server. Key value pairs might need to be entered to use Contrail Insights and Contrail Insights Flows on the same server. See How to Install Contrail Command and Provision Your Contrail Cluster. In all other scenarios, key value pairs should only be used by expert users or by users in specialized circumstances.
Click Next.
The page continues to Step 2 - Assigning Nodes.
The Available Servers table lists the servers that can be provisioned as Contrail Insights nodes. Contrail Insights provides end-to-end visibility into your cloud environment to improve the operations of your network. A Contrail Insights node is needed to run Contrail Insights.
Click the > icon next to a server to assign it as a Contrail Insights node. The server is moved into the Assigned Contrail Insights Nodes table.
Click Provision.
The cluster provisioning begins and the page displays provisioning progress. When the provisioning is completed, you are directed to log in to Contrail Command.
Continue to Connect Collector Nodes to Fabric.
Add Collector Node - Existing Collector Nodes, No Available Server
When there are existing collector nodes in the deployment, you are not required to specify the provisioning type.
To add a collector node when there are existing collector nodes and no available server nodes:
Select Infrastructure > Cluster.
The Cluster Overview page displays.
Click the Collector Nodes tab.
The Collector Nodes page displays with collector nodes listed.
Click Add > Collector Node.
The page opens with Step 1 Adding Servers.
Complete the required fields. See Table 6
Table 6: Collector Nodes: Adding Servers Configuration Information Field
Description
Management Virtual IP address
Server IP address (for example, 1.1.1.1).
Choose Mode
Options include: Express, Detailed, or Bulk Import (CSV). We recommend using the Detailed or Bulk Import (CSV) modes in most environments to ensure all server field data is entered and to avoid performing manual configuration tasks later in the procedure.
Express—includes a limited number of required fields to enter for each server or VM.
Detailed—provides all fields to enter for each server or VM.
Bulk Import (CSV)—Import the physical server or VM fields from a CSV file.
Hostname
Name of the physical server or VM.
Management IP
Management IP address of the physical server or VM.
Management Interface
Name of the management-network facing interface on the physical server or VM.
Credentials
Select any credentials that appear in the drop-down list.
Disk Partition(s)
(Optional) Specify the disk partitions that you want to use. This field is often left blank.
Name
(Network interfaces)—the name of a network-facing interface on the physical server or VM.
IP Address
(Network interfaces)—the IP address of the network-facing interface on the physical server or VM.
Click Next after completing all fields to add the server or VM.
The page continues to Step 2 Assigning Nodes.
You can see the added server in the Available Servers box. Listed are the servers that can be provisioned as Contrail Insights nodes. Contrail Insights provides end-to-end visibility into your cloud environment to improve the operations of your network. A Contrail Insights node is needed to run Contrail Insights.
Click the > icon next to a server to assign it as a Contrail Insights node. The server is moved into the Assigned Contrail Insights Nodes table. If you are assigning an in-band server, you are prompted to enter the in-band interface.
Click Provision.
The cluster provisioning begins and the page displays provisioning progress. When the provisioning is completed, you are directed to log in to Contrail Command.
Continue to Connect Collector Nodes to Fabric.
Add Collector Node - Existing Collector Nodes, Available Server
To add a collector node when there are existing collector nodes and an available server node:
Select Infrastructure > Cluster.
The Cluster Overview page displays.
Click the Collector Nodes tab.
The page displays the existing collector nodes.
Click Add > Collector Nodes.
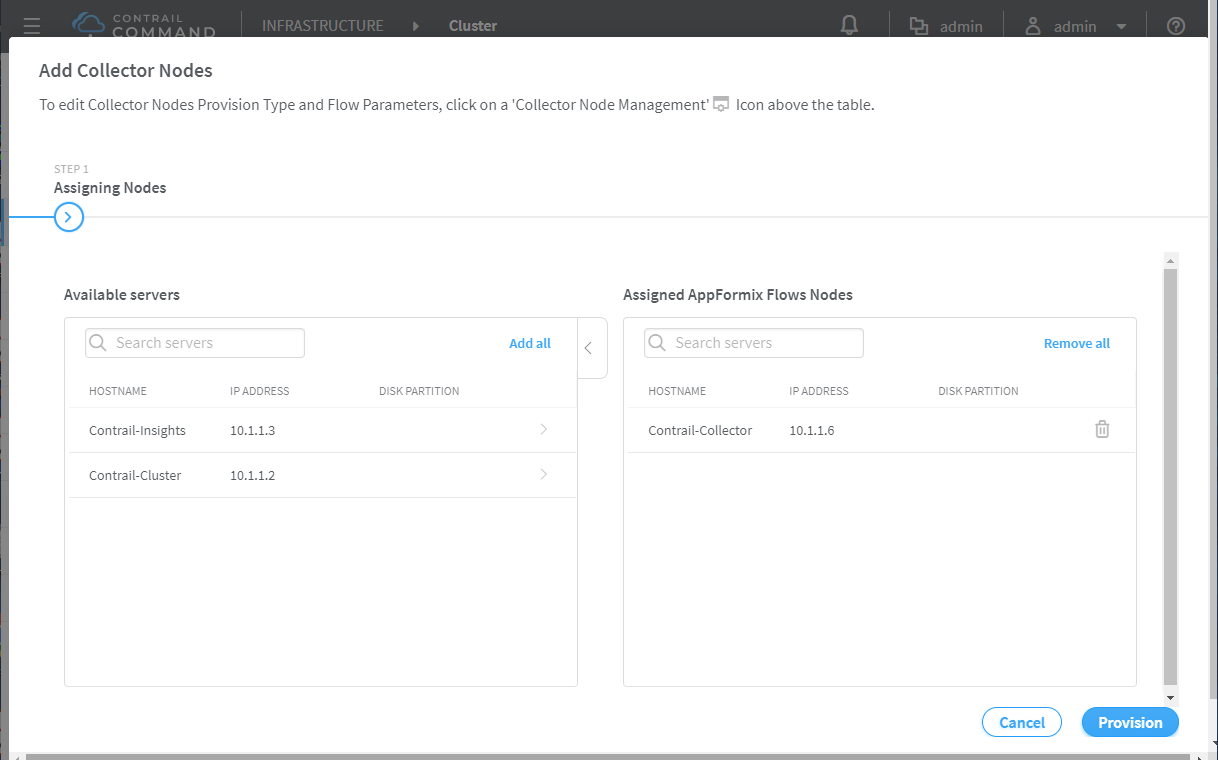
Add Collector Nodes page with Step 1 - Assigning Nodes.
Click the > icon next to a server to assign it as a Contrail Insights node. The server is moved into the Assigned Contrail Insights Nodes table. If you are assigning an in-band server, you are prompted to enter the in-band interface.
Figure 2: Collector Nodes: Assigning Nodes
Click Provision.
The cluster provisioning begins and the page displays provisioning progress. When the provisioning is completed, you are directed to log in to Contrail Command.
Continue to Connect Collector Nodes to Fabric.
Connect Collector Nodes to Fabric
To connect collector nodes to a fabric:
Select Infrastructure > Cluster.
The Cluster Overview page displays.
Click the Collector Nodes tab.
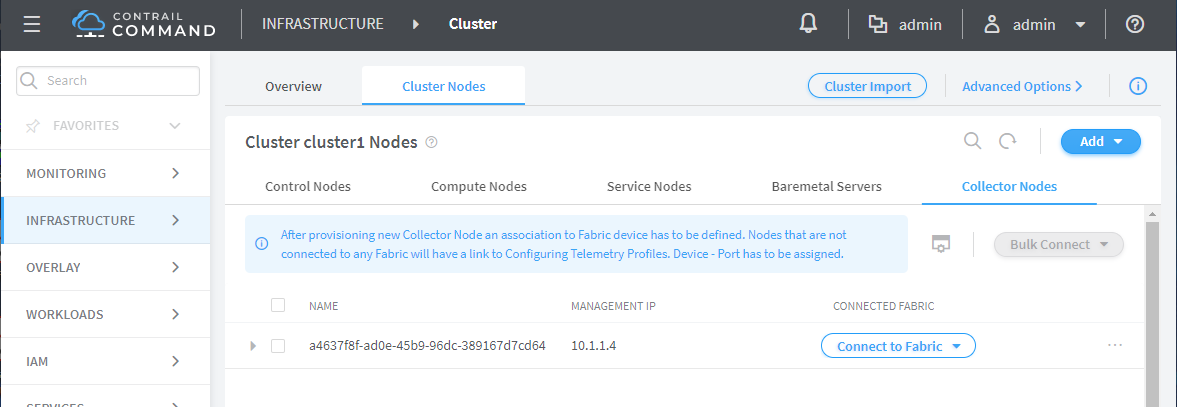
The Collector Nodes page displays with a message stating the new collector nodes need to be associated to a fabric device. In the Connected Fabric column, if the collector node is connected to a fabric the fabric name displays. When a collector node is not connected, the Connect to Fabric drop-down list shows the unconnected nodes. Two options to connect are offered:
Figure 3: Collector Nodes: Connect to FabricTwo options to connect are offered:
Click Connect to Fabric to connect a singular collector node to a fabric device.
Click Bulk Connect to connect multiple selected collector nodes to a fabric device.
Click Connect to Fabric, then select the unconnected node from the drop-down list.
Complete the required fields. See Table 7.
Table 7: Collector Nodes: In-Band Collector Configuration Field
Description
In-Band Collector Configuration
CIDR
Enter the underlay telemetry infrastructure subnet. The in-band interface on the Contrail Insights Flows node is assigned an IP address from this subnet.
Virtual IP Address
Enter the virtual IP address on the Insights Flows node that connects the node to the management network. The address is entered as a four-octet IP address with no mask; for example, 10.1.1.20.
In-Band Collector Details
All in-band configured collector nodes will display here.
Click Next after completing all fields to connect to a fabric.
The page continues to the Assign Telemetry Profiles step.
See Configuring Contrail Insights Flows by Assigning Telemetry and sFlow Profiles to Devices.
Edit Existing Collector Nodes
To edit existing collector nodes:
Select Infrastructure > Cluster.
The Cluster Overview page displays.
Click the Collector Nodes tab.
The Collector Nodes page displays the existing flow collector nodes.
Click the Collector Nodes Management icon.
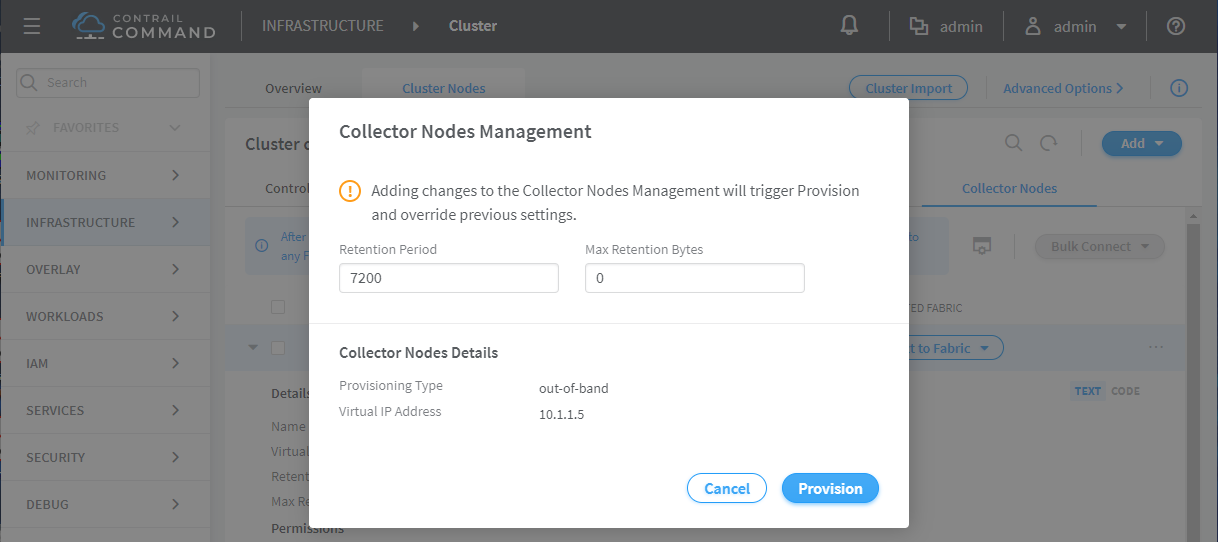
The Collector Nodes Management dialog box displays details about provisioning type and flow parameters.
Figure 4: Collector Nodes: Collector Nodes ManagementComplete the edits and click Provision.
The cluster provisioning begins and the page displays provisioning progress. When the provisioning is completed, you are directed to log in to Contrail Command.
Remove Collector Nodes from a Contrail Cluster
To delete an existing collector node:
Select Infrastructure > Cluster.
The Cluster Overview page displays.
Click the Collector Nodes tab.
The Collector Nodes page displays the existing flow collector nodes.
Click the trash can icon in the row for the flow collector node you want to remove.
Click Delete.
A dialog box displays asking you to confirm.
If your deletion takes the sFlow project below the thresholds, then you are alerted that this will enable sFlow to become unstable. To continue removing the collector node, select the Unsafe Delete check box.
Click Delete.
The cluster provisioning begins and the page displays provisioning progress.
Click Proceed to login.
The log in dialog box appears.
Log in to Contrail Command.
The Collector Nodes page displays and confirms the node is deleted.


