SRX PCAP Data Overview
If your JSA console is configured to integrate with the Juniper Junos OS Platform DSM, JSA can receive, process, and store Packet Capture (PCAP) data from a Juniper SRX-Series Services Gateway log source. For more information about the Juniper Junos OS Platform DSM, see the Juniper Secure Analytics Configuring DSMs.
This section provides information on how to download and view PCAP data using the Events interface on your JSA console. Unless otherwise noted, all references to JSA refer to both JSA and JSA Log Manager.
Before you can display PCAP data in the Events interface, the Juniper SRX-Series Services Gateway log source must be configured with the PCAP Syslog Combination protocol. For more information on configuring log source protocols, see the Log Sources Users Guide.
This document provides information on managing PCAP data, including:
Configure the PCAP Protocol
The Juniper SRX Series appliance supports forwarding of packet capture (PCAP) and Syslog data to JSA.
Syslog data is forwarded to JSA on port 514. The IP address
and outgoing PCAP port number is configured on the Juniper Networks
SRX Series appliance interface. The Juniper Networks SRX Series appliance
must be configured using the to forward PCAP data in the format <IP Address>:<Port>.
Where:
<IP Address> is the IP address of JSA.
<Port> is the outgoing port address for the PCAP
data.
For more information on Configuring Packet Capture, see your Juniper Networks Junos OS documentation.
You are now ready to configure the log source and protocol in JSA. For more information see section Configuring a New Juniper Networks SRX Log Source with PCAP.
Configuring a New Juniper Networks SRX Log Source with PCAP
The Juniper Networks SRX Series appliance is auto discovered by JSA as a Juniper Junos OS Platform.
JSA detects the Syslog data and adds the log source automatically. The PCAP data can be added to JSA as Juniper SRX Series Services Gateway log source using the PCAP Syslog Combination protocol. Adding the PCAP Syslog Combination protocol after JSA auto discovers the Junos OS Syslog data adds an additional log source to your existing log source limit. Deleting the existing Syslog entry, then adding the PCAP Syslog Combination protocol adds both Syslog and PCAP data as single log source.
Log in to JSA.
Click the Admin tab.
On the navigation menu, click Data Sources.
Click the Log Sources icon.
Click Add.
From the Log Source Type list box, select Juniper SRX Series Services Gateway.
From the Protocol Configuration list box, select PCAP Syslog Combination.
Type the Log Source Identifier.
Type the Incoming PCAP Port.
To configure the Incoming PCAP Port parameter in the log source, enter the outgoing port address for the PCAP data as configured on the Juniper Networks SRX Series appliance interface. For more information on configuring log sources, see the Log Sources Users Guide.
Click Save.
Select the auto discovered Syslog-only Junos OS log source for your Juniper Networks SRX Series appliance.
Click Delete.
A delete log source confirmation window is displayed.
Click Yes.
The Junos OS Syslog log source is deleted from the log source list. You should now have the PCAP Syslog Combination protocol in your log source list.
On the Admin tab, click Deploy Changes.
Displaying the PCAP Data Column
The PCAP Data column is not displayed in the Events interface by default. When you create search criteria, you must select the PCAP Data column in the Column Definition section. You can also group your event search results by the PCAP Data column. For more information on searching and viewing events, see the Juniper Secure Analytics Users Guide.
To display the PCAP data column in event search results:
Click the Events tab.
The Events interface appears.
Using the Search drop-down list box, select New Search.
The new event search window appears.
Optional. Configure your specific search criteria:
Note:If you perform this step, the search results display only events that have PCAP data available.
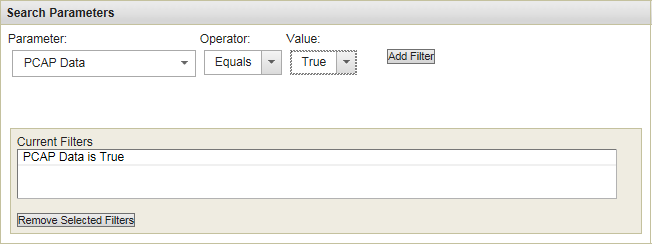
Using the first drop-down list box, select PCAP data.
In the second drop-down list box, select Equals.
In the third drop-down list box, select True.
Click Add Filter, as shown in Figure 1.
Figure 1: Adding PCAP Data to the Columns List
Configure your column definitions:
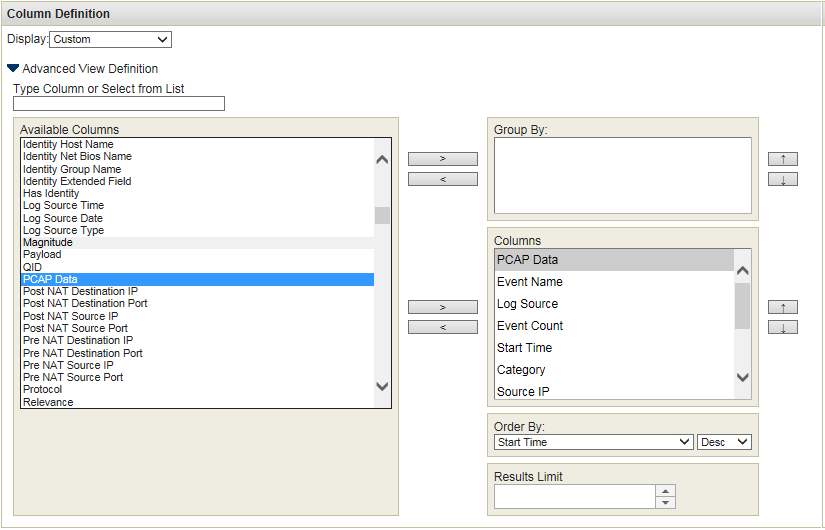
From the Available Columns list in the Column Definition section, click PCAP Data.
Use the bottom set of Add and Remove arrow buttons to select PCAP data from the Available Columns list to add it in the Columns list, as shown in Figure 2.
Figure 2: PCAP Data Column Search Results
Optional. Use the top set of Add and Remove arrow buttons to move PCAP data from the Available Columns list to add it in the Group By list.
Click Filter.
Note:You can configure your event search using additional parameters, however, this procedure only demonstrates the required search criteria to display the PCAP data column. For more information about searching events, see the Juniper Secure Analytics Users Guide.
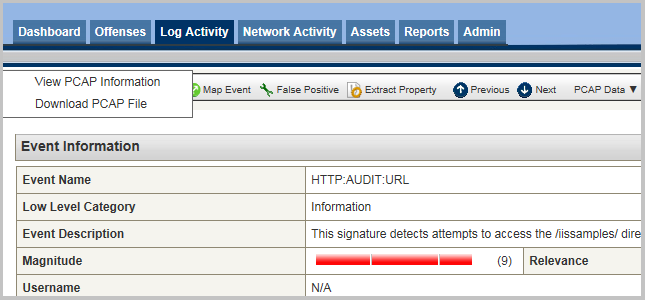
The event search results appear, displaying the PCAP Data column, as shown in Figure 3. If PCAP data is available for an event, an icon appears in the PCAP Data column. Using the PCAP icon, you can view the PCAP data or download the PCAP file to your desktop system.
Double-click the event you want to investigate.
Note:If you are viewing events in streaming mode, you must pause streaming before you double-click an event.
Figure 3: PCAP Events Details Window
The events details window appears.
From the PCAP Data toolbar option, you can view the PCAP information or download the PCAP file to your desktop system.
Viewing PCAP Information
You can view a readable version of the data in the PCAP file. To view PCAP information:
Click the Events tab.
The Events interface appears.
Perform or select a search that displays the PCAP Data column. See section Displaying the PCAP Data Column.
The event search results appear.
Choose one of the following:
Right-click the PCAP icon for the event you want to investigate, and then select More Options > View PCAP Information.
Double-click the event you want to investigate, and then select PCAP Data > View PCAP Information from the event details toolbar.
Note:If you are viewing events in streaming mode, you must pause streaming before you double-click an event.
Note:Before PCAP data can be displayed, JSA must retrieve the PCAP file for display in the user interface. If the download process takes an extended period of time, the Downloading PCAP Packet Information window appears. In most cases, the download process is quick and this window does not appear.
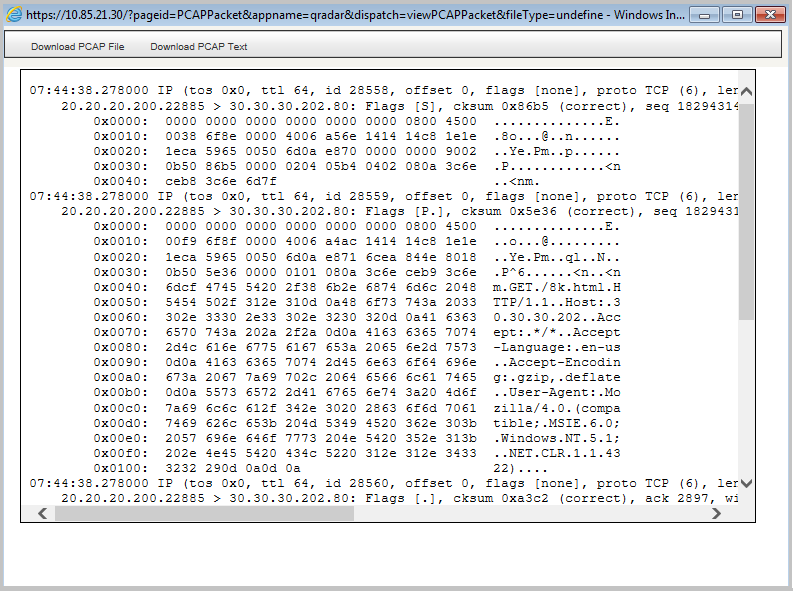
Figure 4: Readable Version of the PCAP file
Once the file is retrieved, a pop-up window appears, displaying a readable version of the PCAP file, as shown in Figure 4.
You can read the information displayed in the window, or download the information to your desktop system.
If you want to download the information to your desktop system, choose one of the following options:
Click Download PCAP File to download the original PCAP file to be used in an external application.
Click Download PCAP Text to download the PCAP information in .txt format.
The Opening window appears, as shown in Figure 5.
Figure 5: PCAP File Save or Open Window
Choose one of the following options:
If you want to open the file for immediate viewing, select the Open with option and select the desired application from the drop-down list box.
If you want to save the list, select the Save File option.
Click OK.
Downloading the PCAP File to Your Desktop System
You can download the PCAP file to your desktop system for storage or for use in other applications. To download the PCAP File to your desktop system:
Click the Events tab.
The Events interface appears.
Perform or select a search that displays the PCAP Data column. See section Displaying the PCAP Data Column.
The event search results appear.
For the event you want to investigate, choose one of the following:
Click the PCAP icon.
Right-click the PCAP icon and select More Options > Download PCAP File.
Double-click the event you want to investigate, and then select PCAP Data > Download PCAP File from the event details toolbar.
Note:If you are viewing events in streaming mode, you must pause streaming before you double-click an event.
The Opening window appears.
Choose one of the following options:
If you want to open the file for immediate viewing, select the Open with option and select the desired application from the drop-down list box.
If you want to save the list, select the Save File option.
Click OK.
