ON THIS PAGE
Guidelines for Configuring Logical Tunnels on MX Series Routers
Configuring Bridge Domain over Logical Tunnel Physical Interface
Configuring Recycle Bandwidth for Logical Tunnel Physical Interface
Configuring an Interface in the VRF Domain to Receive Multicast Traffic
Configuring Single Link Targeting for Redundant Logical Tunnels
Configuring Minimum Active Links for Redundant Logical Tunnels
Connecting Logical Systems Using Logical Tunnel Interfaces
Configuring Logical Tunnel Interfaces
Logical tunnel (lt-) interfaces provide quite different services
depending on the host router:
-
On M Series, MX Series, and T Series routers, logical tunnel interfaces allow you to connect logical systems, virtual routers, or VPN instances. M Series and T Series routers must be equipped with a Tunnel Services PIC or an Adaptive Services Module (only available on M7i routers). MX Series routers must be equipped with a Trio MPC/MIC module. For more information about connecting these applications, see the Junos OS VPNs Library for Routing Devices.
-
On SRX Series Firewalls, the logical tunnel interface is used to interconnect logical systems. See the Logical Systems and Tenant Systems User Guide for Security Devices for information about using the logical tunnel interface on the SRX Series.
Connecting Logical Systems
To connect two logical systems, you configure a logical tunnel interface on both logical systems. Then you configure a peer relationship between the logical tunnel interfaces, thus creating a point-to-point connection.
To configure a point-to-point connection between two logical systems, configure the
logical tunnel interface by including the
lt-fpc/pic/port
statement:
lt-fpc/pic/port {
    unit logical-unit-number {
        encapsulation encapsulation;
        peer-unit unit-number;   # peering logical system unit number
        dlci dlci-number;
        family (inet | inet6 | iso | mpls);
    }
}
You can include this statement at the following hierarchy levels:
-
[edit interfaces] -
[edit logical-systems logical-system-name
                            interfaces]
When configuring logical tunnel interfaces, note the following:
-
You can configure each logical tunnel interface with one of the following encapsulation types: Ethernet, Ethernet circuit cross-connect (CCC), Ethernet VPLS, Frame Relay, Frame Relay CCC, VLAN, VLAN CCC, or VLAN VPLS.
-
You can configure the IP, IPv6, International Organization for Standardization (ISO), or MPLS protocol family.
-
Do not reconfigure a logical tunnel interface that is an anchor point with pseudowire devices stacked above it unless you first deactivate all broadband subscribers that are using the pseudowire subscriber interface.
-
The peering logical interfaces must belong to the same logical tunnel interface derived from the Tunnel Services PIC or Adaptive Services Module.
-
You can configure only one peer unit for each logical interface. For example, unit 0 cannot peer with both unit 1 and unit 2.
-
To enable the logical tunnel interface, you must configure at least one physical interface statement.
-
Logical tunnels are not supported with Adaptive Services, Multiservices, or Link Services PICs (but they are supported on the Adaptive Services Module on M7i routers, as noted above).
-
On M Series routers other than the M40e router, logical tunnel interfaces require an Enhanced Flexible PIC Concentrator (FPC).
-
On MX Series routers, logical tunnel interfaces require Trio MPC/MIC modules. They do not require a Tunnel Services PIC in the same system.
See Also
Guidelines for Configuring Logical Tunnels on MX Series Routers
When you configure a logical tunnel on an MX series router which has one of the peer configured in layer 2 mode, ensure that the peer layer 2 logical tunnel is part of a bridge domain or VPLS instance, for bidirectional traffic flow.
To configure a logical tunnel with bridge encapsulation, you must first configure the logical tunnel to be part of the bridge domain. The following sample configuration allows you to configure a logical tunnel, lt-2/1/0.3 with bridge encapsulation.
user@host# edit bridge-domains {
             bd1 {
                    domain-type bridge;
                    vlan-id 1
                   }
                            }


user@host# edit chassis
lt-2/1/0 {
    unit 3 {
        description "MPLS port mirroring Bridge ingress interface";
        encapsulation ethernet-bridge;
                   mtu 4500;
            peer-unit 4;
            family bridge {
                interface-mode access;
                vlan-id 1;
                          }
            }

    unit 4 {
            description "MPLS Port mirroring L2/CCC egress interface";
            encapsulation ethernet-ccc;
            mtu 4500;
            peer-unit 3;
            family ccc {
                filter {
                    input HighPriority;
                }
            }
          }
    }
Configuring Bridge Domain over Logical Tunnel Physical Interface
On the ACX7K series routers, you can configure a logical tunnel physical interface (IFD) to communicate between two bridge domains (BDs). For this logical tunnel physical interface, you can create logical tunnel interfaces and map the logical tunnel interfaces to each service or bridge domain. Now, the traffic can be forwarded from one service to other using these logical tunnel interfaces. You can also configure bandwidth per logical tunnel interface.
Encapsulate the logical interface for service provider style bridging configuration.
[edit]
user@host# set interfaces et-0/0/2 flexible-vlan-tagging
user@host# set interfaces et-0/0/2 encapsulation flexible-ethernet-services
user@host# set interfaces et-0/0/3 flexible-vlan-tagging
user@host# set interfaces et-0/0/3 encapsulation flexible-ethernet-services
user@host# set interfaces et-0/0/2 unit 0 encapsulation ethernet-bridge vlan-id 100
user@host# set interfaces et-0/0/3 unit 0 encapsulation ethernet-bridge vlan-id 100
Create BD1 and associate logical tunnel interface.
[edit]
user@host# set vlans bd1 interface et-0/0/3.0
user@host# set vlans bd1 interface et-0/0/2.0
user@host# set vlans bd1 interface lt-0/0/0:3.0
Encapsulate the logical interface for service provider style bridging configuration.
[edit]
user@host# set interfaces et-0/0/6 flexible-vlan-tagging
user@host# set interfaces et-0/0/6 encapsulation flexible-ethernet-services
user@host# set interfaces et-0/0/7 flexible-vlan-tagging
user@host# set interfaces et-0/0/7 encapsulation flexible-ethernet-services
user@host# set interfaces et-0/0/6 unit 0 encapsulation ethernet-bridge vlan-id 100
user@host# set interfaces et-0/0/7 unit 0 encapsulation ethernet-bridge vlan-id 100
Create BD2 and associate logical tunnel interface.
[edit]
user@host# set vlans bd2 vlan-id 100
user@host# set vlans bd2 interface et-0/0/7.0
user@host# set vlans bd2 interface et-0/0/6.0
user@host# set vlans bd2 interface lt-0/0/0:3.1
Configuring Recycle Bandwidth for Logical Tunnel Physical Interface
Logical tunnel interfaces on ACX7K series routers use the internal recycle interfaces to recirculate traffic between two interconnecting services.
The recycle mechanism has two modes of operation:
-
Default Recycle Bandwidth Mode
-
Configurable Recycle Bandwidth Mode
For information on recycle infrastructure in ACX7K series platforms, see Recycle Bandwidth Management.
By default, logical tunnel interfaces operates in the default mode. To enable configuration mode for logical tunnel interfaces recycle application using following sample configuration:
Configure percentage of the calendar bandwidth for logical tunnel application.
[edit]
  user@host# set system packet-forwarding-options recycle-bandwidth-profiles prof1 tunnel-services 80
In this example, you reserve 80% of the calendar bandwidth for logical tunnel application. In this case, 80% of 800Gbps, i.e., 640Gbps is reserved for logical tunnel application.
Apply the configured bandwidth to the logical tunnel application.
[edit]
  user@host# set system packet-forwarding-options recycle-bandwidth profile prof1
In the default mode, logical tunnel bandwidth is shared with other recycle applications in best effort mode. In the configuration mode, the sum total of all logical tunnel interfaces' bandwidth is capped by the total logical tunnel recycle application bandwidth. If the sum of configured bandwidth for all logical tunnel interfaces is larger than the bandwidth derived by logical tunnel recycle application then, the sum of logical tunnel interfaces' banwidth is limited to logical tunnel recycle application value.
For example, configure bandwidth of 10Gbps for logical tunnle1 and bandwidth of 100Gbps for logical tunnel2. The logical tunnel application percentage is equal to 100 Gbps. Sum of bandwidth of logical tunnle1 and of logical tunnle2 will be 100 Gbps and not 110 Gbps. In such cases, logical tunnel recycle application bandwidth is distributed in the ratio of individual logical tunnel interface bandwidth. In this case, 1:10 ratio of 100 Gbps.
Layer 3 VPN Support over Logical Tunnel Interfaces
Starting in Junos OS Evolved Release 24.1R1, we support layer 3 VPN service over logical tunnel interface on the ACX7K Series routers. The feature includes:
-
VRF over logical tunnel interface
-
Stitching of layer 3 VPN and layer 2 services through logical tunnel interface
The following sample configuration allows you to configure layer 3 VPN over a logical tunnel interface:
user@host# edit chassis {
lt-0/0/1:0 {
    unit 0 {
        vlan-id 10;
        encapsulation vlan-bridge;
        peer-unit 1;
    }
    unit 1 {
        vlan-id 10;
        family inet {
            address 100.1.1.100/24;
        }
        family inet6 {
            address 2001::1/128;
          }
        peer-unit 0;
    }


        routing-instances {
            vpn100 {
                instance-type vrf;
                interface lt-0/0/1:0.1;
                route-distinguisher <...>;
                vrf-import vpn100-imp;
                vrf-export vpn100-exp;
                vrf-table-label;
}

policy-options {
            policy-statement vpn100-exp {
                term 1 {
                    from {
                        <...>;
                    }
                    then {
                        community add vpn100;
                        accept;
                    }
                }
            }
            policy-statement vpn100-imp {
                term 1 {
                    from {
                        <...>;
                        community vpn100;
                    }
                    then {
                        accept;
                    }
                }
            }
            community vpn100 members <...>;
        }
Example: Configuring Logical Tunnels
Configure three logical tunnels:
[edit interfaces]
lt-4/2/0 {
    description “Logical tunnel interface connects three logical systems”;
}
[edit logical-systems]
lr1 {
    interfaces lt-4/2/0 {
        unit 12 {
            peer-unit 21; #Peering with lr2
            encapsulation frame-relay;
            dlci 612;
            family inet;
        }
        unit 13 {
            peer-unit 31; #Peering with lr3
            encapsulation frame-relay-ccc;
            dlci 613;
        }
    }
}
lr2 {
    interfaces lt-4/2/0 {
        unit 21 {
            peer-unit 12; #Peering with lr1
            encapsulation frame-relay-ccc;
            dlci 612;
        }
        unit 23 {
            peer-unit 32; #Peering with lr3
            encapsulation frame-relay;
            dlci 623;
        }
    }
}
lr3 {
    interfaces lt-4/2/0 {
        unit 31 {
            peer-unit 13; #Peering with lr1
            encapsulation frame-relay;
            dlci 613;
            family inet;
        }
        unit 32 {
            peer-unit 23; #Peering with lr2
            encapsulation frame-relay-ccc;
            dlci 623;
        }
    }
}
See Also
Configuring an Interface in the VRF Domain to Receive Multicast Traffic
You can configure an ACX Series router to receive multicast traffic in a VRF domain. In an IPTV solution, IPTV sources and receivers can be spread across different end points of a network in a VRF domain. To receive the multicast traffic at the receiver’s side, it is necessary for the multicast traffic to be tunneled across the network to reach the end receiving device or the subscriber. This tunneling is usually done using the Multicast Virtual Private Network (MVPN) technology.
ACX Series routers do not support MVPN technology. An alternate method for receiving the multicast traffic in the VRF domain in ACX Series router is by associating a global logical interface to a logical interface in the VRF domain. The global logical interface acts as a proxy for receiving the multicast traffic on the logical interface in the VRF domain. To associate a global logical interface to a logical interface in the VRF domain, you need to configure an IRB interface in a global domain to act as a proxy for the logical interface in the VRF domain.
- Configuring a Proxy Logical Interface in the Global Domain
- Associating the Proxy Logical Interface to a Logical Interface in a VRF Domain
- Limitations
Configuring a Proxy Logical Interface in the Global Domain
To configure a proxy logical interface in the global domain, you need to create logical tunnel (lt-) interface and IRB interface and then associate the IRB interface to a bridge domain. The following is a example to configure a proxy logical interface in the global domain:
Create an logical tunnel (lt-) interface.
[edit]
user@host# set chassis aggregated-devices ethernet device-count 1
user@host# set chassis fpc 0 pic 0 tunnel-services bandwidth 1g
user@host# set interfaces lt-0/0/10 unit 0 encapsulation vlan-bridge
user@host# set interfaces lt-0/0/10 unit 0 vlan-id 101
user@host# set interfaces lt-0/0/10 unit 0 peer-unit 1
user@host# set interfaces lt-0/0/10 unit 1 encapsulation vlan-ccc
user@host# set interfaces lt-0/0/10 unit 1 vlan-id 101
user@host# set interfaces lt-0/0/10 unit 1 peer-unit 0
Create an IRB interface.
[edit]
user@host# set interfaces irb unit 0 family inet address 192.168.1.2/24
Associate the IRB interface to a bridge domain.
[edit]
user@host# set bridge-domains b1 vlan-id 101
user@host# set bridge-domains b1 interface lt-0/0/10.0
user@host# set bridge-domains b1 routing-interface irb.0
Associating the Proxy Logical Interface to a Logical Interface in a VRF Domain
To associate the proxy logical interface to a logical interface in a VRF domain, you need to run the following PFE commands:
test pfe acx vrf-mc-leak enable—Enables proxy association.test pfe acx entry add VRF-logical-interface-name logical-tunnel-logical-interface-name IRB-logical-interface-name IRB-IP-address + 1—Creates an association between proxy logical interface and the logical interface in a VRF domain.test pfe acx vrf-mc-leak disable—Disables proxy association.test pfe acx entry del VRF-logical-interface-name logical-tunnel-logical-interface-name IRB-logical-interface-name IRB-IP-address + 1—Deletes the association between the proxy logical interface and the logical interface in a VRF domain.show pfe vrf-mc-leak—Displays the association entries between proxy logical interface and the logical interface in a VRF domain.
When the router or PFE is rebooted, the proxy associations of logical interfaces is removed and you need to once again create the proxy associations of logical interface.
Limitations
The following limitations need to be considered for receiving multicast traffic in a VRF domain:
Maximum of 5 proxy associations of logical interfaces can be configured.
VRF IPv6 multicast is not supported.
AE interface as a VRF interface (requesting multicast traffic) is not be supported.
Multicast traffic cannot be forwarded from the logical interface in a VRF domain if the first hop router is an ACX router.
Redundant Logical Tunnels Overview
You can connect two devices, such as an access-facing device and a core-facing device, through logical tunnels. To provide redundancy for the tunnels, you can create and configure multiple physical logical tunnels and add them to a virtual redundant logical tunnel.
Redundant logical tunnels are supported only on MX Series routers with MPCs. Starting in Junos OS Release 18.4R3, redundant logical tunnels are supported on MX Series Virtual Chassis..
For example, in an MPLS access network, you can configure multiple pseudowires between an access node and an MX Series router with MPCs and add them to a redundant logical tunnel. You can then add multiple logical tunnels to the redundant logical tunnel. Figure 1 shows a redundant logical tunnel between the access node and the MX Series router.
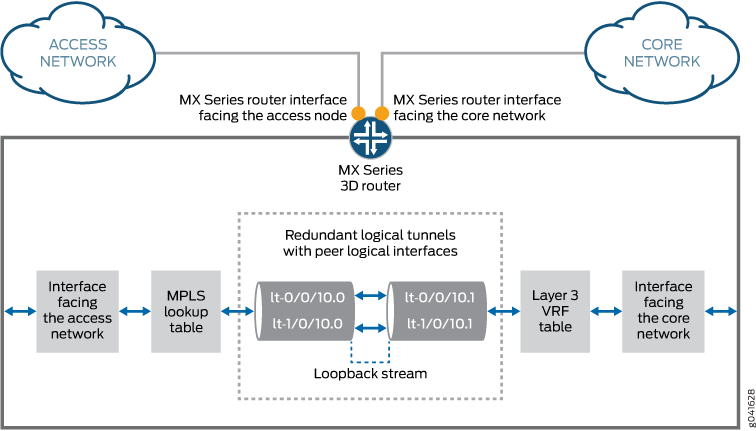
The redundant logical tunnel has peer logical interfaces at each end, rlt0.0 and rlt0.1. You can configure router features on these interfaces for the redundant logical tunnel and its members.
Each member logical tunnel has peer logical interfaces. In Figure 1, lt-0/0/10.0 and lt-0/0/10.1 are peers.
The MX Series router performs IP lookup in the Layer 3 VPN routing and forwarding (VRF) table on the router where the pseudowires that are grouped in logical tunnels terminate.
- Redundant Logical Tunnel Configuration
- Single Link Targeting
- Minimum Active Links
- Redundant Logical Tunnel Failure Detection and Failover
Redundant Logical Tunnel Configuration
In Junos OS Releases 14.1R1 and earlier, you can create up to 16 redundant logical tunnels, depending on the number of Packet Forwarding Engines and the number of loopback interfaces on each Packet Forwarding Engine on your device. Starting in Junos OS Release 14.2 and for 13.3R3 and 14.1R2, the valid range for device-count is from 1 to 255.
You can add up to 32 logical tunnels as members of a redundant logical tunnel.
When you add more than two members to the redundant logical tunnel, they are in active mode. The traffic is load-balanced by default over all the tunnel members. You can also configure your RLT for single-link targeting and specify a minimum number of active links for the RLT.
When you add only two members to the redundant logical tunnel, you can configure the members in one of these ways:
-
Both members in active mode
-
One member in active mode and the other in backup mode
Single Link Targeting
You can configure your RLT anchor to use single link targeting. In this mode, all traffic flowing through your pseudowire or PWHT interface will be directed through just one link in the rlt bundle. If the targeted link goes down, all subscribers on the RLT will be terminated.
Minimum Active Links
In this mode, you can specify the minimum number of links that must be active for the RLT interface to remain up. If the number of active links on the RLT drops below the minimum, the RLT will go down. Any pseudowire and PWHT interfaces stacked on the RLT will also go down, and all subscribers will be terminated.
Redundant Logical Tunnel Failure Detection and Failover
A logical tunnel fails and is removed from the redundant logical tunnel group, and the backup logical tunnel becomes active due to one of these events:
-
A hardware failure on the MPC module occurs.
-
An MPC failure occurs due to a microkernel crash.
-
The MPC module is administratively shut down and removed from the redundant logical tunnel.
-
A power failure on the MPC module occurs.
You can decrease the time it takes for failure detection and failover to occur.
Configure the enhanced-ip statement at the [edit
chassis network-services] hierarchy level to enable Packet
Forwarding Engine liveliness detection.
See Also
Configuring Redundant Logical Tunnels
Use redundant logical tunnels to provide redundancy for logical tunnels between two devices, such as an access-facing device and a core-facing device.
When configuring redundant logical tunnel interfaces, note the following:
Starting in Junos OS Release 13.3, you can configure redundant logical tunnels only on MX Series routers with MPCs.
In Junos OS Releases 14.1R1 and earlier, you can create up to 16 redundant logical tunnels, depending on the number of Packet Forwarding Engines and the number of loopback interfaces on each Packet Forwarding Engine on your device. Starting in Junos OS Release 14.2 and for 13.3R3 and 14.1R2, the valid range for device-count is from 1 to 255. The command is shown below.
set chassis redundancy-group interface-type redundant-logical-tunnel device-count [number];You can add up to 32 logical tunnels as members.
When a logical tunnel with an existing configuration joins a redundant logical tunnel, you must configure the redundant logical tunnel with the settings from the existing configuration.
You can add member logical tunnels to a parent logical tunnel for redundancy.
When you add more than two logical tunnels to the redundant logical tunnel, the members are in active mode by default.
When you add only two members, you can configure the members in one of these ways:
Both members in active mode
One member in active mode and the other in backup mode
To configure a redundant logical tunnel between two devices:
Configuring Single Link Targeting for Redundant Logical Tunnels
Use single link targeting to direct all traffic on a redundant logical tunnel to one specific logical tunnel interface.
single-targeted-link under the
targeted-options entry and specify the logical tunnel link to
target.
[edit interfaces interface-name] user@host# set targeted-options single-targeted-link interface-name
Configuring Minimum Active Links for Redundant Logical Tunnels
You can use Minimum Active Links to specify the number of tunnel links that must be active for the redundant logical tunnel to remain up.
When minimum active links is configured, the redundant logical tunnel (RLT) will go down if the number of active links falls below the configured number. When the RLT goes down, all subscriber traffic stacked on top of the RLT will be terminated, including pseudowire and PWHT traffic.
minimum-links option. This option is found under the
redundancy-group hierarchy.
[edit interfaces rlt-interface] user@host# set redundancy-group minimum-links number-of-links
Example: Configuring Redundant Logical Tunnels
This example shows how to configure redundant logical tunnels in an MPLS access network.
Requirements
In Junos OS Release 13.3 or later, you can configure redundant logical tunnels only on MX Series routers with MPCs.
Overview
When a logical tunnel with an existing configuration joins a redundant logical tunnel, you must configure the redundant logical tunnel with the settings from the existing configuration.
You can add member logical tunnels to a parent logical tunnel for redundancy.
On MX Series routers with MPCs, you can configure redundant logical tunnels as follows:
In Junos OS Releases 14.1R1 and earlier, you can create up to 16 redundant logical tunnels, depending on the number of Packet Forwarding Engines and the number of loopback interfaces on each Packet Forwarding Engine on your device. Starting in Junos OS Release 14.2 and for 13.3R3 and 14.1R2, the valid range for device-count is from 1 to 255. The command is shown below.
set chassis redundancy-group interface-type redundant-logical-tunnel device-count [number];You can add up to 32 logical tunnels as members.
When you add more than two logical tunnels to a redundant logical tunnel, the members are in active mode by default.
When you add only two members, you can configure the members in one of these ways:
Both members in active mode
One member in active mode and the other in backup mode
Topology
Figure 2 shows a redundant logical tunnel between the access node and the MX Series router in an MPLS access network.

The redundant logical tunnel has peer logical interfaces at each end, rlt0.0 and rlt0.1. You can configure router features on these interfaces for the redundant logical tunnel and its members.
Each member logical tunnel has peer logical interfaces on the access-facing and core-facing devices. In Figure 2, lt-0/0/10.0 and lt-0/0/10.1 are peers.
The MX Series router performs IP lookup in the Layer 3 VPN routing and forwarding (VRF) table on the router where the pseudowires that are grouped in logical tunnels terminate.
Configuration
CLI Quick Configuration
To quickly configure
this example, copy the following commands, paste them into a text
file, remove any line breaks, change any details necessary to match
your network configuration, and then copy and paste the commands into
the CLI at the [edit] hierarchy level.
set chassis redundancy-group interface-type redundant-logical-tunnel device-count 4 set chassis fpc 1 pic 0 tunnel-services bandwidth 1g set chassis fpc 2 pic 2 tunnel-services bandwidth 1g set interfaces rlt0 redundancy-group member-interface lt-1/0/10 set interfaces rlt0 redundancy-group member-interface lt-2/0/10 set interfaces rlt0 unit 0 description "Towards Layer 2 Circuit" set interfaces rlt0 unit 0 encapsulation vlan-ccc set interfaces rlt0 unit 0 vlan-id 600 set interfaces rlt0 unit 0 peer-unit 1 set interfaces rlt0 unit 0 family ccc set interfaces rlt0 unit 1 description "Towards Layer 3 VRF" set interfaces rlt0 unit 1 encapsulation vlan set interfaces rlt0 unit 1 vlan-id 600 set interfaces rlt0 unit 1 peer-unit 0 set interfaces rlt0 unit 1 family inet address 10.10.10.2/24 set protocols l2circuit neighbor 192.0.2.2 interface rlt0.0 virtual-circuit-id 100 set protocols l2circuit neighbor 192.0.2.2 interface rlt0.0 no-control-word set routing-instances pe-vrf instance-type vrf set routing-instances pe-vrf interface rlt0.1 set routing-instances pe-vrf route-distinguisher 65056:1 set routing-instances pe-vrf vrf-import VPN-A-Import set routing-instances pe-vrf vrf-export VPN-A-Export set routing-instances pe-vrf vrf-table-label set routing-instances pe-vrf protocols ospf export VPN-A-Import set routing-instances pe-vrf protocols ospf area 0.0.0.0 interface rlt0.1 set protocols mpls no-cspf set protocols mpls interface all set protocols ldp interface all set protocols bgp export local-routes set protocols bgp group internal type internal set protocols bgp group internal local-address 198.51.100.3 set protocols bgp group internal family inet any set protocols bgp group internal family inet-vpn unicast set protocols bgp group internal neighbor 203.0.113.4 set protocols ospf area 0.0.0.0 interface ge-5/3/8.0 set protocols ospf area 0.0.0.0 interface ge-5/2/5.0 set protocols ospf area 0.0.0.0 interface lo0.3 passive set policy-options policy-statement VPN-A-Export term a then community add VPN-A set policy-options policy-statement VPN-A-Export term a then accept set policy-options policy-statement VPN-A-Export term b then reject set policy-options policy-statement VPN-A-Import term a from protocol bgp set policy-options policy-statement VPN-A-Import term a from community VPN-A set policy-options policy-statement VPN-A-Import term a then accept set policy-options policy-statement VPN-A-Import term b then reject set policy-options policy-statement local-routes then accept set policy-options community VPN-A members target:100:100 set routing-options router-id 198.51.100.3 set routing-options autonomous-system 65056
Procedure
Step-by-Step Procedure
In this example, all the logical tunnels are in active mode.
Create the logical tunnel and redundant logical tunnel interfaces.
[edit chassis] user@host# set redundancy-group interface-type redundant-logical-tunnel device-count 4 user@host# set fpc 1 pic 0 tunnel-services bandwidth 1g user@host# set fpc 2 pic 2 tunnel-services bandwidth 1g
Bind the member logical tunnels to the redundant logical tunnel.
[edit interfaces] user@host# set rlt0 redundancy-group member-interface lt-1/0/10 user@host# set rlt0 redundancy-group member-interface lt-2/0/10
Configure the redundant logical tunnel interfaces.
[edit interfaces] user@host# set rlt0 unit 0 description "Towards Layer 2 Circuit" user@host# set rlt0 unit 0 encapsulation vlan-ccc user@host# set rlt0 unit 0 vlan-id 600 user@host# set rlt0 unit 0 peer-unit 1 user@host# set rlt0 unit 0 family ccc user@host# set rlt0 unit 1 description "Towards Layer 3 VRF" user@host# set rlt0 unit 1 encapsulation vlan user@host# set rlt0 unit 1 vlan-id 600 user@host# set rlt0 unit 1 peer-unit 0 user@host# set rlt0 unit 1 family inet address 10.10.10.2/24
Attach rlt0.0 to a Layer 2 circuit.
[edit protocols] user@host# set l2circuit neighbor 192.0.2.2 interface rlt0.0 virtual-circuit-id 100 user@host# set l2circuit neighbor 192.0.2.2 interface rlt0.0 no-control-word
Add rlt0.1 to a Layer 3 VRF instance.
[edit routing-instances] user@host# set pe-vrf instance-type vrf user@host# set pe-vrf interface rlt0.1 user@host# set pe-vrf route-distinguisher 65056:1 user@host# set pe-vrf vrf-import VPN-A-Import user@host# set pe-vrf vrf-export VPN-A-Export user@host# set pe-vrf vrf-table-label user@host# set pe-vrf protocols ospf export VPN-A-Import user@host# set pe-vrf protocols ospf area 0.0.0.0 interface rlt0.1
Configure MPLS and LDP in the pseudowires and the Layer 3 VPN.
[edit protocols]
user@host# set mpls no-cspf
user@host# set mpls interface all
user@host# set ldp interface all
Configure BGP in the Layer 3 VPN.
[edit protocols]
user@host# set bgp export local-routes
user@host# set bgp group internal type internal
user@host# set bgp group internal local-address 198.51.100.3
user@host# set bgp group internal family inet any
user@host# set bgp group internal family inet-vpn unicast
user@host# set bgp group internal neighbor 203.0.113.4
Configure OSPF on the core-facing interfaces and the router local loopback interface.
[edit protocols]
user@host# set ospf area 0.0.0.0 interface ge-5/3/8.0
user@host# set ospf area 0.0.0.0 interface ge-5/2/5.0
user@host# set ospf area 0.0.0.0 interface lo0.3 passive
Set the policy options for BGP.
[edit policy-options]
user@host# set policy-statement VPN-A-Export term a then community add VPN-A
user@host# set policy-statement VPN-A-Export term a then accept
user@host# set policy-statement VPN-A-Export term b then reject
user@host# set policy-statement VPN-A-Import term a from protocol bgp
user@host# set policy-statement VPN-A-Import term a from community VPN-A
user@host# set policy-statement VPN-A-Import term a then accept
user@host# set policy-statement VPN-A-Import term b then reject
user@host# set policy-statement local-routes then accept
user@host# set community VPN-A members target:100:100
Set the router ID and the autonomous system (AS) number.
[edit routing-options]
user@host# set router-id 198.51.100.3
user@host# set autonomous-system 65056
Results
From configuration mode, confirm your configuration by entering the following commands:
show chassisshow interfacesshow policy-optionsshow protocolsshow routing-instancesshow routing-options
If the output does not display the intended configuration, repeat the instructions in this example to correct the configuration.
user@host# show chassis
redundancy-group {
    interface-type {
        redundant-logical-tunnel {
            device-count 4;
        }
    }
}
fpc 1 {
    pic 0 {
        tunnel-services {
            bandwidth 1g;
        }
    }
}
fpc 1 {
    pic 2 {
        tunnel-services {
            bandwidth 1g;
        }
    }
}
user@host# show interfaces rlt0
redundancy-group {
    member-interface lt-1/0/10;
    member-interface lt-2/0/10;
}
unit 0 {
    description "Towards Layer 2 Circuit";
    encapsulation vlan-ccc;
    vlan-id 600;
    peer-unit 1;
    family ccc;
}
unit 1 {
    description "Towards Layer 3 VRF";
    encapsulation vlan;
    vlan-id 600;
    peer-unit 0;
    family inet {
        address 10.10.10.2/24;
    }
}
user@host# show protocols l2circuit
neighbor 192.0.2.2 {
    interface rlt0.0 {
        virtual-circuit-id 100;
        no-control-word;
    }
}
user@host# show protocols
mpls {
    no-cspf;
    interface all;
}
bgp {
    export local-routes;
    group internal {
        type internal;
        local-address 198.51.100.3;
        family inet {
            any;
        }
        family inet-vpn {
            unicast;
        }
        neighbor 203.0.113.4;
    }
}
ospf {
    area 0.0.0.0 {
        interface ge-5/3/8.0;
        interface ge-5/2/5.0;
        interface lo0.3 {
            passive;
        }
    }
}
ldp {
    interface all;
}
l2circuit {
    neighbor 192.0.2.2 {
        interface rlt0.0 {
            virtual-circuit-id 100;
            no-control-word;
        }
    }
}
user@host# routing-instances
pe-vrf {
     instance-type vrf;
    interface rlt0.1;
     route-distinguisher 65056:1;
    vrf-import VPN-A-Import;
    vrf-export VPN-A-Export;
    vrf-table-label;
    protocols {
        ospf {
            export VPN-A-Import;
            area 0.0.0.0 {
                interface rlt0.1;
            }
        }
    }
}
user@host# policy-options
policy-statement VPN-A-Export {
    term a {
        then {
            community add VPN-A;
            accept;
        }
    }
    term b {
        then reject;
    }
}
policy-statement VPN-A-Import {
    term a {
        from {
            protocol bgp;
            community VPN-A;
            }
         then accept;
    }
    term b {
        then reject;
    }
}
policy-statement local-routes {
    then accept;
}
community VPN-A members target:100:100;
user@host# routing-options
router-id 198.51.100.3;
autonomous-system 65056;
Verification
Confirm that the configuration is working properly.
- Verifying the Redundant Logical Tunnel Configuration
- Verifying the Layer 2 Circuit
- Verifying OSPF Neighbors
- Verifying the BGP Group
- Verifying the BGP Routes in the Routing Table
Verifying the Redundant Logical Tunnel Configuration
Purpose
Verify that the redundant logical tunnel with the child logical tunnel interfaces are created with the correct encapsulations.
Action
user@host# run show interfaces terse | match rlt0
lt-1/0/10.0             up    up   container--> rlt0.0
lt-1/0/10.1             up    up   container--> rlt0.1
lt-2/0/10.0             up    up   container--> rlt0.0
lt-2/0/10.1             up    up   container--> rlt0.1
rlt0                    up    up
rlt0.0                  up    up   ccc
rlt0.1                  up    up   inet     10.10.10.2/24
Verifying the Layer 2 Circuit
Purpose
Verify that the Layer 2 circuit is up.
Action
user@host# run show l2circuit connections
Layer-2 Circuit Connections:

Legend for connection status (St)
EI -- encapsulation invalid      NP -- interface h/w not present
MM -- mtu mismatch               Dn -- down
EM -- encapsulation mismatch     VC-Dn -- Virtual circuit Down
CM -- control-word mismatch      Up -- operational
VM -- vlan id mismatch           CF -- Call admission control failure
OL -- no outgoing label          IB -- TDM incompatible bitrate
NC -- intf encaps not CCC/TCC    TM -- TDM misconfiguration
BK -- Backup Connection          ST -- Standby Connection
CB -- rcvd cell-bundle size bad  SP -- Static Pseudowire
LD -- local site signaled down   RS -- remote site standby
RD -- remote site signaled down  HS -- Hot-standby Connection
XX -- unknown

Legend for interface status
Up -- operational
Dn -- down
Neighbor: 192.0.2.2
    Interface                 Type  St     Time last up          # Up trans
    rlt0.0(vc 100)            rmt   Up     Aug  8 00:28:04 2013           1
      Remote PE: 192.0.2.2, Negotiated control-word: No
      Incoming label: 299776, Outgoing label: 299776
      Negotiated PW status TLV: No
      Local interface: rlt0.0, Status: Up, Encapsulation: VLAN
Verifying OSPF Neighbors
Purpose
Verify that routers are adjacent and able to exchange OSPF data.
Action
user@host# run show ospf neighbor
Address          Interface              State     ID               Pri  Dead
198.168.30.2       ge-5/2/5.0             Full      203.0.113.4          128    38
198.168.20.1       ge-5/3/8.0             Full      192.0.2.2          128    38
Verifying the BGP Group
Purpose
Verify that the BGP group is created.
Action
user@host# run show bgp group internal
Group Type: Internal    AS: 65056                  Local AS: 65056
    Name: internal        Index: 0                   Flags: <Export Eval>
    Export: [ local-routes ]
    Holdtime: 0
    Total peers: 1        Established: 1
    203.0.113.4+179
    inet.0: 1/6/3/0
    inet.2: 0/0/0/0
    bgp.l3vpn.0: 2/2/2/0
    pe-vrf.inet.0: 2/2/2/0
Verifying the BGP Routes in the Routing Table
Purpose
Verify that the BGP routes are in the pe-vrf.inet.0 routing table.
Action
user@host# run show route protocol bgp table pe-vrf.inet.0
pe-vrf.inet.0: 5 destinations, 5 routes (5 active, 0 holddown, 0 hidden)
+ = Active Route, - = Last Active, * = Both

198.168.50.0/24      *[BGP/170] 01:18:14, localpref 100, from 203.0.113.4
                      AS path: I, validation-state: unverified
                    > to 198.168.30.2 via ge-5/2/5.0, Push 16
198.168.51.0/24      *[BGP/170] 01:18:14, MED 2, localpref 100, from 203.0.113.4
                      AS path: I, validation-state: unverified
                    > to 198.168.30.2 via ge-5/2/5.0, Push 16
Change History Table
Feature support is determined by the platform and release you are using. Use Feature Explorer to determine if a feature is supported on your platform.