Help us improve your experience.

Let us know what you think.

Do you have time for a two-minute survey?

header-navigation
keyboard_arrow_up
close
keyboard_arrow_left
list Table of Contents
file_download PDF
{ "lLangCode": "en", "lName": "English", "lCountryCode": "us", "transcode": "en_US" }
English
keyboard_arrow_right

Install the Paragon Active Assurance (PAA) Test Agent

date_range 20-Dec-24

Paragon Active Assurance (PAA) is a programmable test and service assurance solution using software-based and traffic-generating test agents, easily used and delivered from the cloud as a SaaS solution or deployed on-premise in NFV environments. You can install a PAA test agent on Junos OS Evolved routers to enable network engineers to measure network quality, availability, and performance.

PAA consists of three parts:

  • Control Center—Software for centralized control and coordination of test agents. Runs on a general-purpose Ubuntu server, or is available as a SaaS solution hosted by Juniper Networks​.

  • Test agent—Software installed on network devices that generate and receive traffic from other test agents and receive control information from the Control Center.

  • Plugins—Software for each type of test, such as TCP, UDP, etc. The test agent downloads the plugin executables from the Control Center.

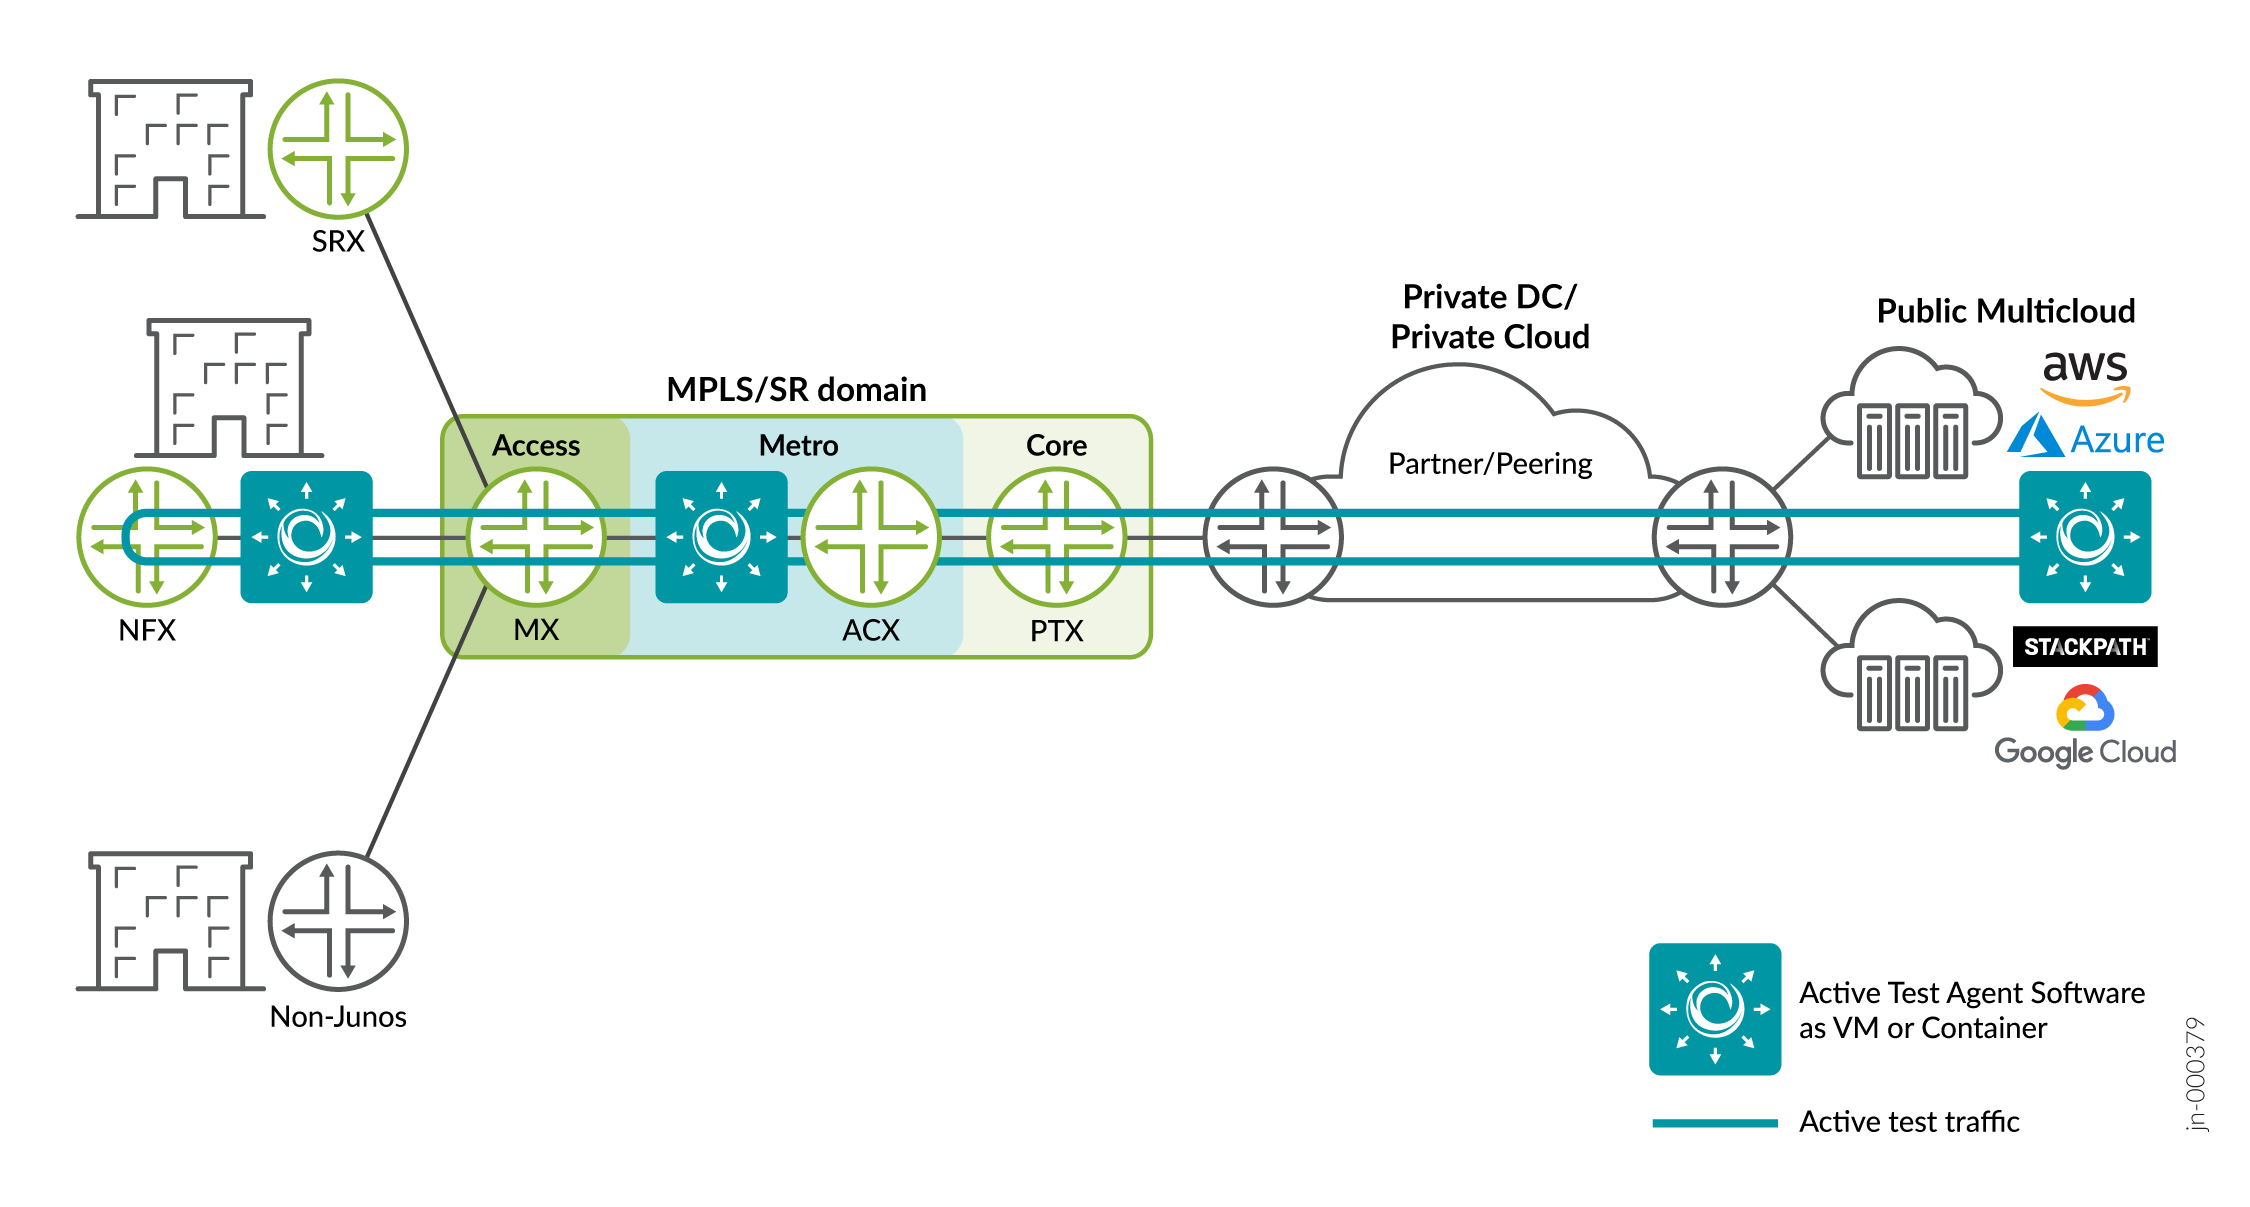
PAA can test your traffic, no matter where it goes—from your edge devices, through your MPLS core, through your private data center or cloud network, to the public multicloud network, and back again, as shown in Figure 1.

Figure 1: PAA Traffic Testing PAA Traffic Testing

Understand the PAA Test Agent on Junos OS Evolved

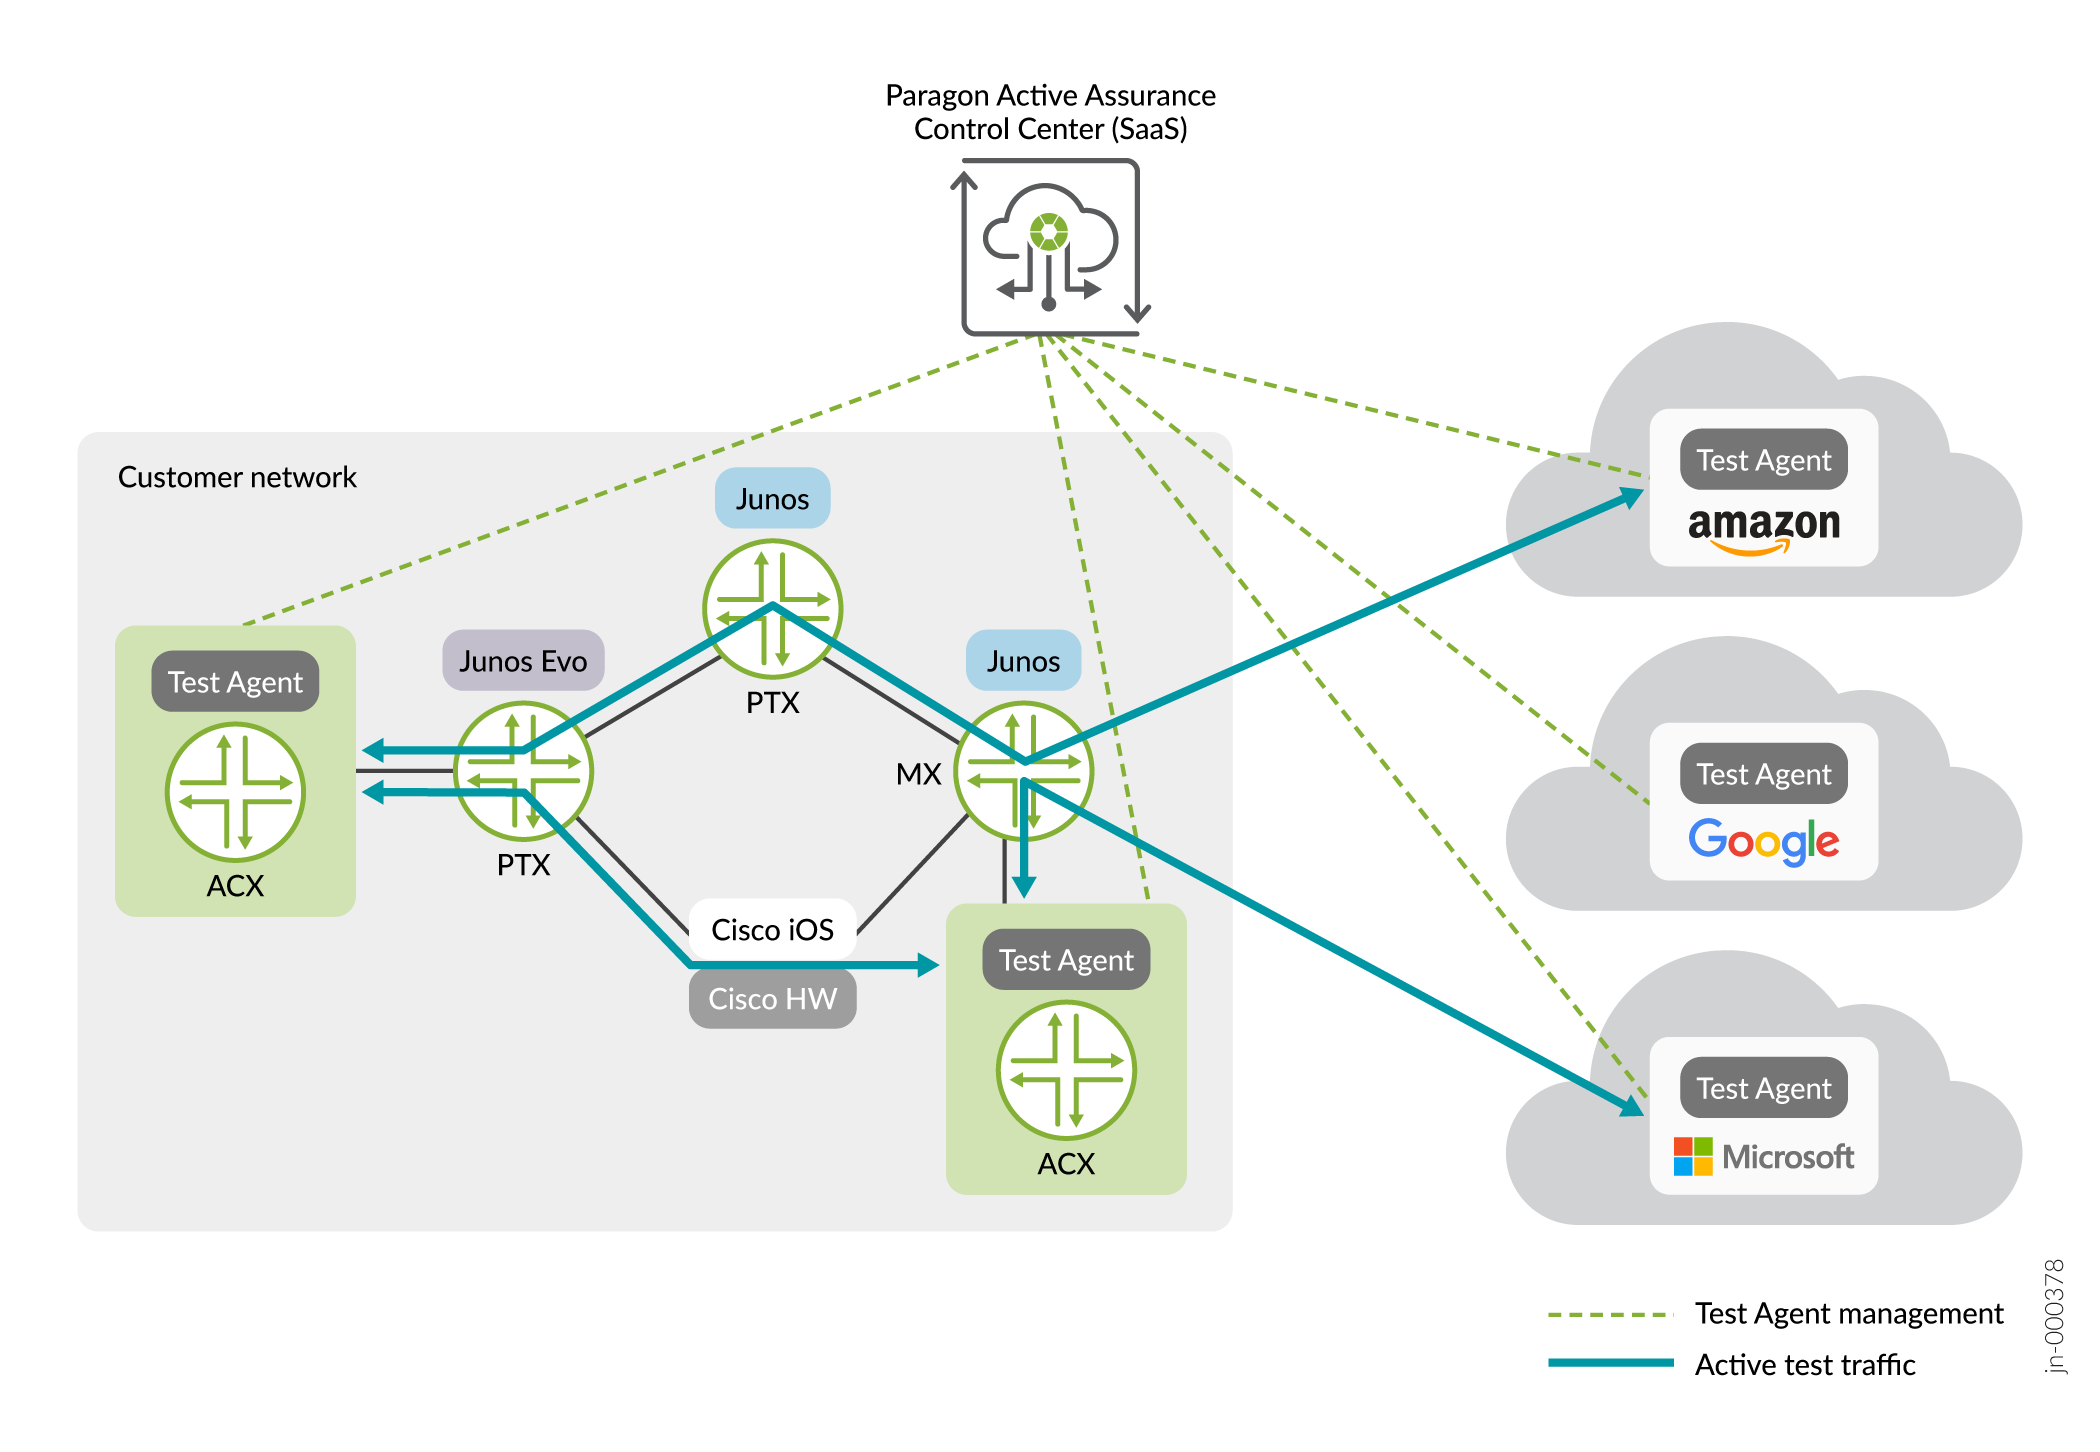
The PAA test agent is a remotely-controlled, software-based active assurance solution on Junos OS Evolved routers that gives you an easy way to test, monitor, and troubleshoot the data plane, which helps improve operational efficiency and decrease churn.​​ Running PAA test agents on routers allows easy testing and monitoring of internal network connectivity and external services, including test agents in cloud platforms, as shown in Figure 2.​

Figure 2: PAA Test Agents PAA Test Agents

The Junos OS Evolved PAA test agent supports these plugins:

  • TCP: measures network quality using TCP streams between test agents.​

  • UDP: measures network quality using UDP streams between test agents.​

  • PING: measures availability of network hosts.​

  • DNS: measures availability and performance of DNS service.​

  • HTTP: measures availability and performance of HTTP(S) servers.​

  • Path trace (ICMP/UDP): measures network route to destination host and response time of intermediate nodes.​

  • IPTV: measures IPTV stream quality.​

  • OTT video: measures OTT video stream quality.​

The PAA test agent software is not part of the operating system. You install the software using the test-agent configuration statement at the [edit services paa] hierarchy level. This statement causes the device to fetch the PAA test agent software image from the PAA Control Center for you and installs the software into a Docker container. You can update the PAA test agent software independently of any updates of the operating system software. The PAA test agent software and configuration persists through any upgrades or downgrades of the operating system, as long as you don't downgrade past Junos OS Evolved 22.3R1. If you downgrade below Release 22.3R1, we recommend that you uninstall the test agent software, and install again when you can upgrade to Release 22.3R1 or later.

Before you upgrade the system software from Junos OS Evolved Release 23.2R1 to a later release, you must uninstall the test agent using the request services paa uninstall command. After you have upgraded the system software, you need to install the test agent using the test-agent configuration statement.

To ensure that traffic bound for the PAA test agent doesn't overwhelm the router, this traffic occupies its own DDOS queue, and the bandwidth is throttled to 140 Mbits/second for the ACX7100 and the ACX7509 routers, to 60 Mbits/second for the ACX7332 and ACX7348 routers, and to 40 Mbits/second for the ACX7024 and ACX7024X routers. For more technical information on the PAA test agent, see Further technical information on Test Agents.

For more information about PAA, see Paragon Active Assurance.

For more information about APIs you can use with PAA, see Developer Guides.

Install the PAA Test Agent For the First Time Using the test-agent Configuration Statement (Junos OS Evolved Release 23.4R1-S1 and Later Releases)

Paragon Active Assurance (PAA) is available either as a SaaS solution hosted by Juniper Networks or as a software package you install and maintain yourself on a general-purpose Ubuntu server in your network. Before you can install the PAA test agent on the router, you must first either purchase the service or install the PAA software on a server. Then you must:

  • Make sure you have an account and a user created in the PAA Control Center, because you need this information to install and register a new PAA test agent on the router.

  • Establish connectivity from the PAA Control Center to the router's management interface. You must have an HTTPS connection to the server hosting the PAA Control Center (port 443 is open) and either port 6800 or a port of your choosing should also be open to connect the test agent with the PAA Control Center. In the PAA Control Center, make sure your SSL certificate is correct on both ports, and both are either secure or self-signed.

  • If the test agent version is prior to 4.2.0, you must configure 127.0.0.1 as the loopback address (lo0.0) on the router. For more information about loopback addresses and how to configure them, see Loopback Interfaces (Junos OS Evolved). If the test agent version is 4.2.0 or newer, you do not need to configure a loopback address.

To install the PAA software on a server instead of using the SaaS solution, or for more information about setting up SSL certificates for PAA, see: Install/Upgrade Software.

Once you complete the prerequisites, you can install the PAA test agent on the router.

  1. Decide what name you want to use for the test agent (the default is the router's hostname), and make sure you know what version of the test agent software you would like to use and what port the test agent should use to communicate with the PAA Control Center (the default is 6800).
  2. Install the test agent.

    The configuration statement command has this format:

    content_copy zoom_out_map
    user@host> edit 
    [edit] 
    user@host# set services paa test-agent cc-account account cc-host host cc-user user@domain cc-password password ta-version version ta-name name cc-port port 
    user@host# commit

    For this example, we use a PAA account name of MyCompany. The email address for the user is firstlast@mycompany.example.net, the Control Center's IP address is 10.49.23.49 , the user's password is Passw0rd, the software version is 4.0.0.29, the test agent's name is USPE1_agent, and the port number is 6800. The user account on the router must have maintenance privileges.

    content_copy zoom_out_map
    user@USPE1> edit 
    [edit] 
    user@USPE1# set services paa test-agent cc-account MyCompany cc-host 10.49.23.49 cc-user firstlast@mycompany.example.net cc-password Passw0rd ta-version 4.0.0.29 ta-name USPE1_agent cc-port 6800 
    user@USPE1# commit

    After the new configuration is committed, the operating system installs the test agent.

  3. Issue the show services paa status command to verify that the PAA test agent installed correctly and is able to generate and receive traffic.

    This example uses the information from the previous step's example.

    content_copy zoom_out_map
    user@USPE1> show services paa status
    Status: Installed
    Error message: None
    Control center: 10.49.23.49
    Image: paa/test-agent-application:4.3.0.20
    Container status: running
    Running: true
    Paused: false
    Restarting: false
    OOMKilled: false
    Dead: false
    Pid: 25078
    ExitCode: 0
    Error: None
    Started At: 2023-12-12T15:02:11.993510852Z Finished At: 0001-01-01T00:00:00Z
    VRF: vrf0
    

    If Status=running, Running=true, and Pid is non-zero, the test agent is installed and running. If there is a problem, you'll see log messages at the end of the output describing the problem. For example, if the password given is incorrect, the output shows that Status=restarting, Restarting=true, Pid=0, and the log messages show that the agent could not register with the PAA Control Center:

    content_copy zoom_out_map
    user@USPE1> show services paa status
    Status: Error
    Error message: Incorrect login credentials
    Logs: 2023-12-12 15:06:27Z INFO: Setting environment
    Logs: 2023-12-12 15:06:30Z ERROR: Incorrect user name or password
    

    To fix, issue the set services paa test-agent configuration mode command again with the correct password and commit the new configuration. Likewise, if you specify any of the other PAA control center options incorrectly, you must determine what the correct values are before reissuing the set services paa test-agent configuration mode command again with the correct values and committing the new configuration to install the test agent.

  4. Verify that the PAA test agent is connected to the PAA Control Center.

    From the PAA Control Center GUI, go to the Test Agents view. If the test agent installed correctly and is connected to the Control Center, you should see an entry for your new test agent and be able to check its status.

Upgrade or Downgrade the PAA Test Agent Software on Junos OS Evolved Using the test-agent Configuration Statement (Junos OS Evolved Release 23.4R1-S1 and Later Releases)

Paragon Active Assurance (PAA) is available either as a SaaS solution hosted by Juniper Networks or as a software package you install and maintain yourself on a general-purpose Ubuntu server in your network. If you use the SaaS solution, you can proceed directly to upgrading or downgrading the PAA test agent. However, if you have chosen to install and maintain PAA on a server in your network, then you need to check to make sure the PAA Control Center and plugins have already been upgraded to the appropriate version before you can upgrade the Junos OS Evolved PAA test agent.

For information about upgrading the PAA Control Center and plugins, see: Install/Upgrade Software.

Once you complete any prerequisites, you can upgrade or downgrade the PAA test agent on the router.

  1. Upgrade or downgrade the test agent by changing the configuration of the test agent.

    The configuration statement command has this format:

    content_copy zoom_out_map
    user@host> edit 
    [edit] 
    user@host# set services paa test-agent cc-account account cc-host host cc-user user@domain cc-password password ta-version version ta-name name cc-port port 
    user@host# commit

    For this example, we use a PAA account name of MyCompany. The email address for the user is firstlast@mycompany.example.net, the Control Center's IP address is 10.49.23.49 , the user's password is Passw0rd, the software version is 4.1.0.36, the test agent's name is USPE1_agent, and the port number is 6800. The user account on the router must have maintenance privileges.

    content_copy zoom_out_map
    user@USPE1> edit 
    [edit] 
    user@USPE1# set services paa test-agent cc-account MyCompany cc-host 10.49.23.49 cc-user firstlast@mycompany.example.net cc-password Passw0rd ta-version 4.1.0.36 ta-name USPE1_agent cc-port 6800 
    user@USPE1# commit

    After the new configuration is committed, the operating system reinstalls the test agent with whatever new values you configured.

  2. Issue the show services paa status command to verify that the PAA test agent installed correctly and is able to generate and receive traffic.

    This example uses the information from the previous step.

    content_copy zoom_out_map
    user@USPE1> show services paa status
    Status: Installed
    Error message: None
    Control center: 10.49.23.49
    Image: paa/test-agent-application:4.1.0.36
    Container status: running
    Running: true
    Paused: false
    Restarting: false
    OOMKilled: false
    Dead: false
    Pid: 25078
    ExitCode: 0
    Error: None
    Started At: 2023-12-12T15:02:11.993510852Z Finished At: 0001-01-01T00:00:00Z
    VRF: vrf0
    

    If Status=running, Running=true, and Pid is non-zero, the test agent is installed and running. If there is a problem, you'll see log messages at the end of the output describing the problem. For example, if the password given is incorrect, the output shows that Status=restarting, Restarting=true, Pid=0, and the log messages show that the agent could not register with the PAA Control Center:

    content_copy zoom_out_map
    user@USPE1> show services paa status
    Status: Error
    Error message: Incorrect login credentials
    Logs: 2023-12-12 15:06:27Z INFO: Setting environment
    Logs: 2023-12-12 15:06:30Z ERROR: Incorrect user name or password
    

    To fix, issue the set services paa test-agent configuration mode command again with the correct password and commit the new configuration. Likewise, if you specify any of the other PAA control center options incorrectly, you must determine what the correct values are before uninstalling and then reissuing the set test-agent configuration mode command again with the correct values and committing the new configuration to install the test agent.

  3. Verify that the PAA test agent is connected to the PAA Control Center.

    From the PAA Control Center GUI, go to the Test Agents view. If the test agent installed correctly and is connected to the Control Center, you should see an entry for your new test agent and be able to check its status.

Uninstall the PAA Test Agent (Junos OS Evolved Release 23.4R1-S1 and Later Releases)

If you no longer want to have the test agent on the device, you can uninstall the test agent by deleting its configuration. To delete the test agent configuration, issue the delete services paa configuration mode command and commit the configuration. The device then uninstalls the test agent.

Install the PAA Test Agent For the First Time Using NETCONF (Junos OS Evolved Release 23.4R1-S1 and Later Releases)

Paragon Active Assurance (PAA) is available either as a SaaS solution hosted by Juniper Networks or as a software package you install and maintain yourself on a general-purpose Ubuntu server in your network. Before you can install the PAA test agent on the router, you must first either purchase the service or install the PAA software on a server. Then you must:

  • Make sure you have an account and a user created in the PAA Control Center, because you need this information to install and register a new PAA test agent on the router.

  • Establish connectivity from the PAA Control Center to the router's management interface. You must have an HTTPS connection to the server hosting the PAA Control Center (port 443 is open) and either port 6800 or a port of your choosing should also be open to connect the test agent with the PAA Control Center. In the PAA Control Center, make sure your SSL certificate is correct on both ports, and both are either secure or self-signed.

  • If the test agent version is prior to 4.2.0, you must configure 127.0.0.1 as the loopback address (lo0.0) on the router. For more information about loopback addresses and how to configure them, see Loopback Interfaces (Junos OS Evolved). If the test agent version is 4.2.0 or newer, you do not need to configure a loopback address.

To install the PAA software on a server instead of using the SaaS solution, or for more information about setting up SSL certificates for PAA, see: Install/Upgrade Software.

You also need to establish a NETCONF session between the router and a NETCONF server, and have already initialized the session. For a sample NETCONF session, see Sample NETCONF Session.

Once you complete the prerequisites, you can install the PAA test agent on the router.

  1. Decide what name you want to use for the test agent (the default is the router's hostname), and make sure you know what version of the test agent software you would like to use and what port the test agent should use to communicate with the PAA Control Center (the default is 6800).
  2. Install the test agent.

    This operational request corresponds to the set services paa test-agent configuration mode command. The operational request to install the test agent has this format:

    content_copy zoom_out_map
    <rpc>
    <edit-config>
     <target>
         <candidate/>
     </target>
       <config>
        <configuration>
         <services>
          <paa>
            <test-agent>
                   <cc-host>host</cc-host>
                   <cc-account>account</cc-account>
                   <cc-user>user@domain</cc-user>
                   <cc-password>password</cc-password>
                   <ta-version>version</ta-version>
                   <cc-port>port</cc-port>​
                   <ta-name>name</ta-name>​
            </test-agent>
          </paa>
         </services>
        </configuration>
       </config>
    </edit-config>
    </rpc>
    ]]>]]>
    
    <rpc>
     <commit></commit>
    </rpc>
    ]]>]]>

    For this example, we use a PAA account name of MyCompany. The email address for the user is firstlast@mycompany.example.net, the Control Center's IP address is 10.49.23.49, the user's password is Passw0rd, the software version is 4.3.0.20, the test agent's name is USPE1_agent, and the port number is 6800.

    content_copy zoom_out_map
    <rpc>
    <edit-config>
     <target>
         <candidate/>
     </target>
       <config>
        <configuration>
         <services>
          <paa>
            <test-agent>
                   <cc-host>10.49.23.49</cc-host>
                   <cc-account>MyCompany</cc-account>
                   <cc-user>firstlast@mycompany.example.net</cc-user>
                   <cc-password>Passw0rd</cc-password>
                   <ta-version>4.3.0.20
    </ta-version>
                   <cc-port>6800</cc-port>​
                   <ta-name>USPE1_agent</ta-name>​
            </test-agent>
          </paa>
         </services>
        </configuration>
       </config>
    </edit-config>
    </rpc>
    ]]>]]>
    
    <rpc>
     <commit></commit>
    </rpc>
    ]]>]]>

    The output:

    content_copy zoom_out_map
    <rpc-reply xmlns="urn:ietf:params:xml:ns:netconf:base:1.0" xmlns:junos="http://xml.juniper.net/junos/23.4IR1junos">
    <ok/>
    </rpc-reply>
    
    ]]>]]>
  3. Verify that the PAA test agent installed correctly and is able to generate and receive traffic.

    The operational request to show the status of the PAA test agent is:

    content_copy zoom_out_map
     
      <rpc>​
         <get-paa-status>​
         </get-paa-status>​
      </rpc>​
      ]]>]]>​ 

    This operational request corresponds to the show services paa status CLI command. For information about parsing the response to this request, see Parse the NETCONF Server Response.

Upgrade or Downgrade the PAA Test Agent Software on Junos OS Evolved Using NETCONF (Junos OS Evolved Release 23.4R1-S1 and Later Releases)

Paragon Active Assurance (PAA) is available either as a SaaS solution hosted by Juniper Networks or as a software package you install and maintain yourself on a general-purpose Ubuntu server in your network. If you use the SaaS solution, you can proceed directly to upgrading or downgrading the PAA test agent. However, if you have chosen to install and maintain PAA on a server in your network, then you need to check to make sure the PAA Control Center and plugins have already been upgraded to the appropriate version before you can upgrade the Junos OS Evolved PAA test agent.

For information about upgrading the PAA Control Center and plugins, see: Install/Upgrade Software.

You also need to establish a NETCONF session between the router and a NETCONF server, and have already initialized the session. For a sample NETCONF session, see Sample NETCONF Session.

Once you complete any prerequisites, you can upgrade or downgrade the PAA test agent on the router.

  1. Upgrade or downgrade the test agent by changing the test agent's configuration.

    This operational request corresponds to the set services paa test-agent configuration mode command. The operational request to install the test agent has this format:

    content_copy zoom_out_map
    <rpc>
    <edit-config>
     <target>
         <candidate/>
     </target>
       <config>
        <configuration>
         <services>
          <paa>
            <test-agent>
                   <cc-host>host</cc-host>
                   <cc-account>account</cc-account>
                   <cc-user>user@domain</cc-user>
                   <cc-password>password</cc-password>
                   <ta-version>version</ta-version>
                   <cc-port>port</cc-port>​
                   <ta-name>name</ta-name>​
            </test-agent>
          </paa>
         </services>
        </configuration>
       </config>
    </edit-config>
    </rpc>
    ]]>]]>
    
    <rpc>
     <commit></commit>
    </rpc>
    ]]>]]>

    For this example, we use a PAA account name of MyCompany. The email address for the user is firstlast@mycompany.example.net, the Control Center's IP address is 10.49.23.49, the user's password is Passw0rd, the software version is 4.1.0.36, the test agent's name is USPE1_agent, and the port number is 6800.

    content_copy zoom_out_map
    <rpc>
    <edit-config>
     <target>
         <candidate/>
     </target>
       <config>
        <configuration>
         <services>
          <paa>
            <test-agent>
                   <cc-host>10.49.23.49</cc-host>
                   <cc-account>MyCompany</cc-account>
                   <cc-user>firstlast@mycompany.example.net</cc-user>
                   <cc-password>Passw0rd</cc-password>
                   <ta-version>4.1.0.36</ta-version>
                   <cc-port>6800</cc-port>​
                   <ta-name>USPE1_agent</ta-name>​
            </test-agent>
          </paa>
         </services>
        </configuration>
       </config>
    </edit-config>
    </rpc>
    ]]>]]>
    
    <rpc>
     <commit></commit>
    </rpc>
    ]]>]]>

    The output:

    content_copy zoom_out_map
    <rpc-reply xmlns="urn:ietf:params:xml:ns:netconf:base:1.0" xmlns:junos="http://xml.juniper.net/junos/23.4IR1junos">
    <ok/>
    </rpc-reply>
    ]]>]]>
  2. Verify that the PAA test agent installed correctly and is able to generate and receive traffic.

    The operational request to show the status of the PAA test agent is:

    content_copy zoom_out_map
     
        <rpc>​
          <get-paa-status>​
          </get-paa-status>​
        </rpc>​
        ]]>]]>​ 

    This operational request corresponds to the show services paa status command. For information about parsing the response to this request, see Parse the NETCONF Server Response.

Uninstall the Test Agent Using NETCONF (Junos OS Evolved Release 23.4R1-S1 and Later Releases

You need to establish a NETCONF session between the router and a NETCONF server, and have already initialized the session. For a sample NETCONF session, see Sample NETCONF Session.

This operational request corresponds to the delete services paa configuration mode CLI command.

content_copy zoom_out_map
<rpc>
  <edit-config>
   <target><candidate/></target>
   <default-operation>none</default-operation>
   <config>
    <configuration>
     <services><paa operation="delete"/></services>
    </configuration>
   </config>
  </edit-config>
</rpc>
]]>]]>

<rpc>
  <commit></commit>
</rpc>
]]>]]>

The output:

content_copy zoom_out_map
<rpc-reply xmlns="urn:ietf:params:xml:ns:netconf:base:1.0" xmlns:junos="http://xml.juniper.net/junos/23.4IR1junos">
<ok/>
</rpc-reply>
]]>]]>

Install the PAA Test Agent For the First Time Using the CLI Command (Junos OS Evolved Release 23.2R1 and Prior Releases)

Paragon Active Assurance (PAA) is available either as a SaaS solution hosted by Juniper Networks or as a software package you install and maintain yourself on a general-purpose Ubuntu server in your network. Before you can install the PAA test agent on the router, you must first either purchase the service or install the PAA software on a server. Then you must:

  • Make sure you have an account and a user created in the PAA Control Center, because you need this information to install and register a new PAA test agent on the router.

  • Establish connectivity from the PAA Control Center to the router's management interface. You must have an HTTPS connection to the server hosting the PAA Control Center (port 443 is open) and either port 6800 or a port of your choosing should also be open to connect the test agent with the PAA Control Center. In the PAA Control Center, make sure your SSL certificate is correct on both ports, and both are either secure or self-signed.

  • If the test agent version is prior to 4.2.0, you must configure 127.0.0.1 as the loopback address (lo0.0) on the router. For more information about loopback addresses and how to configure them, see Loopback Interfaces (Junos OS Evolved). If the test agent version is 4.2.0 or newer, you do not need to configure a loopback address.

To install the PAA software on a server instead of using the SaaS solution, or for more information about setting up SSL certificates for PAA, see: Install/Upgrade Software.

Once you complete the prerequisites, you can install the PAA test agent on the router.

  1. Decide what name you want to use for the test agent (the default is the router's hostname), and make sure you know what version of the test agent software you would like to use and what port the test agent should use to communicate with the PAA Control Center (the default is 6800).
  2. Install the test agent.

    The install command has this format:

    content_copy zoom_out_map
    user@host> request services paa install cc-account account cc-host host cc-user user@domain cc-password password ta-version version ta-name name cc-port port 
    

    For this example, we use a PAA account name of MyCompany. The email address for the user is firstlast@mycompany.example.net, the Control Center's IP address is 10.83.153.119, the user's password is Passw0rd, the software version is 4.0.0.29, the test agent's name is USPE1_agent, and the port number is 6800. The user account on the router must have maintenance privileges..

    content_copy zoom_out_map
    user@USPE1> request services paa install cc-account MyCompany cc-host 10.83.153.119 cc-user firstlast@mycompany.example.net cc-password Passw0rd ta-version 4.0.0.29 ta-name USPE1_agent cc-port 6800 
    

    The command provides status during the install process:

    content_copy zoom_out_map
    ​
    PAA installation files copied from 10.83.153.119.
    Starting docker daemon.​
    Created symlink /etc/systemd/system/extensions.target.wants/docker@vrf0.service -> /lib/systemd/system/docker@.service.
    Starting PAA test agent process.​
    Loaded image: paa/test-agent-application:4.0.0.29
    Setting environment.​
    459d83560855faa6bae16873d3753344f252cb5cd860f790228cf53d5e0ff046
    Done. Starting the test agent with environment file /var/opt/paa.env ​
  3. Issue the show services paa status command to verify that the PAA test agent installed correctly and is able to generate and receive traffic.

    This example uses the information from the previous step's example.

    content_copy zoom_out_map
    user@USPE1> show services paa status
    Control center: 10.83.153.119
    Image: paa/test-agent-application:4.0.0.29
    Status: running
    Running: true
    Paused: false
    Restarting: false
    OOMKilled: false
    Dead: false
    Pid: 2175
    Started At: 2022-08-01T19:26:34.159900834Z 
    Finished At: 0001-01-01T00:00:00Z 
    

    If Status=running, Running=true, and Pid is non-zero, the test agent is installed and running. If there is a problem, you'll see log messages at the end of the output describing the problem. For example, if the password given is incorrect, the output shows that Status=restarting, Restarting=true, Pid=0, and the log messages show that the agent could not register with the PAA Control Center:

    content_copy zoom_out_map
    user@USPE1> show services paa status
    Control center: 10.83.153.119
    Image: paa/test-agent-application:4.0.0.29
    Status: restarting
    Running: true
    Paused: false
    Restarting: true
    OOMKilled: false
    Dead: false
    Pid: 0
    Started At: 2022-08-02T13:28:48.751648112Z 
    Finished At: 2022-08-02T13:28:49.723488791Z
    Last 3 logs: 2022-08-02 13:28:47.765142Z ERROR: Failed to register agent to CC
    Last 3 logs: 2022-08-02 13:28:49.664372Z WARN: Registration error: 401 Not Authorized
    Last 3 logs: 2022-08-02 13:28:49.665425Z ERROR: Failed to register agent to CC
    

    To fix, issue the request services paa uninstall command to delete the Docker container and then issue the request services paa install command again with the correct password. Likewise, if you specify any of the other PAA control center options incorrectly, you must determine what the correct values are before uninstalling and then reissuing the request services paa install command again with the correct values to install the test agent.

  4. Verify that the PAA test agent is connected to the PAA Control Center.

    From the PAA Control Center GUI, go to the Test Agents view. If the test agent installed correctly and is connected to the Control Center, you should see an entry for your new test agent and be able to check its status.

Upgrade or Downgrade the PAA Test Agent Software on Junos OS Evolved Using the CLI Command (Junos OS Evolved Release 23.2R1 and Prior Releases)

Paragon Active Assurance (PAA) is available either as a SaaS solution hosted by Juniper Networks or as a software package you install and maintain yourself on a general-purpose Ubuntu server in your network. If you use the SaaS solution, you can proceed directly to upgrading or downgrading the PAA test agent. However, if you have chosen to install and maintain PAA on a server in your network, then you need to check to make sure the PAA Control Center and plugins have already been upgraded to the appropriate version before you can upgrade the Junos OS Evolved PAA test agent.

For information about upgrading the PAA Control Center and plugins, see: Install/Upgrade Software.

Once you complete any prerequisites, you can upgrade or downgrade the PAA test agent on the router.

  1. Uninstall the PAA test agent.

    For this example, we are logged in as user name user and the router's hostname is USPE1:

    content_copy zoom_out_map
    user@USPE1> request services paa uninstall
    Stopping PAA test agent. 
    Done. Un-installation of PAA test agent.
  2. Upgrade or downgrade the test agent, using the same test agent name as the previous version.

    The install command has this format:

    content_copy zoom_out_map
    user@host> request services paa install cc-account account cc-host host cc-user user@domain cc-password password ta-version version ta-name name cc-port port 
    

    For this example, we use a PAA user account name of MyCompany. The email address for the user is firstlast@mycompany.example.net, the Control Center's IP address is 10.83.153.119, the user's password is Passw0rd, the software version is 4.0.0.36, the test agent's name is USPE1_agent, and the port number is 6800. The user account on the router must have maintenance privileges.

    content_copy zoom_out_map
    user@USPE1> request services paa install cc-account MyCompany cc-host 10.83.153.119 cc-user firstlast@mycompany.example.net cc-password Passw0rd ta-version 4.0.0.36 ta-name USPE1_agent cc-port 6800 
    

    The command provides status during the install process:

    content_copy zoom_out_map
    ​
    PAA installation files copied from 10.83.153.119.
    Starting docker daemon.​
    Starting PAA test agent process.​
    Loaded image: paa/test-agent-application:4.0.0.36
    Setting environment.​
    A0c12feaddb312fd2fe3625a659304a448e9eeac4767d2eccd7749bc6f24e8ca
    Done. Starting the test agent with environment file /var/opt/paa.env​ 
    
  3. Issue the show services paa status command to verify that the PAA test agent installed correctly and is able to generate and receive traffic.

    This example uses the information from the previous step.

    content_copy zoom_out_map
    user@USPE1> show services paa status
    Control center: 10.83.153.119
    Image: paa/test-agent-application:4.0.0.36
    Status: running
    Running: true
    Paused: false
    Restarting: false
    OOMKilled: false
    Dead: false
    Pid: 15302
    Started At: 2022-08-10T06:47:41.204299693Z 
    Finished At: 0001-01-01T00:00:00Z
    

    If Status=running, Running=true, and Pid is non-zero, the test agent is installed and running. If there is a problem, you'll see log messages at the end of the output describing the problem. For example, if the password given is incorrect, the output shows that Status=restarting, Restarting=true, Pid=0, and the log messages show that the agent could not register with the PAA Control Center:

    content_copy zoom_out_map
    user@USPE1> show services paa status
    Control center: 10.83.153.119
    Image: paa/test-agent-application:4.0.0.36
    Status: restarting
    Running: true
    Paused: false
    Restarting: true
    OOMKilled: false
    Dead: false
    Pid: 0
    Started At: 2022-08-10T06:47:41.204299693Z 
    Finished At: 2022-08-10T06:48:25.723488791Z
    Last 3 logs: 2022-08-10 06:47:47.765142Z ERROR: Failed to register agent to CC
    Last 3 logs: 2022-08-02 06:49:49.664372Z WARN: Registration error: 401 Not Authorized
    Last 3 logs: 2022-08-02 06:49:49.665425Z ERROR: Failed to register agent to CC
    

    To fix, issue the request services paa uninstall command to delete the Docker container and then issue the request services paa install command again with the correct password. Likewise, if you specify any of the other PAA control center options incorrectly, you must determine what the correct values are before uninstalling and then reissuing the request services paa install command again with the correct values to install the test agent.

  4. Verify that the PAA test agent is connected to the PAA Control Center.

    From the PAA Control Center GUI, go to the Test Agents view. If the test agent installed correctly and is connected to the Control Center, you should see an entry for your new test agent and be able to check its status.

Install the PAA Test Agent For the First Time Using NETCONF (Junos OS Evolved Release 23.2R1 and Prior Releases)

Paragon Active Assurance (PAA) is available either as a SaaS solution hosted by Juniper Networks or as a software package you install and maintain yourself on a general-purpose Ubuntu server in your network. Before you can install the PAA test agent on the router, you must first either purchase the service or install the PAA software on a server. Then you must:

  • Make sure you have an account and a user created in the PAA Control Center, because you need this information to install and register a new PAA test agent on the router.

  • Establish connectivity from the PAA Control Center to the router's management interface. You must have an HTTPS connection to the server hosting the PAA Control Center (port 443 is open) and either port 6800 or a port of your choosing should also be open to connect the test agent with the PAA Control Center. In the PAA Control Center, make sure your SSL certificate is correct on both ports, and both are either secure or self-signed.

  • If the test agent version is prior to 4.2.0, you must configure 127.0.0.1 as the loopback address (lo0.0) on the router. For more information about loopback addresses and how to configure them, see Loopback Interfaces (Junos OS Evolved). If the test agent version is 4.2.0 or newer, you do not need to configure a loopback address.

To install the PAA software on a server instead of using the SaaS solution, or for more information about setting up SSL certificates for PAA, see: Install/Upgrade Software.

You also need to establish a NETCONF session between the router and a NETCONF server, and have already initialized the session. For a sample NETCONF session, see Sample NETCONF Session.

Once you complete the prerequisites, you can install the PAA test agent on the router.

  1. Decide what name you want to use for the test agent (the default is the router's hostname), and make sure you know what version of the test agent software you would like to use and what port the test agent should use to communicate with the PAA Control Center (the default is 6800).
  2. Install the test agent.

    This operational request corresponds to the request services paa install CLI command. The operational request to install the test agent has this format:

    content_copy zoom_out_map
    <rpc>​
          <install-paa-ta>​
          <cc-host>host</cc-host>​
          <cc-account>account</cc-account>​
          <cc-user>user@domain</cc-user>​
          <cc-password>password</cc-password>​
          <ta-version>version</ta-version>​
          <cc-port>port</cc-port>​
          <ta-name>name</ta-name>​
        </install-paa-ta>​
      </rpc>​
      ]]>]]>​
    

    For this example, we use a PAA account name of MyCompany. The email address for the user is firstlast@mycompany.example.net, the Control Center's IP address is 10.83.153.119, the user's password is Passw0rd, the software version is 4.0.0.29, the test agent's name is USPE1_agent, and the port number is 6800.

    content_copy zoom_out_map
     <rpc>​
        <install-paa-ta>​
          <cc-host>10.83.153.119</cc-host>​
          <cc-account>MyCompany</cc-account>​
          <cc-user>firstlast@mycompany.example.net</cc-user>​
          <cc-password>Passw0rd</cc-password>​
          <ta-version>4.0.0.29</ta-version>​
          <cc-port>6800</cc-port>​
          <ta-name>USPE1_agent</ta-name>​
        </install-paa-ta>​
      </rpc>​
      ]]>]]>​
    
  3. Verify that the PAA test agent installed correctly and is able to generate and receive traffic.

    The operational request to show the status of the PAA test agent is:

    content_copy zoom_out_map
     
      <rpc>​
         <get-paa-status>​
         </get-paa-status>​
      </rpc>​
      ]]>]]>​ 

    This operational request corresponds to the show services paa status CLI command. For information about parsing the response to this request, see Parse the NETCONF Server Response.

Upgrade or Downgrade the PAA Test Agent Software on Junos OS Evolved Using NETCONF (Junos OS Evolved Release 23.2R1 and Prior Releases)

Paragon Active Assurance (PAA) is available either as a SaaS solution hosted by Juniper Networks or as a software package you install and maintain yourself on a general-purpose Ubuntu server in your network. If you use the SaaS solution, you can proceed directly to upgrading or downgrading the PAA test agent. However, if you have chosen to install and maintain PAA on a server in your network, then you need to check to make sure the PAA Control Center and plugins have already been upgraded to the appropriate version before you can upgrade the Junos OS Evolved PAA test agent.

For information about upgrading the PAA Control Center and plugins, see: Install/Upgrade Software.

You also need to establish a NETCONF session between the router and a NETCONF server, and have already initialized the session. For a sample NETCONF session, see Sample NETCONF Session.

Once you complete any prerequisites, you can upgrade or downgrade the PAA test agent on the router.

  1. Uninstall the PAA test agent.

    This operational request corresponds to the request services paa uninstall CLI command.

    content_copy zoom_out_map
       <rpc>​
         <uninstall-paa-ta>​
         </uninstall-paa-ta>​
       </rpc>​
       ]]>]]>​ 
  2. Upgrade or downgrade the test agent, using the same test agent name as the previous version.

    This operational request corresponds to the request services paa install CLI command. The operational request to install the test agent has this format:

    content_copy zoom_out_map
     <rpc>​
        <install-paa-ta>​
          <cc-host>host</cc-host>​
          <cc-account>account</cc-account>​
          <cc-user>user@domain</cc-user>​
          <cc-password>password</cc-password>​
          <ta-version>version</ta-version>​
          <cc-port>port</cc-port>​
          <ta-name>name</ta-name>​
        </install-paa-ta>​
      </rpc>​
      ]]>]]>​
    

    For this example, we use a PAA account name of MyCompany. The email address for the user is firstlast@mycompany.example.net, the Control Center's IP address is 10.83.153.119, the user's password is Passw0rd, the software version is 4.0.0.36, the test agent's name is USPE1_agent, and the port number is 6800.

    content_copy zoom_out_map
     <rpc>​
       <install-paa-ta>​
          <cc-host>10.83.153.119</cc-host>​
          <cc-account>MyCompany</cc-account>​
          <cc-user>firstlast@mycompany.example.net</cc-user>​
          <cc-password>Passw0rd</cc-password>​
          <ta-version>4.0.0.36</ta-version>​
          <cc-port>6800</cc-port>​
          <ta-name>USPE1_agent</ta-name>​
        </install-paa-ta>​
      </rpc>​
      ]]>]]>​
    
  3. Verify that the PAA test agent installed correctly and is able to generate and receive traffic.

    The operational request to show the status of the PAA test agent is:

    content_copy zoom_out_map
     
        <rpc>​
          <get-paa-status>​
          </get-paa-status>​
        </rpc>​
        ]]>]]>​ 

    This operational request corresponds to the show services paa status command. For information about parsing the response to this request, see Parse the NETCONF Server Response.

Change History Table

Feature support is determined by the platform and release you are using. Use Feature Explorer to determine if a feature is supported on your platform.

Release
Description
24.2R1-EVO
Paragon Active Assurance (PAA) 4.4 test agent (ACX7024X)—Starting in Junos OS Evolved Release 24.2R1, we support installing a test agent for Paragon Active Assurance Release 4.4 on the ACX7024X router.
23.4R1S1-EVO
Starting in Junos OS Evolved Release 23.4R1-S1, for ACX7332 and ACX7348 routers, you can install a PAA test agent on your router to help you monitor network quality, availability, and performance. Also, starting in this release for all ACX platforms that support this test agent, you now install the test agent by using the test-agent configuration statement at the [edit services paa] hierarchy level, instead of using the deprecated operational mode command request services paa install.
22.4R1-EVO
Paragon Active Assurance (PAA) 4.1 test agent (ACX7024)—Starting in Junos OS Evolved Release 22.4R1, we support installing a test agent for Paragon Active Assurance Release 4.1 on the ACX7024 router.
22.3R1-EVO
Paragon Active Assurance (PAA) 4.0 test agent (ACX7100 and ACX7509)—Starting in Junos OS Evolved Release 22.3R1, we support installing a test agent for Paragon Active Assurance Release 4.0, a remotely-controlled, software-based active assurance solution, on the ACX7100 and ACX7509 routers, giving network engineers an easy way to test, monitor, and troubleshoot the data plane.
footer-navigation