Static Route Preferences and Qualified Next Hops
Understanding Static Route Preferences and Qualified Next Hops
A static route destination address can have multiple next hops associated with it. In this case, multiple routes are inserted into the routing table, and route selection must occur. Because the primary criterion for route selection is the route preference, you can control the routes that are used as the primary route for a particular destination by setting the route preference associated with a particular next hop. The routes with a lower route preference are always used to route traffic. When you do not set a preferred route, the Junos OS chooses in a random fashion one of the next-hop addresses to install into the forwarding table.
In general, the default properties assigned to a static route apply to all the next-hop addresses configured for the static route. If, however, you want to configure two possible next-hop addresses for a particular route and have them treated differently, you can define one as a qualified next hop.
Qualified next hops allow you to associate one or more properties with a particular next-hop address. You can set an overall preference for a particular static route and then specify a different preference for the qualified next hop. For example, suppose two next-hop addresses (10.10.10.10 and 10.10.10.7) are associated with the static route 192.168.47.5/32. A general preference is assigned to the entire static route, and then a different preference is assigned to only the qualified next-hop address 10.10.10.7. For example:
route 192.168.47.5/32 {
    next-hop 10.10.10.10;
    qualified-next-hop 10.10.10.7 {
        preference 6;
    }
    preference 5;
}
In this example, the qualified next hop 10.10.10.7 is assigned the preference 6, and the next-hop 10.10.10.10 is assigned the preference 5.
The preference and metric options
in the [edit route route qualified-next-hop] hierarchy only apply to the qualified next hops. The qualified
next-hop preference and metric override the route preference and metric
for that specific qualified next hop only, similar to how the route
preference overrides the default preference and metric (for that specific
route).
Starting in Junos OS Release 15.1R4, the router no longer supports a configuration where a static route points to a next hop that is tied to a subscriber. Typically, this might occur when RADIUS assigns the next hop with the Framed-IP-Address attribute. An alternative to this misconfiguration is to have the RADIUS server provide a Framed-Route attribute that matches the static route.
Example: Configuring Static Route Preferences and Qualified Next Hops to Control Static Route Selection
This example shows how to control static route selection.
Requirements
In this example, no special configuration beyond device initialization is required.
Overview
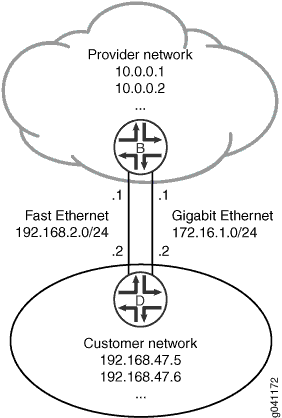
In this example, the static route 192.168.47.0/24 has two possible
next hops. Because one link has higher bandwidth, this link is the
preferred path. To enforce this preference, the qualified-next-hop statement is included in the configuration on both devices. See Figure 1.
Topology
Configuration
Procedure
CLI Quick Configuration
To quickly configure this example, copy the
following commands, paste them into a text file, remove any line breaks,
change any details necessary to match your network configuration,
and then copy and paste the commands into the CLI at the [edit] hierarchy level.
Device B in Provider Network
set interfaces ge-1/2/0 unit 0 description B->D
set interfaces ge-1/2/0 unit 0 family inet address 172.16.1.1/24
set interfaces fe-1/2/1 unit 2 description secondary-B->D
set interfaces fe-1/2/1 unit 2 family inet address 192.168.2.1/24
set interfaces lo0 unit 57 family inet address 10.0.0.1/32
set interfaces lo0 unit 57 family inet address 10.0.0.2/32
set routing-options static route 192.168.47.0/24 next-hop 172.16.1.2
set routing-options static route 192.168.47.0/24 qualified-next-hop 192.168.2.2 preference 25
Device D in Customer Network
set interfaces ge-1/2/0 unit 1 description D->B
set interfaces ge-1/2/0 unit 1 family inet address 172.16.1.2/24
set interfaces fe-1/2/1 unit 3 description secondary-D->B
set interfaces fe-1/2/1 unit 3 family inet address 192.168.2.2/24
set interfaces lo0 unit 2 family inet address 192.168.47.5/32
set interfaces lo0 unit 2 family inet address 192.168.47.6/32
set routing-options static route 0.0.0.0/0 next-hop 172.16.1.1
set routing-options static route 0.0.0.0/0 qualified-next-hop 192.168.2.1 preference 25
Step-by-Step Procedure
The following example requires you to navigate various levels in the configuration hierarchy. For instructions on how to do that, see Using the CLI Editor in Configuration Mode in the Junos OS CLI User Guide.
To control static route selection:
On Device B, configure the interfaces.
[edit interfaces]
user@B# set ge-1/2/0 unit 0 description B->D
user@B# set ge-1/2/0 unit 0 family inet address 172.16.1.1/24
user@B# set fe-1/2/1 unit 2 description secondary-B->D
user@B# set fe-1/2/1 unit 2 family inet address 192.168.2.1/24
user@B# set lo0 unit 57 family inet address 10.0.0.1/32
user@B# set lo0 unit 57 family inet address 10.0.0.2/32
On Device B, configure a static route to the customer network.
[edit routing-options static route 192.168.47.0/24]
user@B# set next-hop 172.16.1.2
On Device B, configure a backup route to the customer network.
[edit routing options static route 192.168.47.0/24]
user@B# set qualified-next-hop 192.168.2.2 preference 25
On Device D, configure the interfaces.
[edit interfaces]
user@D# set ge-1/2/0 unit 1 description D->B
user@D# set ge-1/2/0 unit 1 family inet address 172.16.1.2/24
user@D# set fe-1/2/1 unit 3 description secondary-D->B
user@D# set fe-1/2/1 unit 3 family inet address 192.168.2.2/24
user@D# set lo0 unit 2 family inet address 192.168.47.5/32
user@D# set lo0 unit 2 family inet address 192.168.47.6/32
On Device D, configure a static default route to external networks.
[edit routing options static route 0.0.0.0/0]
user@D# set next-hop 172.16.1.1
On Device D, configure a backup static default route to external networks.
[edit routing options static route 0.0.0.0/0]
user@D# set qualified-next-hop 192.168.2.1 preference 25
Results
Confirm your configuration by issuing the show
interfaces and show routing-options commands. If
the output does not display the intended configuration, repeat the
instructions in this example to correct the configuration.
user@B# show interfaces
ge-1/2/0 {
    unit 0 {
        description B->D;
        family inet {
            address 172.16.1.1/24;
        }
    }
}
fe-1/2/1 {
    unit 2 {
        description secondary-B->D;
        family inet {
            address 192.168.2.1/24;
        }
    }
}
lo0 {
    unit 57 {
        family inet {
            address 10.0.0.1/32;
            address 10.0.0.2/32;
        }
    }
}
user@B# show routing-options
static {
    route 192.168.47.0/24 {
        next-hop 172.16.1.2;
        qualified-next-hop 192.168.2.2 {
            preference 25;
        }
    }
}
user@D# show interfaces
ge-1/2/0 {
    unit 1 {
        description D->B;
        family inet {
            address 172.16.1.2/24;
        }
    }
}
fe-1/2/1 {
    unit 3 {
        description secondary-D->B;
        family inet {
            address 192.168.2.2/24;
        }
    }
}
lo0 {
    unit 2 {
        family inet {
            address 192.168.47.5/32;
            address 192.168.47.6/32;
        }
    }
}
user@D# show routing-options
static {
    route 0.0.0.0/0 {
        next-hop 172.16.1.1;
        qualified-next-hop 192.168.2.1 {
            preference 25;
        }
    }
}
If you are done configuring the devices, enter commit from configuration mode on both devices.
Verification
Confirm that the configuration is working properly.
- Checking the Routing Tables
- Pinging the Remote Addresses
- Making Sure That the Backup Route Becomes the Active Route
Checking the Routing Tables
Purpose
Make sure that the static routes appear in the routing tables of Device B and Device D.
Action
user@B> show route protocol static
inet.0: 7 destinations, 8 routes (7 active, 0 holddown, 0 hidden)
+ = Active Route, - = Last Active, * = Both

192.168.47.0/24    *[Static/5] 02:02:03
                    > to 172.16.1.2 via ge-1/2/0.0
                    [Static/25] 01:58:21
                    > to 192.168.2.2 via fe-1/2/1.2
user@D> show route protocol static
inet.0: 7 destinations, 8 routes (7 active, 0 holddown, 0 hidden)
+ = Active Route, - = Last Active, * = Both

0.0.0.0/0          *[Static/5] 02:02:12
                    > to 172.16.1.1 via ge-1/2/0.1
                    [Static/25] 01:58:31
                    > to 192.168.2.1 via fe-1/2/1.3
Meaning
The asterisks (*) in the routing tables show the active routes. The backup routes are listed next.
Pinging the Remote Addresses
Purpose
Verify that the static routes are working.
From Device B, ping one of the loopback interface addresses on Device D.
From Device D, ping one of the loopback interface addresses on Device B.
Action
user@B> ping 192.168.47.5
PING 192.168.47.5 (192.168.47.5): 56 data bytes
64 bytes from 192.168.47.5: icmp_seq=0 ttl=64 time=156.126 ms
64 bytes from 192.168.47.5: icmp_seq=1 ttl=64 time=120.393 ms
64 bytes from 192.168.47.5: icmp_seq=2 ttl=64 time=175.361 ms
user@D> ping 10.0.0.1
PING 10.0.0.1 (10.0.0.1): 56 data bytes
64 bytes from 10.0.0.1: icmp_seq=0 ttl=64 time=1.315 ms
64 bytes from 10.0.0.1: icmp_seq=1 ttl=64 time=31.819 ms
64 bytes from 10.0.0.1: icmp_seq=2 ttl=64 time=1.268 ms
Making Sure That the Backup Route Becomes the Active Route
Purpose
If the primary route becomes unusable, make sure that the backup secondary route becomes active.
Action
Disable the active route by deactivating the ge-1/2/0.0 interface on Device B.
user@B# deactivate interfaces ge-1/2/0 unit 0 family inet address 172.16.1.1/24
user@B# commit
Check Device B’s routing table.
user@B> show route protocol static
inet.0: 5 destinations, 5 routes (5 active, 0 holddown, 0 hidden)
+ = Active Route, - = Last Active, * = Both

192.168.47.0/24    *[Static/25] 02:06:24
                    > to 192.168.2.2 via fe-1/2/1.2
Meaning
The backup route has become the active route.
Conserving IP Addresses Using Static Routes
Hosting providers host multiple servers for multiple customers and want to conserve the usage of their IP address space. Traditionally, when a hosting provider client adds new servers, the servers are allocated a small block of IP addresses, such as a /29 block, and the client’s servers are all located in that block of IP addresses.
The Issue, Illustrated
For example, Customer A might need three servers and is assigned the block 10.3.3.0/29 (10.3.3.0 through 10.3.3.7). In this scenario, several IP addresses are consumed. These include the network and broadcast IP addresses (10.3.3.0 and 10.3.3.7), the addresses for the router gateway that the servers are connected to, and the addresses of the individual servers. To allocate three servers, eight IP addresses have to be allocated. Breaking up a single /24 network into 32 /29 networks results in 96 IP addresses out of the 256, in that /24 is being consumed by the network, broadcast, and gateway addresses. When this effect is multiplied across thousands of hosting providers, IP address space is far from being used efficiently. Figure 2 illustrates the issue.
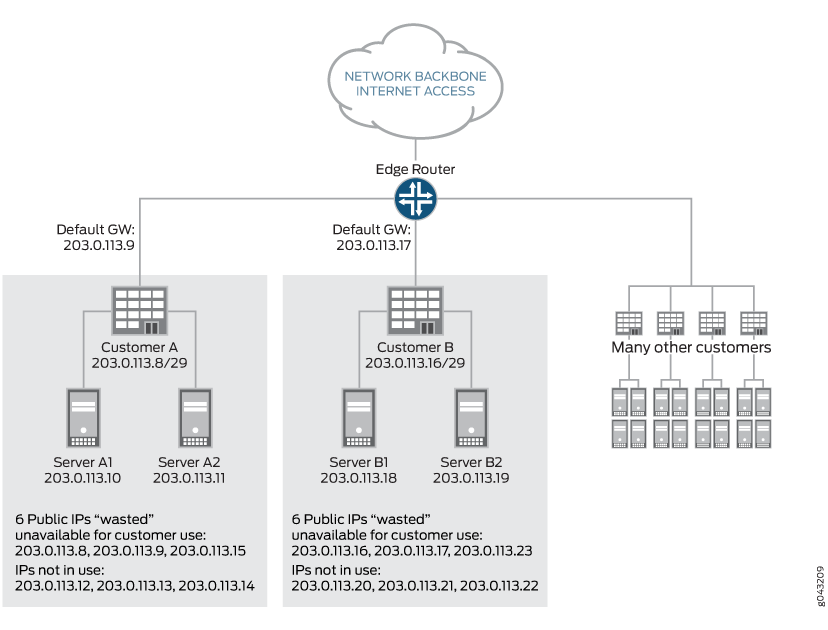
In this configuration, each customer is allocated a /29 block of address space. For each block, the network, broadcast, and gateway addresses are not available for server IP addressing, which results in three IP addresses being used inefficiently. In addition, the blocks consume unused IP addresses for future expansion.
Solution
This issue can be resolved by configuring the interface on the router with an address from the reserved IPv4 prefix for shared address space (RFC 6598) and by using static routes pointed at interfaces. IANA has recorded the allocation of an IPv4 /10 for use as shared address space. The shared address space address range is 100.64.0.0/10.
The interface in the router gets allocated an IP address from the RFC 6598 space, so it is not consuming publicly routable address space, and connectivity is handled with static routes on an interface. The interface in the server is configured with a publicly routable address, but the router interfaces are not. Network and broadcast addresses are consumed out of the RFC 6598 space rather than the publicly routable address space.
This feature is supported on QFX10000 switches starting with Junos OS 17.1R1.
Figure 3 shows the efficient use of IP address space.
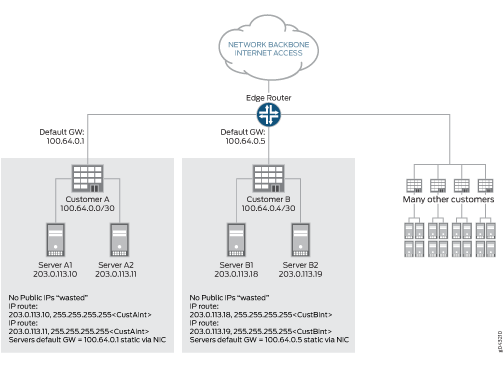
In this configuration, each customer gets allocated individual IP addresses per server. There is a static route that can be configured as a host route. The interface in the router gets allocated an IP address from the RFC 6598 space, so it does not consume publicly routable address space, and connectivity is handled with static routes out to an interface.
Configuration
The configuration would look like this for Customer A on the gateway router:
    interfaces {
        ge-1/0/1 {
            unit 0 {
                family inet {
                    address 100.64.0.1/30;
                }
            }
        }
    }
    routing-options {
        static {
            route 203.0.113.10/32 {
                qualified-next-hop ge-1/0/1.0;
            }
            route 203.0.113.11 {
                qualified-next-hop ge-1/0/1.0;
            }
        }
    }
With this configuration, no publicly routable IP addresses are
wasted. It is worth noting that when a packet is forwarded in this
configuration from the router to the server of Customer A’s
server 203.0.113.10, the route is forwarded out to the interface ge-1/0/1.0
which has an IP address of 100.64.0.1.
The servers for customer A would be configured as follows:
ifconfig eth0 203.0.113.10 netmask 255.255.255.255route add -host 100.64.0.1/32 dev eth0 route add default gw 100.64.0.1
ifconfig eth0 203.0.113.11 netmask 255.255.255.255route add -host 100.64.0.1/32 dev eth0 route add default gw 100.64.0.1
This example shows a single host route per server, which is a 1:1 mapping. This could equate to a large number of static host routes, if maintained. For scaling purposes, we need to support nonhost routes in this environment. For example, if there were a Customer C in this configuration that had eight servers, it would be much more efficient to allocate a /29 route on the router that points out the interface on which the eight servers are connected. If Customer C were allocated server IPs from 203.0.114.8 through 203.0.114.15 and these were connected via interface ge-1/0/2.0, this would look like:
user@host# set routing-options static route 203.0.114.8/29 qualified-next-hop ge-1/0/2.0
Understanding Static Route Control in Routing and Forwarding Tables
You can control the importation of static routes into the routing and forwarding tables in a number of ways. Primary ways include assigning one or more of the following attributes to the route:
retain—Keeps the route in the forwarding table after the routing process shuts down or the device reboots.
no-readvertise—Prevents the route from being readvertised to other routing protocols.
passive—Rejects traffic destined for the route.
This topic includes the following sections:
Route Retention
By default, static routes are not retained in the forwarding table when the routing process shuts down. When the routing process starts up again, any routes configured as static routes must be added to the forwarding table again. To avoid this latency, routes can be flagged as retain, so that they are kept in the forwarding table even after the routing process shuts down. Retention ensures that the routes are always in the forwarding table, even immediately after a system reboot.
Readvertisement Prevention
Static routes are eligible for readvertisement by other routing protocols by default. In a stub area where you might not want to readvertise these static routes under any circumstances, you can flag the static routes as no-readvertise.
Forced Rejection of Passive Route Traffic
Generally, only active routes are included in the routing and forwarding tables. If a static route's next-hop address is unreachable, the route is marked passive, and it is not included in the routing or forwarding tables. To force a route to be included in the routing tables regardless of next-hop reachability, you can flag the route as passive. If a route is flagged passive and its next-hop address is unreachable, the route is included in the routing table, and all traffic destined for the route is rejected.
Example: Preventing a Static Route from Being Readvertised
This example shows how to prevent a static route from being readvertised into OSPF, thereby preventing the route from appearing in the routing and forwarding tables.
Requirements
In this example, no special configuration beyond device initialization is required.
Overview
This example shows how to configure a routing policy that readvertises
static routes into OSPF, with the exception of one static route that
is not readvertised because it is tagged with the no-readvertise statement.
Topology
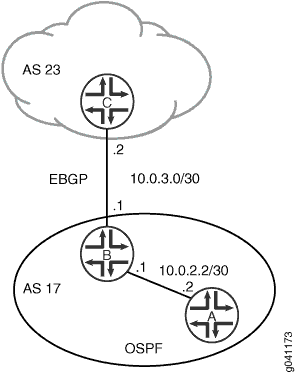
Figure 4 shows the sample network.
Configuration
Procedure
- CLI Quick Configuration
- Step-by-Step Procedure
- Step-by-Step Procedure
- Step-by-Step Procedure
- Results
CLI Quick Configuration
To quickly configure this example, copy the
following commands, paste them into a text file, remove any line breaks,
change any details necessary to match your network configuration,
and then copy and paste the commands into the CLI at the [edit] hierarchy level.
Device A
set interfaces fe-1/2/0 unit 4 description A->B
set interfaces fe-1/2/0 unit 4 family inet address 10.0.2.2/30
set protocols ospf area 0.0.0.0 interface fe-1/2/0.4
Device B
set interfaces fe-1/2/0 unit 3 description B->A
set interfaces fe-1/2/0 unit 3 family inet address 10.0.2.1/30
set interfaces fe-1/2/1 unit 6 description B->C
set interfaces fe-1/2/1 unit 6 family inet address 10.0.3.1/30
set protocols bgp group ext type external
set protocols bgp group ext peer-as 23
set protocols bgp group ext neighbor 10.0.3.2
set protocols ospf export send-static
set protocols ospf area 0.0.0.0 interface fe-1/2/0.3
set policy-options policy-statement send-static from protocol static
set policy-options policy-statement send-static then accept
set routing-options static route 0.0.0.0/0 next-hop 10.0.3.2
set routing-options static route 192.168.0.0/24 next-hop 10.0.3.2
set routing-options static route 192.168.0.0/24 no-readvertise
set routing-options autonomous-system 17
Device C
set interfaces fe-1/2/0 unit 7 description B->C
set interfaces fe-1/2/0 unit 7 family inet address 10.0.3.2/30
set interfaces lo0 unit 5 family inet address 192.168.0.1/32
set protocols bgp group ext type external
set protocols bgp group ext peer-as 17
set protocols bgp group ext neighbor 10.0.3.1
set routing-options autonomous-system 23
Step-by-Step Procedure
The following example requires you to navigate various levels in the configuration hierarchy. For instructions on how to do that, see Using the CLI Editor in Configuration Mode in the Junos OS CLI User Guide.
To configure Device A:
Configure the interface to Device B.
[edit interfaces fe-1/2/0 unit 4]
user@A# set description A->B
user@A# set family inet address 10.0.2.2/30
Configure OSPF to form an OSPF peer relationship with Device B.
[edit protocols ospf area 0.0.0.0]
user@A# set interface fe-1/2/0.4
Step-by-Step Procedure
To configure Device B:
Configure the interfaces to Device A and Device C.
[edit interfaces]
user@B# set fe-1/2/0 unit 3 description B->A
user@B# set fe-1/2/0 unit 3 family inet address 10.0.2.1/30
user@B# set fe-1/2/1 unit 6 description B->C
user@B# set fe-1/2/1 unit 6 family inet address 10.0.3.1/30
Configure one or more static routes and the autonomous system (AS) number.
[edit routing-options]
user@B# set static route 0.0.0.0/0 next-hop 10.0.3.2
user@B# set static route 192.168.0.0/24 next-hop 10.0.3.2
user@B# set autonomous-system 17
Configure the routing policy.
This policy exports static routes from the routing table into OSPF.
[edit policy-options policy-statement send-static]
user@B# set from protocol static
user@B# set then accept
Include the
no-readvertisestatement to prevent the 192.168.0.0/24 route from being exported into OSPF.[edit routing-options] user@B# set static route 192.168.0.0/24 no-readvertise
Configure the routing protocols.
The BGP configuration forms an external BGP (EBGP) peer relationship with Device C.
The OSPF configuration forms an OSPF peer relationship with Device A and applies the send-static routing policy.
[edit protocols]
user@B# set bgp group ext type external
user@B# set bgp group ext peer-as 23
user@B# set bgp group ext neighbor 10.0.3.2
user@B# set ospf export send-static
user@B# set ospf area 0.0.0.0 interface fe-1/2/0.3
Step-by-Step Procedure
To configure Device C:
Create the interface to Device B, and configure the loopback interface.
[edit interfaces ]
user@C# set fe-1/2/0 unit 7 description B->C
user@C# set fe-1/2/0 unit 7 family inet address 10.0.3.2/30
user@C# set lo0 unit 5 family inet address 192.168.0.1/32
Configure the EBGP peering session with Device B.
[edit protocols bgp group ext]
user@C# set type external
user@C# set peer-as 17
user@C# set neighbor 10.0.3.1
Configure the AS number.
[edit routing-options]
user@C# set autonomous-system 23
Results
Confirm your configuration by issuing the show
interfaces, show policy-options, show protocols, and show routing-options commands. If the output does
not display the intended configuration, repeat the instructions in
this example to correct the configuration.
Device A
user@A# show interfaces
fe-1/2/0 {
    unit 4 {
        description A->B;
        family inet {
            address 10.0.2.2/30;
        }
    }
}
user@A# show protocols
ospf {
    area 0.0.0.0 {
        interface fe-1/2/0.4;
    }
}
Device B
user@B# show interfaces
interfaces {
    fe-1/2/0 {
        unit 3 {
            description B->A;
            family inet {
                address 10.0.2.1/30;
            }
        }
    }
    fe-1/2/1 {
        unit 6 {
            description B->C;
            family inet {
                address 10.0.3.1/30;
            }
        }
    }
}
user@B# show policy-options
policy-statement send-static {
    from protocol static;
    then accept;
}
user@B# show protocols
bgp {
    group ext {
        type external;
        peer-as 23;
        neighbor 10.0.3.2;
    }
}
ospf {
    export send-static;
    area 0.0.0.0 {
        interface fe-1/2/0.3;
    }
}
user@B# show routing-options
static {
    route 0.0.0.0/0 next-hop 10.0.3.2;
    route 192.168.0.0/24 {
        next-hop 10.0.3.2;
        no-readvertise;
    }
}
autonomous-system 17;
Device C
user@C# show interfaces
fe-1/2/0 {
    unit 7 {
        description B->C;
        family inet {
            address 10.0.3.2/30;
        }
    }
}
lo0 {
    unit 5 {
        family inet {
            address 192.168.0.1/32;
        }
    }
}
user@C# show protocols
bgp {
    group ext {
        type external;
        peer-as 17;
        neighbor 10.0.3.1;
    }
}
user@C# show routing-options
autonomous-system 23;
If you are done configuring the devices, enter commit from configuration mode.
Verification
Confirm that the configuration is working properly.
Checking the Routing Table
Purpose
Make sure that the no-readvertise statement
is working.
Action
On Device A, run the
show route protocol ospfcommand to make sure that the 192.168.0.0/24 route does not appear in Device A’s routing table.user@A> show route protocols ospf inet.0: 4 destinations, 4 routes (4 active, 0 holddown, 0 hidden) + = Active Route, - = Last Active, * = Both 0.0.0.0/0 *[OSPF/150] 00:03:15, metric 0, tag 0 > to 10.0.2.1 via fe-1/2/0.4 224.0.0.5/32 *[OSPF/10] 00:04:07, metric 1 MultiRecvOn Device B, deactivate the
no-readvertisestatement.user@B# deactivate routing-options static route 192.168.0.0/24 no-readvertise
On Device A, rerun the
show route protocol ospfcommand to make sure that the 192.168.0.0/24 route appears in Device A’s routing table.user@A> show route protocols ospf inet.0: 5 destinations, 5 routes (5 active, 0 holddown, 0 hidden) + = Active Route, - = Last Active, * = Both 0.0.0.0/0 *[OSPF/150] 00:04:24, metric 0, tag 0 > to 10.0.2.1 via fe-1/2/0.4 192.168.0.0/24 *[OSPF/150] 00:00:15, metric 0, tag 0 > to 10.0.2.1 via fe-1/2/0.4 224.0.0.5/32 *[OSPF/10] 00:05:16, metric 1 MultiRecv
Meaning
The no-readvertise statement is working
as expected.
Verifying the Static Route Configuration
Purpose
Verify that the static routes are in the routing table and that those routes are active.
Action
From the CLI, enter the show route terse command.
Sample Output
command-name
user@host> show route terse
inet.0: 20 destinations, 20 routes (20 active, 0 holddown, 0 hidden)
+ = Active Route, - = Last Active, * = Both
A Destination        P Prf   Metric 1   Metric 2  Next hop        AS path
* 192.168.47.5/32        S   5                        Reject
* 172.16.0.0/12      S   5                       >192.168.71.254
* 192.168.0.0/18     S   5                       >192.168.71.254
* 192.168.40.0/22    S   5                       >192.168.71.254
* 192.168.64.0/18    S   5                       >192.168.71.254
* 192.168.64.0/21    D   0                       >fxp0.0
* 192.168.71.246/32  L   0                        Local
* 192.168.220.4/30   D   0                       >ge-0/0/1.0
* 192.168.220.5/32   L   0                        Local
* 192.168.220.8/30   D   0                       >ge-0/0/2.0
* 192.168.220.9/32   L   0                        Local
* 192.168.220.12/30  D   0                       >ge-0/0/3.0
* 192.168.220.13/32  L   0                        Local
* 192.168.220.17/32  L   0                        Reject
* 192.168.220.21/32  L   0                        Reject
* 192.168.220.24/30  D   0                       >at-1/0/0.0
* 192.168.220.25/32  L   0                        Local
* 192.168.220.28/30  D   0                       >at-1/0/1.0
* 192.168.220.29/32  L   0                        Local
* 224.0.0.9/32       R 100          1             MultiRecv
Meaning
The output shows a list of the routes that are currently in the inet.0 routing table. Verify the following information:
Each configured static route is present. Routes are listed in ascending order by IP address. Static routes are identified with an S in the protocol (P) column of the output.
Each static route is active. Routes that are active show the next-hop IP address in the Next hop column. If a route's next-hop address is unreachable, the next-hop address is identified as Reject. These routes are not active routes, but they appear in the routing table because the passive attribute is set.
The preference for each static route is correct. The preference for a particular route is listed in the Prf column of the output.
See Also
Change History Table
Feature support is determined by the platform and release you are using. Use Feature Explorer to determine if a feature is supported on your platform.