View and Update Your Device Inventory
Follow these steps to view and manage your Juniper Mist™ device inventory.
Find the Inventory Page
From the left menu, select Organization > Admin > Inventory.
View and Find Information
Use the various buttons at the top of the Inventory page to view and find information.

-
To select the device type, click a device button:
-
Access Points
-
Switches
-
WAN Edges
-
Cellular Edges
-
Mist Edges
-
-
To view devices that are linked through the Juniper Account Integration option on the Organization Settings page, click the Installed Base button. For more information, see View Juniper Support Insights (JSI) for Your Installed Base.
-
To select an organization or a site, use the org drop-down list.

-
To view the complete inventory as a CSV file, click the cloud button (near the top-right corner of the screen).

-
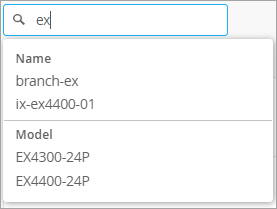
To find a specific device, use the Filter box below the device buttons. Enter characters from any of the device information fields that you see on the screen. When the matching devices appear in the drop-down list, select the device that you want to view.
Example: Start typing the letters ex. The drop-down list shows devices with ex in the device name (such as branch-ex and ix-ex4400-01) and the model name (such as EX4300-24P and EX4400-24P).

Claim or Adopt Devices
To manage devices as part of your Juniper Mist organization, you need to claim or adopt them.
Claim new devices:
Adopt devices from your Juniper Installed Base:
Make Other Changes
You also can assign devices to a site, change the device names, or release devices from this organization's inventory.
Select the devices that you want to assign, rename, or release. Then click the More button and select the action that you want to take.

-
Assign to Site—Select a site to assign this device to.
-
Rename—Enter a new device name.
-
Release—Remove (delete) the device from this organization's inventory and delete the device configuration.
Follow the on-screen prompts to complete the action.
